
:max_bytes(150000):strip_icc():format(webp)/GettyImages-534572567-56facec43df78c784197b92d.jpg)
How to Transfer Data After Switching From Samsung Galaxy M54 5G to Latest Samsung | Dr.fone
How to Transfer Data After Switching From Samsung Galaxy M54 5G to Latest Samsung
Have you finally gotten your hands on the latest smartphone from Samsung’s flagship Galaxy S series? Whether you have the compact S23, the slightly larger S23 Plus, or the sleek S23 Ultra, you’re in for a thrilling ride of exceptional performance and vivid graphics.
What about files on your old Android? Can you transfer data after switching from Samsung Galaxy M54 5G to Samsung S23? Sure thing. We’ll walk you through the seven best methods for Android to Samsung data transfer shortly.
However, can you save all the data? Let’s find out.
Can You Save Your Data After Switching From Samsung Galaxy M54 5G to Samsung S23?
You can save all data after switching from Samsung Galaxy M54 5G to Samsung S23. It doesn’t matter which Android phone you’ve used before buying the latest Samsung model because you have many data transfer options.
Samsung Smart Switch may have features exclusive to Galaxy devices (among other limitations), but all methods let you transfer data seamlessly from Samsung Galaxy M54 5G to Samsung S23. Here’s how each works.
The following methods will help you move data from Samsung Galaxy M54 5G to Samsung S23 within minutes. Each is straightforward, so your choice will depend on your preferences. Let’s dive in.
1. Transfer Data Using Wondershare Dr.Fone Phone Transfer
Wondershare Dr.Fone is an all-in-one phone manager offering multiple tools. Besides moving data between phones, it lets you repair your Android system, recover files and passwords, remove lock screens, and erase data. You can even transfer WhatsApp, Viber, WeChat, and LINE chats and files.
Here’s how to move data from Samsung Galaxy M54 5G to Samsung S23 with Wondershare Dr.Fone:
- Download and install the app on your computer.
- Go to Toolbox > Phone Transfer.

- Connect your old Android and Samsung S23 to the computer with USB cables.
- Set the source and destination devices in Wondershare Dr.Fone Phone Transfer. The app will load data automatically.

- Select the categories to copy to Samsung S23 and click Start Transfer.
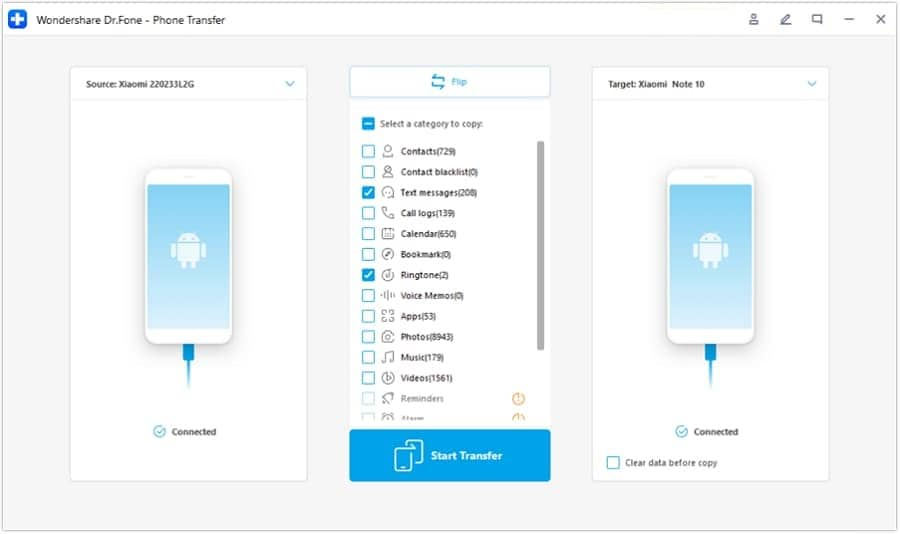
Wondershare Dr.Fone Phone Transfer lets you move apps, contacts, photos, videos, music, ringtones, text messages, voice memos, call logs, bookmarks, and calendar data between Android devices.
2. Move Data From Samsung Galaxy M54 5G to Samsung Using Smart Switch
Samsung’s Smart Switch app is excellent for moving data (even settings) between Android devices. However, you can only transfer settings, memos (including voice), and app data between Galaxy phones.
Also, you can’t transfer apps you haven’t downloaded from the Play Store or encrypted data like WhatsApp chats. Wondershare Dr.Fone is better if you don’t want to lose your IM conversations.
Here’s how to move data from Samsung Galaxy M54 5G to Samsung S23 with Smart Switch:
- Download and install Smart Switch on both phones and place them next to one another.
- Get your Samsung S23 and go to Settings > Accounts and backup > Bring data from an old device.
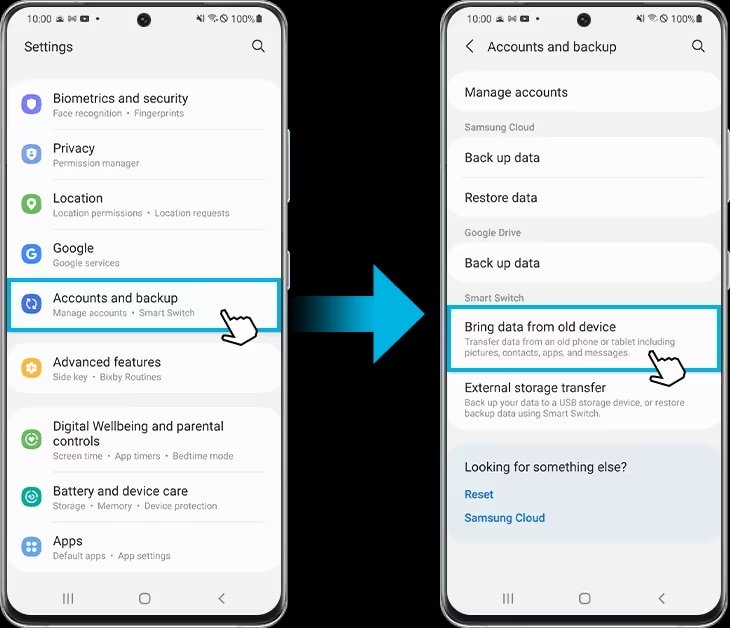
- On your Samsung S23, tap Receive dataand choose Galaxy/Android as the source.
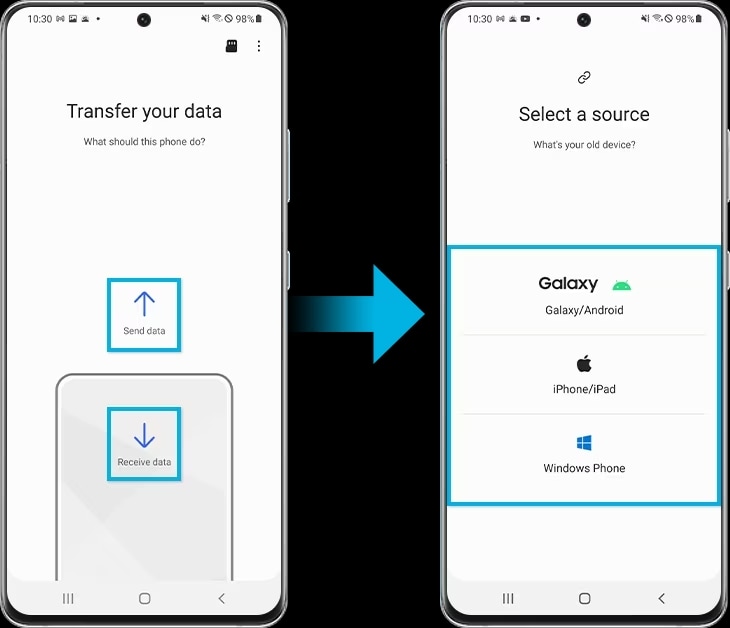
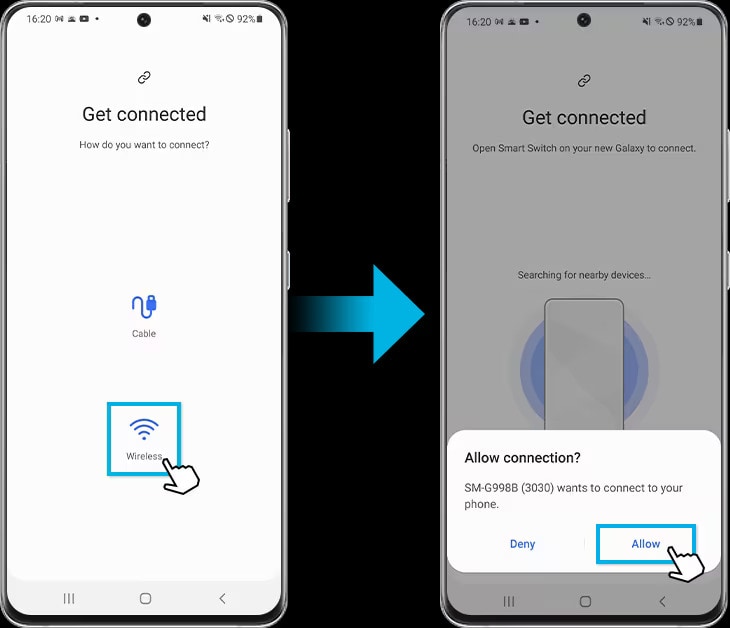
- Tap Send dataon your old phone and select Wireless (it’s faster than a cable connection). Tap Allow to enable data access.
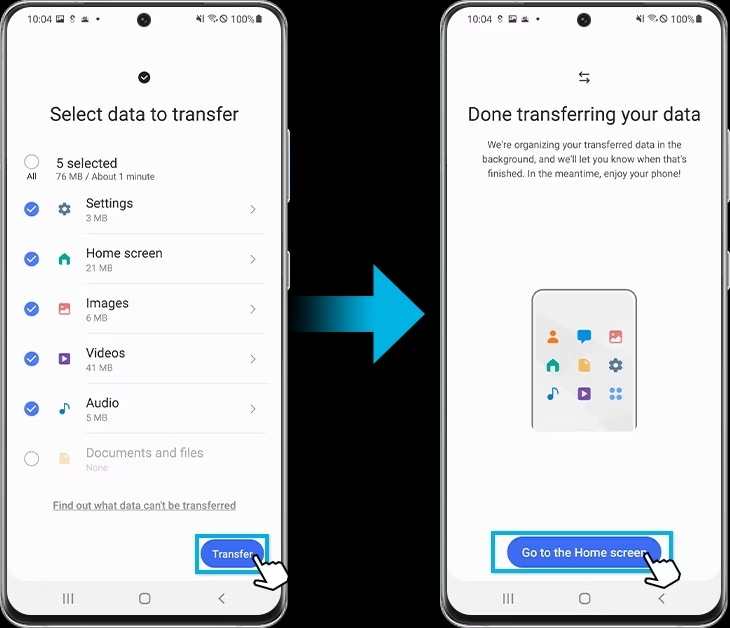
- Choose the desired data using your Samsung S23, tap Transfer, then Go to the Home screenonce everything is on your new phone.
Remember to charge both phones before transferring data or connect them to a power source to ensure the process goes smoothly.
3. Transfer Data Using Google Account Sync
Backing up your Google Account data with Google One means accessing it on any device upon login. The backup includes apps, phone settings, messages, calls, photos, videos, and your chosen Google Account data (e.g., contacts, calendar, emails, and documents).
Here’s how to transfer data to Samsung Galaxy S23 using Google Account synchronization:
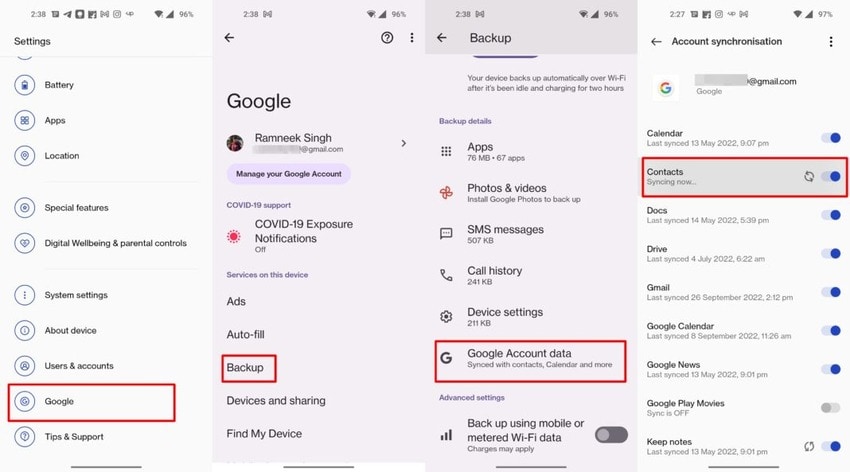
- Go to Settings > Google > Backup > Google Account dataon your old Android phone and toggle on the desired switches for synchronization.
- On your Samsung S23, go to Settings > Googleand log into your backed-up Google Account.
Everything you’ve previously backed up will automatically sync once you log into your Google Account.
4. Share Data via Bluetooth
Bluetooth may be slower than most data-sharing methods, but its reliability is why we never have to imagine life without it. It may not support transferring settings or downloaded apps, but it’s excellent for moving all your photos, videos, music, and other files.
Here’s how to share data between Android and Samsung S23 via Bluetooth:
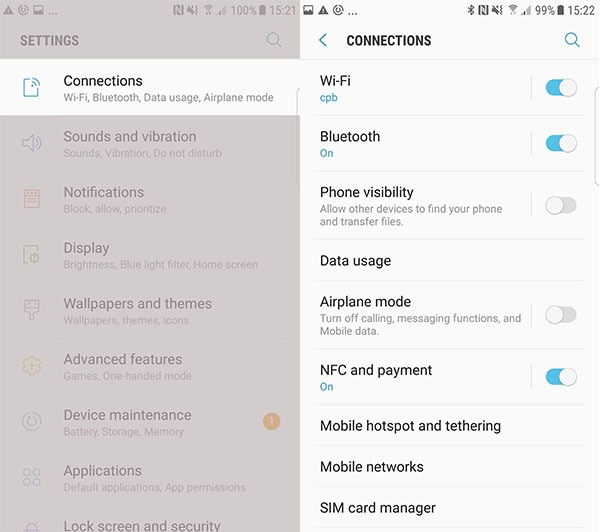
- Go to Settings > Connectionsand toggle on the Bluetooth switch on both phones. Alternatively, use a shortcut in the Notification panel.
- Pair the phones and select folders or files you wish to transfer to your Samsung Galaxy S23.
- Tap Share > Bluetoothand choose your new phone.
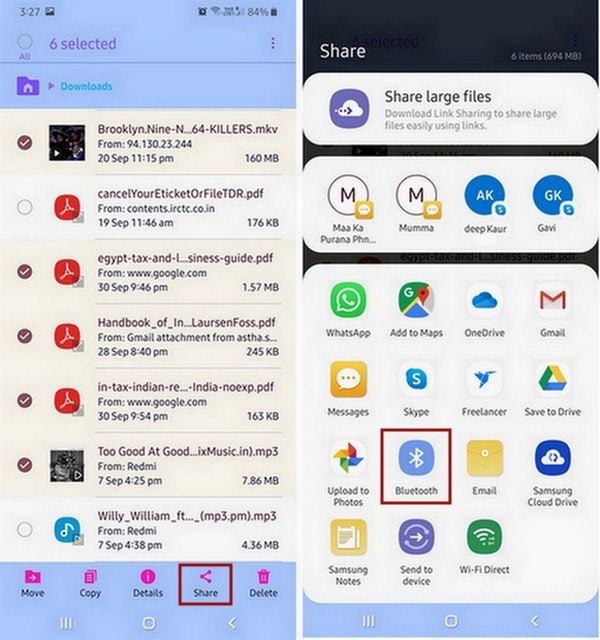
Sharing data via Bluetooth may take a while, but this valuable feature will bring everything you need to your new smartphone.
5. Use Google Drive
Google Drive is a prominent cloud storage and file-sharing platform. You’re missing out if you don’t use it. It lets you synchronize data across devices, access files in the cloud, and create presentation slides, spreadsheets, forms, and documents (online and offline).
Transferring data from Samsung Galaxy M54 5G to Samsung S23 is seamless with Google Drive. Here’s what to do:
- Launch Google Drive on your old Android and tap New > Upload. The Newbutton features only a plus sign on some devices.
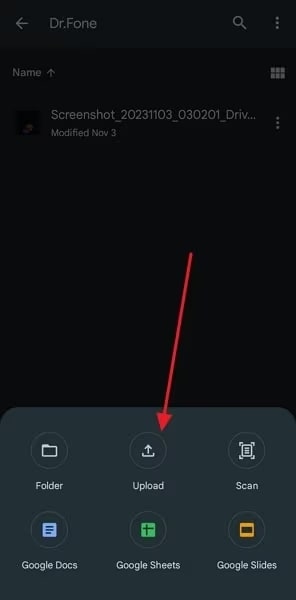
- Add all folders or files you wish to transfer to your new phone.
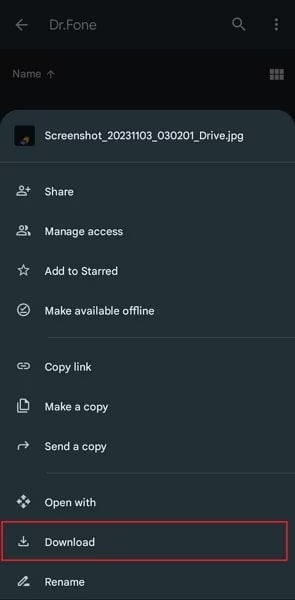
- Open Google Drive on your Samsung S23 and sign into the correct account.
- Select the uploaded data, tap the kebab menu(the three vertical dots in the top right corner), and hit Download.
Google Drive may limit you to 15 GB of free storage, but it’s among the best Google apps for sharing files across devices. You may already use its desktop version to collaborate on docs and spreadsheets, so why not leverage its handy mobile app?
6. Transfer Data Using a USB Cable
USB cables—the unsung heroes of connectivity. Like Bluetooth and Wi-Fi, we can’t imagine life without them. They’re perfect for transferring data between devices.
However, in this instance, we don’t mean the traditional data transfer between your phone and computer (we’ll get to that shortly). This trick involves connecting your old Android phone to your new Samsung Galaxy S23 with a USB cable.
It’s almost like Samsung’s Smart Switch, except you don’t need to download an app and can move more data. You can transfer everything from your old Android device’s internal storage to your new smartphone. Here’s how:
- Connect your phones using a USB-C to USB-C cable. Your Samsung Galaxy S23 came with it.
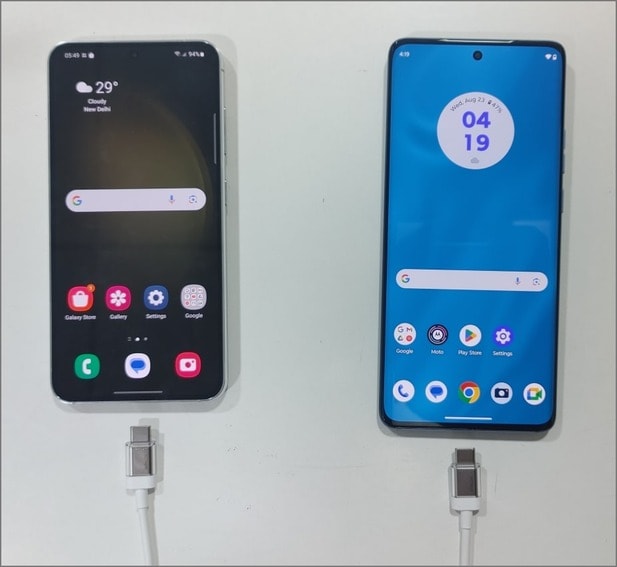
- Tap Connected to Androidon your Galaxy S23 phone and select MTP Host (Media Transfer Protocol).
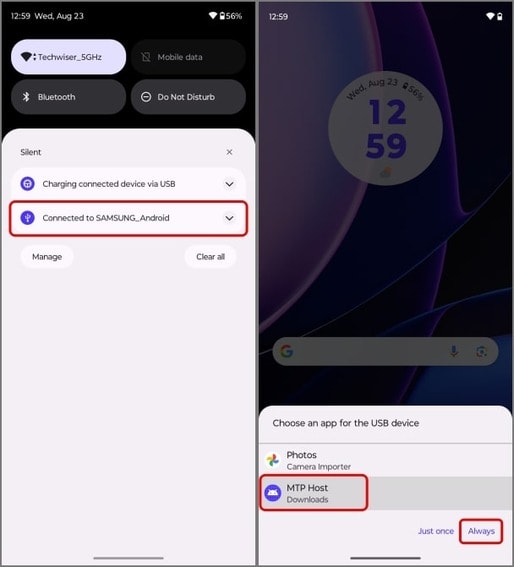
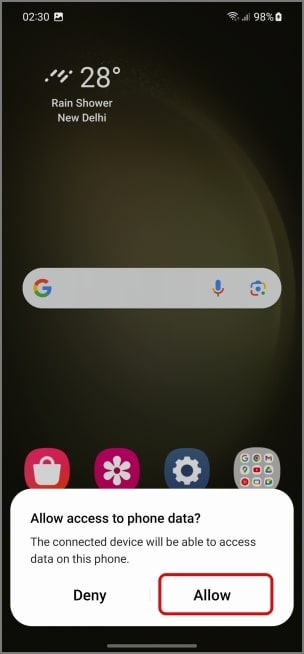
- Tap Allowon your old Android to enable data access.
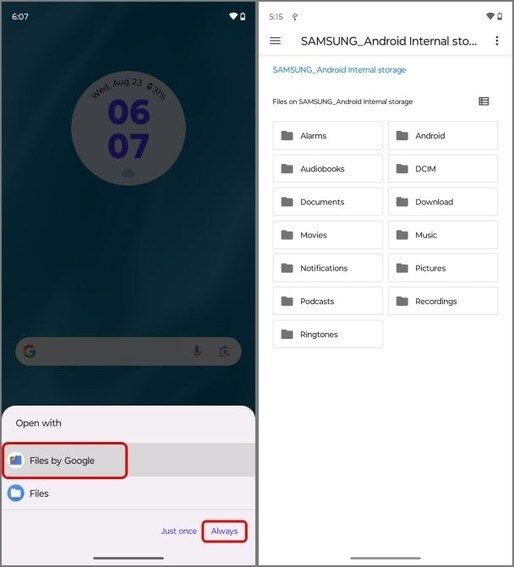
- Choose the desired file manager on your new phone and browse your old Android’s internal storage.
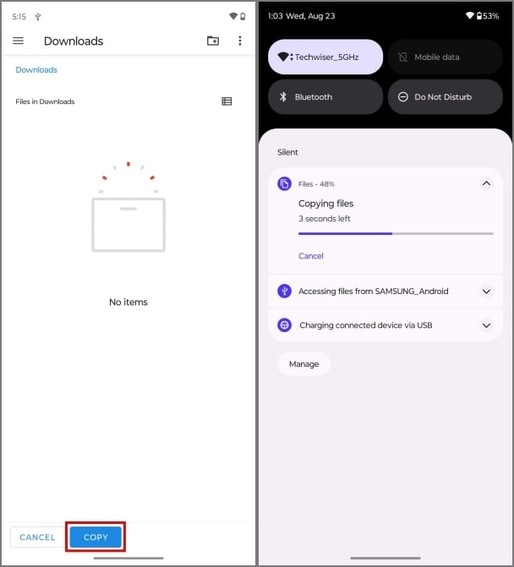
- Choose folders or files to transfer, tap the kebab menufor more options, and select Copy to.
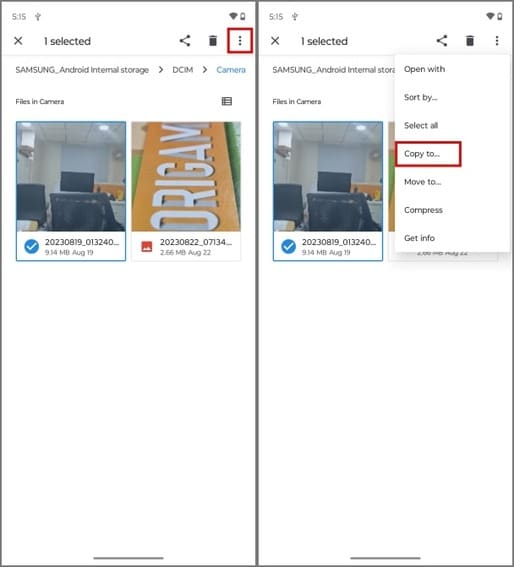
- Pick any location on your Samsung S23 phone (e.g., the Downloadsfolder for quick access) and tap Copy.
Moving data between phones using a USB cable is faster than Bluetooth but offers the same functionality. However, charge your devices beforehand because the data transfer may take a while (if you have many sizable files).
7. Use an SD Card
We can almost see you fumbling with your Samsung S23, looking for an SD or microSD card slot. Newsflash: there isn’t one. Like its predecessors, S21 and S22, the Galaxy S23 series doesn’t support expandable storage.
How can you transfer data from an SD card, then? Well, there’s always your computer. You can migrate your SD card data to your desktop or laptop before moving it to your new Galaxy phone.
It may not be as straightforward as the methods above, but it’s ideal for keeping precious files from your old Android’s SD card. Here’s what to do:
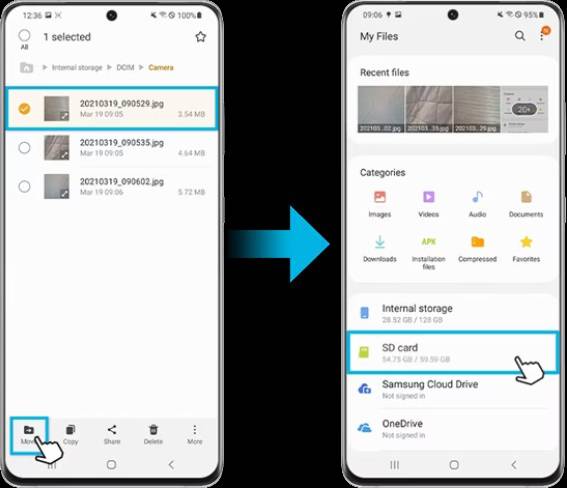
- Select the desired files or folders on your old Android, tap Move, and choose your SD card.
- Connect the Android to your computer with a USB cable.
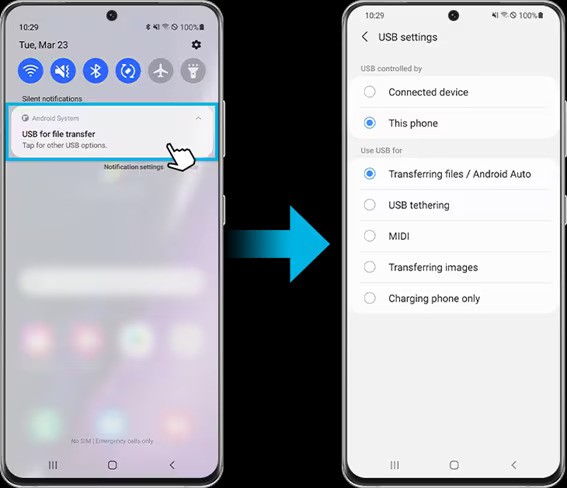
- Tap USB for file transferin the Notification panel and select Transferring files / Android Auto.
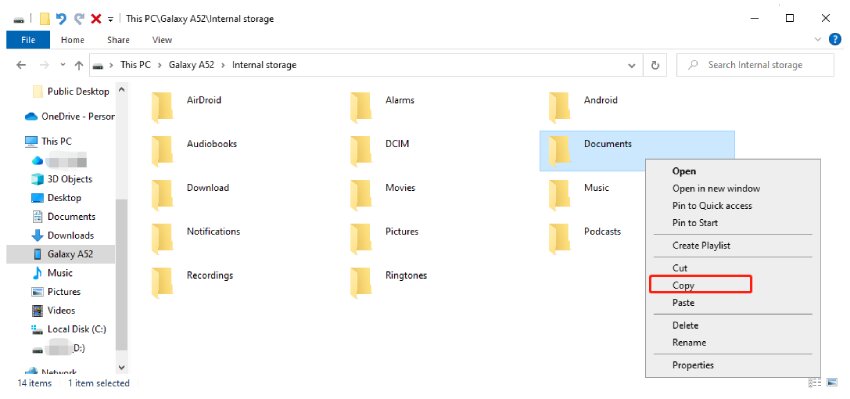
- Go to This PCin File Explorer and open your phone under Devices and drives.
- Right-click the folders or files you wish to move, select Copy, and paste them to any location on your computer.
- Once you move the data, safely disconnect your old Android and connect your Samsung S23 to the PC.
- Go to the folder with your newly saved data and copy-paste it to your Samsung S23.
This method is best for transferring photos, videos, and other files from an SD card you might not use anymore. After all, smartphone manufacturers increasingly ditch SD card slots for sleek, more compact designs.
Conclusion
Switching from Samsung Galaxy M54 5G to Samsung S23 is a breeze because you have many data transfer options. Besides Samsung’s Smart Switch, you can use your synced Google Account, Google Drive, Bluetooth, or a USB-C to USB-C cable. You can also migrate data from your old Android SD card to your computer before transferring it to your new phone.
However, Wondershare Dr.Fone Phone Transfer might be your best option. Besides transferring files, it features many tools for seamless phone management, making it a fantastic addition to your digital toolbox.
How to Transfer Text Messages from Samsung Galaxy M54 5G to New Phone
Hi, I have recently bought a new iPhone. Is there any way to transfer my text messages (Inbox and Sentbox) from my old Samsung phone to the new iPhone? I have used the Samsung Kies program to transfer my Contacts, Music, and Pictures, but there is no option within the program to transfer text messages. I would really appreciate any suggestions? How to transfer texts to a new phone? Thanks.
In this article, we are going to introduce a powerful tool to solve the problem above. This tool is MoibleTrans; it will help you to easily transfer text messages to a new phone in 1 click.
Best Way to Transfer Text Messages to New Phone
After getting a new phone, you may transfer text messages with important or sensitive information from the old phone to a new one. Therefore, you can read the text messages on your new phone. To transfer text messages to a new phone, you highly recommend you a one-click phone transfer tool - Dr.Fone - Phone Transfer . It’s mainly used to help you transfer data between phones and tablets running iOS, Symbian and Android. With its help, you can transfer all text messages on your old Android phone, Nokia phone, and iPhone to the new Android phone or iPhone in one click.
Dr.Fone - Phone Transfer
Transfer Text Messages to New Phone in 1 click!
- Easily transfer photos, videos, calendar, contacts, iMessage, and music from an old phone to a new one.
- Works perfectly with Apple, Samsung, HTC, LG, Sony, Google, HUAWEI, Motorola, ZTE, Nokia and more smartphones and tablets.
- Fully compatible with major providers like AT&T, Verizon, Sprint and T-Mobile.
- Fully compatible with the newest iOS and Android.
- Fully compatible with Windows and Mac.
3,053,460 people have downloaded it
Download this tool to try transferring text messages to the new phone. Here, I’d like to give the Windows version a shot. And also, we take data transfer from Samsung to iPhone as an example.
How to Transfer Text Messages to New Phone Step by Step
Step 1. Run this phone transfer tool on the computer
To begin with, install and run Dr.Fone on the computer. The primary window will be shown on the computer screen. Click “Switch”. This brings up the phone transfer window.
Note: To transfer data to or from iPhone (iPhone 8 Plus, iPhone X supported), iPad and iPod, you should install iTunes on the computer.
Step 2. Connect your old and new phones to the computer
As I mentioned above, Dr.Fone lets you export SMS on the old Nokia phone, Android phone and even iPhone, and then copy them to your new iPhone or Android phone. So, connect two phones to do the SMS transfer to the computer with USB cables. After detected, the old phone is shown on the left, named as the source phone, and the new Android phone or iPhone, the destination phone appears on the right.
Besides, “Flip” between two phones lets you change places of the two phones.

Step 3. Transfer text messages to new phone
Besides text messages, Dr.Fone - Phone Transfer empowers you to transfer other files, like contacts, music, and photos. Therefore, remove the marks before other files when you just want to move text messages to the new phone. Then, click “Start Transfer”. Please never disconnect either phone before the transfer is done. When it’s done, click “OK”. That’s all about how to transfer texts to a new phone.
Android to Apple: How To Transfer Photos From Samsung Galaxy M54 5G to iPad Easily
If you are an Android user and have recently switched to an iPad, you might be wondering how to transfer photos from Samsung Galaxy M54 5G to iPad. It is a common question that many people ask when they switch from one device to another. Fortunately, there are several ways to transfer photos from Samsung Galaxy M54 5G to iPad easily. In this article, we will show you how to do it using different methods.
We are living in a world where capturing memories is at our fingertips, and the need to share photos across different devices is more prevalent than ever. Whether you’re looking to share your photos with friends or ensure a secure backup, transferring photos from your Android to your iPad shouldn’t be a hassle.
This article is your ultimate guide to executing photo transfer with no problems. We’ll walk you through the process of how to transfer photos from Samsung Galaxy M54 5G to iPad as well as iPhone, highlight common mistakes to avoid, and make sure your cherished moments are transferred seamlessly.
Part 1. How Can I Transfer Photos From Samsung Galaxy M54 5G to iPad Directly?
For a straightforward photo transfer from Samsung Galaxy M54 5G to iPad, Apple’s Move to iOS app can be an excellent choice. It’s important to note, though, that your iPad must be in setup mode for this method to work. If it’s not in setup mode, you’ll need to perform a reset on your iPad before proceeding with the transfer.
How can I transfer photos from Samsung Galaxy M54 5G to iPad? Follow the steps below.
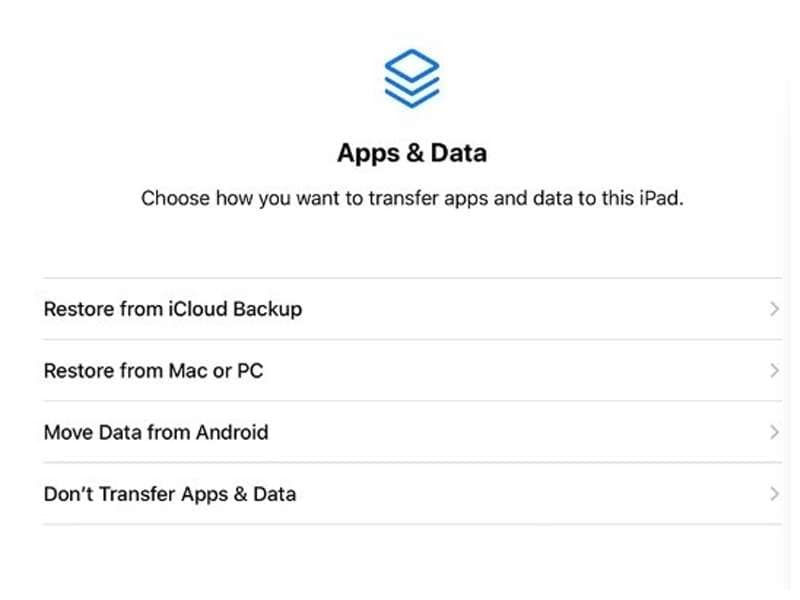
Step 1: Set Up Your iPad.
As you set up your iPad, reach the “Apps & Data” screen and select “Move Data from Android.”
Step 2: Install and launch Move to iOS on your Samsung Galaxy M54 5G.
Install Move to iOS and open the app on your Android. Review the terms and conditions and press “Agree” to proceed.
Step 3: Enter the code.
A six to ten-digit code will be displayed on your iPad screen. Enter this code when prompted on your Samsung Galaxy M54 5G.
Step 4: Select photos to transfer.
In the Move to iOS app, choose “Photos” to transfer your images. Then, tap “Continue” to initiate the transfer process. Remember to keep your devices close to each other and connected to power until the transfer process is completed for quicker transfer.
Step 5: Transfer complete.
Allow the app to complete the transfer process. Once the transfer is complete, you will be prompted to finish setting up your iPad. Follow the instructions to complete the setup process.
Part 2. How to Transfer Photos from Samsung Galaxy M54 5G to iPad Using Cloud Services (Google Drive)
In addition to dedicated apps like Move to iOS, you can also use cloud-based storage services such as Google Drive to transfer photos from Samsung Galaxy M54 5G to iPad.
Because it’s stored in the cloud, you can find your photos from any device as long as there is an internet connection. Just upload your photos to Google Drive and later download them on your iPad. It’s also suitable for backup purposes. Google provides its users a 15 GB of free storage.
How to transfer photos from Samsung Galaxy M54 5G to iPad with Google Drive:
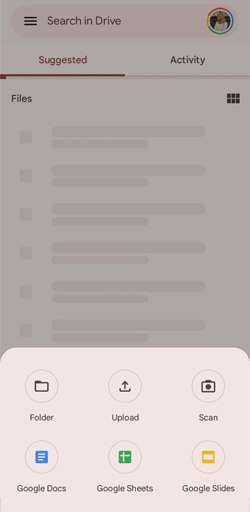
Step 1: Upload photos to Google Drive.
Open Google Drive on your Samsung Galaxy M54 5G, navigate to the “+” icon, and select “Upload.” Choose the photos you want to transfer and upload them to your Google Drive.
Step 2: Access Google Drive on iPad.
On your iPad, download and install Google Drive if you haven’t. Log in with the same Google account used on your Samsung Galaxy M54 5G.
Step 3: Download Photos to iPad.
Locate the uploaded photos in Google Drive on your iPad. Tap on each photo or select multiple photos, then click download to save them directly to your iPad.
Part 3. How to Share Pics From iPhone to Android with Dr.Fone
In addition to transferring photos from Samsung Galaxy M54 5G to iPad, you might also be interested in sharing pictures from iPhone to Android. Although both iPad and iPhone belong to the same Apple ecosystem, they function on slightly distinct operating systems— iPads utilize iPadOS, whereas iPhones operate on iOS.
For an efficient transfer of pictures from iPhone to Android, Wondershare Dr.Fone comes into play. This versatile tool features a dedicated Phone Transfer tool that enables comprehensive sharing of photos and other media content.
This method is particularly well-suited for streamlined bulk photo transfers, making it an ideal choice for individuals seeking a more encompassing solution for data transfer.
Dr.Fone Basic
Backup & Restore iOS Data Turns Flexible.
- One-click to back up the whole iOS device to your computer.
- Preview and selectively restore files to any device with simplicity.
- Export what you want from the backup to your computer.
- Your device’s data remains intact during the restore process.
- Supports iPhone, iPad, iPod touch, and the latest iOS version.
4,781,237 people have downloaded it
How to share pics from iPhone to Android with Dr.Fone Phone Transfer tool:
Step 1: Open Dr.Fone’s Phone Transfer tool
Make a connection between your iPhone and your Samsung Galaxy M54 5G on your computer. Launch Wondershare Dr.Fone on your computer and navigate to Toolbox > Phone Transfer.
Step 2: Specify the source and destination devices
After connecting them, the platform will identify the connected devices and load their data. Choose iPhone as the source and Android as the destination device to set the transfer path. Use the Flip button to alter the transfer direction.

Step 3: Choose photos for the transfer
Proceed to select the types of data you wish to transfer. Checkmark photos and click the Start Transfer button. If you want to remove existing data from the destination device, you can select “Clear data before copy.”

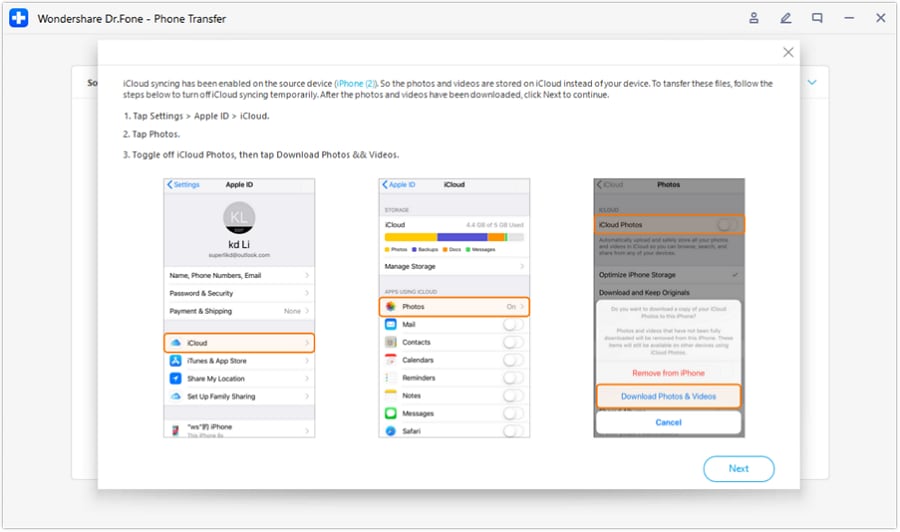
Step 4: Disable iCloud syncing
Now, Dr. Fone’s Phone Transfer tool should prompt you to disable iCloud syncing. Follow the instructions.
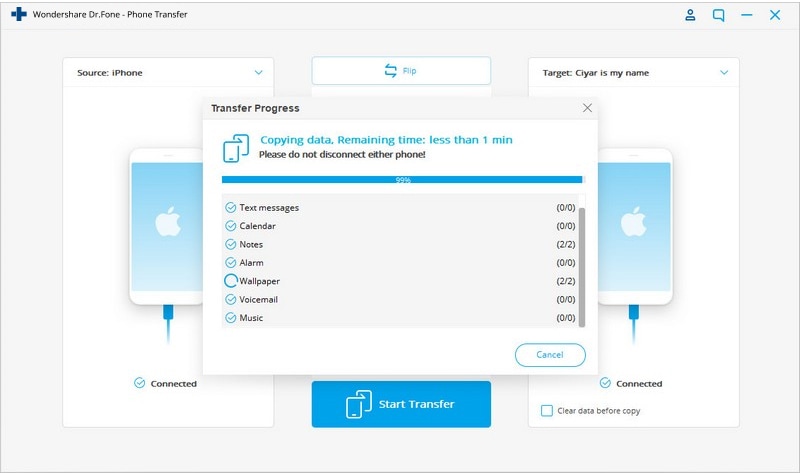
Step 5: Monitor data transfer progress
The progress of the data transfer will be displayed in a pop-up window. Once completed, click OK to conclude the process.

Part 4. Mistakes to Avoid When Transferring Photos from Samsung Galaxy M54 5G to iPad/iPhone
Transferring photos from your Samsung Galaxy M54 5G to an iPad or iPhone holds the promise of seamless photo sharing. However, several factors can contribute to the failure of file transfer processes. To address them, it’s essential to navigate through common mistakes that users often encounter so you won’t make the same errors.
1. Insufficient battery levels
Users often attempt photo transfers with low battery levels on either device. For a successful process, it is crucial to make sure that both your Android and iPad/iPhone have sufficient battery levels or are connected to power sources during the transfer.
2. Limited storage space
Overlooking available storage space on the iPad/iPhone is a common oversight. To avoid transfer failures, check and clear sufficient space on your iPad/iPhone to accommodate the photos you intend to transfer.
3. Interference from Third-Party Apps:
Allowing interference from other apps during the transfer. Close unnecessary apps on both devices to prevent potential conflicts and ensure a smoother transfer process.
4. Ignoring file compatibility:
Apple and Android devices often have varying file compatibilities. For example, iPhones commonly employ the HEIC format, which may pose recognition challenges on Android devices. So, verify that the photo formats are compatible with both Android and iOS devices. If necessary, convert files to ensure a trouble-free transfer.
5. Skipping App Permissions:
When you use apps to transfer files, they usually ask for permission to access your media files. While it’s common for users to overlook this step or hesitate to do it, not granting access can actually lead to transfer failures. The app needs permission to access and transfer files securely.
Conclusion
Although they work in different operating systems, transferring photos between Android and Apple devices, including iPad and iPhone, can be accomplished through various methods. Apps like Move to iOS and Dr.Fone provide straightforward solutions, while cloud services like Google Drive offer convenient alternatives.
- Title: How to Transfer Data After Switching From Samsung Galaxy M54 5G to Latest Samsung | Dr.fone
- Author: Emma
- Created at : 2024-04-02 07:26:49
- Updated at : 2024-04-03 07:26:49
- Link: https://android-transfer.techidaily.com/how-to-transfer-data-after-switching-from-samsung-galaxy-m54-5g-to-latest-samsung-drfone-by-drfone-transfer-from-android-transfer-from-android/
- License: This work is licensed under CC BY-NC-SA 4.0.
