
How to Transfer Data from Itel P40 to Any iOS Devices | Dr.fone
How to Transfer Data from Itel P40 to Any iOS Devices


If you are a proud owner of smartphones running on two different operating systems such as Windows and iOS, you might face the challenging task of transferring the data from your Windows phone to iPhone. Transferring the data between the two devices running the OS of the different platforms is not as easy as it is when you have devices with a common platform. This article aims to guide you through two simple routes that you can follow to transfer the data stored in your Windows phone such as Itel P40 to iPhone or other iOS devices. You don’t need to worry about how to transfer from Itel P40 to iPhone or How to transfer contacts from Itel P40 to iPhone anymore after reading this article. Read them on.
- 1. You can rely on some program/online service/website such as Outlook, CSV file format, Google Contacts, etc.
- 2. You may experience issues while transferring data from your Itel P40 phone to iPhone.
Part 1: Transfer Data Wirelessly via Microsoft ID
Windows phones such as Itel P40 depend on a Microsoft ID to back up your important data such as contacts, text messages, calendar, and device preferences. Once you have configured the data on your Itel P40 smartphone, you can add the same Microsoft email address to your iPhone and then sync the data to it. Given below are the step-by-step instructions on how to transfer from Itel P40 to iPhone via Microsoft ID:
Step 1: Make an account on Outlook.com.
1. Open www.outlook.com on the web browser on your smartphone or PC.
2. Once you are redirected to the website, tap the “Sign up” option from the top-right corner.
3. Enter the required information in the available fields to create an account.
Step 2: Sync the data on your Itel P40 to Microsoft’s Outlook.com account.
1. Switch on your Itel P40 smartphone.
2. Scroll through the Home screen to find the “Settings” option.
3. Once located, tap the “Settings” option to open it.
4. On the “Settings” window, locate and tap the “email+accounts” option to open it.
5. From the opened window, tap the “add an account” option.
6. After the “ADD AN ACCOUNT” window opens, tap “Outlook.com” from the available options.
7. Tap the connect button from the bottom-left corner of the OUTLOOK.COM window.
8. Once you are redirected to the outlook.com website, in the available fields, enter the credentials of your Microsoft account that you created earlier.
9. Tap the “Log in” button when done.
10. Wait till the data on your Itel P40 automatically gets synchronized with your Outlook account.
Step 3: Import the data from your Outlook account to the iPhone.
1. Switch on your iPhone and scroll through the Home screen to locate the “Settings” option.
Note: Make sure your device is connected to the Internet.
2. Once located, tap to launch the “Settings” app.
3. On the opened “Settings” window, tap the “Mail, Contacts, Calendars” option.
4. After the “Mail, Contacts, Calendars” window opens, tap the “Add Account” Add Account option under the “ACCOUNTS” section.
5. From the available options, tap “Step two”Outlook.com.
6. Once the “Outlook” window opens, enter your Outlook account credentials, and tap “Next” from the top-right corner.
7. Wait till your device verifies your account.
8. Once your account details are verified and a list of transferrable data types is displayed on the screen, tap to slide the switch to the right for the data that you want to import.
Note: After you slide the switch to transfer the Contacts, iPhone provides you with an option to keep the contacts that are already stored in your device or delete them altogether before importing the new ones from your Outlook account. You can choose any option as per your requirement.
9. Once you have selected the data that you want to import, tap the “Save” button from the top-right corner.
10. Wait till the data gets imported to your iPhone.
Pros:
- You can transfer your data for free using this method and the only requirement is Internet connectivity.
- You are saved from downloading a third-party application to transfer your data.
- You can easily transfer the data wirelessly without the need to make your PC as a go-between
Cons:
- It is a time-consuming process.
- You cannot transfer photos and media files by following this method.
Part 2: Transfer Data Using PhoneCopy
With PhoneCopy you can easily export data from your Itel P40 to the PhoneCopy server, and then import the data from the PhoneCopy server to your new iOS device. It is easy to transfer contacts from Itel P40 to iPhone with PhoneCopy. What you need is PhoneCopy iPhone Itel P40.
In order to do so, you need:
A registered PhoneCopy account.
1. On your computer, open any web browser of your choice and go to https://www.phonecopy.com/en/ .
Note: Make sure your device is connected to the Internet.
2. From the right section of the opened web page, click “REGISTER NOW.”
3. On the “REGISTRATION” page, populate the available fields with the correct values and click “CONTINUE” from the bottom.
4. Follow the on-screen instructions thereafter to complete the account creation process.
Note: You may need to activate your account using the confirmation mail that you would receive while completing the account creation process.
The PhoneCopy app on your Windows phone.
1. Power on your Itel P40 smartphone.
Note: Make sure that the phone is connected to the Internet.
2. From the Home screen, locate and tap the Store icon to open the Windows App Store.
Note: You must use your Microsoft account to sign in to Windows Store before the phone allows you to download the apps.
3. Once you are on the “store” interface, search for and tap the “PhoneCopy” app
4. On the next window that appears, tap “Install” pato install PhoneCopy on your Windows phone.
After you have successfully installed PhoneCopy on your Itel P40, it is now time to export all your contacts to the PhoneCopy server. You can do so by following the steps given below:
Step 1: Export data to the PhoneCopy server.
1. On your Windows phone, locate and tap to launch the “PhoneCopy” app.
2. On the displayed interface, in the available fields provide your PhoneCopy account credentials (username and password) that you used to create your PhoneCopy account earlier.
3. Once done, tap the”Export to phonecopy.com” button and wait till all your contacts are exported to the PhoneCopy server.
Step 2: Import data to the iPhone from the PhoneCopy server.
1. Power on your iPhone.
Note: Make sure that your phone is connected to the Internet.
2. From the Home screen, locate and tap the Apple App Store icon.
Note: Ensure that you are signed in to the App Store using your Apple ID.
3. Search for, locate, download, and install the “PhoneCopy” app on your iPhone
4. Once installed, tap the “PhoneCopy” icon on your iOS device to launch the program.
5. When asked for, provide the same PhoneCopy credentials that you used to export the data from your Itel P40 phone in the previous step.
6. After you are signed in to your PhoneCopy account on your iPhone, click the “Synchronize” button to import all the data from the PhoneCopy server to your new iPhone.
Although PhoneCopy does a great job when it comes to transferring data between the phones from different platforms, the app comes with a few pros and cons which include:
Pros:
Registering and using PhoneCopy is free.
PhoneCopy can back up your calendar events, SMS, tasks, and notes and can help you import them on a different phone (typically on iPhone).
Cons:
Only up to 500 contacts, SMS, tasks, and notes can be synched while using the Basic version (free account) of PhoneCopy. To remove this restriction, you must buy the Premium version for which PhoneCopy charges $25 annually.
The archived data is auto-deleted from the PhoneCopy server after one month when using the Basic version, and after 1 year when using the Premium version.
Bonus Tip: Best Way to Transfer data between Android and iPhone
Dr.Fone - Phone Transfer lets you transfer data from Itel P40 to iPhone or iPhone to Android in 1 Click. It supports almost all mobiles, including iPhone, Android Samsung, LG, Sony, HTC, etc. Dr.Fone - Phone Transfer can transfer music, videos, contacts, messages, call logs, and apps between mobiles. If you want to transfer data between Android and iPhone, it must be the best solution for you. Try it free. Follow the steps below to know how to transfer data between Android and iPhone.
Dr.Fone - Phone Transfer
Transfer Data between Android and iPhone in One Click.
- 1 CLick to transfer contacts from Itel P40 to iPhone.
- Easily transfer photos, videos, calendar, contacts, messages, and music from Itel P40 to iPhone/iPad.
- Works perfectly with Apple, Samsung, HTC, LG, Sony, Google, HUAWEI, Motorola, ZTE, Nokia, and more smartphones and tablets.
- Fully compatible with major providers like AT&T, Verizon, Sprint, and T-Mobile.
- Supports iPhone, iPad, iPod touch and the latest iOS version.
- Fully compatible with the latest Windows or Mac version.
3981454 people have downloaded it
Note: If you have no computer at hand, you can also get the Dr.Fone - Phone Transfer (mobile version) from Google Play, with which you could log into your iCloud account to download the data, or transfer from iPhone to Itel P40 using an iPhone-to-Android adapter.
Step 1. Download Dr.Fone - Phone Transfer to transfer from Itel P40 to iPhone
Launch Dr.Fone. You will see “Phone Transfer”. Click it.

Step 2. Connect Phones and select files
Connect your Android and iPhone. Dr.Fone will detect it soon. Then select the files and click Start Transfer. It can transfer almost all files, contacts, apps, messages, photos, music, videos, etc. If you just want to transfer contacts from Itel P40 to iPhone, then it is also ok. Just check the Contacts option to transfer contacts from Itel P40 to iPhone easily.
Conclusion
Regardless of the fact that many free solutions are there that can help you transfer data from your Itel P40 to iPhone. If you also have an Android device, the Dr.Fone - Phone Transfer always has an upper hand when it comes to providing hassle-free migration between iPhone and Android devices.
Top 5 from Itel P40 to iPhone Contacts Transfer Apps and Software
A lot of people switch from Itel P40 to iPhone due to numerous reasons. For example, switch to the latest iPhone 15. Whenever we move from one smartphone to another, the first thing we do is transfer our contacts. Thankfully, plenty of Android to iPhone contacts transfer software can help you do the same. By taking the assistance of these readily available apps, you can move your data from one smartphone to another in no time. This guide will make you familiar with the 5 best Android to iPhone contacts transfer apps and software. Read on and learn more about these solutions.
Part 1: The best Android to iPhone contacts transfer software: Dr.Fone - Phone Transfer [iPhone 15 Included]Dr.Fone - Phone Transfer is undoubtedly the best Android to iPhone contacts transfer software that you can use. Since it is compatible with all the leading versions of iOS and Android (including iOS 16 and Android 13), you won’t face any issues using it. It follows an intuitive process and has a user-friendly interface. Here are some other features of this reliable Android to iPhone contacts transfer software.
Dr.Fone - Phone Transfer
Best Android to iPhone Contacts Transfer Software
- Provides a one-click direct phone-to-phone transfer process.
- It supports iOS and Android, allowing a seamless cross-platform transfer.
- Supports iOS devices that run the latest iOS
- Transfer photos, text messages, contacts, notes, and many other file types.
- Supports over 8000+ Android devices. Works for all models of iPhone, iPad, and iPod.

3981454 people have downloaded it
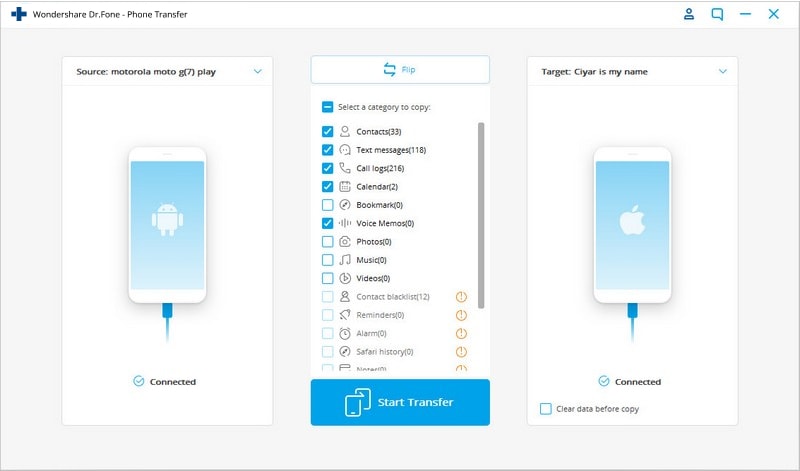
Using this Android to iPhone contacts transfer software is pretty easy. Launch the Dr.Fone and visit the “Phone Transfer” tool. After connecting your Android and iPhone to the computer, the application will automatically detect your devices. The source phone should be Android, and the target should be an iPhone like iPhone 15/14/13. You can use the “Flip” button to change their positions.

Now, select the data you wish to move. Enable “Contacts” and click on the “Start Transfer” button to initiate the process. Your contacts would be moved from your Android to an iOS device like iPhone 15/14/13 within a few seconds.

All of this makes Dr.Fone - Phone Transfer the best Android to iPhone contacts transfer software that you can use. However, if you are looking for alternative methods, you can go through the next section.
Part 2: Top 4 Android to iPhone contacts transfer Apps [iPhone 15 Included]
Dr.Fone is the fastest tool to transfer all kinds of data from one device to another. Nevertheless, if you want to try some other Android to iPhone contacts transfer app, you can give these options a try.
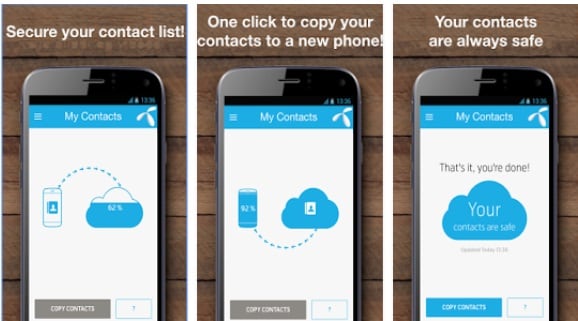
1. My Contacts - Phonebook Backup & Transfer App
If you want to back up your contacts list and move it from one device to another, you can try My Contacts. This Android to iPhone contacts transfer app works on Android and iOS devices like iPhone 15, iPhone 13, 12 Pro, 12 Pro Max. It will also keep your contacts safe on the cloud. Therefore, you can first copy your contacts from Itel P40 to My Contacts and later use its app on your iPhone to extract them.
- • It is an easy-to-use app that can help you transfer your contacts wirelessly.
- • Besides transferring your contacts, it also keeps them safe by maintaining their backup.
- • You can clean your contacts list by editing them or deleting the duplicate entries.
- • The only drawback is that you can only transfer contacts and no other data type.
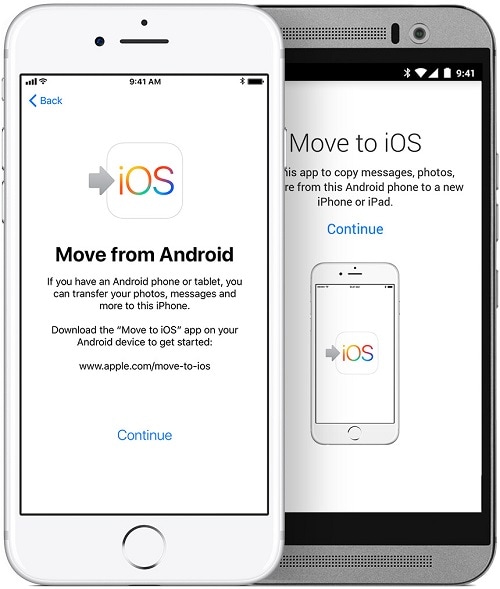
2. Move to iOS
Move to iOS is the official app developed by Apple to help users switch from an Android to an iOS device. Since Apple develops it, it is a highly secure Android to iPhone contacts transfer app. After maintaining a secure private WiFi direct connection, you can easily transfer your data.
- • The app can only be used to transfer your content from Itel P40 to iOS while setting up a new iOS device.
- • You can transfer photos, bookmarks, contacts, messages, and other important data items.
- • It can transfer your content over the air by establishing a secure private connection.
- • It fully supports all Android devices running on Android 4.0 and later versions.
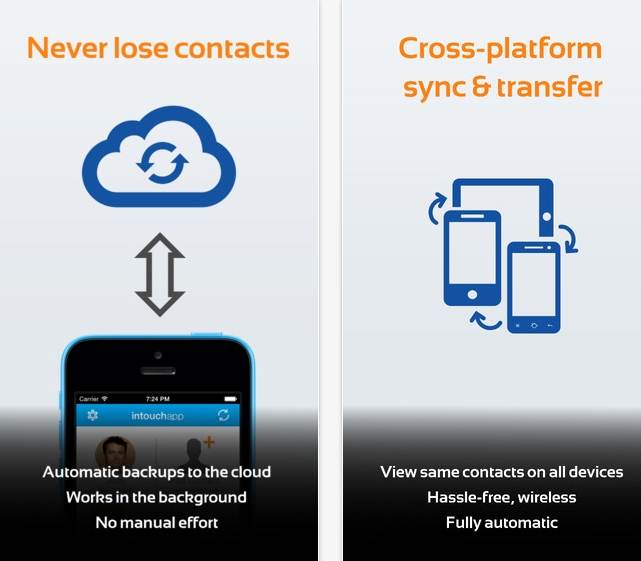
3. Contacts Transfer Backup Sync & Dialer: InTouchApp
Ideally, the InTouchApp is a smart contact management tool that can be used to add “context” to your contact list. You can use it to describe your contacts, search them easily, set reminders, and more. You can also use InTouch as an Android to iPhone contacts transfer app since it supports cross-platform syncing.
- • You can keep your contacts safe by taking their backup using this tool.
- • It can help you manage your contacts and make the most of your list.
- • The app allows a seamless sharing of contacts between different devices.
- • It is compatible with leading iOS, Android, BlackBerry, and Windows phones. Also, you can sync your device’s contacts with Outlook as well.

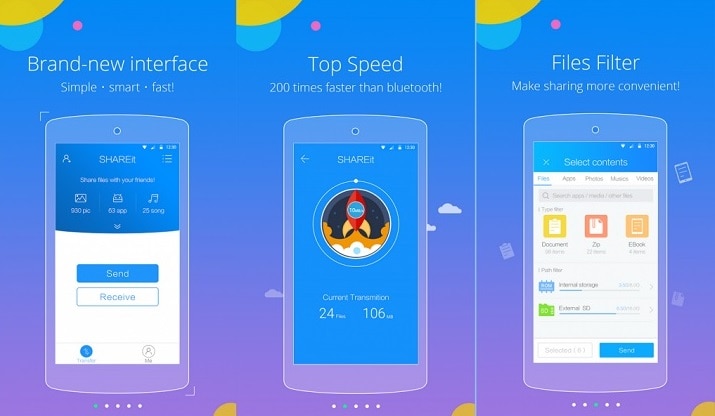
4. SHAREit
Boasting an impressive number of over 1 billion downloads, SHAREit is one of the best ways to move your data from one platform to another. This Android to iPhone contacts transfer app claims to be 200 times faster than Bluetooth and establishes a secure Wi-Fi-direct connection to transfer your data.
- • You can use SHAREit to move your contacts, photos, videos, messages, third-party app data, and other types of content.
- • It has a sleek interface and is extremely easy to use.
- • You can even back up your important content on the SHAREit Vault.
- • Group sharing feature is also provided.
- • The app also has a section to discover video content, music, wallpapers, and more.
- • Compatible with Android, iOS, and Windows phones as well as Mac and Windows PC
After learning about these top 5 Android to iPhone contacts transfer software, you can easily complete the Itel P40 device transition without any data loss. Out of all the alternatives, we recommend Dr.Fone - Phone Transfer. It provides the fastest and most secure option to move your content directly from one device to another with a single click. Go ahead and give it a try to move from Itel P40 to iPhone (iPhone 15 included) in a few minutes while keeping your data intact.
How to Transfer Data After Switching From Itel P40 to Latest Samsung
Have you finally gotten your hands on the latest smartphone from Samsung’s flagship Galaxy S series? Whether you have the compact S23, the slightly larger S23 Plus, or the sleek S23 Ultra, you’re in for a thrilling ride of exceptional performance and vivid graphics.
What about files on your old Android? Can you transfer data after switching from Itel P40 to Samsung S23? Sure thing. We’ll walk you through the seven best methods for Android to Samsung data transfer shortly.
However, can you save all the data? Let’s find out.
Can You Save Your Data After Switching From Itel P40 to Samsung S23?
You can save all data after switching from Itel P40 to Samsung S23. It doesn’t matter which Android phone you’ve used before buying the latest Samsung model because you have many data transfer options.
Samsung Smart Switch may have features exclusive to Galaxy devices (among other limitations), but all methods let you transfer data seamlessly from Itel P40 to Samsung S23. Here’s how each works.
The following methods will help you move data from Itel P40 to Samsung S23 within minutes. Each is straightforward, so your choice will depend on your preferences. Let’s dive in.
1. Transfer Data Using Wondershare Dr.Fone Phone Transfer
Wondershare Dr.Fone is an all-in-one phone manager offering multiple tools. Besides moving data between phones, it lets you repair your Android system, recover files and passwords, remove lock screens, and erase data. You can even transfer WhatsApp, Viber, WeChat, and LINE chats and files.
Here’s how to move data from Itel P40 to Samsung S23 with Wondershare Dr.Fone:
- Download and install the app on your computer.
- Go to Toolbox > Phone Transfer.
- Connect your old Android and Samsung S23 to the computer with USB cables.
- Set the source and destination devices in Wondershare Dr.Fone Phone Transfer. The app will load data automatically.

- Select the categories to copy to Samsung S23 and click Start Transfer.

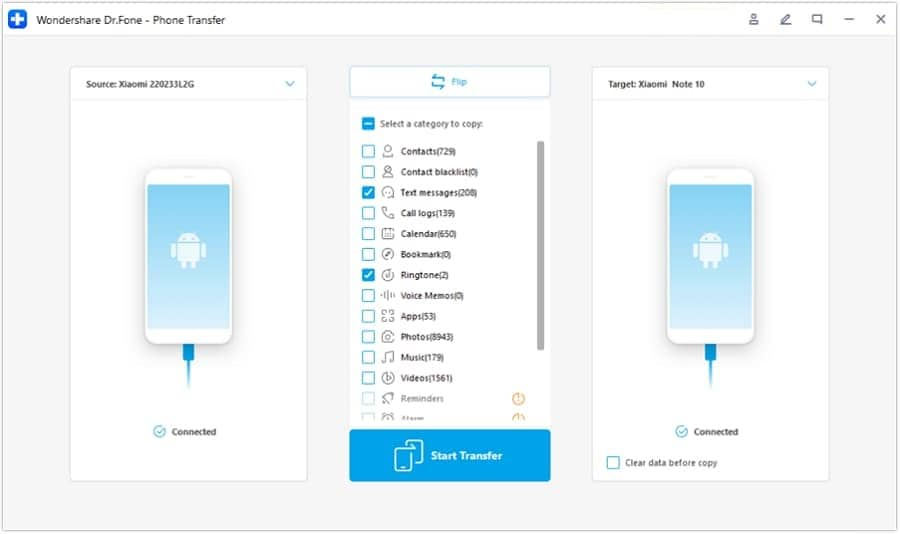
Wondershare Dr.Fone Phone Transfer lets you move apps, contacts, photos, videos, music, ringtones, text messages, voice memos, call logs, bookmarks, and calendar data between Android devices.
2. Move Data From Itel P40 to Samsung Using Smart Switch
Samsung’s Smart Switch app is excellent for moving data (even settings) between Android devices. However, you can only transfer settings, memos (including voice), and app data between Galaxy phones.
Also, you can’t transfer apps you haven’t downloaded from the Play Store or encrypted data like WhatsApp chats. Wondershare Dr.Fone is better if you don’t want to lose your IM conversations.
Here’s how to move data from Itel P40 to Samsung S23 with Smart Switch:
- Download and install Smart Switch on both phones and place them next to one another.
- Get your Samsung S23 and go to Settings > Accounts and backup > Bring data from an old device.
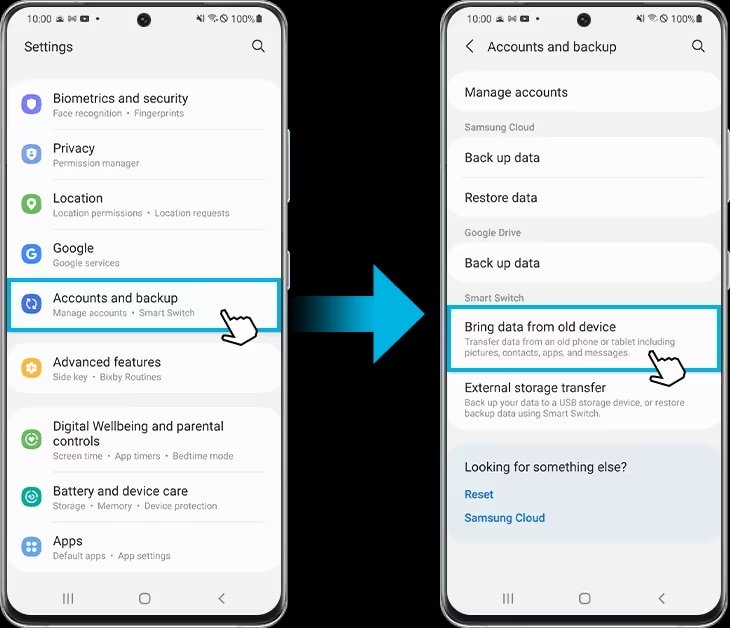
- On your Samsung S23, tap Receive dataand choose Galaxy/Android as the source.
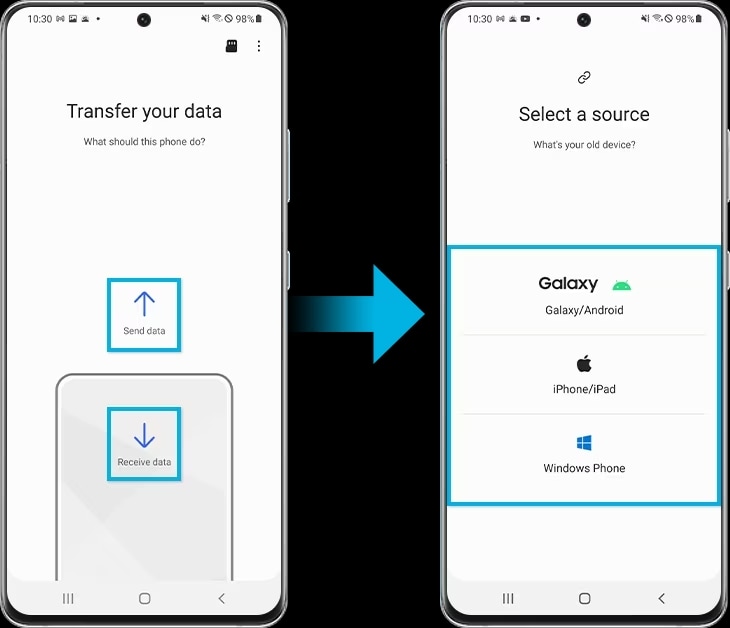
- Tap Send dataon your old phone and select Wireless (it’s faster than a cable connection). Tap Allow to enable data access.
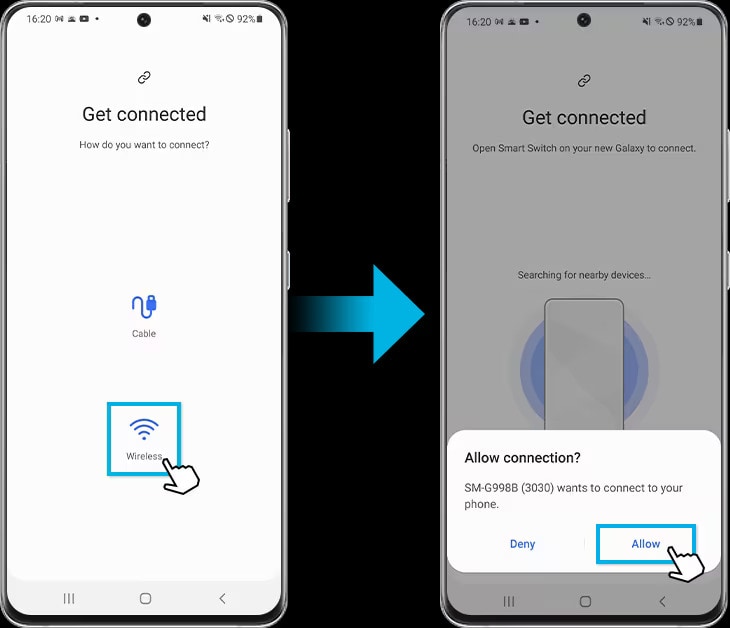
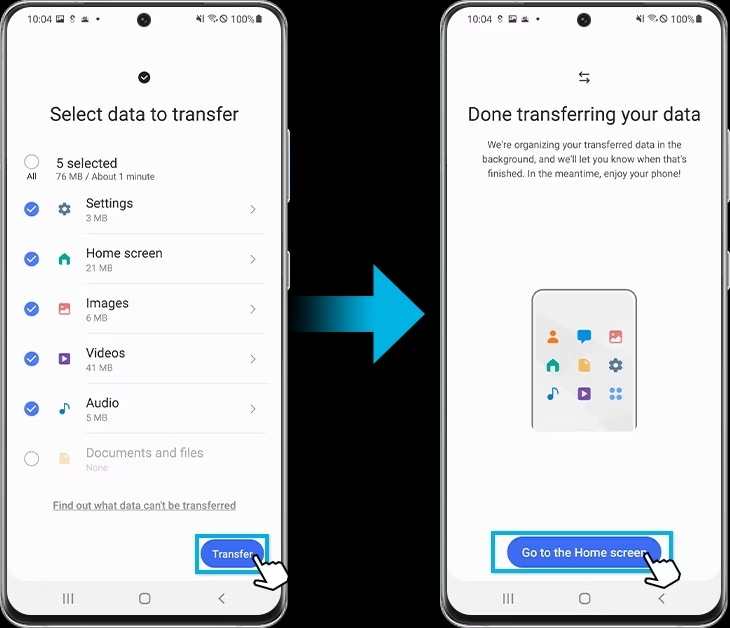
- Choose the desired data using your Samsung S23, tap Transfer, then Go to the Home screenonce everything is on your new phone.
Remember to charge both phones before transferring data or connect them to a power source to ensure the process goes smoothly.
3. Transfer Data Using Google Account Sync
Backing up your Google Account data with Google One means accessing it on any device upon login. The backup includes apps, phone settings, messages, calls, photos, videos, and your chosen Google Account data (e.g., contacts, calendar, emails, and documents).
Here’s how to transfer data to Samsung Galaxy S23 using Google Account synchronization:
- Go to Settings > Google > Backup > Google Account dataon your old Android phone and toggle on the desired switches for synchronization.
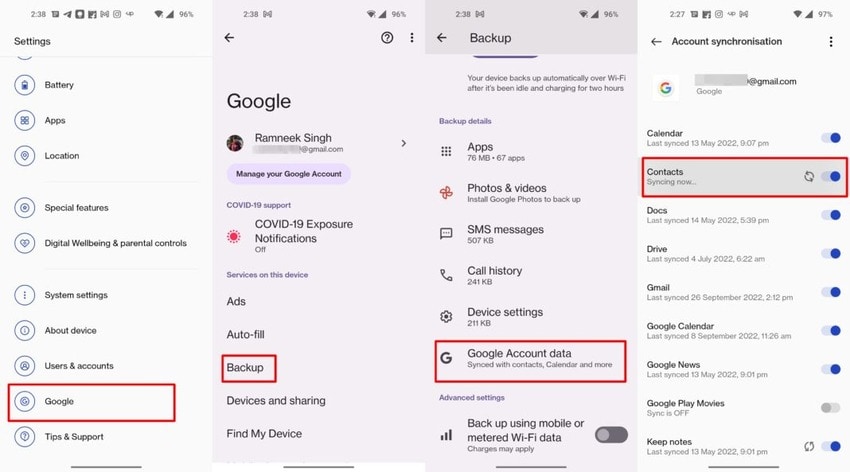
- On your Samsung S23, go to Settings > Googleand log into your backed-up Google Account.
Everything you’ve previously backed up will automatically sync once you log into your Google Account.
4. Share Data via Bluetooth
Bluetooth may be slower than most data-sharing methods, but its reliability is why we never have to imagine life without it. It may not support transferring settings or downloaded apps, but it’s excellent for moving all your photos, videos, music, and other files.
Here’s how to share data between Android and Samsung S23 via Bluetooth:
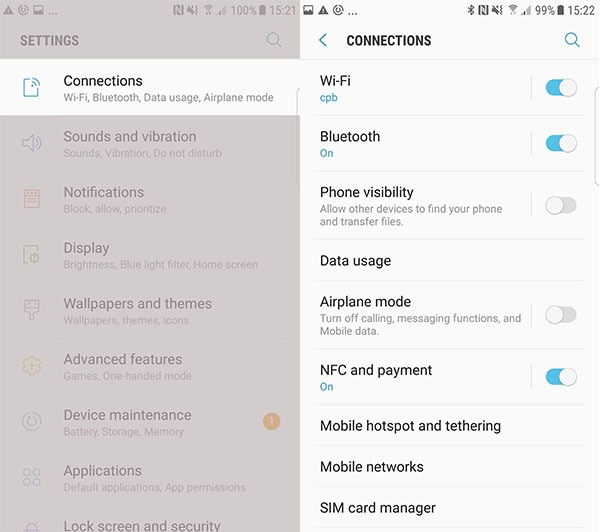
- Go to Settings > Connectionsand toggle on the Bluetooth switch on both phones. Alternatively, use a shortcut in the Notification panel.
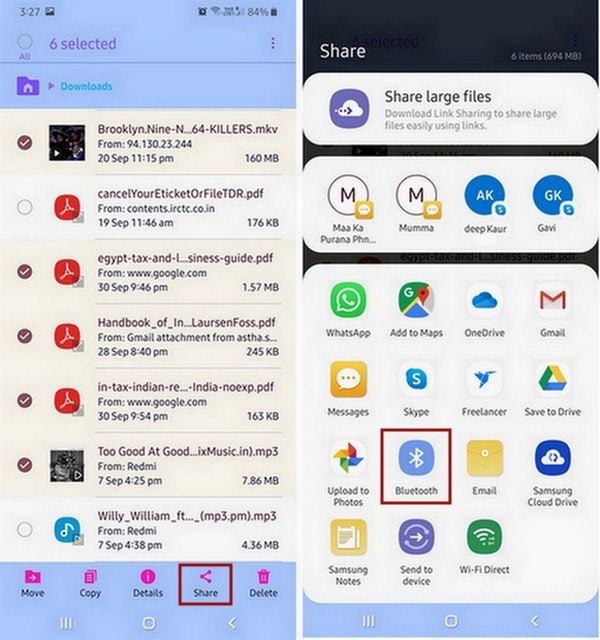
- Pair the phones and select folders or files you wish to transfer to your Samsung Galaxy S23.
- Tap Share > Bluetoothand choose your new phone.
Sharing data via Bluetooth may take a while, but this valuable feature will bring everything you need to your new smartphone.
5. Use Google Drive
Google Drive is a prominent cloud storage and file-sharing platform. You’re missing out if you don’t use it. It lets you synchronize data across devices, access files in the cloud, and create presentation slides, spreadsheets, forms, and documents (online and offline).
Transferring data from Itel P40 to Samsung S23 is seamless with Google Drive. Here’s what to do:
- Launch Google Drive on your old Android and tap New > Upload. The Newbutton features only a plus sign on some devices.
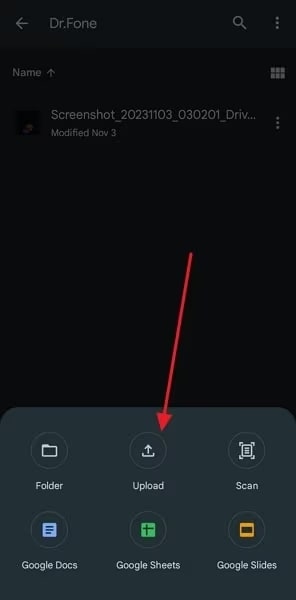
- Add all folders or files you wish to transfer to your new phone.
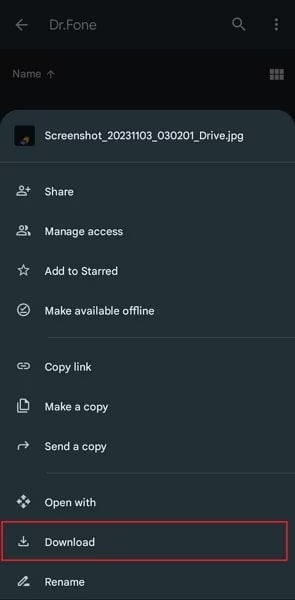
- Open Google Drive on your Samsung S23 and sign into the correct account.
- Select the uploaded data, tap the kebab menu(the three vertical dots in the top right corner), and hit Download.
Google Drive may limit you to 15 GB of free storage, but it’s among the best Google apps for sharing files across devices. You may already use its desktop version to collaborate on docs and spreadsheets, so why not leverage its handy mobile app?
6. Transfer Data Using a USB Cable
USB cables—the unsung heroes of connectivity. Like Bluetooth and Wi-Fi, we can’t imagine life without them. They’re perfect for transferring data between devices.
However, in this instance, we don’t mean the traditional data transfer between your phone and computer (we’ll get to that shortly). This trick involves connecting your old Android phone to your new Samsung Galaxy S23 with a USB cable.
It’s almost like Samsung’s Smart Switch, except you don’t need to download an app and can move more data. You can transfer everything from your old Android device’s internal storage to your new smartphone. Here’s how:
- Connect your phones using a USB-C to USB-C cable. Your Samsung Galaxy S23 came with it.
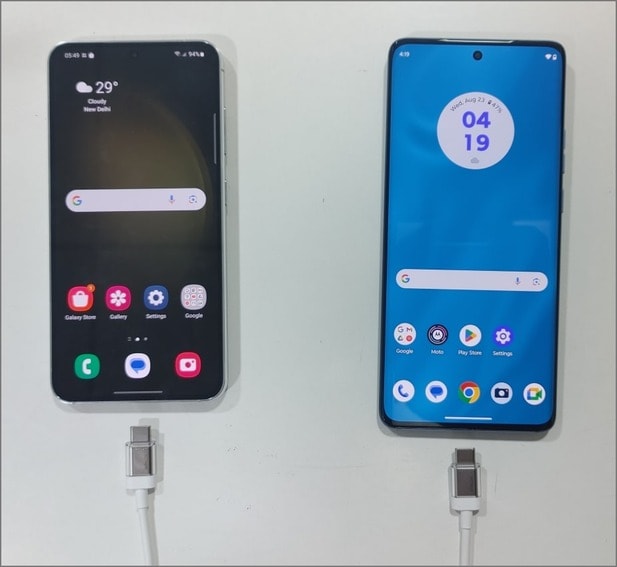
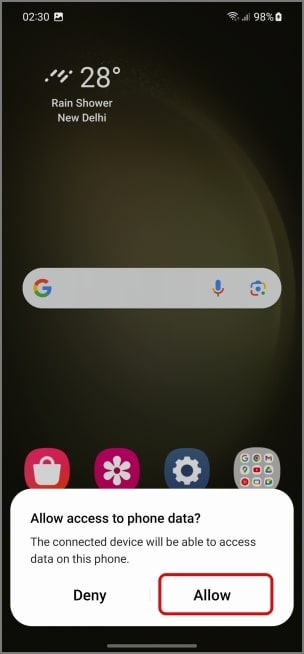
- Tap Connected to Androidon your Galaxy S23 phone and select MTP Host (Media Transfer Protocol).
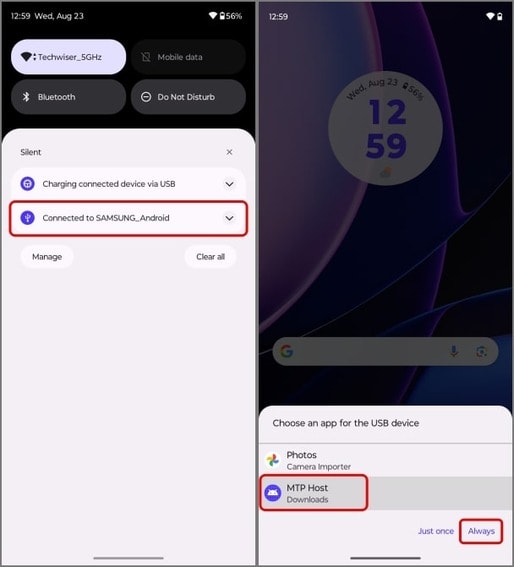
- Tap Allowon your old Android to enable data access.
- Choose the desired file manager on your new phone and browse your old Android’s internal storage.
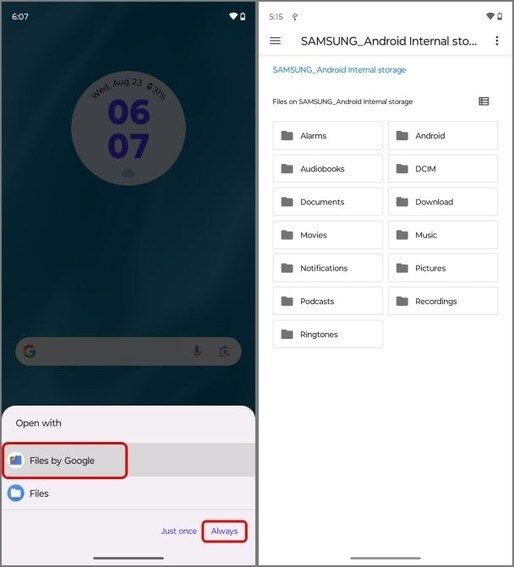
- Choose folders or files to transfer, tap the kebab menufor more options, and select Copy to.
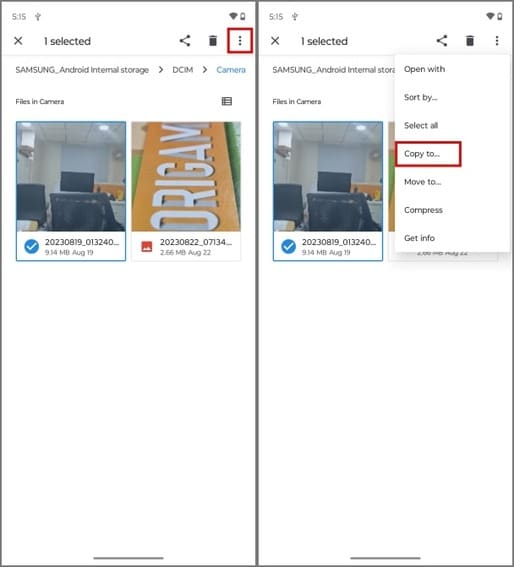
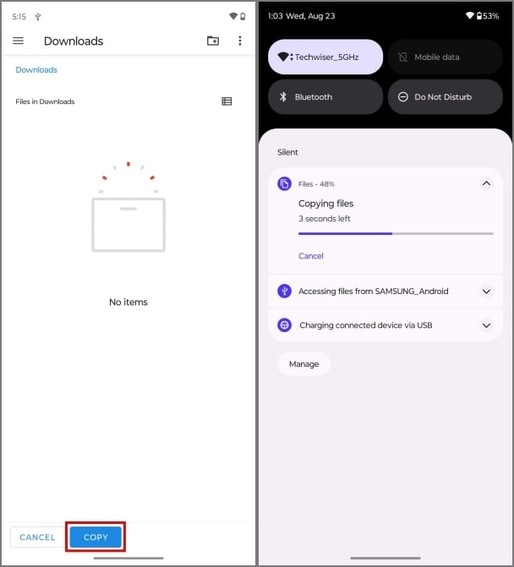
- Pick any location on your Samsung S23 phone (e.g., the Downloadsfolder for quick access) and tap Copy.
Moving data between phones using a USB cable is faster than Bluetooth but offers the same functionality. However, charge your devices beforehand because the data transfer may take a while (if you have many sizable files).
7. Use an SD Card
We can almost see you fumbling with your Samsung S23, looking for an SD or microSD card slot. Newsflash: there isn’t one. Like its predecessors, S21 and S22, the Galaxy S23 series doesn’t support expandable storage.
How can you transfer data from an SD card, then? Well, there’s always your computer. You can migrate your SD card data to your desktop or laptop before moving it to your new Galaxy phone.
It may not be as straightforward as the methods above, but it’s ideal for keeping precious files from your old Android’s SD card. Here’s what to do:
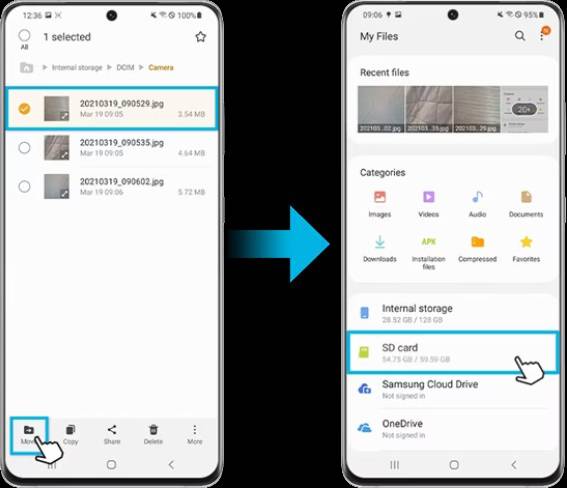
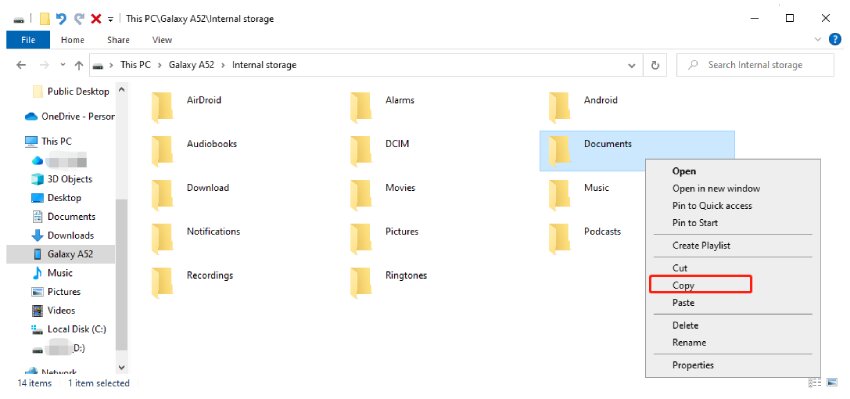
- Select the desired files or folders on your old Android, tap Move, and choose your SD card.
- Connect the Android to your computer with a USB cable.
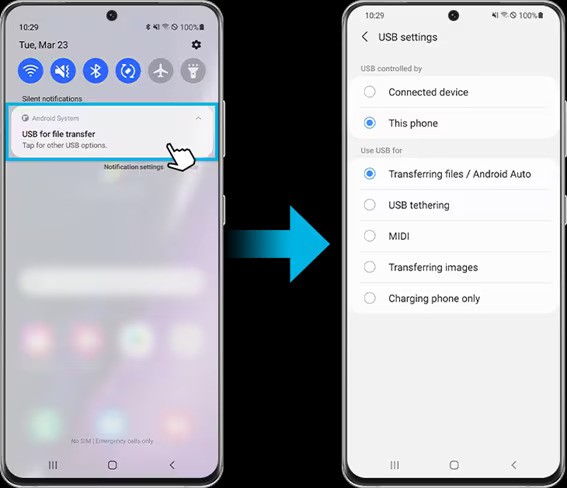
- Tap USB for file transferin the Notification panel and select Transferring files / Android Auto.
- Go to This PCin File Explorer and open your phone under Devices and drives.
- Right-click the folders or files you wish to move, select Copy, and paste them to any location on your computer.
- Once you move the data, safely disconnect your old Android and connect your Samsung S23 to the PC.
- Go to the folder with your newly saved data and copy-paste it to your Samsung S23.
This method is best for transferring photos, videos, and other files from an SD card you might not use anymore. After all, smartphone manufacturers increasingly ditch SD card slots for sleek, more compact designs.
Conclusion
Switching from Itel P40 to Samsung S23 is a breeze because you have many data transfer options. Besides Samsung’s Smart Switch, you can use your synced Google Account, Google Drive, Bluetooth, or a USB-C to USB-C cable. You can also migrate data from your old Android SD card to your computer before transferring it to your new phone.
However, Wondershare Dr.Fone Phone Transfer might be your best option. Besides transferring files, it features many tools for seamless phone management, making it a fantastic addition to your digital toolbox.
- Title: How to Transfer Data from Itel P40 to Any iOS Devices | Dr.fone
- Author: Emma
- Created at : 2024-08-02 15:34:06
- Updated at : 2024-08-03 15:34:06
- Link: https://android-transfer.techidaily.com/how-to-transfer-data-from-itel-p40-to-any-ios-devices-drfone-by-drfone-transfer-from-android-transfer-from-android/
- License: This work is licensed under CC BY-NC-SA 4.0.