
How to Transfer Data from Nokia C12 Plus to BlackBerry | Dr.fone
How to Transfer Data from Nokia C12 Plus to BlackBerry
Today’s world is full of technological benefits. Transferring data from one part of the world to another can be done in the blink of an eye. Transferring data from one phone to another should be that simple right? Well, it is if you are using devices with the same OS. But, what should you do if you want to transfer data from, let’s say, Android to BlackBerry? Don’t worry. It is possible, and we will guide you step by step through the entire process.

Option 1: Issues about transferring data from Nokia C12 Plus to BlackBerry
When transferring data from Nokia C12 Plus to BlackBerry, you can’t use Bluetooth or a third party software that will help you speed up the process. And unfortunately, you will sometimes wish that you can speed up this process. You can try to manually transfer data from Nokia C12 Plus to a computer, and then from a computer to BlackBerry, but this process can take hours. It is boring to transfer the files from one place to another, and the time it takes is a real pain in the neck. And also, it is impossible to transfer apps from Nokia C12 Plus to BlackBerry because of different operating systems. Sometimes, not even all photos, videos and music files will be compatible. But, luckily, the BlackBerry developers have thought of a one way, which is simpler than the manual transfer mentioned above, to transfer your data from Nokia C12 Plus to BlackBerry. It takes less time, but you still need to do some work.
Part 2: How to transfer data from Nokia C12 Plus to Blackberry (Free)
The BlackBerry developers have thought of an app that will help you transfer your contacts, calendar videos and photos from and Android device to a BlackBerry. You will not need to connect the Nokia C12 Plus devices to a PC or Mac. You will only need to connect both devices to the same Wi-Fi network. The app is called Device Switch.
From the Home screen of your BlackBerry tap the ‘BlackBerry World’.
Then, tap the search box and enter ‘Device Switch’. After the Nokia C12 Plus device shows up, tap it.

Then, you should be able to see the ‘Download’ button on the right side. Tap it, and wait for the app to download. You may be prompted to enter the login information for your BlackBerry ID account.

Once the download is done, ‘Open’ button will appear. Tap it.

You should read through the top half of the screen, and make sure that the preferred options are checked. Once you finish reading, click ‘OK’.

After pressing OK, swipe left. A new screen will show up. You will have the option to choose the Nokia C12 Plus device you are switching data from. Make sure to click Android.

Then, download the Nokia C12 Plus device Switch application from Google Play on your Nokia C12 Plus. When the application is installed, open it, tap next and then RIM BlackBerry Device. Note the PIN code and enter it on your BlackBerry when prompted.

Make sure that the preferred sync options are checked on the Android device and then tap ‘Next.’ These two devices will establish a connection using the same Wi-Fi network. Once that happens, the transfer process will begin. The process may take a while. It depends on the amount of data which is being moved.
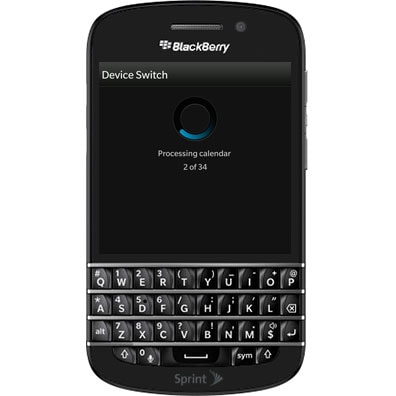
Once the transfer is done, tap finish. And that is it! The content from the Android device was successfully transferred to your BlackBerry device.

The Device Switch app is very reliable. But, there is one downside. You cannot transfer all file types using it, and the process may take a lot of time sometimes. But, we have found an even easier way. It is software called Dr.Fone - Phone Transfer. Keep reading to find out more about it!

Part 3: Transfer data from Nokia C12 Plus to Blackberry by Dr.Fone (Fast, easy and safe)
Dr.Fone - Phone Transfer can transfer all kinds of data including text messages, call logs, contacts, and of course, photos, videos and music. The software does not only enable transfer between Android, iOS and Symbian, but also restores data from iTunes, iCloud, kies and BlackBerry backup files. It supports more than 3000 phones currently, from all manufacturers.
Dr.Fone - Phone Transfer
How to Transfer Data from Nokia C12 Plus to BlackBerry With 1-Click
- Transfer all contacts, music, video and music, from Nokia C12 Plus to BlackBerry.
- Enable to transfer from HTC, Samsung, Nokia, Motorola and more to iPhone 15/14/13/12/11/X.
- Works perfectly with Apple, Samsung, HTC, LG, Sony, Google, HUAWEI, Motorola, ZTE, Nokia and more smartphones and tablets.
- Fully compatible with major providers like AT&T, Verizon, Sprint and T-Mobile.
- Fully compatible with iOS 17 and Android 13.
- Fully compatible with Windows 10 and Mac 14.
3,975,690 people have downloaded it
Steps to transfer data from Android phone to BlackBerry by Dr.Fone
Step 1: In order to transfer data from Android phone to BlackBerry, you are supposed to download and install Dr.Fone fisrt. And then launch Mobiletrans and select the “Phone Transfer” mode.

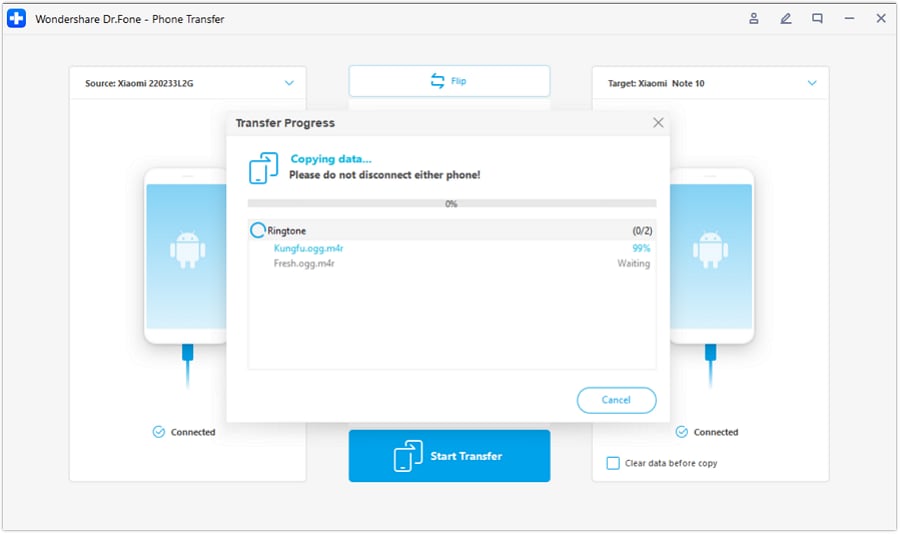
Step 2: Connect both your Nokia C12 Plus and BlackBerry phone to your computer. On the window below, you can click the “Flip” button on the program in order to switch the destination and source phones, please make sure that the BlackBerry phone is the destination. Then you can select the contents you’d like to transfer.

Step 3: After you select the transfer contents, just click “Start Transfer”. Then the program MobileTrans will start to transfer data from Nokia C12 Plus to BlackBerry. After a few minutes, the process will finish.

How to Transfer Photos from Nokia C12 Plus to New Android?

The phone industry, for years, has constantly improved on the design and development of mobile phones being released into the market. One of the major developments is the introduction of the camera to mobile phones. The ease of carriage and portability has made mobile phone cameras a preference over digital cameras. As a result we are witnessing more pictures taken with the aid of a phone. This also means most of these photos are stored on the phone memory.
Most of these photos would need to be shared with other people who are either a part of the photo or you would want to transfer them to your new android device. Most users are at a loss about how to transfer their photos from one android device to another. There are several ways to do that successfully without the risk of losing your priced photos. And in this article we have outlined several ways through which you can transfer your photos from your Nokia C12 Plus to your new android device.
Part 1. Transfer Photos from Nokia C12 Plus to New Android with a File Transfer Software
One way of moving your photos between android devices is through the use of file transfer software. This software enables you to connect both android devices together.
Using file transfer software to move your photos from one android device to another android device provides a secure and sure transfer window, ensuring your files won’t be lost. Reliable software you can use for this purpose is the Dr.Fone - Phone Transfer software. Dr.Fone - Phone Transfer file transfer software is topnotch and user friendly. This article will carefully lead you through the process of using this software.
Dr.Fone - Phone Transfer
Transfer Everything from Android/iPhone to New iPhone in 1 Click.
- It supports all the leading iOS devices, including devices running on iOS 11.
- The tool can transfer your photos, videos, contacts, messages, music, call logs, notes, bookmarks, and so much more.
- You can transfer all your data or select the type of content you wish to move.
- It is compatible with Android devices as well. This means you can easily perform a cross-platform transfer (e.g. iOS to Android).
- Extremely user-friendly and fast, it provides a one-click solution
3981454 people have downloaded it
Ensure you have a good PC where you would download and install the Dr.Fone software. When the software has installed, go to desktop home screen and double click on the icon. You can follow the steps below to start a file transfer.
Step 1. Click on “Switch” module after you open Dr.Fone toolkit
Step 2. Connect both phones to PC and select “Photos”
Using a good USB cable, connect both old and new devices to your PC. When that is done, a list of data that can be transferred will appear. Choose “Photos” and this will move your photos from the source device to the destination device. You can also change both device between “source” and “Destination” by using the “Flip” button.

Step 3. Click “Start Transfer”
Click on the button “Start Transfer”. Keep phones connected. Dr.Fone starts to transfer photos. Go to view trabsferred photos on the destination phone until it completes.
Part 2. How to Transfer Photos from Nokia C12 Plus to New Android Using NFC
Near Field Communication(NFC) is a technology that supports Android Beam and is ideal for transferring data between android devices by just pressing their backs together. It is a fast and simple program that requires both devices to NFC-capable. This means they are able to communicate with each other when their fields are near. This communication is made possible through radio frequencies. Most devices have NFC hardware integrated underneath their panel.
NFC can be found in almost every android device. In the past, it was easy to identify devices with NFC as such devices usually had NFC printed somewhere in the back of the Nokia C12 Plus devices, most tines on the battery pack. But since most android devices don’t have a removable back, there is an alternative to checking if your device is NFC enabled.
1. On your Nokia C12 Plus, tap on “Settings” and click on “More” located under “Wireless and Networks” .
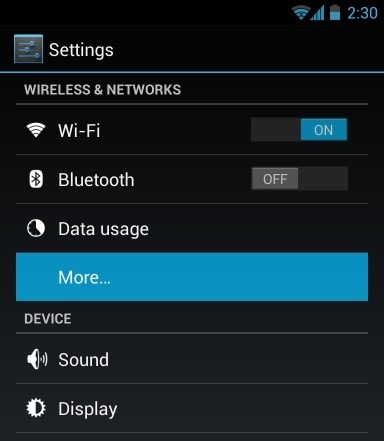
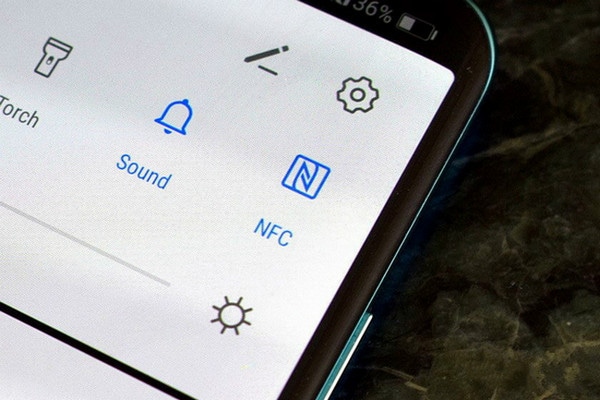
This would take you to a screen where you should find the NFC and android beam options as depicted in the image below. At this stage enable both options if any or both have been disabled. If the NFC option doesn’t appear, it then means your device does not have Near Field Communication (NFC) functionality.
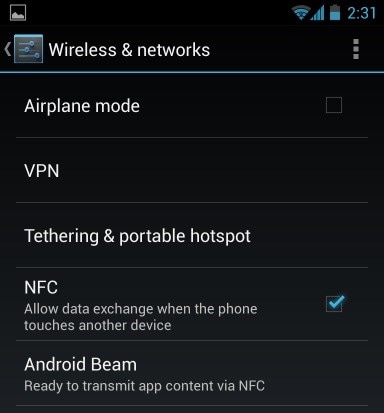
2. Another method of checking is by opening settings menu and tapping on the search icon. Type in “NFC”. If your phone is capable, it will show up. The NFC function works hand-in-hand with the android beam. NFC may not work at optimal levels if android beam is “off”.
To Transfer Photos from your Nokia C12 Plus to a new android device, ensure both devices support NFC using the method explained above. Once this is confirmed, use Android beam to access the photos you want to transfer to your new android device.
1. To select multiple photos, long press on a photo. Then choose the photos you want to transfer to new android device. When you are done selecting, you can begin the beaming process.
2. Next, place both devices against each other, back to back.
3. At this stage, both an audio sound and visual message will appear, acting as confirmation that both devices have found each other’s radio waves.
4. Now, on your Nokia C12 Plus, the screen will reduce to a thumbnail and a “Touch to beam” message will pop up at the top.
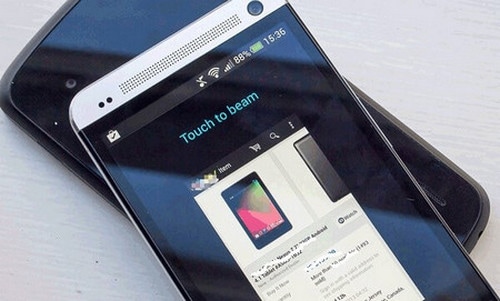
To begin beaming, you must touch the screen on your Nokia C12 Plus from where the photos are been sent. A sound will alert you that beaming has started.
To ensure a successful transfer, make sure devices are not locked neither should the screen be turned off. Also both devices should be kept back-to-back throughout the duration of the transfer.
5. Finally, when the beaming is complete, you will hear an audio sound. This is to confirm completion of the process. Alternatively, instead of an audio confirmation, the application on your new android device to which the photos were sent will automatically launch and display the beamed content.
Part 3. Transfer Photos between Android Phones by Bluetooth
The Presence of Bluetooth technology in phones is as old as android itself. The use of this technology offers another method that you can employ in transferring your photos from your Nokia C12 Plus to your new android device. It is a short and simple method that is known to most android users.
The purpose of this article is to guide you through the process of successfully transferring your photos from your Nokia C12 Plus to your new android device. This process involves navigating to the Bluetooth option on your device, connecting to your new device and initiating transfer. The steps are outlined below
1. Locate the Bluetooth on both devices. Go to your Settings and click on the “Connected device “Option. Under that option, you will find Bluetooth, click on it and toggle it on. Do the same for the receiving device.
2. Your device will start searching for nearby visible devices to pair with. Make Sure your new android device is visible to other devices. When your android device appears on the list of available devices on your old Android, select it to pair.
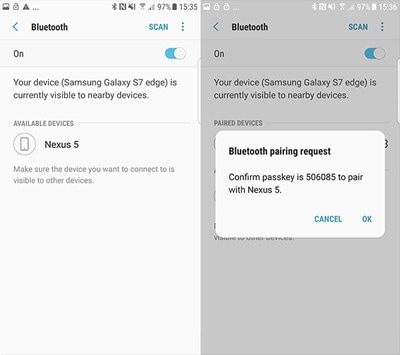
A message will pop up on your new android device, requesting permission to pair with your Nokia C12 Plus. Click “Accept “to establish connection.
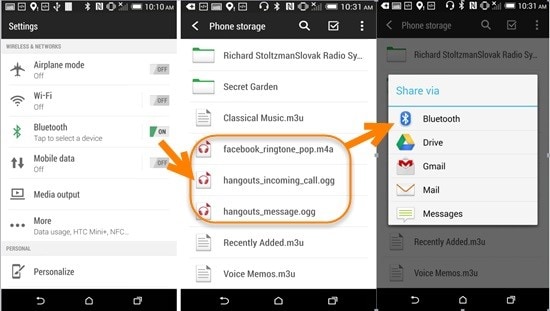
3. After both devices have successfully been paired to each other, go to the folder containing the Photos your want to send to your new Android device. Select the photo or if they are more than one, long press on a photo. This will create a thumbnail. Select the photos you want to transfer and choose the share button normally depicted by this icon
4. A list of option will appear. Choose Bluetooth. This will take you back to The Bluetooth application. Click on your new android device that you have previously paired with. A Message will appear on your new device asking for permission to receive the photos from your Nokia C12 Plus. Click “Accept”. This will initiate the transfer process. A progress bar at the top of your screen will show you the Progress of each transfer.
Part 4. Transfer Photos from Old to New Android Phones via Device-Specific App
Samsung Smart Switch
The Samsung smart switch software helps to Transfer Photos either by cable or wireless transfer If your Samsung device does not come with the software, you can download it here .
1. Open the switch app on both Samsung devices. On the sending device, tap “Send data” and on the receiving device, tap “Receive data”.
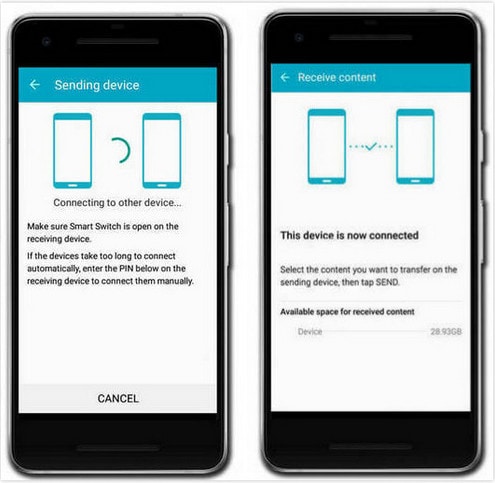
2. Now, choose either the Cable option using an OTG adapter or wireless transfer option.
3. On the old Samsung device, select the data to be transferred to the new Samsung device. When you are done with this, your phone will notify the size and time length of the transfer.


4. Thereafter, click on “Send” to begin the transfer of data from on device to the other.
LG Mobile Switch
LG’s mobile switch software is device specific software that allows for data transfer. Follow the steps below.
1. Switch on your LG device. On the home screen, swipe left. Click on Management and tap “LG Mobile Switch”. Select the data to be transferred and tap on “agree”. A list of options will appear on how to transfer the data; select “Wireless” and tap receive. On the screen that comes up next, tap on “Start”.
2. Now go to your old LG device and open the software. Click on “Send Data” and choose “send data wirelessly”. Next, tap “tap start” and choose the name of your new phone. Then click on “accept” and on the new device, tap on “receive”. Select the data to be sent and tap “Next”. This will start the transfer. When it is completed, the data would have been transferred from your old android to the new android.
Huawei Backup
Huawei devices have HiSuite, an inbuilt manager tool. This app helps users to manage the data on their Huawei devices and also to back up and restore data. To backup and restore on Huawei devices using Hisuite, follow the steps below
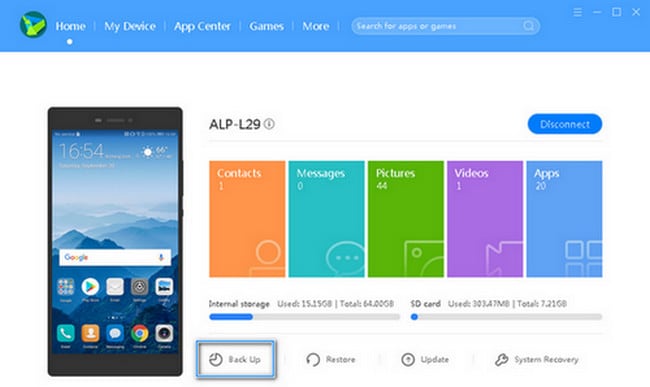
1. Download the tool here and install. This tool is supported by windows only. Then, open the tool and connect your Huawei device to you PC by means of a USB cable.
2. Go to settings app on your android device and click on “advanced settings”. Click on “security” and choose “Allow Hisuite to use HDB”. You will see the “Back Up” and “Restore” options. Click on “Back Up” and select the data you want to back up. You can encrypt your backup with a password. Then click on “Back Up”.
3. Click on “Restore” to retrieve data from previous backups after selecting the backup file you want.
How to Transfer Contacts from Nokia C12 Plus to Other Android Devices Devices?
Android, which is developed by the Google, has a very strong mobile operating system. It is totally based on the Linux kernel and specially designed for touch screen mobile devices such as smartphones and tablets. And these Android mobiles are used by millions of people. Some of the users might feel the need to transfer their contacts from one Android device to another due to up gradation or changing of the mobile. There are many methods which can help transfer contacts from Nokia C12 Plus to Other Android Devices.
So for all those who want to know how to transfer contacts from Nokia C12 Plus to Other Android Devices, keep reading to know more.
Part 1: How to transfer contacts from Nokia C12 Plus to Other Android Devices using Dr.Fone toolkit?
One of the most popular toolkit to transfer contacts from Nokia C12 Plus to Other Android Devices is the Dr.Fone toolkit - Phone Transfer . This is a revolutionary application for your entire backup and restores solutions. This application supports over 8000+ Android devices worldwide and with its advanced features, the application allows the user to take backup and restore by selecting their needs and requirements.
Dr.Fone - Phone Transfer
Transfer Everything from Android/iPhone to New iPhone in 1 Click.
- It supports all the leading iOS devices, including devices running on iOS 11.
- The tool can transfer your photos, videos, contacts, messages, music, call logs, notes, bookmarks, and so much more.
- You can transfer all your data or select the type of content you wish to move.
- It is compatible with Android devices as well. This means you can easily perform a cross-platform transfer (e.g. iOS to Android).
- Extremely user-friendly and fast, it provides a one-click solution
3,748,995 people have downloaded it
Ensure you have a good PC where you would download and install the Dr.Fone software. When the software has installed, go to desktop home screen and double click on the icon. You can follow the steps below to start a file transfer.
Step 1. Click on “Phone Transfer” module after you open Dr.Fone toolkit
Step 2. Connect both phones to PC and select “Photos”
Using a good USB cable, connect both old and new devices to your PC. When that is done, a list of data that can be transferred will appear. Choose “Photos” and this will move your photos from the source device to the destination device. You can also change both devices between “source” and “Destination” by using the “Flip” button.
Step 3. Click “Start Transfer”
Click on the button “Start Transfer”. Keep phones connected. Dr.Fone starts to transfer photos. Go to view transferred photos on the destination phone until it completes.
Part 2. How to Transfer Photos from Old Android to New Android Using NFC
Near Field Communication(NFC) is a technology that supports Android Beam and is ideal for transferring data between android devices by just pressing their backs together. It is a fast and simple program that requires both devices to NFC-capable. This means they are able to communicate with each other when their fields are near. This communication is made possible through radio frequencies. Most devices have NFC hardware integrated underneath their panel.
NFC can be found in almost every android device. In the past, it was easy to identify devices with NFC as such devices usually had NFC printed somewhere in the back of the Nokia C12 Plus devices, most tines on the battery pack. But since most android devices don’t have a removable back, there is an alternative to checking if your device is NFC enabled.
- On your Nokia C12 Plus, tap on “Settings” and click on “More” located under “Wireless and Networks” .
- This would take you to a screen where you should find the NFC and android beam options as depicted in the image below. At this stage enable both options if any or both have been disabled. If the NFC option doesn’t appear, it then means your device does not have Near Field Communication (NFC) functionality.
- Another method of checking is by opening the settings menu and tapping on the search icon. Type in “NFC”. If your phone is capable, it will show up. The NFC function works hand-in-hand with the android beam. NFC may not work at optimal levels if the android beam is “off”.
To Transfer Photos from your old android device to a new android device, ensure both devices support NFC using the method explained above. Once this is confirmed, use the Android beam to access the photos you want to transfer to your new android device.
To select multiple photos, long press on a photo. Then choose the photos you want to transfer to new android device. When you are done selecting, you can begin the beaming process.
Next, place both devices against each other, back to back.
At this stage, both an audio sound and visual message will appear, acting as confirmation that both devices have found each other’s radio waves.
Now, on your old android device, the screen will reduce to a thumbnail and a “Touch to beam” message will pop up at the top.
To begin beaming, you must touch the screen on your old android device from where the photos are been sent. A sound will alert you that beaming has started.
To ensure a successful transfer, make sure devices are not locked neither should the screen be turned off. Also, both devices should be kept back-to-back throughout the duration of the transfer.
Finally, when the beaming is complete, you will hear an audio sound. This is to confirm the completion of the process. Alternatively, instead of an audio confirmation, the application on your new android device to which the photos were sent will automatically launch and display the beamed content.
Now, we’ll discuss how to transfer contacts from one Android to another with the help of a SIM card.
Part 2: How to transfer contacts from Nokia C12 Plus to Other Android Devices using SIM card?
Here are the steps which will help you.
- To copy the contacts to your SIM card, you should follow the sequence –
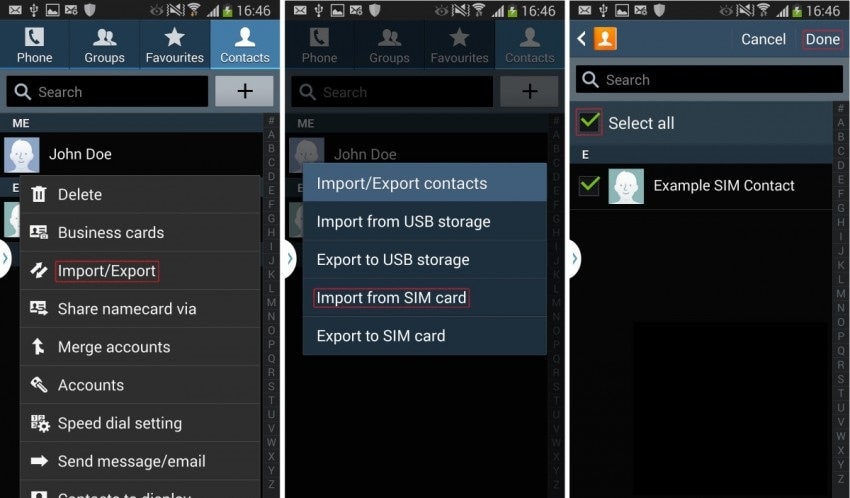
- Go to “contact” on your old device.
- Then tap on “More” and then choose “settings”.
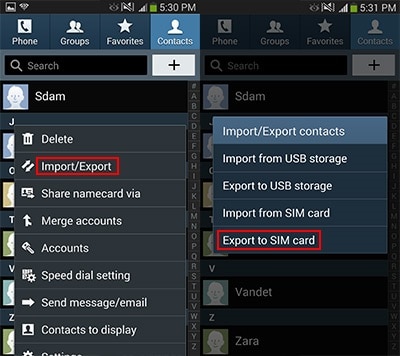
- Here you can find “import / Export” option. Tap on it and then choose “Export” option.
- Now click on “Export to SIM card” option. On choosing this step, all your contacts will be copied to the SIM card in a few minutes. This depending upon the capacity of the SIM card.
Now, pull the SIM card out and insert in on your new device.
• Here follow the same steps above and on “Import / Export” option, choose “Import”. Then it will ask for the option to import from. Choose “SIM Card” here. Now, all your contacts will be imported to your phone memory from the SIM card.
Advantages: This process is easy to use and can be done without any PC.
Disadvantage: It can only transfer the contacts up to the SIM capacity that is 200 to 250 in one time. If you have lots of contacts, it is impossible to transfer by this method.
Part 3: How to transfer contacts from Nokia C12 Plus to Other Android Devices using Bluetooth or Wi-Fi Direct?
To transfer contacts from Nokia C12 Plus to Other Android Devices using Bluetooth or Wi-Fi Direct is one of the easiest methods. For this method, make sure that you should enable “Bluetooth” or “Wi-Fi Direct” on both the Android devices.
The steps:
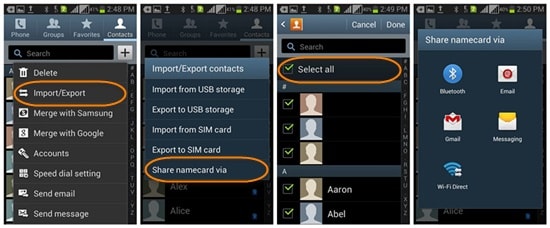
1. Go to the “Contacts” menu on your old Android device.
2. Now, find “Import / Export” option. It might be under “More” > “Settings” menu. Tap on it.
3. Now go to “Share namecard via” option from the menu and select all the contacts to transfer process.
4. Now you have two options. Share via “Bluetooth” or ‘Wi-Fi Direct”. Select any option you want and accept from the other device.
5. After successful connection, all the contacts from old Android devices will be transferred to your new Android device.
This method is simple and easy to use.
There is yet another method to transfer contacts from Nokia C12 Plus to Other Android Devices using Samsung’s own app “Smart Switch”.
Advantage: This is a very fast process.
Disadvantage : Sometimes the contacts are not saved automatically. You have to open the name card file one by one to save them. If you have a lot of contacts, this process is very hectic and lengthy.
Part 4: How to transfer contacts from Nokia C12 Plus to Other Android Devices using Samsung Smart Switch?
Samsung launched a new app called “Smart Switch” to allow transfer of content between Android devices. Although, it does not support allAndroid devices.
To transfer contacts from Nokia C12 Plus to Other Android Devices via this app, follow the below method step by step.
1. First of all, download the app on both the mobiles.
2. Then, open this app on new Android device and Start the process by tapping on “Start”.
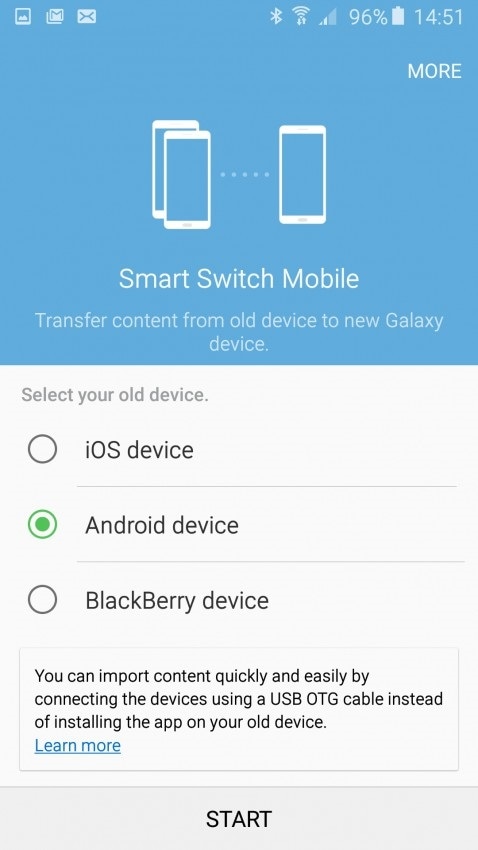
3. Now, Select the new device as ‘Receiving device”
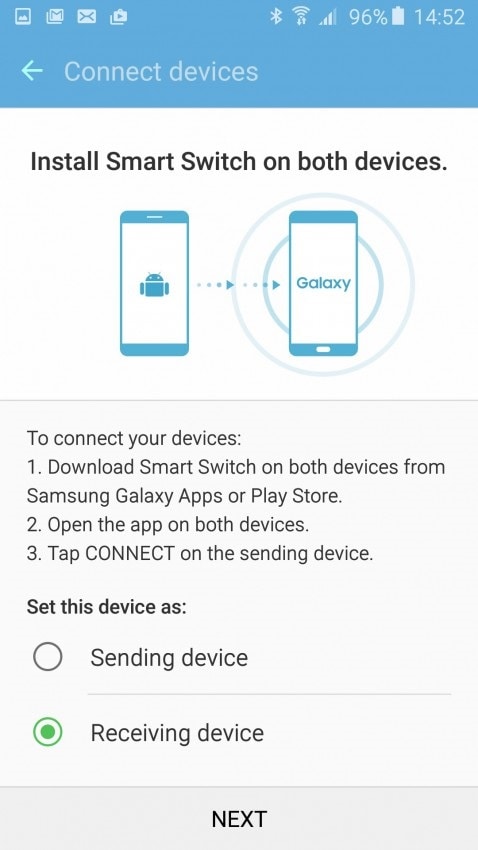
4. Now connect with your old device by opening the app on your old Android mobile. This will prompt to enter the pin number as displayed. Enter the same and hit “Connect” to start the process.
5. Now, select “Contact” on your old device and tap “Send”.
6. You should see a prompt on your new device which asks you to confirm the “receive” of the contact. Tap on “Receive” and all the contacts from your old device will be copied to your new Android device in few minutes.
Advantages: The process is very fast and can transfer all the contacts at once.
Disadvantages: This app is not supported on all the Android devices. Also, the process is lengthy and needs some technical knowledge.
Thus, these were the four best options that you can use to transfer contacts from Nokia C12 Plus to Other Android Devices. However, in our experience, the first method, the Dr.Fone toolkit- Android data backup and restore is by far the best and most secured among all solutions for transferring contacts from Nokia C12 Plus to Other Android Devices. So, if you do not want to lose any data while transfer or worry about the security, use the Dr.Fone toolkit for the best result.
- Title: How to Transfer Data from Nokia C12 Plus to BlackBerry | Dr.fone
- Author: Emma
- Created at : 2024-07-17 19:58:46
- Updated at : 2024-07-18 19:58:46
- Link: https://android-transfer.techidaily.com/how-to-transfer-data-from-nokia-c12-plus-to-blackberry-drfone-by-drfone-transfer-from-android-transfer-from-android/
- License: This work is licensed under CC BY-NC-SA 4.0.