
How to Transfer Data from Vivo V27e to Any iOS Devices | Dr.fone
How to Transfer Data from Vivo V27e to Any iOS Devices


If you are a proud owner of smartphones running on two different operating systems such as Windows and iOS, you might face the challenging task of transferring the data from your Windows phone to iPhone. Transferring the data between the two devices running the OS of the different platforms is not as easy as it is when you have devices with a common platform. This article aims to guide you through two simple routes that you can follow to transfer the data stored in your Windows phone such as Vivo V27e to iPhone or other iOS devices. You don’t need to worry about how to transfer from Vivo V27e to iPhone or How to transfer contacts from Vivo V27e to iPhone anymore after reading this article. Read them on.
- 1. You can rely on some program/online service/website such as Outlook, CSV file format, Google Contacts, etc.
- 2. You may experience issues while transferring data from your Vivo V27e phone to iPhone.
Part 1: Transfer Data Wirelessly via Microsoft ID
Windows phones such as Vivo V27e depend on a Microsoft ID to back up your important data such as contacts, text messages, calendar, and device preferences. Once you have configured the data on your Vivo V27e smartphone, you can add the same Microsoft email address to your iPhone and then sync the data to it. Given below are the step-by-step instructions on how to transfer from Vivo V27e to iPhone via Microsoft ID:
Step 1: Make an account on Outlook.com.
1. Open www.outlook.com on the web browser on your smartphone or PC.
2. Once you are redirected to the website, tap the “Sign up” option from the top-right corner.
3. Enter the required information in the available fields to create an account.
Step 2: Sync the data on your Vivo V27e to Microsoft’s Outlook.com account.
1. Switch on your Vivo V27e smartphone.
2. Scroll through the Home screen to find the “Settings” option.
3. Once located, tap the “Settings” option to open it.
4. On the “Settings” window, locate and tap the “email+accounts” option to open it.
5. From the opened window, tap the “add an account” option.
6. After the “ADD AN ACCOUNT” window opens, tap “Outlook.com” from the available options.
7. Tap the connect button from the bottom-left corner of the OUTLOOK.COM window.
8. Once you are redirected to the outlook.com website, in the available fields, enter the credentials of your Microsoft account that you created earlier.
9. Tap the “Log in” button when done.
10. Wait till the data on your Vivo V27e automatically gets synchronized with your Outlook account.
Step 3: Import the data from your Outlook account to the iPhone.
1. Switch on your iPhone and scroll through the Home screen to locate the “Settings” option.
Note: Make sure your device is connected to the Internet.
2. Once located, tap to launch the “Settings” app.
3. On the opened “Settings” window, tap the “Mail, Contacts, Calendars” option.
4. After the “Mail, Contacts, Calendars” window opens, tap the “Add Account” Add Account option under the “ACCOUNTS” section.
5. From the available options, tap “Step two”Outlook.com.
6. Once the “Outlook” window opens, enter your Outlook account credentials, and tap “Next” from the top-right corner.
7. Wait till your device verifies your account.
8. Once your account details are verified and a list of transferrable data types is displayed on the screen, tap to slide the switch to the right for the data that you want to import.
Note: After you slide the switch to transfer the Contacts, iPhone provides you with an option to keep the contacts that are already stored in your device or delete them altogether before importing the new ones from your Outlook account. You can choose any option as per your requirement.
9. Once you have selected the data that you want to import, tap the “Save” button from the top-right corner.
10. Wait till the data gets imported to your iPhone.
Pros:
- You can transfer your data for free using this method and the only requirement is Internet connectivity.
- You are saved from downloading a third-party application to transfer your data.
- You can easily transfer the data wirelessly without the need to make your PC as a go-between
Cons:
- It is a time-consuming process.
- You cannot transfer photos and media files by following this method.
Part 2: Transfer Data Using PhoneCopy
With PhoneCopy you can easily export data from your Vivo V27e to the PhoneCopy server, and then import the data from the PhoneCopy server to your new iOS device. It is easy to transfer contacts from Vivo V27e to iPhone with PhoneCopy. What you need is PhoneCopy iPhone Vivo V27e.
In order to do so, you need:
A registered PhoneCopy account.
1. On your computer, open any web browser of your choice and go to https://www.phonecopy.com/en/ .
Note: Make sure your device is connected to the Internet.
2. From the right section of the opened web page, click “REGISTER NOW.”
3. On the “REGISTRATION” page, populate the available fields with the correct values and click “CONTINUE” from the bottom.
4. Follow the on-screen instructions thereafter to complete the account creation process.
Note: You may need to activate your account using the confirmation mail that you would receive while completing the account creation process.
The PhoneCopy app on your Windows phone.
1. Power on your Vivo V27e smartphone.
Note: Make sure that the phone is connected to the Internet.
2. From the Home screen, locate and tap the Store icon to open the Windows App Store.
Note: You must use your Microsoft account to sign in to Windows Store before the phone allows you to download the apps.
3. Once you are on the “store” interface, search for and tap the “PhoneCopy” app
4. On the next window that appears, tap “Install” pato install PhoneCopy on your Windows phone.
After you have successfully installed PhoneCopy on your Vivo V27e, it is now time to export all your contacts to the PhoneCopy server. You can do so by following the steps given below:
Step 1: Export data to the PhoneCopy server.
1. On your Windows phone, locate and tap to launch the “PhoneCopy” app.
2. On the displayed interface, in the available fields provide your PhoneCopy account credentials (username and password) that you used to create your PhoneCopy account earlier.
3. Once done, tap the”Export to phonecopy.com” button and wait till all your contacts are exported to the PhoneCopy server.
Step 2: Import data to the iPhone from the PhoneCopy server.
1. Power on your iPhone.
Note: Make sure that your phone is connected to the Internet.
2. From the Home screen, locate and tap the Apple App Store icon.
Note: Ensure that you are signed in to the App Store using your Apple ID.
3. Search for, locate, download, and install the “PhoneCopy” app on your iPhone
4. Once installed, tap the “PhoneCopy” icon on your iOS device to launch the program.
5. When asked for, provide the same PhoneCopy credentials that you used to export the data from your Vivo V27e phone in the previous step.
6. After you are signed in to your PhoneCopy account on your iPhone, click the “Synchronize” button to import all the data from the PhoneCopy server to your new iPhone.
Although PhoneCopy does a great job when it comes to transferring data between the phones from different platforms, the app comes with a few pros and cons which include:
Pros:
Registering and using PhoneCopy is free.
PhoneCopy can back up your calendar events, SMS, tasks, and notes and can help you import them on a different phone (typically on iPhone).
Cons:
Only up to 500 contacts, SMS, tasks, and notes can be synched while using the Basic version (free account) of PhoneCopy. To remove this restriction, you must buy the Premium version for which PhoneCopy charges $25 annually.
The archived data is auto-deleted from the PhoneCopy server after one month when using the Basic version, and after 1 year when using the Premium version.
Bonus Tip: Best Way to Transfer data between Android and iPhone
Dr.Fone - Phone Transfer lets you transfer data from Vivo V27e to iPhone or iPhone to Android in 1 Click. It supports almost all mobiles, including iPhone, Android Samsung, LG, Sony, HTC, etc. Dr.Fone - Phone Transfer can transfer music, videos, contacts, messages, call logs, and apps between mobiles. If you want to transfer data between Android and iPhone, it must be the best solution for you. Try it free. Follow the steps below to know how to transfer data between Android and iPhone.
Dr.Fone - Phone Transfer
Transfer Data between Android and iPhone in One Click.
- 1 CLick to transfer contacts from Vivo V27e to iPhone.
- Easily transfer photos, videos, calendar, contacts, messages, and music from Vivo V27e to iPhone/iPad.
- Works perfectly with Apple, Samsung, HTC, LG, Sony, Google, HUAWEI, Motorola, ZTE, Nokia, and more smartphones and tablets.
- Fully compatible with major providers like AT&T, Verizon, Sprint, and T-Mobile.
- Supports iPhone, iPad, iPod touch and the latest iOS version.
- Fully compatible with the latest Windows or Mac version.
3981454 people have downloaded it
Note: If you have no computer at hand, you can also get the Dr.Fone - Phone Transfer (mobile version) from Google Play, with which you could log into your iCloud account to download the data, or transfer from iPhone to Vivo V27e using an iPhone-to-Android adapter.
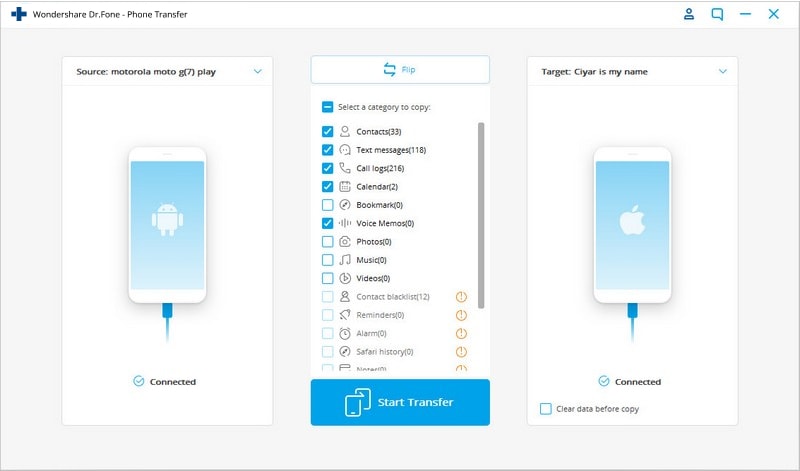
Step 1. Download Dr.Fone - Phone Transfer to transfer from Vivo V27e to iPhone
Launch Dr.Fone. You will see “Phone Transfer”. Click it.

Step 2. Connect Phones and select files
Connect your Android and iPhone. Dr.Fone will detect it soon. Then select the files and click Start Transfer. It can transfer almost all files, contacts, apps, messages, photos, music, videos, etc. If you just want to transfer contacts from Vivo V27e to iPhone, then it is also ok. Just check the Contacts option to transfer contacts from Vivo V27e to iPhone easily.
Conclusion
Regardless of the fact that many free solutions are there that can help you transfer data from your Vivo V27e to iPhone. If you also have an Android device, the Dr.Fone - Phone Transfer always has an upper hand when it comes to providing hassle-free migration between iPhone and Android devices.
How to Transfer Data from Vivo V27e to Any iOS Devices
If you are a proud owner of smartphones running on two different operating systems such as Windows and iOS, you might face the challenging task of transferring the data from your Windows phone to iPhone. Transferring the data between the two devices running the OS of the different platforms is not as easy as it is when you have devices with a common platform. This article aims to guide you through two simple routes that you can follow to transfer the data stored in your Windows phone such as Vivo V27e to iPhone or other iOS devices. You don’t need to worry about how to transfer from Vivo V27e to iPhone or How to transfer contacts from Vivo V27e to iPhone anymore after reading this article. Read them on.
- 1. You can rely on some program/online service/website such as Outlook, CSV file format, Google Contacts, etc.
- 2. You may experience issues while transferring data from your Vivo V27e phone to iPhone.
Part 1: Transfer Data Wirelessly via Microsoft ID
Windows phones such as Vivo V27e depend on a Microsoft ID to back up your important data such as contacts, text messages, calendar, and device preferences. Once you have configured the data on your Vivo V27e smartphone, you can add the same Microsoft email address to your iPhone and then sync the data to it. Given below are the step-by-step instructions on how to transfer from Vivo V27e to iPhone via Microsoft ID:
Step 1: Make an account on Outlook.com.
1. Open www.outlook.com on the web browser on your smartphone or PC.
2. Once you are redirected to the website, tap the “Sign up” option from the top-right corner.
3. Enter the required information in the available fields to create an account.
Step 2: Sync the data on your Vivo V27e to Microsoft’s Outlook.com account.
1. Switch on your Vivo V27e smartphone.
2. Scroll through the Home screen to find the “Settings” option.
3. Once located, tap the “Settings” option to open it.
4. On the “Settings” window, locate and tap the “email+accounts” option to open it.
5. From the opened window, tap the “add an account” option.
6. After the “ADD AN ACCOUNT” window opens, tap “Outlook.com” from the available options.
7. Tap the connect button from the bottom-left corner of the OUTLOOK.COM window.
8. Once you are redirected to the outlook.com website, in the available fields, enter the credentials of your Microsoft account that you created earlier.
9. Tap the “Log in” button when done.
10. Wait till the data on your Vivo V27e automatically gets synchronized with your Outlook account.
Step 3: Import the data from your Outlook account to the iPhone.
1. Switch on your iPhone and scroll through the Home screen to locate the “Settings” option.
Note: Make sure your device is connected to the Internet.
2. Once located, tap to launch the “Settings” app.
3. On the opened “Settings” window, tap the “Mail, Contacts, Calendars” option.
4. After the “Mail, Contacts, Calendars” window opens, tap the “Add Account” Add Account option under the “ACCOUNTS” section.
5. From the available options, tap “Step two”Outlook.com.
6. Once the “Outlook” window opens, enter your Outlook account credentials, and tap “Next” from the top-right corner.
7. Wait till your device verifies your account.
8. Once your account details are verified and a list of transferrable data types is displayed on the screen, tap to slide the switch to the right for the data that you want to import.
Note: After you slide the switch to transfer the Contacts, iPhone provides you with an option to keep the contacts that are already stored in your device or delete them altogether before importing the new ones from your Outlook account. You can choose any option as per your requirement.
9. Once you have selected the data that you want to import, tap the “Save” button from the top-right corner.
10. Wait till the data gets imported to your iPhone.
Pros:
- You can transfer your data for free using this method and the only requirement is Internet connectivity.
- You are saved from downloading a third-party application to transfer your data.
- You can easily transfer the data wirelessly without the need to make your PC as a go-between
Cons:
- It is a time-consuming process.
- You cannot transfer photos and media files by following this method.
Part 2: Transfer Data Using PhoneCopy
With PhoneCopy you can easily export data from your Vivo V27e to the PhoneCopy server, and then import the data from the PhoneCopy server to your new iOS device. It is easy to transfer contacts from Vivo V27e to iPhone with PhoneCopy. What you need is PhoneCopy iPhone Vivo V27e.
In order to do so, you need:
A registered PhoneCopy account.
1. On your computer, open any web browser of your choice and go to https://www.phonecopy.com/en/ .
Note: Make sure your device is connected to the Internet.
2. From the right section of the opened web page, click “REGISTER NOW.”
3. On the “REGISTRATION” page, populate the available fields with the correct values and click “CONTINUE” from the bottom.
4. Follow the on-screen instructions thereafter to complete the account creation process.
Note: You may need to activate your account using the confirmation mail that you would receive while completing the account creation process.
The PhoneCopy app on your Windows phone.
1. Power on your Vivo V27e smartphone.
Note: Make sure that the phone is connected to the Internet.
2. From the Home screen, locate and tap the Store icon to open the Windows App Store.
Note: You must use your Microsoft account to sign in to Windows Store before the phone allows you to download the apps.
3. Once you are on the “store” interface, search for and tap the “PhoneCopy” app
4. On the next window that appears, tap “Install” pato install PhoneCopy on your Windows phone.
After you have successfully installed PhoneCopy on your Vivo V27e, it is now time to export all your contacts to the PhoneCopy server. You can do so by following the steps given below:
Step 1: Export data to the PhoneCopy server.
1. On your Windows phone, locate and tap to launch the “PhoneCopy” app.
2. On the displayed interface, in the available fields provide your PhoneCopy account credentials (username and password) that you used to create your PhoneCopy account earlier.
3. Once done, tap the”Export to phonecopy.com” button and wait till all your contacts are exported to the PhoneCopy server.
Step 2: Import data to the iPhone from the PhoneCopy server.
1. Power on your iPhone.
Note: Make sure that your phone is connected to the Internet.
2. From the Home screen, locate and tap the Apple App Store icon.
Note: Ensure that you are signed in to the App Store using your Apple ID.
3. Search for, locate, download, and install the “PhoneCopy” app on your iPhone
4. Once installed, tap the “PhoneCopy” icon on your iOS device to launch the program.
5. When asked for, provide the same PhoneCopy credentials that you used to export the data from your Vivo V27e phone in the previous step.
6. After you are signed in to your PhoneCopy account on your iPhone, click the “Synchronize” button to import all the data from the PhoneCopy server to your new iPhone.
Although PhoneCopy does a great job when it comes to transferring data between the phones from different platforms, the app comes with a few pros and cons which include:
Pros:
Registering and using PhoneCopy is free.
PhoneCopy can back up your calendar events, SMS, tasks, and notes and can help you import them on a different phone (typically on iPhone).
Cons:
Only up to 500 contacts, SMS, tasks, and notes can be synched while using the Basic version (free account) of PhoneCopy. To remove this restriction, you must buy the Premium version for which PhoneCopy charges $25 annually.
The archived data is auto-deleted from the PhoneCopy server after one month when using the Basic version, and after 1 year when using the Premium version.
Bonus Tip: Best Way to Transfer data between Android and iPhone
Dr.Fone - Phone Transfer lets you transfer data from Vivo V27e to iPhone or iPhone to Android in 1 Click. It supports almost all mobiles, including iPhone, Android Samsung, LG, Sony, HTC, etc. Dr.Fone - Phone Transfer can transfer music, videos, contacts, messages, call logs, and apps between mobiles. If you want to transfer data between Android and iPhone, it must be the best solution for you. Try it free. Follow the steps below to know how to transfer data between Android and iPhone.
Dr.Fone - Phone Transfer
Transfer Data between Android and iPhone in One Click.
- 1 CLick to transfer contacts from Vivo V27e to iPhone.
- Easily transfer photos, videos, calendar, contacts, messages, and music from Vivo V27e to iPhone/iPad.
- Works perfectly with Apple, Samsung, HTC, LG, Sony, Google, HUAWEI, Motorola, ZTE, Nokia, and more smartphones and tablets.
- Fully compatible with major providers like AT&T, Verizon, Sprint, and T-Mobile.
- Supports iPhone, iPad, iPod touch and the latest iOS version.
- Fully compatible with the latest Windows or Mac version.
3981454 people have downloaded it
Note: If you have no computer at hand, you can also get the Dr.Fone - Phone Transfer (mobile version) from Google Play, with which you could log into your iCloud account to download the data, or transfer from iPhone to Vivo V27e using an iPhone-to-Android adapter.
Step 1. Download Dr.Fone - Phone Transfer to transfer from Vivo V27e to iPhone
Launch Dr.Fone. You will see “Phone Transfer”. Click it.
Step 2. Connect Phones and select files
Connect your Android and iPhone. Dr.Fone will detect it soon. Then select the files and click Start Transfer. It can transfer almost all files, contacts, apps, messages, photos, music, videos, etc. If you just want to transfer contacts from Vivo V27e to iPhone, then it is also ok. Just check the Contacts option to transfer contacts from Vivo V27e to iPhone easily.
Conclusion
Regardless of the fact that many free solutions are there that can help you transfer data from your Vivo V27e to iPhone. If you also have an Android device, the Dr.Fone - Phone Transfer always has an upper hand when it comes to providing hassle-free migration between iPhone and Android devices.
How to Transfer Text Messages from Vivo V27e to New Phone
Hi, I have recently bought a new iPhone. Is there any way to transfer my text messages (Inbox and Sentbox) from my old Samsung phone to the new iPhone? I have used the Samsung Kies program to transfer my Contacts, Music, and Pictures, but there is no option within the program to transfer text messages. I would really appreciate any suggestions? How to transfer texts to a new phone? Thanks.
In this article, we are going to introduce a powerful tool to solve the problem above. This tool is MoibleTrans; it will help you to easily transfer text messages to a new phone in 1 click.
Best Way to Transfer Text Messages to New Phone
After getting a new phone, you may transfer text messages with important or sensitive information from the old phone to a new one. Therefore, you can read the text messages on your new phone. To transfer text messages to a new phone, you highly recommend you a one-click phone transfer tool - Dr.Fone - Phone Transfer . It’s mainly used to help you transfer data between phones and tablets running iOS, Symbian and Android. With its help, you can transfer all text messages on your old Android phone, Nokia phone, and iPhone to the new Android phone or iPhone in one click.
Dr.Fone - Phone Transfer
Transfer Text Messages to New Phone in 1 click!
- Easily transfer photos, videos, calendar, contacts, iMessage, and music from an old phone to a new one.
- Works perfectly with Apple, Samsung, HTC, LG, Sony, Google, HUAWEI, Motorola, ZTE, Nokia and more smartphones and tablets.
- Fully compatible with major providers like AT&T, Verizon, Sprint and T-Mobile.
- Fully compatible with the newest iOS and Android.
- Fully compatible with Windows and Mac.
3,053,460 people have downloaded it
Download this tool to try transferring text messages to the new phone. Here, I’d like to give the Windows version a shot. And also, we take data transfer from Samsung to iPhone as an example.
How to Transfer Text Messages to New Phone Step by Step
Step 1. Run this phone transfer tool on the computer
To begin with, install and run Dr.Fone on the computer. The primary window will be shown on the computer screen. Click “Switch”. This brings up the phone transfer window.
Note: To transfer data to or from iPhone (iPhone 8 Plus, iPhone X supported), iPad and iPod, you should install iTunes on the computer.
Step 2. Connect your old and new phones to the computer
As I mentioned above, Dr.Fone lets you export SMS on the old Nokia phone, Android phone and even iPhone, and then copy them to your new iPhone or Android phone. So, connect two phones to do the SMS transfer to the computer with USB cables. After detected, the old phone is shown on the left, named as the source phone, and the new Android phone or iPhone, the destination phone appears on the right.
Besides, “Flip” between two phones lets you change places of the two phones.

Step 3. Transfer text messages to new phone
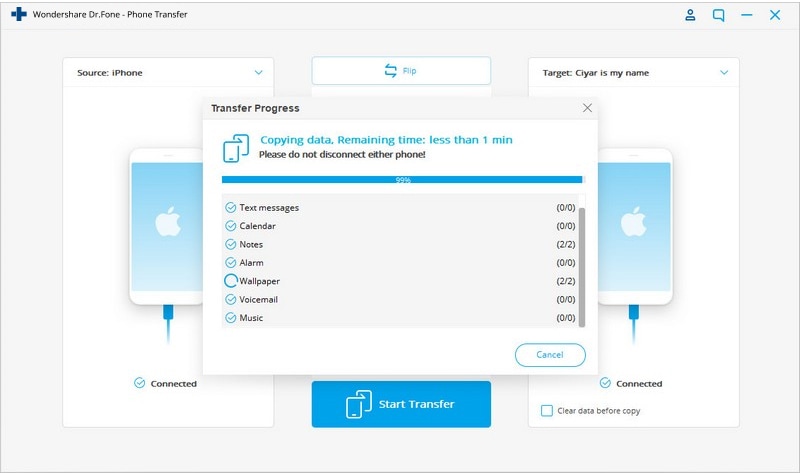
Besides text messages, Dr.Fone - Phone Transfer empowers you to transfer other files, like contacts, music, and photos. Therefore, remove the marks before other files when you just want to move text messages to the new phone. Then, click “Start Transfer”. Please never disconnect either phone before the transfer is done. When it’s done, click “OK”. That’s all about how to transfer texts to a new phone.
- Title: How to Transfer Data from Vivo V27e to Any iOS Devices | Dr.fone
- Author: Emma
- Created at : 2024-07-17 20:15:34
- Updated at : 2024-07-18 20:15:34
- Link: https://android-transfer.techidaily.com/how-to-transfer-data-from-vivo-v27e-to-any-ios-devices-drfone-by-drfone-transfer-from-android-transfer-from-android/
- License: This work is licensed under CC BY-NC-SA 4.0.