
How to Transfer Data from Vivo X Flip to Any iOS Devices | Dr.fone
How to Transfer Data from Vivo X Flip to Any iOS Devices


If you are a proud owner of smartphones running on two different operating systems such as Windows and iOS, you might face the challenging task of transferring the data from your Windows phone to iPhone. Transferring the data between the two devices running the OS of the different platforms is not as easy as it is when you have devices with a common platform. This article aims to guide you through two simple routes that you can follow to transfer the data stored in your Windows phone such as Vivo X Flip to iPhone or other iOS devices. You don’t need to worry about how to transfer from Vivo X Flip to iPhone or How to transfer contacts from Vivo X Flip to iPhone anymore after reading this article. Read them on.
- 1. You can rely on some program/online service/website such as Outlook, CSV file format, Google Contacts, etc.
- 2. You may experience issues while transferring data from your Vivo X Flip phone to iPhone.
Part 1: Transfer Data Wirelessly via Microsoft ID
Windows phones such as Vivo X Flip depend on a Microsoft ID to back up your important data such as contacts, text messages, calendar, and device preferences. Once you have configured the data on your Vivo X Flip smartphone, you can add the same Microsoft email address to your iPhone and then sync the data to it. Given below are the step-by-step instructions on how to transfer from Vivo X Flip to iPhone via Microsoft ID:
Step 1: Make an account on Outlook.com.
1. Open www.outlook.com on the web browser on your smartphone or PC.
2. Once you are redirected to the website, tap the “Sign up” option from the top-right corner.
3. Enter the required information in the available fields to create an account.
Step 2: Sync the data on your Vivo X Flip to Microsoft’s Outlook.com account.
1. Switch on your Vivo X Flip smartphone.
2. Scroll through the Home screen to find the “Settings” option.
3. Once located, tap the “Settings” option to open it.
4. On the “Settings” window, locate and tap the “email+accounts” option to open it.
5. From the opened window, tap the “add an account” option.
6. After the “ADD AN ACCOUNT” window opens, tap “Outlook.com” from the available options.
7. Tap the connect button from the bottom-left corner of the OUTLOOK.COM window.
8. Once you are redirected to the outlook.com website, in the available fields, enter the credentials of your Microsoft account that you created earlier.
9. Tap the “Log in” button when done.
10. Wait till the data on your Vivo X Flip automatically gets synchronized with your Outlook account.
Step 3: Import the data from your Outlook account to the iPhone.
1. Switch on your iPhone and scroll through the Home screen to locate the “Settings” option.
Note: Make sure your device is connected to the Internet.
2. Once located, tap to launch the “Settings” app.
3. On the opened “Settings” window, tap the “Mail, Contacts, Calendars” option.
4. After the “Mail, Contacts, Calendars” window opens, tap the “Add Account” Add Account option under the “ACCOUNTS” section.
5. From the available options, tap “Step two”Outlook.com.
6. Once the “Outlook” window opens, enter your Outlook account credentials, and tap “Next” from the top-right corner.
7. Wait till your device verifies your account.
8. Once your account details are verified and a list of transferrable data types is displayed on the screen, tap to slide the switch to the right for the data that you want to import.
Note: After you slide the switch to transfer the Contacts, iPhone provides you with an option to keep the contacts that are already stored in your device or delete them altogether before importing the new ones from your Outlook account. You can choose any option as per your requirement.
9. Once you have selected the data that you want to import, tap the “Save” button from the top-right corner.
10. Wait till the data gets imported to your iPhone.
Pros:
- You can transfer your data for free using this method and the only requirement is Internet connectivity.
- You are saved from downloading a third-party application to transfer your data.
- You can easily transfer the data wirelessly without the need to make your PC as a go-between
Cons:
- It is a time-consuming process.
- You cannot transfer photos and media files by following this method.
Part 2: Transfer Data Using PhoneCopy
With PhoneCopy you can easily export data from your Vivo X Flip to the PhoneCopy server, and then import the data from the PhoneCopy server to your new iOS device. It is easy to transfer contacts from Vivo X Flip to iPhone with PhoneCopy. What you need is PhoneCopy iPhone Vivo X Flip.
In order to do so, you need:
A registered PhoneCopy account.
1. On your computer, open any web browser of your choice and go to https://www.phonecopy.com/en/ .
Note: Make sure your device is connected to the Internet.
2. From the right section of the opened web page, click “REGISTER NOW.”
3. On the “REGISTRATION” page, populate the available fields with the correct values and click “CONTINUE” from the bottom.
4. Follow the on-screen instructions thereafter to complete the account creation process.
Note: You may need to activate your account using the confirmation mail that you would receive while completing the account creation process.
The PhoneCopy app on your Windows phone.
1. Power on your Vivo X Flip smartphone.
Note: Make sure that the phone is connected to the Internet.
2. From the Home screen, locate and tap the Store icon to open the Windows App Store.
Note: You must use your Microsoft account to sign in to Windows Store before the phone allows you to download the apps.
3. Once you are on the “store” interface, search for and tap the “PhoneCopy” app
4. On the next window that appears, tap “Install” pato install PhoneCopy on your Windows phone.
After you have successfully installed PhoneCopy on your Vivo X Flip, it is now time to export all your contacts to the PhoneCopy server. You can do so by following the steps given below:
Step 1: Export data to the PhoneCopy server.
1. On your Windows phone, locate and tap to launch the “PhoneCopy” app.
2. On the displayed interface, in the available fields provide your PhoneCopy account credentials (username and password) that you used to create your PhoneCopy account earlier.
3. Once done, tap the”Export to phonecopy.com” button and wait till all your contacts are exported to the PhoneCopy server.
Step 2: Import data to the iPhone from the PhoneCopy server.
1. Power on your iPhone.
Note: Make sure that your phone is connected to the Internet.
2. From the Home screen, locate and tap the Apple App Store icon.
Note: Ensure that you are signed in to the App Store using your Apple ID.
3. Search for, locate, download, and install the “PhoneCopy” app on your iPhone
4. Once installed, tap the “PhoneCopy” icon on your iOS device to launch the program.
5. When asked for, provide the same PhoneCopy credentials that you used to export the data from your Vivo X Flip phone in the previous step.
6. After you are signed in to your PhoneCopy account on your iPhone, click the “Synchronize” button to import all the data from the PhoneCopy server to your new iPhone.
Although PhoneCopy does a great job when it comes to transferring data between the phones from different platforms, the app comes with a few pros and cons which include:
Pros:
Registering and using PhoneCopy is free.
PhoneCopy can back up your calendar events, SMS, tasks, and notes and can help you import them on a different phone (typically on iPhone).
Cons:
Only up to 500 contacts, SMS, tasks, and notes can be synched while using the Basic version (free account) of PhoneCopy. To remove this restriction, you must buy the Premium version for which PhoneCopy charges $25 annually.
The archived data is auto-deleted from the PhoneCopy server after one month when using the Basic version, and after 1 year when using the Premium version.
Bonus Tip: Best Way to Transfer data between Android and iPhone
Dr.Fone - Phone Transfer lets you transfer data from Vivo X Flip to iPhone or iPhone to Android in 1 Click. It supports almost all mobiles, including iPhone, Android Samsung, LG, Sony, HTC, etc. Dr.Fone - Phone Transfer can transfer music, videos, contacts, messages, call logs, and apps between mobiles. If you want to transfer data between Android and iPhone, it must be the best solution for you. Try it free. Follow the steps below to know how to transfer data between Android and iPhone.
Dr.Fone - Phone Transfer
Transfer Data between Android and iPhone in One Click.
- 1 CLick to transfer contacts from Vivo X Flip to iPhone.
- Easily transfer photos, videos, calendar, contacts, messages, and music from Vivo X Flip to iPhone/iPad.
- Works perfectly with Apple, Samsung, HTC, LG, Sony, Google, HUAWEI, Motorola, ZTE, Nokia, and more smartphones and tablets.
- Fully compatible with major providers like AT&T, Verizon, Sprint, and T-Mobile.
- Supports iPhone, iPad, iPod touch and the latest iOS version.
- Fully compatible with the latest Windows or Mac version.
3981454 people have downloaded it
Note: If you have no computer at hand, you can also get the Dr.Fone - Phone Transfer (mobile version) from Google Play, with which you could log into your iCloud account to download the data, or transfer from iPhone to Vivo X Flip using an iPhone-to-Android adapter.
Step 1. Download Dr.Fone - Phone Transfer to transfer from Vivo X Flip to iPhone
Launch Dr.Fone. You will see “Phone Transfer”. Click it.

Step 2. Connect Phones and select files
Connect your Android and iPhone. Dr.Fone will detect it soon. Then select the files and click Start Transfer. It can transfer almost all files, contacts, apps, messages, photos, music, videos, etc. If you just want to transfer contacts from Vivo X Flip to iPhone, then it is also ok. Just check the Contacts option to transfer contacts from Vivo X Flip to iPhone easily.

Conclusion
Regardless of the fact that many free solutions are there that can help you transfer data from your Vivo X Flip to iPhone. If you also have an Android device, the Dr.Fone - Phone Transfer always has an upper hand when it comes to providing hassle-free migration between iPhone and Android devices.
How to Transfer Data from Vivo X Flip to Other Android Devices?
Hi, I have recently bought a new Android phone. Is there any way to transfer my data (Contacts, Messages, Photos, Videos, Music, Apps, etc.) from my old Android phone to the new Android phone? I have used the Samsung Kies program to transfer my Contacts, Music, and Pictures, but there is no option within the program to transfer text messages. I would really appreciate any suggestions? How to transfer data to a new phone? Thanks.
Have you had your old Android device for years, and it’s time for an upgrade? Here top 4 solutions to transfer data from Vivo X Flip to Other Android Devices . Getting a shiny Android device, like Samsung Galaxy Note 8, S7, S8, is an exciting thing, but also frustrates you. Although Android offers easy access to the SD card, you still find it difficult to transfer data, like apps and SMS from Vivo X Flip to Other Android Devices in batch. Are you scratching your head about it? Don’t worry. Here is a chance for you. All you need is to give a professional transfer tool, Dr.Fone - Phone Transfer to transfer everything from one phone to another. Read this article, and you will know how to transfer data from Vivo X Flip to Other Android Devices easily and quickly.
Part 1. How to transfer data from Vivo X Flip to Other Android Devices in One Click
When you log into the accounts, like Google, Facebook, Twitter, contacts in them will also be transferred. Thus, make sure whether you want to transfer them or not. If not, do not sign in the accounts before the Android to Android transfer. Dr.Fone can transfer everything from Vivo X Flip to Other Android Devices, including apps, contacts, messages, videos, music, photos, calendar, even WhatsApp chats, etc. Follow the steps below to know clearly how to send data from Vivo X Flip to Other Android Devices.
Step 1. Run the Android to Android transfer Tool
The first thing is to install and run Dr.Fone on your computer. When its primary window appears, click Phone Transfer to start transfer data.
Step 2. Get Both Android Devices Connected
Connect your two Android devices to the computer via USB cables. After recognized, your Vivo X Flips will be listed res on both sides of the window.

Step 3. Transfer Contacts, Photos, Videos, Music, SMS, Call Logs, Calendar and Apps from Vivo X Flip to Other Android Devices
Between the two Android phones, display all the contents you can transfer. You can uncheck any content you dislike to transfer. Then, click Start Transfer to transfer files from Vivo X Flip to another Android Phone quickly.


That’s all. It isn’t easy to transfer all your data from Vivo X Flip to Other Android Devices. Try Dr.Fone - Phone Transfer free to transfer Android files to your new Android phone. It is the best Android to Android data transfer tool. With it, you can transfer everything from Vivo X Flip to Other Android Devices.
Part 2. How to Transfer Everything from Vivo X Flip to Other Android Devices with Google Backup
No one likes to spend a lot of time on the stuff, such as transfer data from Vivo X Flip to Other Android Devices every time you change the phone. If you want to transfer quickly and painlessly, then here is the best which explains how to transfer data from Vivo X Flip to Other Android Devices using the Google Backup method. Google still has many ways to get all your stuff off your old device and add to your new device using Google Backup.
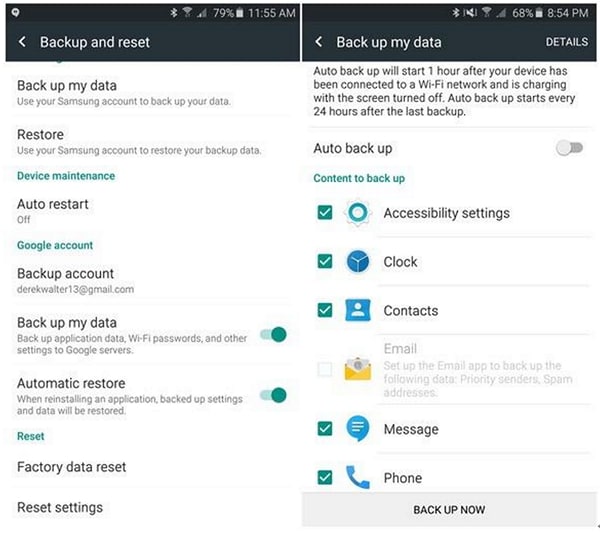
Before taking up backup the first thing you need to do is to sign-in the Android phone using your Google account. In the setting menu, you need to search for Backup and reset mode. Make sure you have backup data and automatic restore as both are flipped on your google account. Your Google server will remember your password, so you do not need to re-enter the password every time you sign in. Google sync really very well with Android devices.
Part 3. How to Transfer Data from Vivo X Flip to Other Android Devices with Bluetooth
Users feel good while setting up a new Android device. But we also know that your data is sensitive, so there would be one thing that would bother you is how to transfer data from Vivo X Flip to Other Android Devices using Bluetooth . Don’t worry. Here’s an easy way that would help you out to transfer all the data safely by simply using Bluetooth. You have to connect both the Vivo X Flip devices and enable the Bluetooth.

This one is the best to transfer the data such as photos, videos, songs, and other files. You have to discover the Vivo X Flip device and connect them through the wireless Bluetooth exchange data method. Allow your destination device to detect its presence and attempt to establish the connection between them. Once both devices are paired with Bluetooth, exchange the data, which include files, songs, ringtones, photos and videos. Note that Bluetooth can’t transfer text messages, contacts, call history or Apps.
Part 4. Tips about how to transfer from Vivo X Flip to Other Android Devices
When you have bought a new device, then certainly there is a need to transfer your data such as Contacts, SMS, Photos, Music, Apps, and more other documents using different methods. Your device data can also be transferred from Android smartphones to iPhone and vice versa. If you need to have a fast and easy way to transfer the data, you can try with Dr.Fone - Phone Transfer. Here we also have a list of a few different ways which can be used easily without any restrictions.
Transfer Contacts from Vivo X Flip to Other Android Devices
Transferring the contacts is the most important thing, the time has come when you do not need to face the painstaking process of copying each contact with the hand. Now you can transfer the contacts easier along with cloud synchronization. It’s one of the easiest ways to keep your contacts up-to-date and sync it with your Google account. Transfer the contacts and sync it on that registered account. Similarly, when you buy a new device, open your Google account on your new device and copy all the saved contacts from that account onto your new device.

Transfer SMS from Vivo X Flip to Other Android Devices
You can now transfer your old SMS to the Android device easily by using this free SMS backup app, which can restore and transfer all SMS stored in XML file format, and then you can send directly to your new Android devices. Here we have used a backup app that can explain how to transfer from Vivo X Flip to Other Android Devices easily when connected with each other and help you out to restore the SMS messages. Note that this app won’t pay attention to which SMS already exists and which one is imported twice. Instead, you can use MobileTrans one-click app, which helps you out in resolving this problem.

Transfer Photos from Vivo X Flip to Other Android Devices
You can use Dr.Fone - Phone Transfer, which can help you in how to transfer from Vivo X Flip to Other Android Devices easily. You simply have to install the tool, connect your Vivo X Flip, and share your data such as photos, movies, and other files directly from Vivo X Flip to the other Android devices. Try it free.
Transfer Music from Vivo X Flip to Other Android Devices
We all love music and have collected the music according to our choice. Mostly we store the MP3 files that appear on your computer after you connect your smartphone. Firstly you need to download the Android File Transfer app if you’re a mac user or else use Bluetooth File Transfer that saves these files on your computer, and then you can transfer to another device. Instead, you can use MobileTrans tool, which can easily resolve your problem of how to transfer everything from Vivo X Flip to Other Android Devices with few clicks only.
Parental Control Software
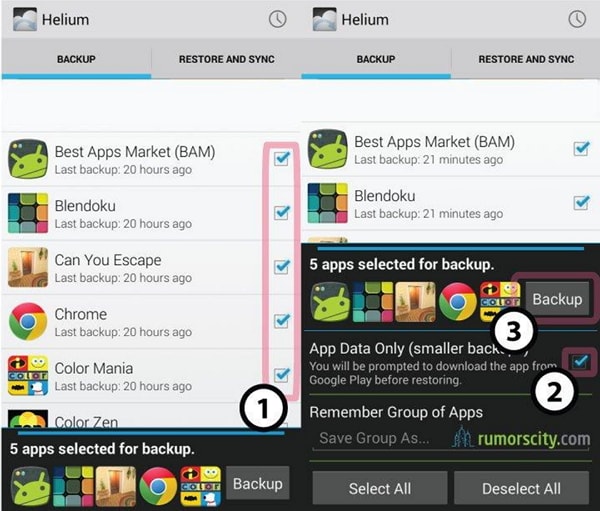
Transfer Apps from Vivo X Flip to Other Android Devices
There are many apps that you require to transfer from your old phone to a new device, but here we have a Helium backup tool that can explain how to transfer from Vivo X Flip to Other Android Devices apps easily and do not require to be rooted. It can transfer the tool which can come in a free trial version and also support SD card and PC. You can automatically schedule the backup and can sync your Vivo X Flips.
I hope we were able to make you understand how to transfer everything from Vivo X Flip to Other Android Devices using third-party tools. We recommend using Dr.Fone - Phone Transfer, which works as the all-in-one tool and transfers all your data within few clicks only, including contacts, SMS, Photos, Music, Videos, Apps, etc.
Why not download it have a try? If this guide helps, don’t forget to share it with your friends.
[Solved] Move from Vivo X Flip to iOS not Working Problems
You might be wondering, what is the Move to iOS? If you are an android user and have decided to shift to the iPhone, you will need the Move to iOS tool. The app is developed to help transfer data from an android device to iOS devices. Google play store has the app, and it’s free.
To use the app, install it on your android device first. The transfer process requires following several simple steps to move to iOS. The app seems easy to use the tool, but newbies must learn about the Move to iOS guidelines to complete the process. With this tool, you will transfer various android data such as camera photos, contacts, message history, mail accounts, calendars, and videos.
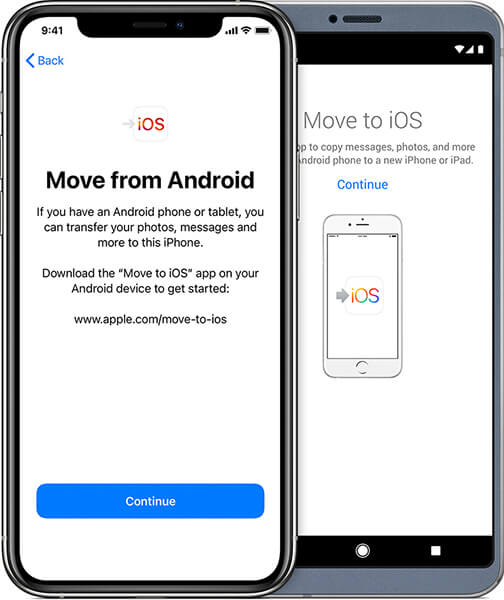
Move to iOS app works on android version 4.0 or higher. You can transfer data to any iPhone in a relatively straightforward process. Also, beware that the Move to iOS will work only when setting up a new iPhone or iPad.
Besides knowing what the content that Moves to iOS tool can transfer, you might be wondering how long the process can take. Depending on the content you want to transfer, the process generally takes around 10 – 30 minutes. However, other factors can determine the time the app will take to move content to iOS. They include the speed of the network, patency of the transmission process, and Wi-Fi stability.
Part 1: Move to iOS not working problem lists
Users can learn to use the Move to iOS app quickly. However, they will occasionally experience problems while using this tool. If the app runs into errors, you will encounter some problems.
- Move to iOS no code.
These steps will help you get the Move to iOS code;
When setting up your iPhone, tap on the move data from the android option. Then, launch the Move to ios app on your android device and tap continue. You will see the find you code screen; tap on the .next’ button to continue.
Tap on the continue button on your iOS device and wait for a ten-digit code to appear.
Once you receive the code on your iPhone, enter it on the android device and wait for the Vivo X Flip devices to connect. Select all the content you want to move and click Next.
Once the loading bar on the iOS device is done, tap on the ‘Done’ button on your android device. Proceed to set up your iOS device using the onscreen steps.
If you are not receiving any code on your iOS device, you can fix it by ensuring the Wi-Fi is always on throughout the process. You can also reboot your devices if the error is temporary.
- Move to iOS could not communicate correctly with the Vivo X Flip devices.
To avoid this Move to iOS error, ensure both devices run on updated operating systems, i.e., android 4.0 or later and iOS 9 or later. The phones must have enough power, and lastly, ensure that you turn off background apps to avoid notifications during the transfer process.
- Move to iOS stuck on preparing/transferring.
You are transferring your android data to iOS, but the process is stuck on the transferring page. The problem is related to Wi-Fi connections. Should the Wi-Fi disconnect for a few seconds, the transfer process stops. Other distractions on android such as calls, switching to sleep mode, or other background operations might also cause the Move to iOS error.
- Move to iOS takes forever/slow.
The length of time taken to transfer data from android to iOS depends on the size of the data and Wi-Fi connection. To speed up the transfer, check your Wi-Fi connection, delete unnecessary data from the android device, or restart the transfer if it takes too long.
- Move to iOS Wi-Fi disconnect.
Wi-Fi drops will obviously interfere with the transfer process. To avoid this error, you can reset your router and the network and turn off smart switching and airplane mode.
- Move to iOS interrupted
If the Move to iOS process is interrupted, you can fix it by restarting the phone, check your network connections on both devices, turn off the smart network swath on android and turn on the airplane mode.
- Move to iOS, not connecting devices.
The circumstances can be frustrating as the transfer process will not be completed successfully. But what is the solution to all these problems? We will discuss the solutions to move to iOS not working in the later sections of this article.

While the Move to iOS app can be easy to use, you need to know a couple of things before transferring.
- Ensure the android and iOS device can connect to Wi-Fi
- Ensure the Vivo X Flip devices have enough power to complete the process/ plug the Vivo X Flip devices into power
- The iOS device should run on iOS 9.0 or higher
- The android device should run on android 4.0 or higher
- Check the capacity of the transferred content, whether it will fit the new iOS device.
- Update chrome on android to the latest version to transfer bookmarks
Part 2: 9 Tips about moving to iOS not working problems
Even though Move to iOS is a useful tool for android users willing to transfer content to the iOS device, there are several instances where it fails to work correctly. The app will show a message indicating the type of error you are experiencing during the transfer process.
Most of the ‘move to iOS’ problems are related to Wi-Fi connection issues, android and iOS versions, space requirements, connection optimizers, and application issues. Nevertheless, you will need to find a solution to these problems to transfer your data successfully from android to iOS devices. This section will discuss possible solutions to the errors that occasionally appear when moving android data to iOS devices.
Tip 1: Restart both your devices
Restarting your devices is the essential thing to do when troubleshooting the Move to iOS problems. It is a great way o eliminate minor issues during data transfer from android to iOS devices. The process can resolve the Move to iOS stuck on connecting to iPhone issues. A simple restart will eliminate the bugs and any cached error in the Vivo X Flip devices.
### Tip 2: Clear all running appsIt is recommended to avoid using the android device o run applications when using the Move to iOS app. Since the app runs in the foreground, you should ensure all other apps in the android are disabled before starting the data transfer process. Notifications and incoming calls are likely to interfere with the process; therefore, users must ensure such distraction is not happening by disabling such apps.
Tip 3: Make sure the Wi-Fi connection is turned on
Wi-Fi connectivity is a significant factor in ensuring data transfer is successful. Since Move to iOS relies on Wi-Fi, you should ensure it Is turned on and is stable. The iPhone usually creates a private network for the android device to connect. Please turn on the Wi-Fi connection on your android to make it ready to connect to the iPhone’s private network. This will make it possible to send the Move to iOS code to initiate the data transfer process.
Tip 4: Plug both devices to power
You should ensure that both the android and iOS devices have sufficient power to run through the entire data transfer process. If you doubt the power consumption, keep the Vivo X Flip devices connected to power before you start moving your content from android to iOS device.
Tip 5: Set your phone into airplane mode
When you transfer android data to iOS using the Move to iOS tool, apple recommends that you turn off your mobile data. Some android devices can switch from Wi-Fi to mobile data when the connection tends to drop on either side using the smart switch feature. This can interfere with the transfer process. Similarly, it could be useful if incoming calls were prevented to avoid interfering with the data transfer process. All mediums of connectivity are disabled except for the connection between the android and iOS devices through the iPhones Wi-Fi network.
The best way to ensure these distractions are not happening is to turn on airplane mode on the android device.
Tip 6: Check the storage requirement
Before you begin transferring android data to iOS devices, check the size of all content including the external micro SD card, to determine whether it fits into the new iOS device. If the content is larger than the destination storage, you will obviously encounter an error during the transfer process. You need to delete the content you don’t need to transfer from your android device before getting started.
Tip 7: Disable the connection optimizer
Android devices with connection optimizers will switch between different connections for better connectivity. Since the Move to iOS app utilizes the iPhones private network, the connection optimizer might start using mobile data or switch to another Wi-Fi connection when the current connection drops. The circumstance can break the connection between the android ad iOS device hence interfering with the data transfer process. Be sure to turn off the feature from settings before running the Move to iOS app.
Tip 8: Check the compatibility of your devices
You need to check whether your android device meets the minimum requirements to be compatible with the Move to iOS app, much like other apps found on the App Store and Google play store. Generally, the app runs on Android 4.0 and above while transferring data to iOS 9.0 or later devices.
Tip 9: Turn off battery optimization
Turning off the battery optimization on both your Android and iOS device is a requirement when using the Move to iOS tool. The app is designed to run in the foreground, and the android user should not have other applications running. However, the phone might automatically minimize the Move to iOS app when it switches to battery optimization mode. Therefore you should ensure the feature is closed from the settings of your android device.
Part 3: [Alternative] Move to iOS not working solved without a PC
An alternative solution to Move to iOS not working problem is to use Dr. Fone – Phone Manager (iOS) . The software can transfer all types of data from android to iOS devices quickly. Here, you will select the type of data you need and begin moving in a single click.
Most importantly, the programs transfer data at a very high speed compared to other alternatives. You can also use the software to transfer social apps and retain the important history of apps like WhatsApp, Wechat, Viber, Line, or Kik.
### [Dr.Fone - Phone Manager (iOS)](https://drfone.wondershare.com/iphone-transfer.html "iphone transfer")Move/Transfer Android data from Computer to iPod/iPhone/iPad without iTunes
- Transfer, manage, export/import your music, photos, videos, contacts, SMS, Apps, etc.
- Back up your music, photos, videos, contacts, SMS, Apps, etc., to the computer and restore them easily.
- Transfer music, photos, videos, contacts, messages, etc., from one smartphone to another.
- Transfer media files between iOS devices and iTunes.
- Fully compatible with iOS 7 to iOS 15 and iPod.
3981454 people have downloaded it
Here is how to transfer data from iOS to android device without a PC
You need to login to your iCloud account on android to download data, or you can use the iOS-to-android adapter to connect your iPhone to android to transfer data directly.
Use the following simple steps.
Install Dr. Fone- Phone Transfer app on your android device and click on the ‘Import From iCloud’ option.
Use your apple passcode to log in to the iCloud account. You will be required to enter a verification code if prompted to two-factor authentication.
Select from the list of data detected from iCloud and tap on start importing.
Wait for the data transfer process to complete.
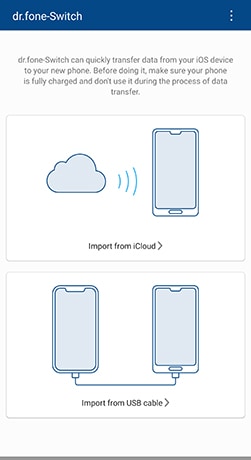
To transfer content from your iPhone to Android device directly, open Dr. Fone – Phone Transfer on android and tap ‘import from a USB cable.’ Use the iOS-to-android cable to connect your iOS and Android devices.
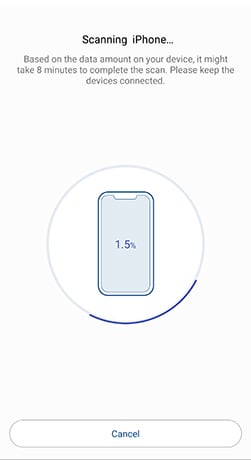
Dr. Fone – Phone Transfer will begin to scan data on your iPhone. The time will depend on the content on the iPhone.
Tap on ‘start importing’ once all data has been detected.
Part 4: [Alternative] Move to iOS not working solved with a PC
The following steps will help you transfer data from android to an iOS device using a PC.
- Open the Dr. Fone program on your computer and click ‘phone transfer’ from the modules displayed.
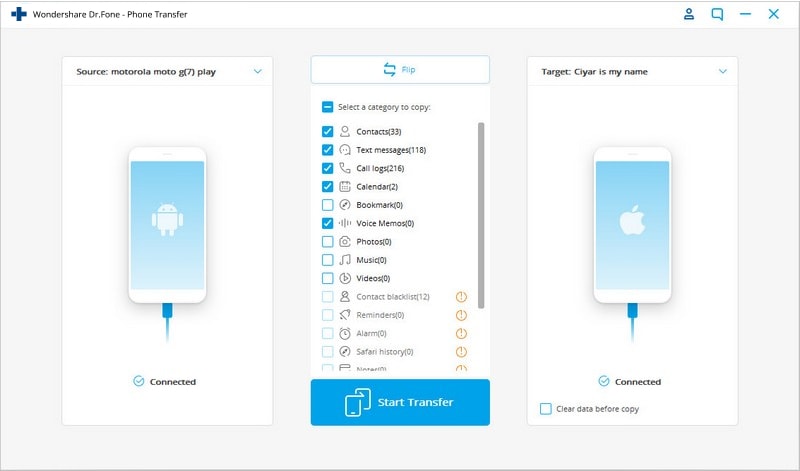
- Connect your iOS and Android devices to the computer. You can always use the ‘flip’ option to change the source and destination devices.
- Select the types of data you want to transfer, then click on the ‘start transfer’ option to continue. Be careful not to disconnect the Vivo X Flip devices until the process is complete.

- If you want to clear the destination phone’s data before transferring data, ensure you check the ‘clear data before copy’ box.
- All the data you selected will be transferred successfully in a few minutes.
Conclusion
Transferring data from android to iOS device has been made easier with the Move to iOS app. However, you need to consider the requirements for the data transfer process to complete successfully. You can also apply Dr. Fone – Phone Transfer as your recommended alternatives to transfer android data to the iOS device in the simplest way.
- Title: How to Transfer Data from Vivo X Flip to Any iOS Devices | Dr.fone
- Author: Emma
- Created at : 2024-07-17 20:16:16
- Updated at : 2024-07-18 20:16:16
- Link: https://android-transfer.techidaily.com/how-to-transfer-data-from-vivo-x-flip-to-any-ios-devices-drfone-by-drfone-transfer-from-android-transfer-from-android/
- License: This work is licensed under CC BY-NC-SA 4.0.