
How to Transfer Photos From Itel P55 5G to Samsung Galaxy S21 Ultra | Dr.fone
How to Transfer Photos From Itel P55 5G to Samsung Galaxy S21 Ultra
Samsung is one of the leading brands in the technology market, and Samsung Galaxy S21 Ultra is the latest device released by them. Among all the gadgets and smartphones released by Samsung, S21 Ultra is really a remarkable creation that is amazingly filled with all the latest technology. If you are thinking about getting a brand new Samsung S21 Ultra, you are in the right place.
In this article, we will talk about the Samsung Galaxy S21 Ultra price and all its details with proper dissection that will help you determine whether this device is worth the value. Also, you’ll definitely get to learn how to transfer photos to Samsung Galaxy S21 Ultra with advanced software that surely does the job well. So let’s get to the details without wasting any time!
Part 1: Samsung Galaxy S21 Ultra Introduction
Samsung Galaxy S21 Ultra is the new model of the Samsung Galaxy series. This amazing device has so many features, the best quality camera, and 5G connectivity. This model of the Samsung Galaxy series has a pro-grade camera. Using its camera, you can take the best shots of anything. You can record video like a professional by using the camera. The camera has multi-lens with zoom-in features. You cannot take a perfect zoomed shot using another device because they don’t have these zoom-in features.

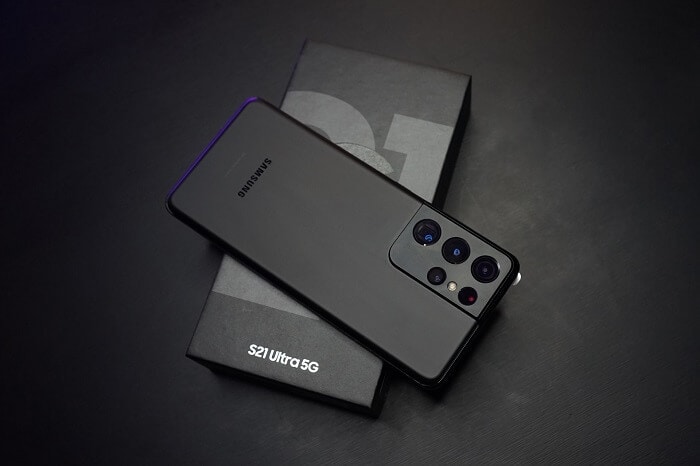
Record your life’s best moment with the Samsung Galaxy S21 Ultra 8k video feature. With this camera, you can also make GIFs, record short videos, slow-motion videos, etc. Galaxy S21 Ultra has a 108MP resolution. When it comes to the battery, you should know it has one lithium battery. Once you charge the Itel P55 5G device, it’s ready to go for a long day. Now share your life moment on social media and enjoy your favorite game with Galaxy Ultra 5G. This device is available in multiple colors, including Phantom Black, Phantom Silver, Phantom Titanium, Phantom Navy, and Phantom Brown.
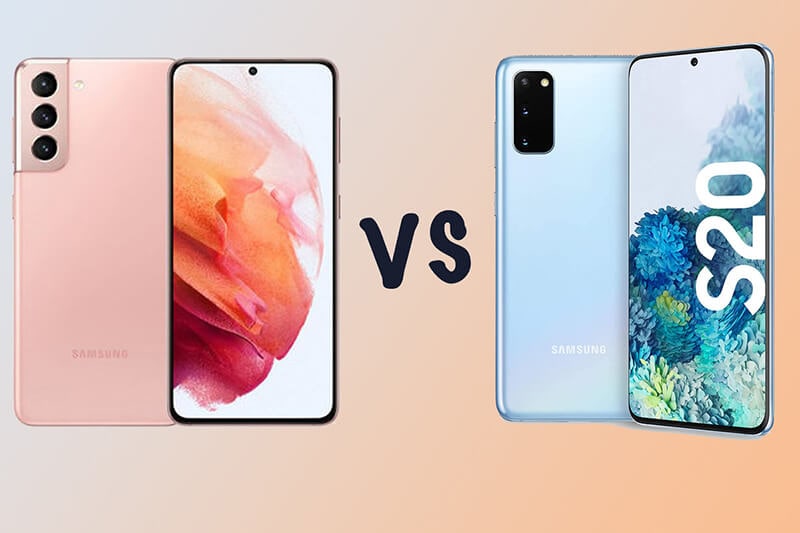
Part 2: The Differences among S21, S21+, and S21 Ultra
We all know how amazing the Samsung Galaxy S21 series is. Their features and quality make us fall in love with these devices. Though Samsung Galaxy S21, S21+, and S21 Ultra have many common features, there are still many differences among these. So, let’s find out what those are:
Price:
Among Samsung Galaxy S21, S21 Plus, and S21 Ultra, Samsung Galaxy S21 has the lowest price in town. It costs only $799. After S21, here comes S21 plus. The price of this model starts at $999. Now when it comes to Galaxy S21 Ultra, it begins at $1299. So, comparatively, Galaxy S21 Ultra is an expensive model. Among these three models, ultra has the best quality features, camera, and RAM capacity.
Design:
Though three of these have the same design of camera and position, the real difference is in size. Galaxy S21 comes in 6.2 inches screen, Galaxy S21 Plus has a 6.7-inch screen, and Galaxy S21 Ultra has a 6.8-inch screen. Galaxy S21 Ultra comes with a wide camera bump that fits the extra sensors. Galaxy S21 Ultra fits better in hands because of its curved edges.
Display:
As mentioned, the difference of screen measurements. Besides this, there are some other differences in the display. Galaxy S21 and S21 Plus come in FHD resolution displays, where Galaxy S21 Ultra has QHD resolution. That means you can see the details on the Galaxy S21 Ultra. Galaxy S21 and S21 Plus change the refresh rate between 48Hz and 120Hz, where Galaxy S21 Ultra can go 10Hz and 120Hz.
Camera:
Galaxy S21 and S21 Plus have three cameras: a 12MP main camera and a 12MP ultra-wide camera with a 64MP telephoto camera. The front camera comes in 10MP. On the other side, Galaxy S21 Ultra comes with a 108MP main camera, 12MP ultra-wide, and two 10MP telephoto cameras. Among these two telephoto cameras, one has 3x zoom capacity, and the other has 10X zoom capacity. S21 Ultra has a laser autofocus sensor that will track the subject and take the perfect shot. For video recording, three of these models have great video features. However, S21 Ultra is offering you the bright night sensor so you can record and take pictures in low light.
Battery and Charging:
Regarding the battery performance and charging system, there are many differences among Samsung Galaxy S21, Galaxy S21 Plus, and S21 Ultra. Samsun Galaxy S21 has 4000 mAh battery capacity, Galaxy S21 Plus comes in 4800 mAh, and Galaxy S21 Ultra has 5000 mAh. So, comparatively, Galaxy S21 Ultra has the best quality battery. The charging system is the same for all of these three models. It needs 25W on a wired connection. You can also charge them wireless on 15W.
Connectivity:
In these three models, you will get 5G. So, there is no argument about this. However, Galaxy S21 Plus and S21 Ultra have been manufactured with Ultra-Wide Band (UWB) chips. It is a new feature that will provide hands-free control. Using these features, you can unlock your car or find the SmartTag tracker. Among these, S21 Ultra offers you more. It has Wi-Fi 6E compatibility, which is the fastest and lowest latency for Wi-Fi connection.
Pro tips: How to Transfer Photos to S21 Ultra?
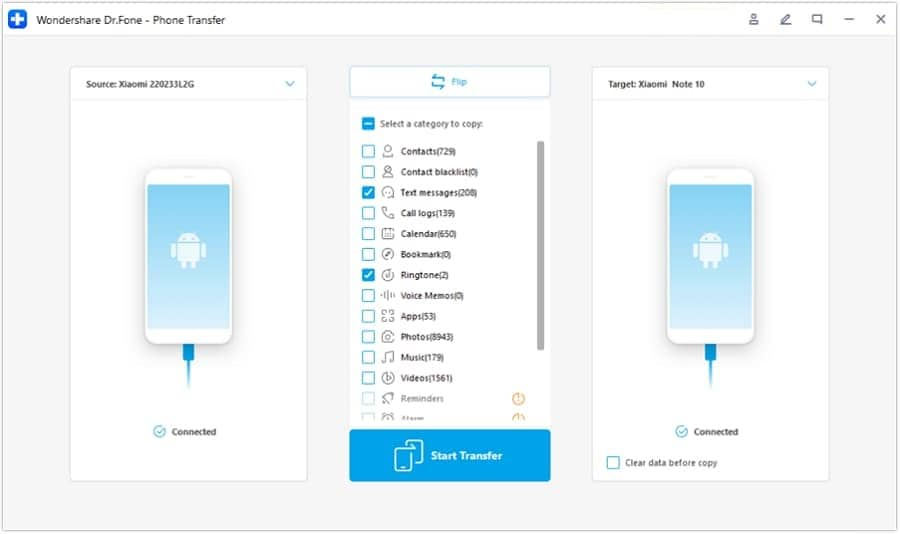
Most of the time, after purchasing a new phone, we cannot transfer photos or other data to that device easily. At that moment, if you can use amazing data recovery software to transfer all your photos to the new Samsung Galaxy S21 Ultra, that would be a great solution. Well, we have the best solution for you. We are going to introduce you to an amazing software: Dr.Fone - Phone Transfer . It is a brilliant data recovery software that you can use for both iOS and Android systems. It has many amazing features. You can recover your data, transfer your photos and files, unlock Apple’s ID and lock screen, repair the Android or iOS system, switch data from one phone to another phone, keep backup, restore data and erase data permanently from a device. Using this amazing software, you can transfer your photos to Samsung Galaxy S21 Ultra within one single click. Let’s follow the guideline to know how to do this.
Step 1: Download & Install Program
Download and install the software on your computer. Then start the Dr.Fone - Phone Transfer, and you’ll get the program’s home page. Now click on the “Switch” option to proceed forward.

Step 2: Connect Android and iOS Device
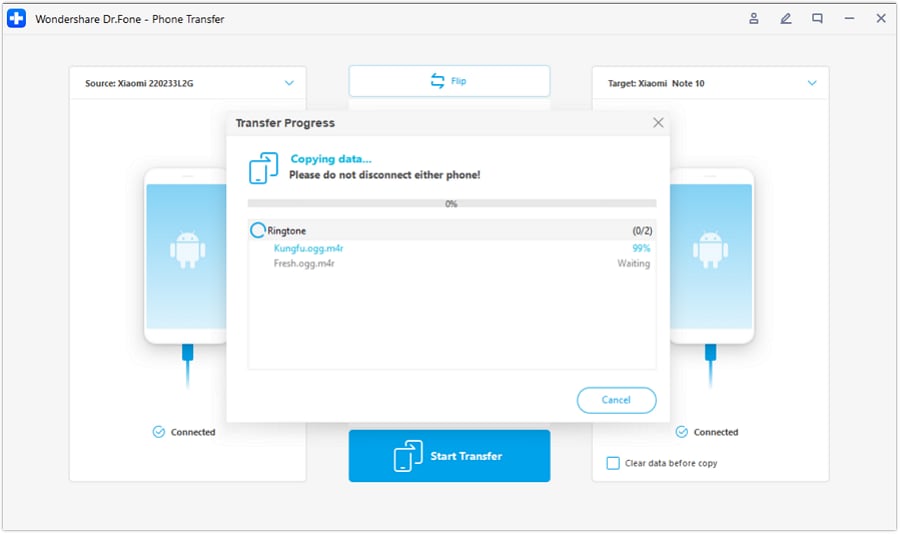
Next, you can connect your Samsung Galaxy S21 Ultra and an iOS device to the computer (you can also use an Android device here). Use a USB cable for the Android device and a lightning cable for the iOS device. You’ll get an interface like below when the program detects both devices. You can use the “Flip” button to change devices as the target device and the sender device. You can also choose the file types here to transfer.

Step 3: Start Transfer Process
After choosing the desired file types (Photos for this case), click on the “Start Transfer” button to start the transfer process. Keep patience until the process ends and make sure both Android and iOS devices stay connected properly during the process.

Step 4: Finish Transfer and Check
Within a short time, all your selected photos will be transferred to the Samsung Galaxy S21 Ultra. Then disconnect the Itel P55 5G devices and check if everything is okay.
Here is the video tutorial for you:
Important Note: New Samsung Galaxy S21 Ultra has new software to transfer all files to another device, called Smart switch. This feature is used for keeping the backup and restoring the files. Though it is good software, it has many cons. So, before using that app, check these cons.
- Smart Switch has a low-speed transfer problem. It shows up when you transfer data with wireless connectivity.
- After transferring the data, the smart switch does not back up the data. It is quite hard to recover the data using this app.
- Using the Smart Switch app, you can only transfer the data from Samsung to Samsung. You can’t use it for other devices.
Conclusion
Samsung Galaxy S21 Ultra has amazing features for the bottom line and is more updated than other models. It has the best quality camera, better battery capacity, and other new features. The design and the display are way better than the other models. After purchasing the Samsung Galaxy S21 Ultra, if you get stuck transferring your photos to the Itel P55 5G device, then you don’t have to worry. We have introduced you to Dr.Fone - Phone Transfer in this article. Using this software, you can recover any files and keep data backup and restore them later. To transfer your photos to Galaxy S21 Ultra, you can use Dr.Fone Switch app by following the steps we provided. It’s definitely better software than Smart Switch.
How to Copy Data from Samsung to Pixel 8 and Pixel 8 Pro
Getting a new phone is incredibly exciting, but once you realize how much data you need to transfer, the experience can take a sudden turn for the worse. Fortunately, there are now multiple ways to transfer data from your old phone to a new device, and we’re here to help you with these.
Today’s article will teach you how to transfer data from a Samsung to a Google Pixel device with the help of Wi-Fi, USB cables, Google Drive, and a third-party app. Stay with us to learn how to copy data from Samsung to Pixel with these seven incredibly convenient methods.
Transfer Data From Samsung to Pixel 8 and Pixel 8 Pro via Dr. Fone Phone Transfer

While a third-party data transfer app might not be your first thought, they’re undoubtedly worth checking out as they can make the entire experience flow much more seamlessly. Wondershare Dr.Fone is one such app, and it’s a toolkit designed to help you manage your Itel P55 5G] and other smartphones and make the most out of your journey. It has been on the market for over 17 years, meaning it’s reliable, trustworthy, and highly efficient.
On top of effortless file transfers between phones, the toolkit also offers numerous advanced phone features, such as:
- Screen Unlock;
- Data Eraser;
- Data Recovery;
- System Repair.
These advanced capabilities make Wondershare Dr.Fone an all-in-one phone manager with everything you’ll ever need. It’s also the best option for data transfers between two devices since it’s compatible with more than 8,000 smartphones and supports all sorts of data types, making the transfer process as easy as possible.
Here’s how you can use Wondershare Dr.Fone to transfer data from a Samsung device to a Pixel 8/Pixel 8 Pro:
- Download Wondershare Dr.Fone from the official website and launch it on your PC.
- Connect the Samsung and the Pixel 8/Pixel 8 Pro phones to the PC.
- Navigate to Toolbox > Phone Transfer.

Select the Sourcedevice (Samsung) and your Destination device (Pixel 8/Pixel 8 Pro). You can also use the Flip option to switch the file transfer’s direction if you ever need to.
Select the types of data you want to transfer and hit the Start Transfer.
The progress bar will appear. You can click the Cancel button if you wish to pause the process.

- You’ll be notified when the process is complete. Tap OK.

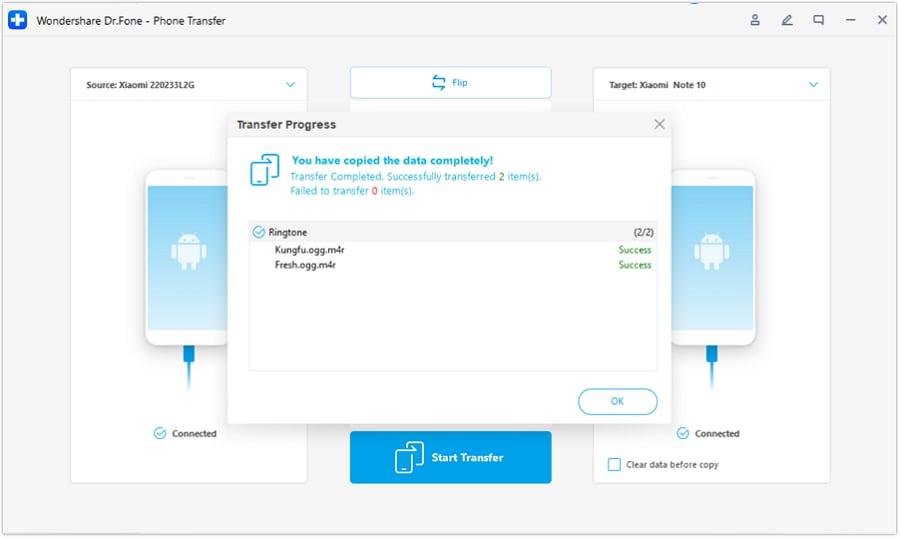
Once you see that the file transfer between your Samsung and Pixel 8/8 Pro devices has been completed, you can disconnect your phones from the PC and start using your new Pixel phone. You should then check if all the data has been transferred.
Transfer Data From Samsung to Google Pixel 8 and Pixel 8 Pro Using Wi-Fi
Users who want to avoid downloading apps can use the built-in file transfer app instead. All Android phones include a data transfer tool that appears when setting up a new device. Using it is incredibly straightforward, and all you need to do is follow the on-screen instructions to initiate a file transfer between your old and new phone over Wi-Fi. Here’s how:
Power on your new Pixel phone and tap the Get startedbutton during the initial setup. Choose to restore from an old phone.
Connect the Itel P55 5G device to a Wi-Fi network.
Choose the “Can’t use old device” option and sign in with your Google account.
Select which apps and types of data you want to transfer to it and tap Restore.
Follow the file transfer instructions and watch as data copies from your old Samsung to your new Pixel 8/8 Pro device.
Your new phone will notify you when the file transfer is complete, and you can continue using your brand-new device right where you left off with the Samsung one.
Copy Data From Samsung to Pixel 8 and Pixel 8 Pro Using USB
If you don’t want to transfer files over a Wi-Fi network, don’t want to waste your mobile data, or wish to complete the file transfer the old-fashioned way with a USB cable, you can follow these steps to transfer data from Samsung to Pixel:
Turn on your new Pixel 8/8 Pro device and launch the built-in data transfer tool that appears when setting up your device.
Hit the Get started button on your Pixel phone and connect to a Wi-Fi network (this is required to initiate a data transfer, regardless of your connection).
Tap on Nextwhen you see the “Copy apps and data” screen. Click Next again when prompted to use your old phone.
Connect the USB cable between your old Samsung and new Pixel 8/8 Pro phones and tap Next.
Confirm data transfer on your old phone, select what you want to transfer, and hit Copy.
Follow the rest of the on-screen instructions and transfer data between your old and new phones.
Give your phones a few minutes to transfer data from Samsung to Pixel, and remember that it can even take several hours, depending on your phone’s internal storage size and filled space. The built-in file transfer app will notify you once it completes everything.
Transfer Files to Pixel 8 and Pixel 8 Pro via PC
Using a computer as an intermediary device for transferring files is another excellent idea, and it’ll even let you organize your old phone’s data before you copy it to your new device. You’ll need to follow these steps to transfer data from your old phone to your PC and from your PC to your new Pixel 8/8 Pro device:
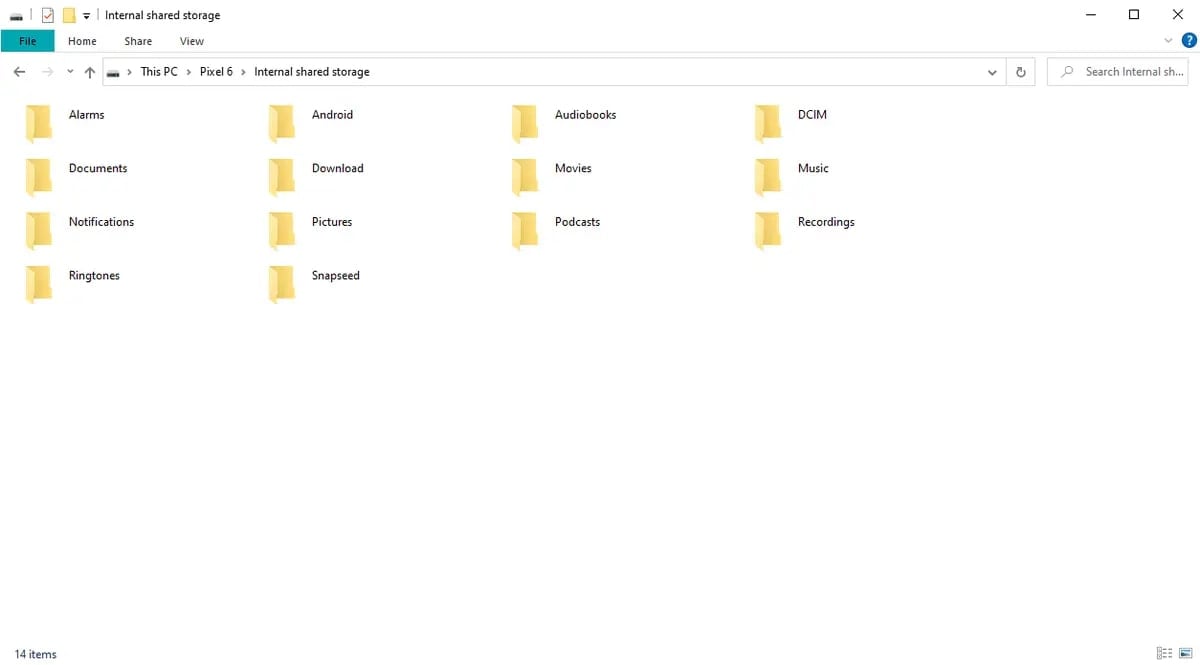
- Connect your old Samsung device to your PC via USB.
- Tap the phone’s notification and select File Transferunder the “Use USB for” option.
- Access its memory through the computer’s File Explorer.
- Select the files and folders you want to copy and transfer them to a new folder on your PC. You can then go through these files on your PC, delete what you don’t need, and organize everything before transferring the data to your new Pixel 8 device, but this is optional.

- Disconnect the old phone from the computer.
- Connect your new Pixel phone to the PC.
- Once again, click the phone’s notification and select the File Transfer
- Transfer the contents of your computer’s folder onto the new device.
- Disconnect the new device after your files have been copied.
You’ll need to consider which types of files go into which folders. For example, you’ll need to ensure that music data goes into Android’s Music folder, pictures and videos go into Camera or DCIM folders, and documents and downloads have their respective folders, which are typical on Android.
Copy Data From Samsung to Pixel 8 Pro via Quick Switch
Another excellent option for transferring files to any Pixel phone is with Google’s Quick Switch adapters. These free OTG devices are included in every Pixel phone box and are designed to help you transfer data from an old phone to a new Pixel device.
A Quick Switch adapter connects to your Pixel phone, and you can insert a Samsung-compatible USB cable on the other end to start the transfer process.
Here’s what you’ll need to do:
Power on your new Pixel 8/8 Pro phone and click Start.
Plug the Quick Switch adapter into the Pixel device and connect the USB cable with the USB-A end into the Quick Switch. Connect the other end to the Samsung phone.
Unlock your Samsung device and click the Copy
Select the type of data you want to transfer and hit Copy.
Once the process is complete, click Next > Done.
Before you start the file transfer process using a Quick Switch, you should ensure both devices are fully charged. Furthermore, you should also update your Samsung device to the latest software version to avoid potential transfer issues, such as data corruption or incomplete transfers.
Transfer Data From Samsung to Pixel Using Google Drive
Being an Android user requires a Google account, granting you access to 15 GB of free storage space on Google Drive, making the app an excellent way to transfer files from your old phone to your new one. Here’s how you can use it:
- Using your old Samsung phone, navigate to Settings> Accounts and Backup> Back up data under Google Drive.
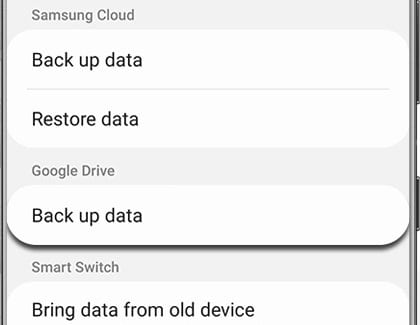
Change the Backup detailsand add the types of data you want to back up.
Hit the Back up nowbutton and give your phone time to upload everything to Google Drive. You can watch the progress at the top of your screen.
Power on your new Pixel 8/8 Pro device and follow the on-screen setup instructions.
Log in with the same Google account you used on the Samsung phone.
The new device will immediately recognize older backups.
Choose the latest backup made on your Samsung phone and tap Restoreto copy data from Samsung to Pixel.
It’s worth noting that Google Drive users aren’t limited to 15 GB of storage space, as paid plans also include 100 GB and 200 GB options for a few dollars per month, making this type of transfer incredibly efficient.
Transfer Data From Samsung to Google Pixel 8, 8 Pro Using Email
Although it’s not as effective as the abovementioned methods, email is also an option for transferring data between phones. Using it is as straightforward as sending emails, meaning that this method is effortless, and anyone can do it. Here’s how:
- Open your old Samsung phone’s email app and compose a new email.
- Hit the attachment icon and add your files to the email. Send it to whomever you like or to your secondary email account.
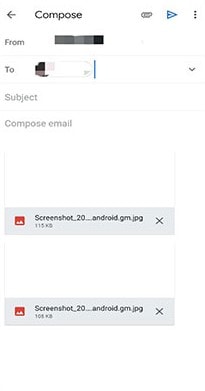
- Launch the email app on your new Google Pixel 8 or 8 Pro device.
- Download the email attachments you’ve just sent.
Please note that while email providers like Gmail, Yahoo, or Hotmail might not have restrictions on the number of files you can send, they do restrict emails to 25MB in size. It essentially means that this method will work for smaller files but isn’t viable if you need to transfer large sets of data.
Conclusion
Transferring data from one smartphone to another can be challenging, especially if you’re new to the whole thing or do it manually. To help you out, we’ve prepared the top seven methods for handling data transfers from Samsung to Google Pixel, which include the built-in data transfer tool during device setup, USB cables, Quick Switch adapter, Google Drive, email, and a dedicated third-party app – Wondershare Dr.Fone.
As you can see, it’s your safest bet, ensuring the most straightforward and fastest data transfer between your old and new device. This way, you won’t need to organize and transfer anything manually or risk losing data, and Wondershare Dr.Fone can be used even after the initial device setup.
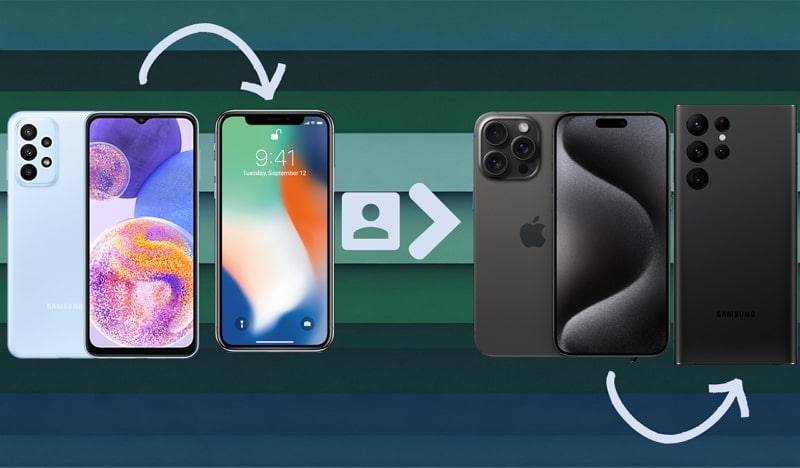
How to Transfer Contacts from Itel P55 5G To Phone
When you get a new phone or switch between Android and iPhone, transferring contacts is essential. Moreover, to avoid losing your important contacts, you need some techniques to move them smoothly. The method you select has to transfer your contacts efficiently on a new device without losing information.
In this article, we will move you through various effective methods on how to copy contacts from phone to phone. Also, we have provided the best software that will assist you in transferring contacts securely. After that, you can seamlessly continue communication with your family, friends, and colleagues.
Part 1. One-Click Solution To Handle All Contacts Transfer Between iPhone and Android
Wondershare Dr.Fone – Phone Transfer offers a one-click solution to transfer all contacts between your smartphones. The tool has advanced features to move your device’s content in a few minutes. This aspect of the software helps users increase their productivity and easily handle their tasks.
Also, besides contacts, you can transfer other content from your old device to a new one. This Phone Transfer tool can transfer your contacts regardless of the operating system they are running on. You can easily transfer contacts from your iPhone and vice versa if you have an Android device.
Key Features of Wondershare Dr.Fone
- The Phone Transfer tool of Dr.Fone supports all kinds of data files to transfer. It allows more than 12 types of files, including Photos, Videos, Bookmarks, Voice Memos, and more.
- This software provides easy navigation so that even a layman can operate the software with a one-click solution.
- The transfer speed of Dr.Fone’s Phone Transfer tool is the lowest among other transfer methods. Within 3 minutes, all of your content can be transferred to another device.
Guide To Move Contacts Between iPhone and Android Using Wondershare Dr.Fone
This software will require a few steps to transfer your contacts to another device. Here is the answer in a step-wise manner to your “how do I transfer contacts from phone to phone“ question. Moreover, this toolkit can work in all directions, such as from one iPhone to another or from an old Android smartphone to a new one.
- Step 1. Open Dr.Fone to Transfer Your Contacts
First, you have to activate Wondershare Dr.Fone on your computer and navigate to the “Toolbox” section. In that section, you have to select the “Phone Transfer” tool to proceed further.
- Step 2. Designate the “Source” and “Destination” Devices
Here, you need to set “Source” and “Destination” devices. In either case, you must set the Itel P55 5G device as a source from which you want to transfer the contacts. Moreover, you can also use the “Flip” button to change the transfer direction between the Itel P55 5G devices.
- Step 3. Select the “Contacts” Option for their Transfer
Now, select the type of data you want to transfer, which, in your case, is “Contacts.” Checkmark the “Contacts” option, and click the “Start Transfer” button to begin the transfer. Now, you can monitor the progress of the contacts transfer in a new window.

- Step 4. Finalize the Contact Transfer Process
After you turn off iCloud syncing on your iOS device, a notification will indicate the successful execution of the process once it is complete. Tap the “OK” button to close the window promptly.

Part 2. 2 Methods To Transfer Contacts From iPhone to iPhone
Although Wondershare Dr.Fone is the perfect solution to transfer your contacts, we’ll consider various scenarios in which you can transfer contacts. Now, if you have an iPhone and want to know how to copy contacts from phone to phone, you can adopt the following two methods:
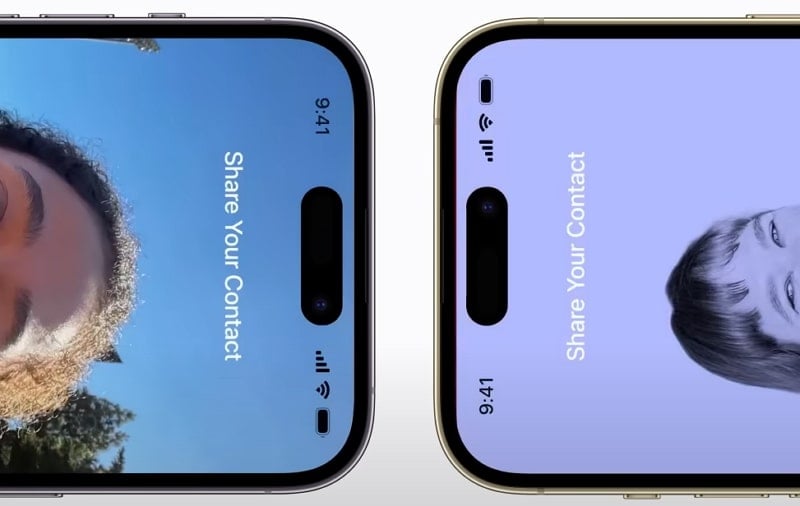
Method 1. Use NameDrop
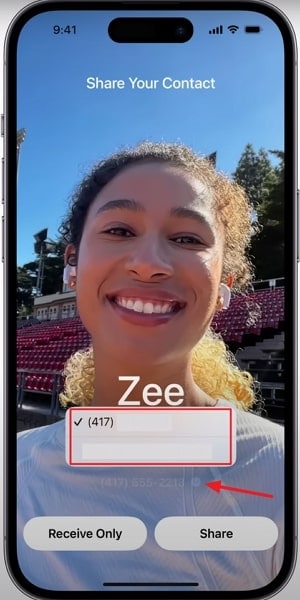
Apple has introduced a new feature in the latest iPhones named NameDrop. The feature allows you to share your contact card with another person by tapping the two iPhones together. The step-by-step guide to move contacts between iPhone and iPhone using “NameDrop” is below.
- Step 1. Start by holding your iPhone’s display a few centimeters from the top of the other person’s iPhone. Keep both devices close until “NameDrop” appears on both screens.
Parental Control Software
- Step 2. Afterward,you have to select whether to “Share” your contact card and receive the contact of another person. Or tap “Receive Only” to receive another person’s contact information.
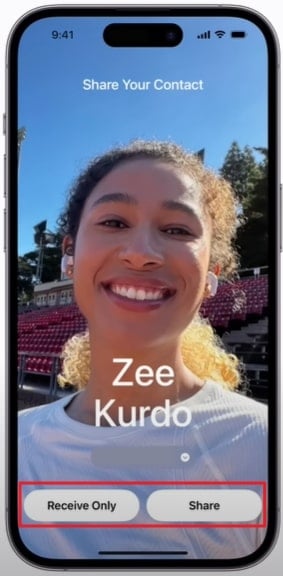
- Step 3. If you want to share your contact card, tap the “ Downward Arrow” icon, choose the fields you wish to include, and then share it.
Method 2. iCloud Sync
The alternate method to transfer your phone contacts is via iCloud synchronization. The technique involves your iCloud contacts option to be toggled on. You can sign in with the same iCloud account to transfer the contact list to your new iPhone. Here’s how to transfer contacts from iPhone to iPhone using iCloud Sync:
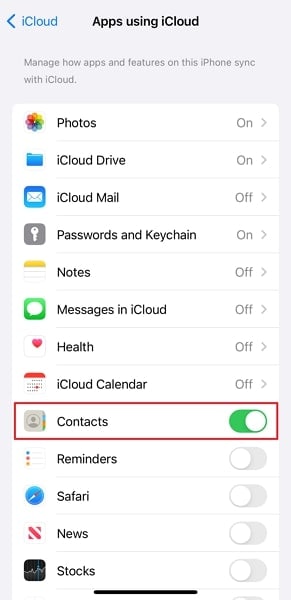
- Step 1. First, you need to access the “Settings” of your old iPhone and tap on the “Apple ID” on the top. There, continue with the “iCloud” option and tap on “Show All” to display all features.
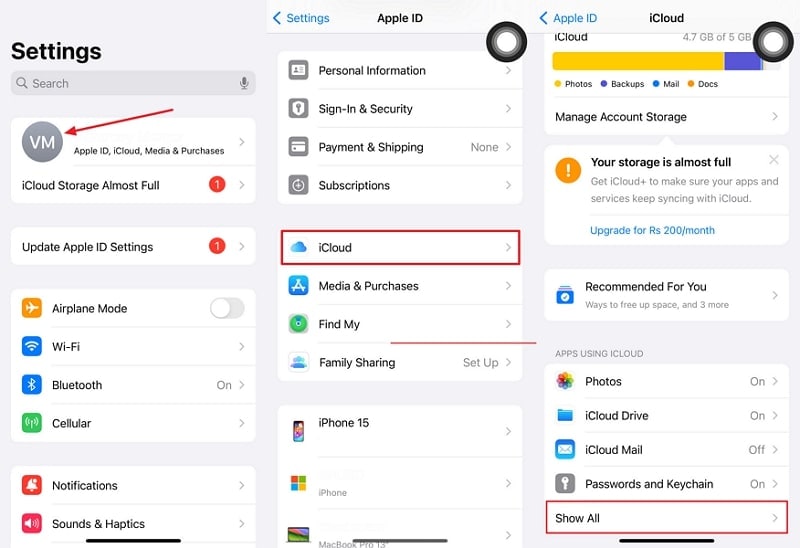
- Step 2. Next, you can see the “Contacts” option; toggle on the switch to synchronize them. When you sign in with your iCloud account on the new iPhone, contacts will be restored there.
Part 3. 2 Methods To Transfer Contacts From Itel P55 5G to iPhone
Let’s discuss another scenario in which we will transfer the contact list from an Android to an iPhone. If you want to switch from Itel P55 5G to a new iPhone, you will probably need an effective method to transfer your phone numbers. In this section, we will discuss two simple and quick ways to how do I transfer contacts from phone to phone:
Method 1. Sync Google Account
Android users can back up their phone’s data to Google Drive. Also, an Android phone’s “Google Contacts” app saves the contact information to their linked Google account. The same account can be logged in a new iPhone, where they can be restored. Follow the simple guide to sync your Google account with the updated contact information:
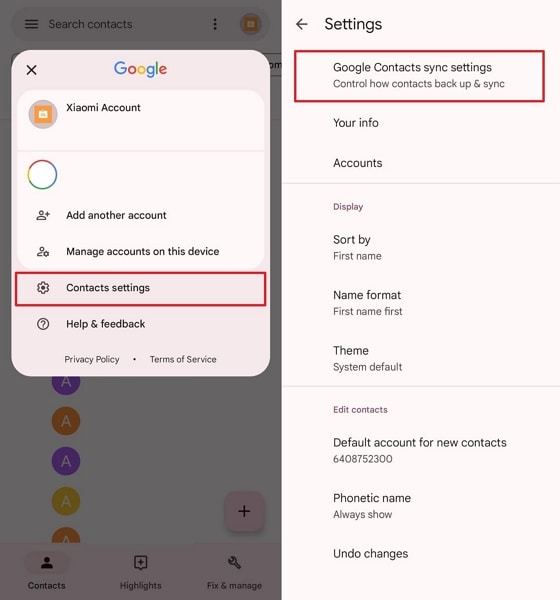
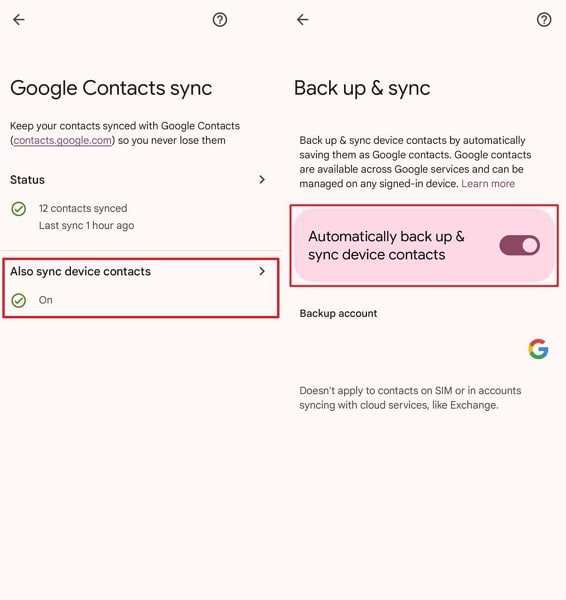
- Step 1. First, open the “Google Contacts” app on your Itel P55 5G and tap the “Profile” icon at the top right corner. Following this, head to the “Contacts settings” and choose the “Google Contacts sync settings” option.
- Step 2. Next, choose the “Also sync device contacts” option at the top of the screen and ensure that the “Automatically back up & sync device contacts” feature is turned on. Afterward, switch to your iPhone and open the “Settings” app.
- Step 3. Subsequently, navigate to the “Contacts” settings within your iPhone’s “Settings” app. Here, find and select the “Accounts” option and proceed to the next step.
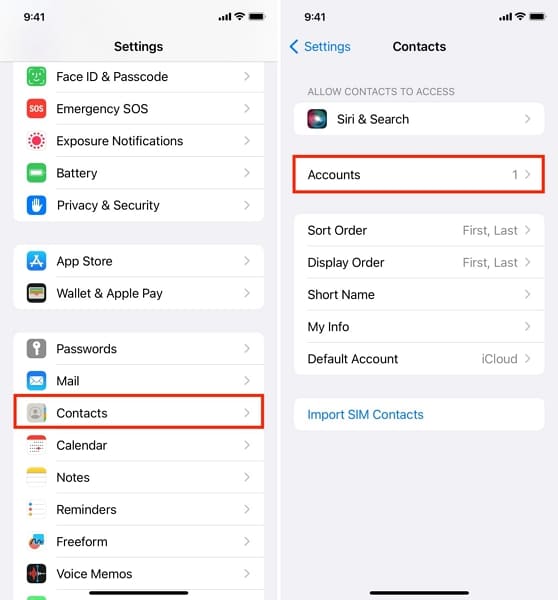
- Step 4. As you lead to the next window, tap the “Add Account” option. You have to sign in with your Google Account and ensure that the “Contacts” option is enabled.

Method 2. Use the VCF File
This method simplifies transferring contacts from Itel P55 5G to iPhone without requiring additional software or complex procedures. Also, it maintains contact details and facilitates a smooth transfer between devices. You can follow these steps to import a VCF file in which your contacts are saved.
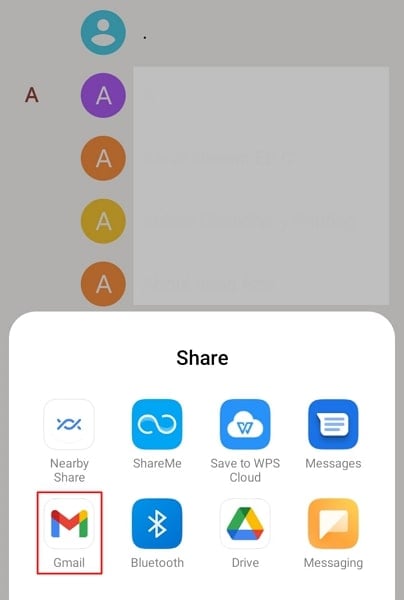
- Step 1. Start by opening the “Contacts” app on your Itel P55 5G. Choose the “Select all” option to select all contacts and tap the “Share” icon. You can choose any sharing method, but we’ll use Gmail to send the VCF file in this case.
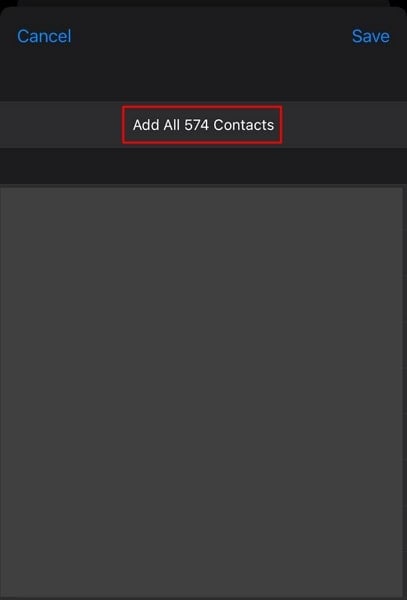
- Step 2. Now, on your iPhone, you need to open the email containing the “Contacts VCF” file from your Itel P55 5G. Tap to open the attached file and choose the “arrow” icon on the top to select the “Share” option. Next, choose the “Contacts” app and tap the “Add All Contacts” option to save contacts on your iPhone.
Part 4. 2 Methods To Transfer Contacts from Itel P55 5G to Other Android Devices
This section will shed some light on the transfer process of contacts between one Android phone to another. Android devices offer various options to share content with another Android device. You can send contact lists and achieve how to copy contacts from phone to phone with these two methods:
Method 1. Nearby Share
Nearby Share is a feature available on Android devices that allows you to easily share various types of content, including contacts. You have to ensure that both devices have Bluetooth and Location Services turned on. That’s because Nearby Share uses these services to find nearby devices and establish a connection for sharing content.
- Step 1. To begin, navigate to the “Settings” of your Itel P55 5G and tap on the “Google” option. Then, proceed with “Devices and Sharing,” followed by switching on the “Nearby Share” feature.
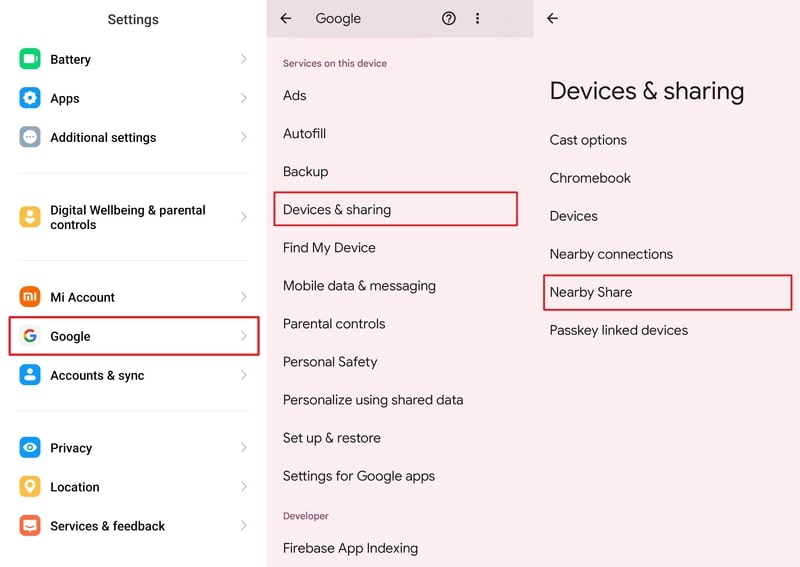
- Step 2. As you proceed into the “Nearby Share” option, you have to turn on the “Device visibility” toggle. This will enable Nearby Share on your Android smartphone.

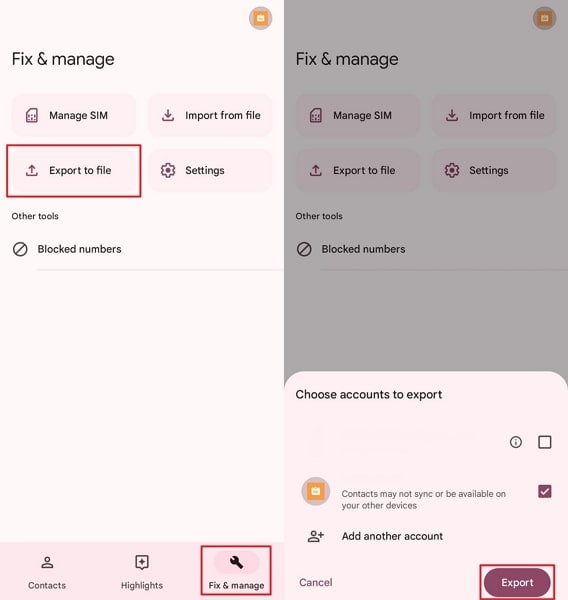
- Step 3. Now, you have to open the “Google Contacts” app on your Itel P55 5G and access the “Fix & manage” tab. Choose the “Export to file” option and select the Itel P55 5G device and account from which you want to share contacts. After making the selection, hit the “Export” button and save the file within your device.

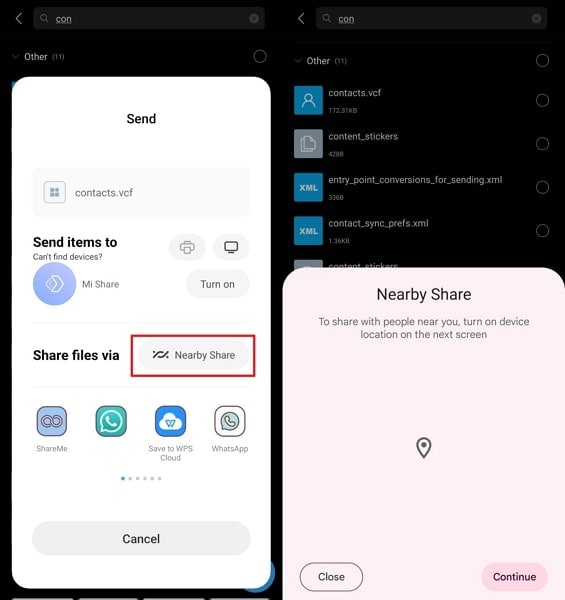
- Step 3. Continue by locating the saved contacts file, then tap on it, and choose the “Send” option. Next, from the available sharing options, select “Nearby Share.” Lastly, you have to locate and select the name of your target Android device when it becomes visible and tap to accept the file share on your destination device.

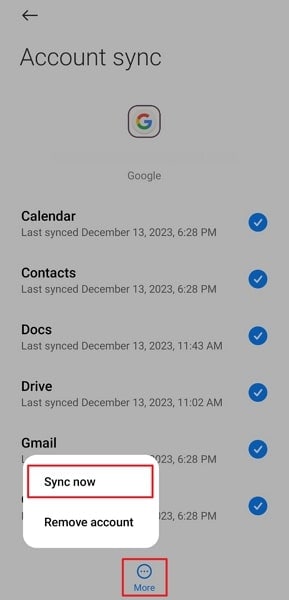
Method 2. Use Google Account
The Google account transfer method can also transfer between Android and Android devices. You just have to ensure that the contacts synchronization is turned on. You can follow these steps to handle your “How do I transfer contacts from phone to phone” question.
- Step 1. First, create a backup on your previous Android phone. For this, you need to access “Settings” on your phone and tap the “Accounts & Sync” option. Then, select “Google” and enable the “Contacts” option to allow the syncing process to complete.
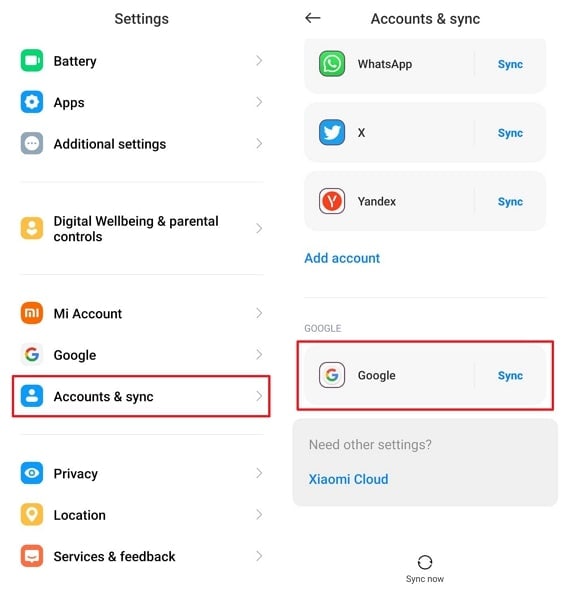
- Step 2. In the next step, navigate to “Settings” of your new Android device and tap “Accounts & Sync.” Afterward, log in using your Google account credentials and select the “Sync Now” feature within the “More” option. This will import the synced contacts to your new Android device.
Part 5. 2 Methods To Transfer Contacts From iPhone to Android
This section will discuss two methods to transfer contacts from an iPhone to an Android. Similarly, in this iPhone-to-Android transfer case, the iPhone synchronization method and importing VCF file method can be used to move your contact list.
Method 1. Enable iPhone Sync Feature
You can enable the iPhone Sync feature to transfer contacts from an iPhone to an Android device. In this case, ensure the contacts option in the Gmail synchronization is toggled on. Later, the contacts are saved when you sign in with the same Google account on your Itel P55 5G. Let’s learn how to transfer from phone to phone using this feature:
- Step 1. Access the “Settings” app on your iPhone and navigate to the “Contacts” settings. Then, tap on “Accounts” and choose your Gmail account. Turn on the “Contacts” toggle switch to synchronize them.

Note: You can select “Add Account,” tap “Google,” and input your credentials if your account has not been added yet.
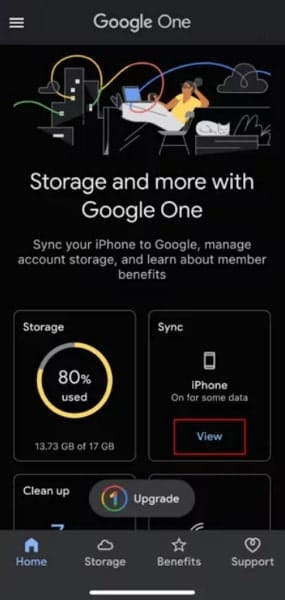
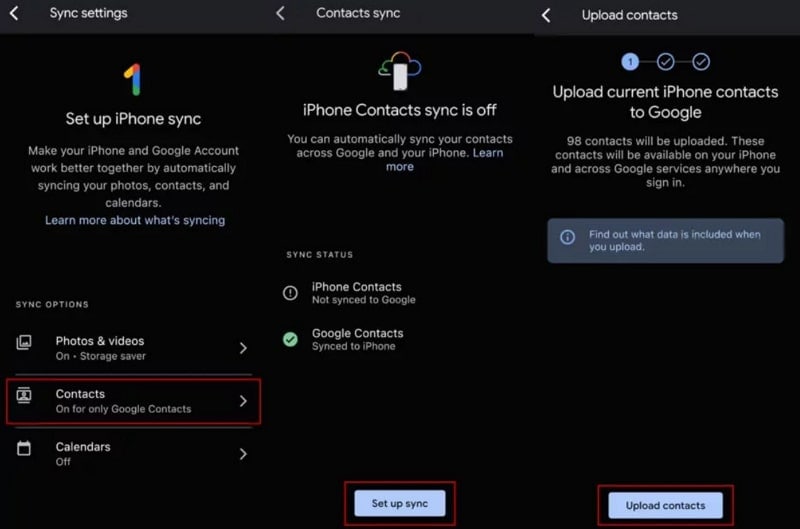
- Step 2. Now, you have to install or access the “Google One” app on your Itel P55 5G. Sign in and configure your Google One settings. Then, navigate to the “Sync” section and tap the “View” option.
- Step 3. There, you need to select the “Contacts” option and click “Set up Sync.” Next, proceed to the “Upload Contacts” option.Subsequently, contacts will sync to your Itel P55 5G.
Method 2. Import the VCF File
Importing a VCF file is another simple method for transferring contacts. It includes a vCard creation, in which contacts are saved. Then, this card can be downloaded from an iCloud account and imported to your Itel P55 5G. Moreover, this simple process does not involve any complicated steps to implement it. You can import a VCF file by following these simple steps.
- Step 1. At first, you will have to access “Settings” on your iPhone and tap your “Profile” icon at the top. After that, tap “iCloud,” followed by the “Show All” option. Then,you need to toggle the “Contacts” switch to turn it on.

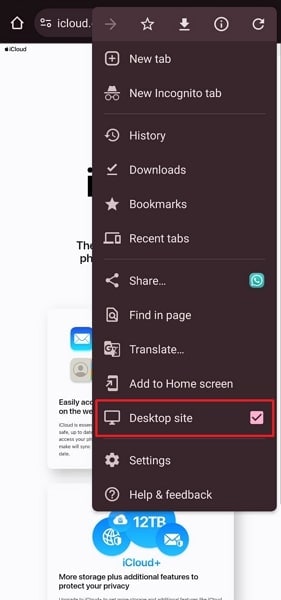
- Step 2. Now,on your Itel P55 5G, open “Chrome” browser and navigate to the “iCloud” site. Then, sign in to your iCloud account and tap the “Three Dots” icon in the browser. Afterward, select the “Desktop site” option among various other options.
- Step 3. Now, choose “Contacts” on the iCloud website, tap the “Three Dots” icon, and proceed with the “Select All” option. After that, you can tap the “Share” icon to choose the “Export vCard” feature. Subsequently, you need to open the exported file and select your Google account to import the contacts to your Itel P55 5G.
Conclusion
We have discussed various scenarios on how to copy contacts from phone to phone, whether the Itel P55 5G devices are Android or iPhone. Nonetheless, Wondershare Dr.Fone - Phone Transfer stands out as the perfect method. This software provides a one-click and swift solution to all your transfer processes, including the contacts. Moreover, Dr.Fone can deal with all types of phone transfers, such as iPhone to iPhone, Android to iPhone, iPhone to Android, and Android to Android.
- Title: How to Transfer Photos From Itel P55 5G to Samsung Galaxy S21 Ultra | Dr.fone
- Author: Emma
- Created at : 2024-07-17 20:36:01
- Updated at : 2024-07-18 20:36:01
- Link: https://android-transfer.techidaily.com/how-to-transfer-photos-from-itel-p55-5g-to-samsung-galaxy-s21-ultra-drfone-by-drfone-transfer-from-android-transfer-from-android/
- License: This work is licensed under CC BY-NC-SA 4.0.