How to Use Phone Clone to Migrate Your Lava Yuva 2 Data? | Dr.fone
How to Use Phone Clone to Migrate Your Lava Yuva 2 Data?
Dr.Fone - Phone Transfer

Best Tool to Migrate Huawei Phone Data
- Transfers any data between devices.
- Supports all phone models like iPhone, Samsung, Huawei, LG, Moto, etc.
- 2-3x faster transfer process compared to other transfer tools.
- Data kept absolutely secure during the transfer.

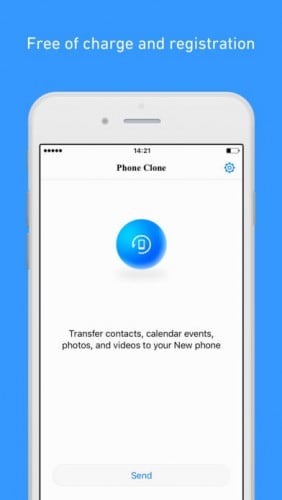
The rapid change in the mobile models has made it difficult for us to keep up with the trend. For some, while it might be a matter of owing only the best mobile, for others it’s a matter of enjoying the best of the world at each point of time. Thereby they try to keep up with the mobile trend by getting their hands on the latest mobile whenever possible whether iOS or Android. In such a scenario it becomes difficult to transfer data from one to another. But here is some mobile technology such as Phone Clone that will change it forever. So, let us see how you can use it to your advantage to transfer your valuable information.
Before we move on to see how to transfer data we will first see why someone would like to migrate the information from old phone to new phone:
- - To replace the old phone with a new phone as the primary phone
- - To back up all the info in both the phone
Moving on, in the subsequent section, we will understand how to use Phone Clone Lava.
Part 1: How to use Phone Clone for Android?
Android has been ruling the world with its open-source technology and compatibility for a wide range of devices. As a result of which, many companies are producing the latest technology in hardware without any worry of OS support. Android phone makers such as Huawei, Samsung, HTC, and many others are at the trend of releasing flagship models at the different budget range on a regular interval. As a result, this has made people run like fans for grabbing a hand on the latest rig, to enjoy the best of the world at every point in time. In such a scenario, it becomes difficult to transfer your data from one phone to another securely. Well in this part, we will be introduced to the Huawei Phone Clone app that will help you to migrate information from one phone to another.
Here are the steps to be followed for Phone Clone Lava to transfer your data from one phone to another:
1. First, install the app on both the phones, i.e., on both old and new mobiles
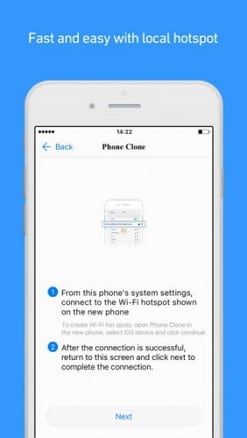
2. Open the app on the new phone. Click on the new phone button. A Wi-Fi will be created whose password will be displayed at the time of creation. You will need that password in the next step.
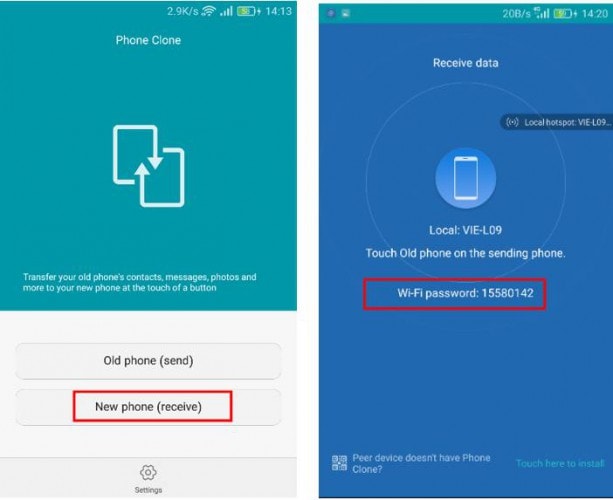
3. Open the app on the old phone. Click on the old phone button. Select the wi-fi network created in the 2nd step and enter the password that you received in the 2nd step.
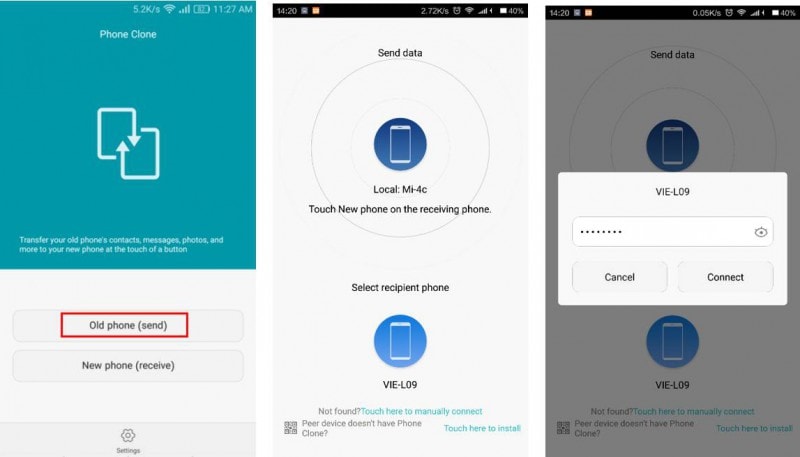
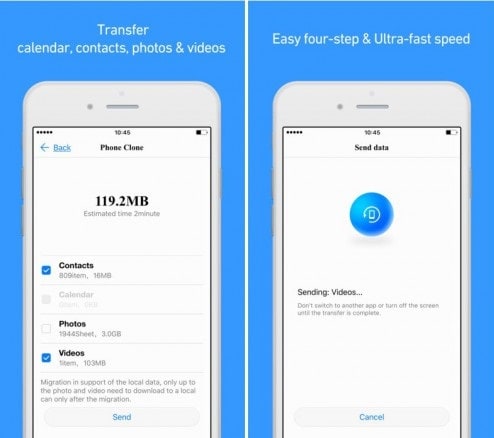
4. Once connected, click the number of tabs on the old phone that you want to send to a new phone.
Part 2: How to use Phone Clone for iPhone
The best part of the Huawei Phone Clone is that it supports not only Android but it also supports the iPhone. All the things that you can do while transferring data from one Android to another, you can achieve the same feat while transferring data from one iPhone to another iPhone. It is especially useful when you get that big update to your iPhone version, and most of the apps get useless due to the drastic hardware and software change in old and new iPhones. Thinking about changing your old iPhone to a new one could have been disastrous if not catastrophic if personal data could not have been transferable from one mobile to another. Phone Clone by Huawei lets you simply achieve the task while at the same time saving you a lot of data and time
Now, let us take a look at how you can use Phone Clone Lava app without spending a penny on expensive services and with 4 simple steps:
1. Install the Phone Clone app on old and new iPhone mobile
2. Open the app for the new iPhone. Click on the send button. A Wi-Fi hotspot will be created, displaying its name and password.
3. Go to the wi-fi setting of the old iPhone and connect to the Wifi network mentioned in step 2. Open the app on the old iPhone and click on next to complete the connection.
4. Once connected, click on the tabs presented in the old iPhone and select the tab that you want to send to the new iPhone.
Part 3: Best Phone Clone alternative: Dr.Fone - Phone Transfer to migrate iPhone/Android data
While Phone Clone is free of cost and is a great emergency there is still much lagging in the app. It does not connect properly; it sometimes fails to send files completely and many more. To overcome we have with you the best Huawei Phone Clone alternative, called Dr.Fone - Phone Transfer , the easiest way to migrate iPhone/Android data.
Dr.Fone provides one of the best options to switch personal data from one phone to another seamlessly. It supports mobile of all kinds of data and service carriers, so you are not restricted to any particular type of mobile set or carrier service. Enjoy the freedom of information transfer without any loss in security and fast process.
Some of the pros of Dr.Fone - Phone Transfer are as follows:
Dr.Fone - Phone Transfer
1-Click Phone-to-Phone Transfer
- Easy, fast, and safe.
- Move data between devices with different operating systems, i.e. iOS to Android.
- Supports iOS devices that run the latest iOS version
- Transfer photos, text messages, contacts, notes, and many other file types.
- Supports over 8000+ Android devices. Works for all models of iPhone, iPad, and iPod.

3981454 people have downloaded it
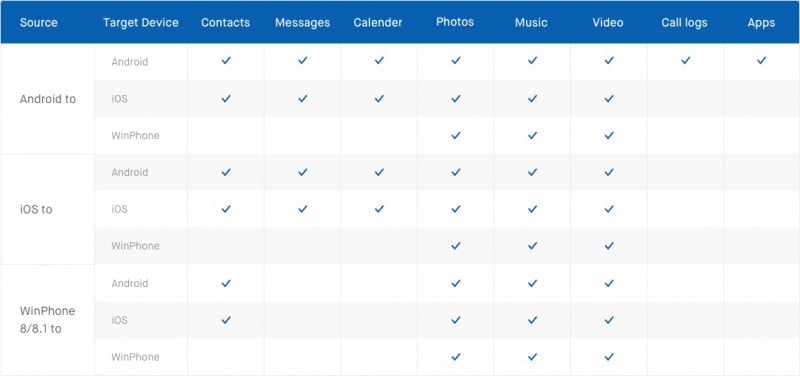
Here is a small comparison of how data transfer from one platform to another platform fares in Dr.Fone

Now let us take a look at how to use Dr. Fone to transfer data between mobiles:
1. Launch the Dr.Fone app on the computer and select Phone Transfer.

2. Connect both the mobile to the computer and select the send and receive side on the computer

3. Select the files and then click on “Start transfer” to complete the transfer process

The best part of Dr.Fone is that you can try it free of cost to check if it suits your requirements. We are sure that its jaw-dropping feature will leave an impression on your mind.
We hope that you learned some of the phone clone methods and applications that you can use to transfer your information from an old phone to a new phone. Use the methods mentioned above and be sure that you are on the safer and faster side of transferring data.
How to Transfer Data from Lava Yuva 2 to Other Android Devices?
Hi, I have recently bought a new Android phone. Is there any way to transfer my data (Contacts, Messages, Photos, Videos, Music, Apps, etc.) from my old Android phone to the new Android phone? I have used the Samsung Kies program to transfer my Contacts, Music, and Pictures, but there is no option within the program to transfer text messages. I would really appreciate any suggestions? How to transfer data to a new phone? Thanks.
Have you had your old Android device for years, and it’s time for an upgrade? Here top 4 solutions to transfer data from Lava Yuva 2 to Other Android Devices . Getting a shiny Android device, like Samsung Galaxy Note 8, S7, S8, is an exciting thing, but also frustrates you. Although Android offers easy access to the SD card, you still find it difficult to transfer data, like apps and SMS from Lava Yuva 2 to Other Android Devices in batch. Are you scratching your head about it? Don’t worry. Here is a chance for you. All you need is to give a professional transfer tool, Dr.Fone - Phone Transfer to transfer everything from one phone to another. Read this article, and you will know how to transfer data from Lava Yuva 2 to Other Android Devices easily and quickly.
Part 1. How to transfer data from Lava Yuva 2 to Other Android Devices in One Click
When you log into the accounts, like Google, Facebook, Twitter, contacts in them will also be transferred. Thus, make sure whether you want to transfer them or not. If not, do not sign in the accounts before the Android to Android transfer. Dr.Fone can transfer everything from Lava Yuva 2 to Other Android Devices, including apps, contacts, messages, videos, music, photos, calendar, even WhatsApp chats, etc. Follow the steps below to know clearly how to send data from Lava Yuva 2 to Other Android Devices.
Step 1. Run the Android to Android transfer Tool
The first thing is to install and run Dr.Fone on your computer. When its primary window appears, click Phone Transfer to start transfer data.
Step 2. Get Both Android Devices Connected
Connect your two Android devices to the computer via USB cables. After recognized, your Lava Yuva 2s will be listed res on both sides of the window.
Step 3. Transfer Contacts, Photos, Videos, Music, SMS, Call Logs, Calendar and Apps from Lava Yuva 2 to Other Android Devices
Between the two Android phones, display all the contents you can transfer. You can uncheck any content you dislike to transfer. Then, click Start Transfer to transfer files from Lava Yuva 2 to another Android Phone quickly.

That’s all. It isn’t easy to transfer all your data from Lava Yuva 2 to Other Android Devices. Try Dr.Fone - Phone Transfer free to transfer Android files to your new Android phone. It is the best Android to Android data transfer tool. With it, you can transfer everything from Lava Yuva 2 to Other Android Devices.
Part 2. How to Transfer Everything from Lava Yuva 2 to Other Android Devices with Google Backup
No one likes to spend a lot of time on the stuff, such as transfer data from Lava Yuva 2 to Other Android Devices every time you change the phone. If you want to transfer quickly and painlessly, then here is the best which explains how to transfer data from Lava Yuva 2 to Other Android Devices using the Google Backup method. Google still has many ways to get all your stuff off your old device and add to your new device using Google Backup.
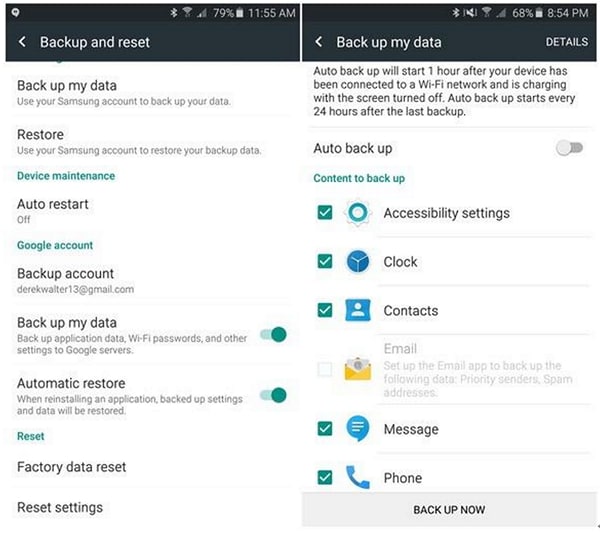
Before taking up backup the first thing you need to do is to sign-in the Android phone using your Google account. In the setting menu, you need to search for Backup and reset mode. Make sure you have backup data and automatic restore as both are flipped on your google account. Your Google server will remember your password, so you do not need to re-enter the password every time you sign in. Google sync really very well with Android devices.
Part 3. How to Transfer Data from Lava Yuva 2 to Other Android Devices with Bluetooth
Users feel good while setting up a new Android device. But we also know that your data is sensitive, so there would be one thing that would bother you is how to transfer data from Lava Yuva 2 to Other Android Devices using Bluetooth . Don’t worry. Here’s an easy way that would help you out to transfer all the data safely by simply using Bluetooth. You have to connect both the Lava Yuva 2 devices and enable the Bluetooth.

This one is the best to transfer the data such as photos, videos, songs, and other files. You have to discover the Lava Yuva 2 device and connect them through the wireless Bluetooth exchange data method. Allow your destination device to detect its presence and attempt to establish the connection between them. Once both devices are paired with Bluetooth, exchange the data, which include files, songs, ringtones, photos and videos. Note that Bluetooth can’t transfer text messages, contacts, call history or Apps.
Part 4. Tips about how to transfer from Lava Yuva 2 to Other Android Devices
When you have bought a new device, then certainly there is a need to transfer your data such as Contacts, SMS, Photos, Music, Apps, and more other documents using different methods. Your device data can also be transferred from Android smartphones to iPhone and vice versa. If you need to have a fast and easy way to transfer the data, you can try with Dr.Fone - Phone Transfer. Here we also have a list of a few different ways which can be used easily without any restrictions.

Transfer Contacts from Lava Yuva 2 to Other Android Devices
Transferring the contacts is the most important thing, the time has come when you do not need to face the painstaking process of copying each contact with the hand. Now you can transfer the contacts easier along with cloud synchronization. It’s one of the easiest ways to keep your contacts up-to-date and sync it with your Google account. Transfer the contacts and sync it on that registered account. Similarly, when you buy a new device, open your Google account on your new device and copy all the saved contacts from that account onto your new device.

Transfer SMS from Lava Yuva 2 to Other Android Devices
You can now transfer your old SMS to the Android device easily by using this free SMS backup app, which can restore and transfer all SMS stored in XML file format, and then you can send directly to your new Android devices. Here we have used a backup app that can explain how to transfer from Lava Yuva 2 to Other Android Devices easily when connected with each other and help you out to restore the SMS messages. Note that this app won’t pay attention to which SMS already exists and which one is imported twice. Instead, you can use MobileTrans one-click app, which helps you out in resolving this problem.


Transfer Photos from Lava Yuva 2 to Other Android Devices
You can use Dr.Fone - Phone Transfer, which can help you in how to transfer from Lava Yuva 2 to Other Android Devices easily. You simply have to install the tool, connect your Lava Yuva 2, and share your data such as photos, movies, and other files directly from Lava Yuva 2 to the other Android devices. Try it free.
Transfer Music from Lava Yuva 2 to Other Android Devices
We all love music and have collected the music according to our choice. Mostly we store the MP3 files that appear on your computer after you connect your smartphone. Firstly you need to download the Android File Transfer app if you’re a mac user or else use Bluetooth File Transfer that saves these files on your computer, and then you can transfer to another device. Instead, you can use MobileTrans tool, which can easily resolve your problem of how to transfer everything from Lava Yuva 2 to Other Android Devices with few clicks only.

Transfer Apps from Lava Yuva 2 to Other Android Devices
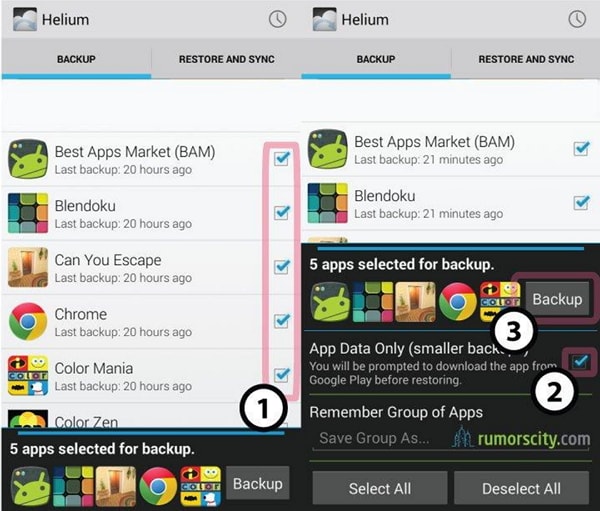
There are many apps that you require to transfer from your old phone to a new device, but here we have a Helium backup tool that can explain how to transfer from Lava Yuva 2 to Other Android Devices apps easily and do not require to be rooted. It can transfer the tool which can come in a free trial version and also support SD card and PC. You can automatically schedule the backup and can sync your Lava Yuva 2s.
I hope we were able to make you understand how to transfer everything from Lava Yuva 2 to Other Android Devices using third-party tools. We recommend using Dr.Fone - Phone Transfer, which works as the all-in-one tool and transfers all your data within few clicks only, including contacts, SMS, Photos, Music, Videos, Apps, etc.
Why not download it have a try? If this guide helps, don’t forget to share it with your friends.
How to Transfer Contacts from Lava Yuva 2 To Phone
When you get a new phone or switch between Android and iPhone, transferring contacts is essential. Moreover, to avoid losing your important contacts, you need some techniques to move them smoothly. The method you select has to transfer your contacts efficiently on a new device without losing information.
In this article, we will move you through various effective methods on how to copy contacts from phone to phone. Also, we have provided the best software that will assist you in transferring contacts securely. After that, you can seamlessly continue communication with your family, friends, and colleagues.
Part 1. One-Click Solution To Handle All Contacts Transfer Between iPhone and Android
Wondershare Dr.Fone – Phone Transfer offers a one-click solution to transfer all contacts between your smartphones. The tool has advanced features to move your device’s content in a few minutes. This aspect of the software helps users increase their productivity and easily handle their tasks.
Also, besides contacts, you can transfer other content from your old device to a new one. This Phone Transfer tool can transfer your contacts regardless of the operating system they are running on. You can easily transfer contacts from your iPhone and vice versa if you have an Android device.
Key Features of Wondershare Dr.Fone
- The Phone Transfer tool of Dr.Fone supports all kinds of data files to transfer. It allows more than 12 types of files, including Photos, Videos, Bookmarks, Voice Memos, and more.
- This software provides easy navigation so that even a layman can operate the software with a one-click solution.
- The transfer speed of Dr.Fone’s Phone Transfer tool is the lowest among other transfer methods. Within 3 minutes, all of your content can be transferred to another device.
Guide To Move Contacts Between iPhone and Android Using Wondershare Dr.Fone
This software will require a few steps to transfer your contacts to another device. Here is the answer in a step-wise manner to your “how do I transfer contacts from phone to phone“ question. Moreover, this toolkit can work in all directions, such as from one iPhone to another or from an old Android smartphone to a new one.
- Step 1. Open Dr.Fone to Transfer Your Contacts
First, you have to activate Wondershare Dr.Fone on your computer and navigate to the “Toolbox” section. In that section, you have to select the “Phone Transfer” tool to proceed further.

- Step 2. Designate the “Source” and “Destination” Devices
Here, you need to set “Source” and “Destination” devices. In either case, you must set the Lava Yuva 2 device as a source from which you want to transfer the contacts. Moreover, you can also use the “Flip” button to change the transfer direction between the Lava Yuva 2 devices.
- Step 3. Select the “Contacts” Option for their Transfer
Now, select the type of data you want to transfer, which, in your case, is “Contacts.” Checkmark the “Contacts” option, and click the “Start Transfer” button to begin the transfer. Now, you can monitor the progress of the contacts transfer in a new window.


- Step 4. Finalize the Contact Transfer Process
After you turn off iCloud syncing on your iOS device, a notification will indicate the successful execution of the process once it is complete. Tap the “OK” button to close the window promptly.
Part 2. 2 Methods To Transfer Contacts From iPhone to iPhone
Although Wondershare Dr.Fone is the perfect solution to transfer your contacts, we’ll consider various scenarios in which you can transfer contacts. Now, if you have an iPhone and want to know how to copy contacts from phone to phone, you can adopt the following two methods:
Method 1. Use NameDrop
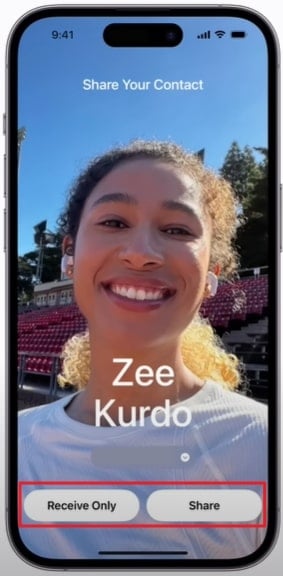
Apple has introduced a new feature in the latest iPhones named NameDrop. The feature allows you to share your contact card with another person by tapping the two iPhones together. The step-by-step guide to move contacts between iPhone and iPhone using “NameDrop” is below.
- Step 1. Start by holding your iPhone’s display a few centimeters from the top of the other person’s iPhone. Keep both devices close until “NameDrop” appears on both screens.
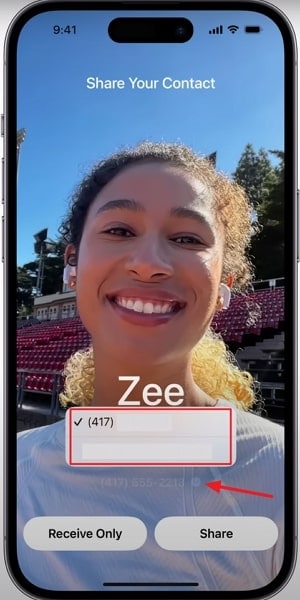
- Step 2. Afterward,you have to select whether to “Share” your contact card and receive the contact of another person. Or tap “Receive Only” to receive another person’s contact information.
- Step 3. If you want to share your contact card, tap the “ Downward Arrow” icon, choose the fields you wish to include, and then share it.
Method 2. iCloud Sync
The alternate method to transfer your phone contacts is via iCloud synchronization. The technique involves your iCloud contacts option to be toggled on. You can sign in with the same iCloud account to transfer the contact list to your new iPhone. Here’s how to transfer contacts from iPhone to iPhone using iCloud Sync:
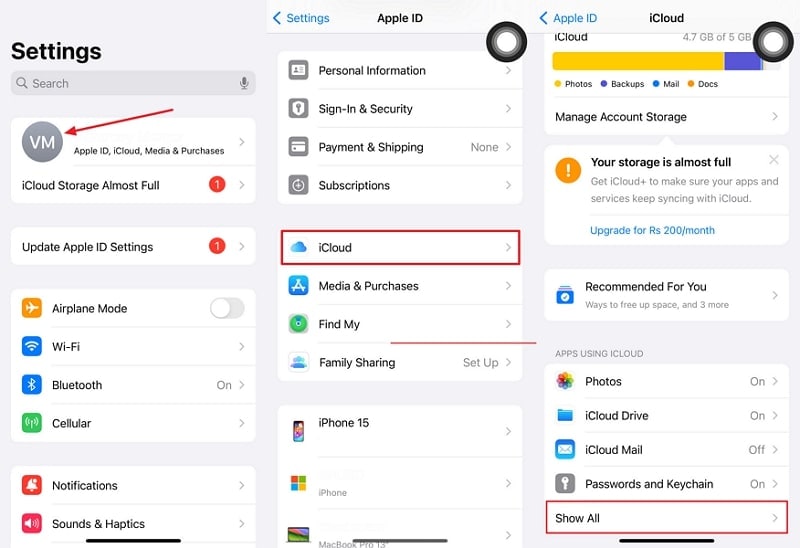
- Step 1. First, you need to access the “Settings” of your old iPhone and tap on the “Apple ID” on the top. There, continue with the “iCloud” option and tap on “Show All” to display all features.
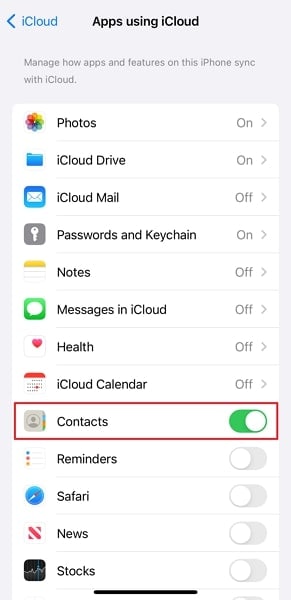
- Step 2. Next, you can see the “Contacts” option; toggle on the switch to synchronize them. When you sign in with your iCloud account on the new iPhone, contacts will be restored there.
Part 3. 2 Methods To Transfer Contacts From Lava Yuva 2 to iPhone
Let’s discuss another scenario in which we will transfer the contact list from an Android to an iPhone. If you want to switch from Lava Yuva 2 to a new iPhone, you will probably need an effective method to transfer your phone numbers. In this section, we will discuss two simple and quick ways to how do I transfer contacts from phone to phone:
Method 1. Sync Google Account
Android users can back up their phone’s data to Google Drive. Also, an Android phone’s “Google Contacts” app saves the contact information to their linked Google account. The same account can be logged in a new iPhone, where they can be restored. Follow the simple guide to sync your Google account with the updated contact information:
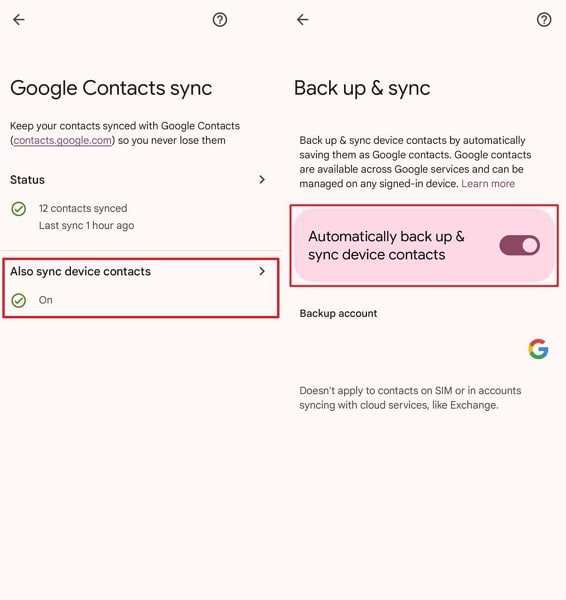
- Step 1. First, open the “Google Contacts” app on your Lava Yuva 2 and tap the “Profile” icon at the top right corner. Following this, head to the “Contacts settings” and choose the “Google Contacts sync settings” option.
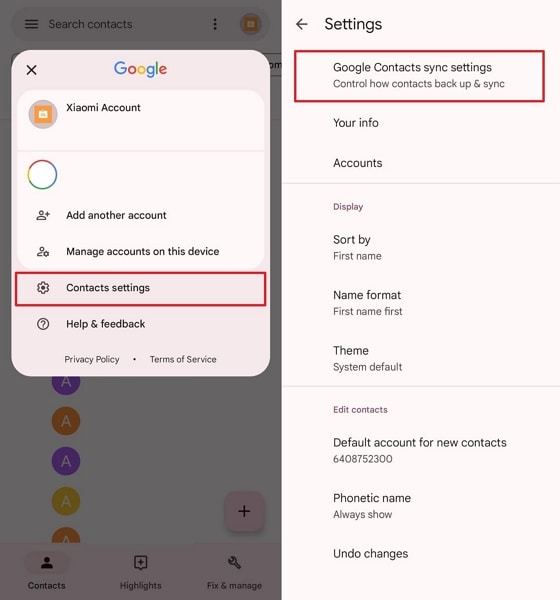
- Step 2. Next, choose the “Also sync device contacts” option at the top of the screen and ensure that the “Automatically back up & sync device contacts” feature is turned on. Afterward, switch to your iPhone and open the “Settings” app.
- Step 3. Subsequently, navigate to the “Contacts” settings within your iPhone’s “Settings” app. Here, find and select the “Accounts” option and proceed to the next step.
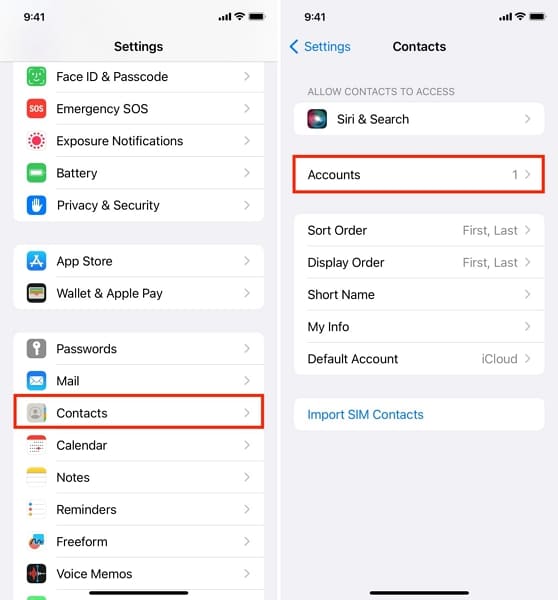
- Step 4. As you lead to the next window, tap the “Add Account” option. You have to sign in with your Google Account and ensure that the “Contacts” option is enabled.

Method 2. Use the VCF File
This method simplifies transferring contacts from Lava Yuva 2 to iPhone without requiring additional software or complex procedures. Also, it maintains contact details and facilitates a smooth transfer between devices. You can follow these steps to import a VCF file in which your contacts are saved.
- Step 1. Start by opening the “Contacts” app on your Lava Yuva 2. Choose the “Select all” option to select all contacts and tap the “Share” icon. You can choose any sharing method, but we’ll use Gmail to send the VCF file in this case.
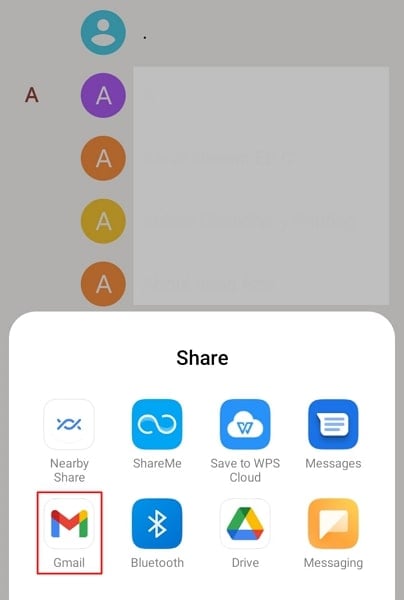
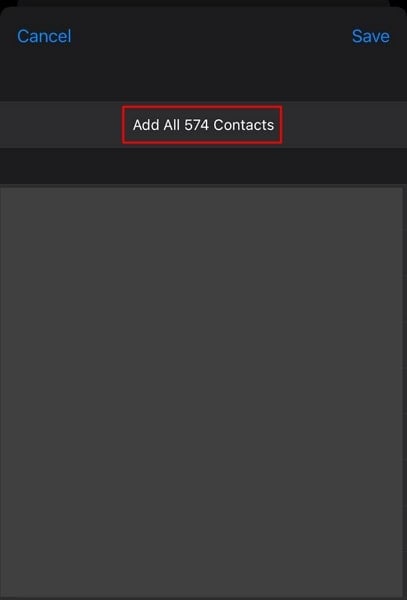
- Step 2. Now, on your iPhone, you need to open the email containing the “Contacts VCF” file from your Lava Yuva 2. Tap to open the attached file and choose the “arrow” icon on the top to select the “Share” option. Next, choose the “Contacts” app and tap the “Add All Contacts” option to save contacts on your iPhone.
Part 4. 2 Methods To Transfer Contacts from Lava Yuva 2 to Other Android Devices
This section will shed some light on the transfer process of contacts between one Android phone to another. Android devices offer various options to share content with another Android device. You can send contact lists and achieve how to copy contacts from phone to phone with these two methods:
Method 1. Nearby Share
Nearby Share is a feature available on Android devices that allows you to easily share various types of content, including contacts. You have to ensure that both devices have Bluetooth and Location Services turned on. That’s because Nearby Share uses these services to find nearby devices and establish a connection for sharing content.
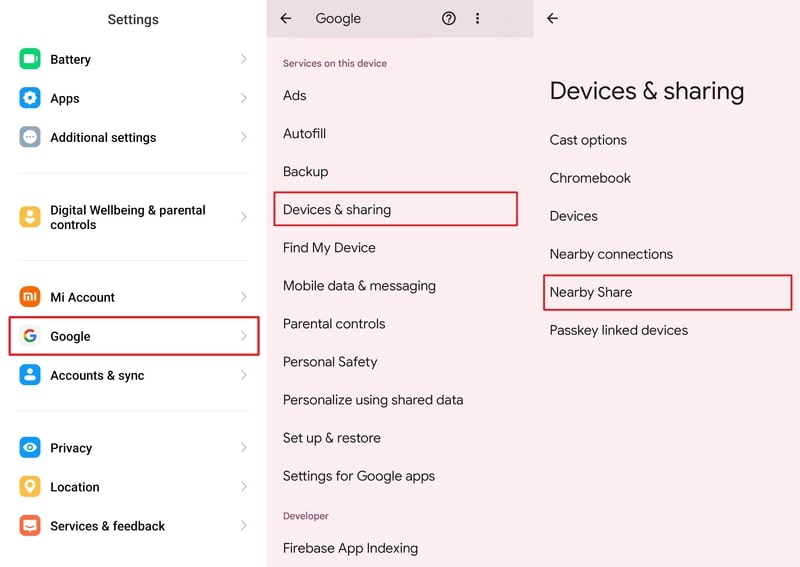
- Step 1. To begin, navigate to the “Settings” of your Lava Yuva 2 and tap on the “Google” option. Then, proceed with “Devices and Sharing,” followed by switching on the “Nearby Share” feature.
- Step 2. As you proceed into the “Nearby Share” option, you have to turn on the “Device visibility” toggle. This will enable Nearby Share on your Android smartphone.

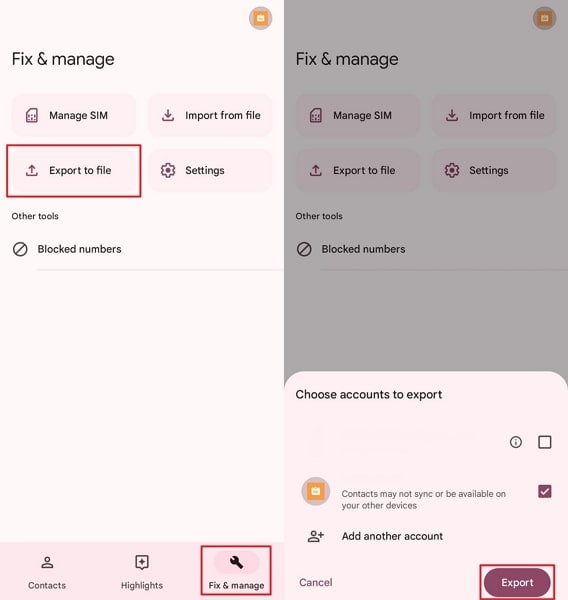
- Step 3. Now, you have to open the “Google Contacts” app on your Lava Yuva 2 and access the “Fix & manage” tab. Choose the “Export to file” option and select the Lava Yuva 2 device and account from which you want to share contacts. After making the selection, hit the “Export” button and save the file within your device.
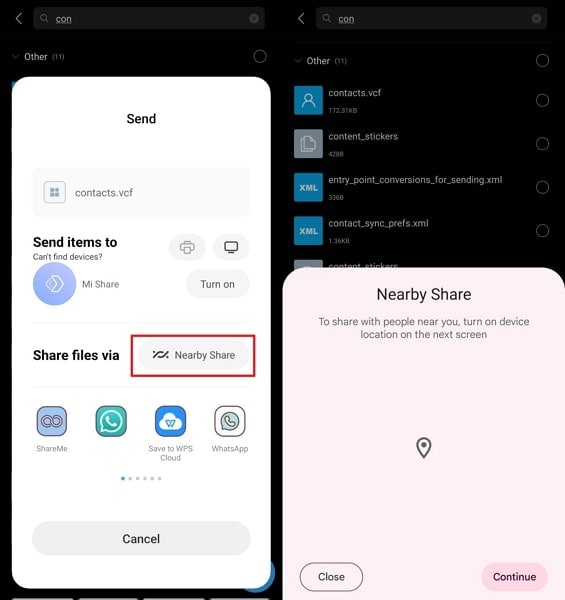
- Step 3. Continue by locating the saved contacts file, then tap on it, and choose the “Send” option. Next, from the available sharing options, select “Nearby Share.” Lastly, you have to locate and select the name of your target Android device when it becomes visible and tap to accept the file share on your destination device.
Method 2. Use Google Account
The Google account transfer method can also transfer between Android and Android devices. You just have to ensure that the contacts synchronization is turned on. You can follow these steps to handle your “How do I transfer contacts from phone to phone” question.
- Step 1. First, create a backup on your previous Android phone. For this, you need to access “Settings” on your phone and tap the “Accounts & Sync” option. Then, select “Google” and enable the “Contacts” option to allow the syncing process to complete.
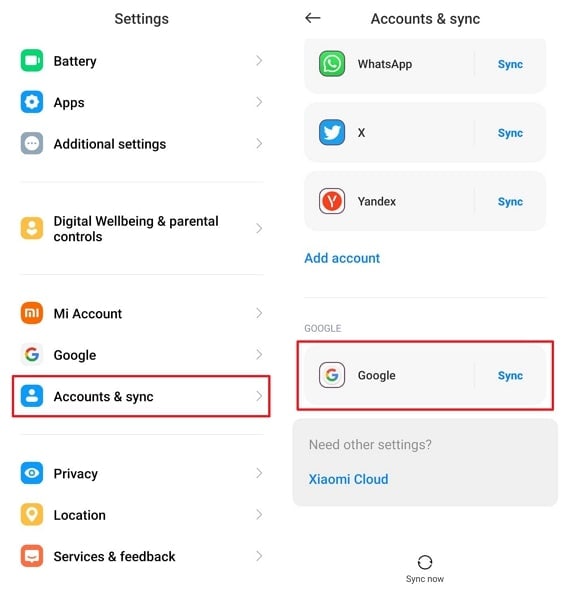
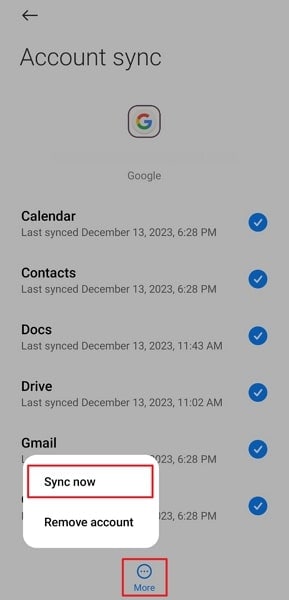
- Step 2. In the next step, navigate to “Settings” of your new Android device and tap “Accounts & Sync.” Afterward, log in using your Google account credentials and select the “Sync Now” feature within the “More” option. This will import the synced contacts to your new Android device.

Part 5. 2 Methods To Transfer Contacts From iPhone to Android
This section will discuss two methods to transfer contacts from an iPhone to an Android. Similarly, in this iPhone-to-Android transfer case, the iPhone synchronization method and importing VCF file method can be used to move your contact list.
Method 1. Enable iPhone Sync Feature
You can enable the iPhone Sync feature to transfer contacts from an iPhone to an Android device. In this case, ensure the contacts option in the Gmail synchronization is toggled on. Later, the contacts are saved when you sign in with the same Google account on your Lava Yuva 2. Let’s learn how to transfer from phone to phone using this feature:
- Step 1. Access the “Settings” app on your iPhone and navigate to the “Contacts” settings. Then, tap on “Accounts” and choose your Gmail account. Turn on the “Contacts” toggle switch to synchronize them.

Note: You can select “Add Account,” tap “Google,” and input your credentials if your account has not been added yet.
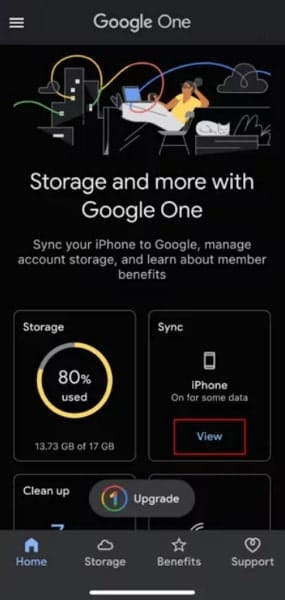
- Step 2. Now, you have to install or access the “Google One” app on your Lava Yuva 2. Sign in and configure your Google One settings. Then, navigate to the “Sync” section and tap the “View” option.
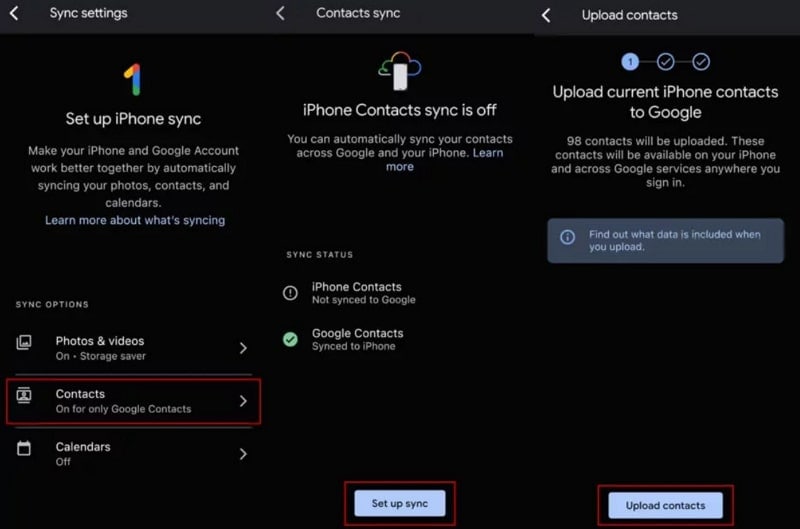
- Step 3. There, you need to select the “Contacts” option and click “Set up Sync.” Next, proceed to the “Upload Contacts” option.Subsequently, contacts will sync to your Lava Yuva 2.
Method 2. Import the VCF File
Importing a VCF file is another simple method for transferring contacts. It includes a vCard creation, in which contacts are saved. Then, this card can be downloaded from an iCloud account and imported to your Lava Yuva 2. Moreover, this simple process does not involve any complicated steps to implement it. You can import a VCF file by following these simple steps.
- Step 1. At first, you will have to access “Settings” on your iPhone and tap your “Profile” icon at the top. After that, tap “iCloud,” followed by the “Show All” option. Then,you need to toggle the “Contacts” switch to turn it on.

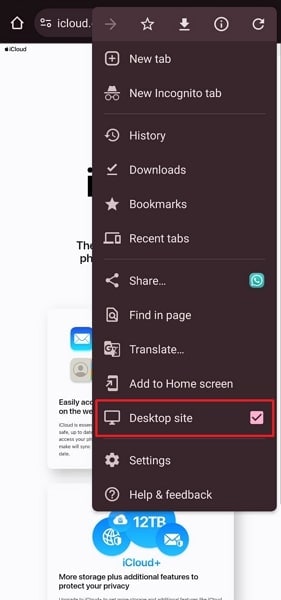
- Step 2. Now,on your Lava Yuva 2, open “Chrome” browser and navigate to the “iCloud” site. Then, sign in to your iCloud account and tap the “Three Dots” icon in the browser. Afterward, select the “Desktop site” option among various other options.

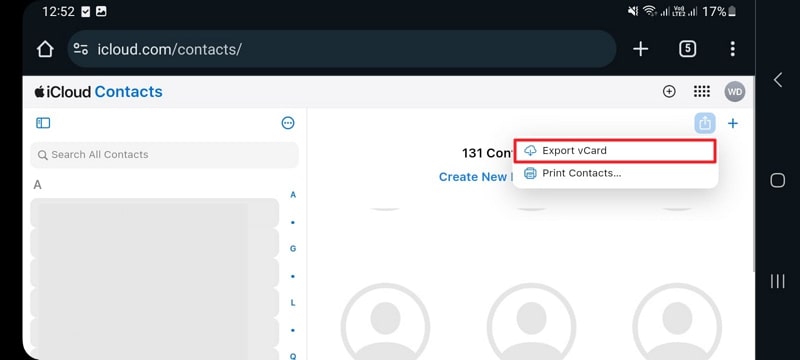
- Step 3. Now, choose “Contacts” on the iCloud website, tap the “Three Dots” icon, and proceed with the “Select All” option. After that, you can tap the “Share” icon to choose the “Export vCard” feature. Subsequently, you need to open the exported file and select your Google account to import the contacts to your Lava Yuva 2.
Conclusion
We have discussed various scenarios on how to copy contacts from phone to phone, whether the Lava Yuva 2 devices are Android or iPhone. Nonetheless, Wondershare Dr.Fone - Phone Transfer stands out as the perfect method. This software provides a one-click and swift solution to all your transfer processes, including the contacts. Moreover, Dr.Fone can deal with all types of phone transfers, such as iPhone to iPhone, Android to iPhone, iPhone to Android, and Android to Android.
- Title: How to Use Phone Clone to Migrate Your Lava Yuva 2 Data? | Dr.fone
- Author: Emma
- Created at : 2024-07-17 21:15:28
- Updated at : 2024-07-18 21:15:28
- Link: https://android-transfer.techidaily.com/how-to-use-phone-clone-to-migrate-your-lava-yuva-2-data-drfone-by-drfone-transfer-from-android-transfer-from-android/
- License: This work is licensed under CC BY-NC-SA 4.0.