
In 2024, 4 Ways to Transfer Music from Nokia G42 5G to iPhone | Dr.fone
4 Ways to Transfer Music from Nokia G42 5G to iPhone
You switch from an Android device to an iPhone but can’t find an ideal solution to transfer music from Nokia G42 5G to iPhone.
Welcome to the club! A while back, I was facing the same issue as iOS devices come with numerous restrictions. Unlike an Android to Android transfer, it can be tough to move music from Android to a new iPhone , such as iPhone 13. Thankfully, I discovered some quick fixes for this problem, which I’m going to share with all of you right here. Read on and learn how to transfer music from Nokia G42 5G to iPhone in 4 surefire ways.
Part 1: How to transfer music from Nokia G42 5G to iPhone, including in 1 click?
Yes – you have read it right. You can learn how to send music from Nokia G42 5G to iPhone using Dr.Fone - Phone Transfer with just one click. This remarkable tool by Dr.Fone can help you switch from one device to another in a few minutes. A highly advanced tool, it supports data transfer between Android and iPhone, iPhone and iPhone, and Android and Android. Since a cross-platform data transfer is supported, you won’t face any trouble moving music from Nokia G42 5G to iPod, iPad, or iPhone.
Dr.Fone - Phone Transfer
Transfer music from Nokia G42 5G to iPhone in 1 Click!
- Easily transfer every type of data from Nokia G42 5G to iPhone, including music, videos, photos, messages, contacts, apps data, call logs, etc.
- Works perfectly with most smartphones and tablets, including Apple, Samsung, HTC, LG, Sony, Google, HUAWEI, Motorola, ZTE, Nokia, and more.
- Fully compatible with major network providers such as AT&T, T-mobile, Verizon & Sprint.
- Compatible with the latest mobile phone operating system, including iOS & Android.
- Fully compatible with the latest computer system Windows and Mac
3981454 people have downloaded it
A user-friendly tool is compatible with most Android and iOS devices. The desktop application is available for Windows and Mac, which comes with a free trial as well. Besides music, you can also move your contacts, messages, photos, call logs, and other important content. Follow the steps below to get started:
Firstly, launch the Dr.Fone toolkit on your computer and go to the “Switch” option from its welcome screen.

Now, you need to connect two devices to the system. Once the Nokia G42 5G devices are detected, authenticate them and select the media transfer option.
Both of your devices will automatically be detected by the application. Ideally, your Nokia G42 5G will be listed as “Source” while the iPhone should be the “Destination” device. If not, you can click on the Flip button to interchange their positions.

Choose the data that you would like to transfer. To move music from Nokia G42 5G to iPhone, make sure the option of “Music” is enabled before clicking on the “Start Transfer” button.
As Dr.Fone - Phone Transfer will move the selected data from Nokia G42 5G to iPhone, wait for a while. Once it is completed, you will be notified.


That’s it! With just one click, you can now move music from Nokia G42 5G to iPhone. After that, you can safely disconnect both of the Nokia G42 5G devices.
## Part 2: How to transfer music from Nokia G42 5G to iPhone selectively?Another user-friendly way to learn how to send music from Nokia G42 5G to iPhone is by using Dr.Fone - Phone Manager (Android) . A part of the Dr.Fone toolkit, it can be a complete Android device manager. You can transfer your data between Android and computer and from an Android to an iOS device. You can even move songs from your Nokia G42 5G to iTunes without using iTunes itself.
Dr.Fone - Phone Manager (Android)
Transfer Media from Nokia G42 5G to iPhone/iTunes
- Transfer contacts, music, messages, and more data between Android and computer.
- Manage, export & import the data easily.
- Transfer your data between iTunes & Android.
- Manage the data on your Nokia G42 5G on a computer.
- Compatible with the newest Android and iPhone.
3981454 people have downloaded it
Since it is a complete Android phone manager, you can use it to transfer all the other kinds of data (like photos, videos, contacts, messages, and more) from one source to another. Unlike Dr.Fone - Phone Transfer that moves all the music files at once, you can perform a selective data transfer. The interface will provide a preview of your data so that you can choose the files you wish to move. To learn how to transfer music from Nokia G42 5G to iPhone selectively, follow these steps:
- Install and open the Dr.Fone toolkit on your computer and click on the “Phone Manager” option from the home screen.

Connect both Android phones and iPhone to software and let them be detected automatically. From the top-left option, make sure you have selected your Nokia G42 5G as a default/source device. The interface will provide its snapshot with some shortcuts.
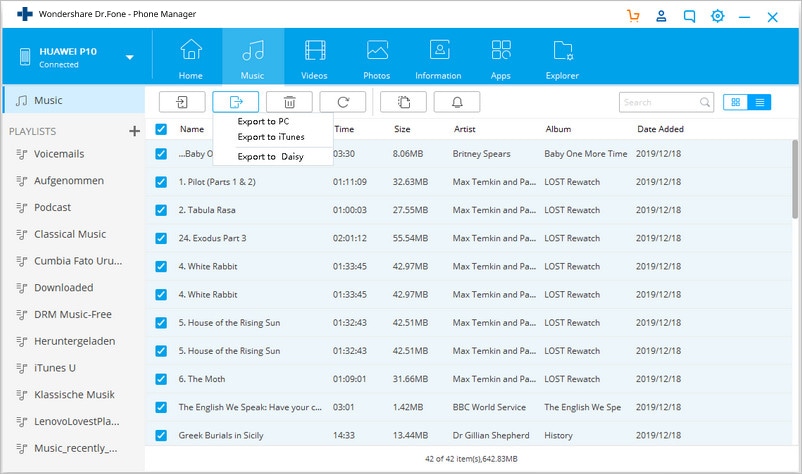
To manage the music files stored on the Android device, go to the “Music” tab on the interface. Here, you can view all music files, podcasts, audiobooks, songs, etc., listed in different categories.
Choose the files and then select the export button on the toolbar. From here, select the connected iPhone as a source.
Wait a moment and let the application automatically transfer your selected music files from your Nokia G42 5G to your iPhone.
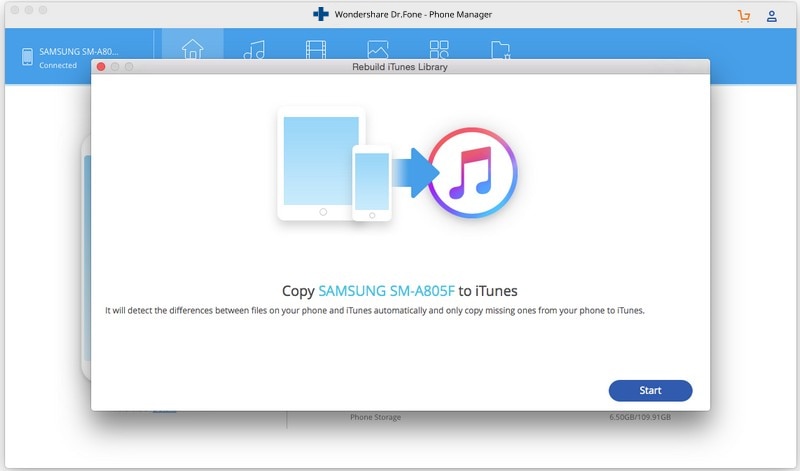
Besides performing a direct transfer of data from one smartphone to another, you can also use the application to transfer music from Nokia G42 5G to iTunes as well. To do this, you need to select the “Transfer Device Media to iTunes” option from its home page. This will launch a pop-up window and let you move your music files from the Android device to iTunes directly.
In this way, you can selectively transfer music from Nokia G42 5G to iPhone in a hassle-free manner.
Part 3: How to transfer music from Nokia G42 5G to iPhone using Android File Transfer?
If you use a Mac, then you can use Android File Transfer to move your data from your Nokia G42 5G to your system. Though, to transfer music from Nokia G42 5G to iPhone, you would later need to take the assistance of iTunes. This is because you can’t simply drag and drop your data from your system to the iPhone. While the solution is free, it is certainly quite complicated and is not direct like Dr.Fone.
To start with, download and install Android File Transfer from its official website on your Mac. It is compatible with macOS 10.7 and higher versions.
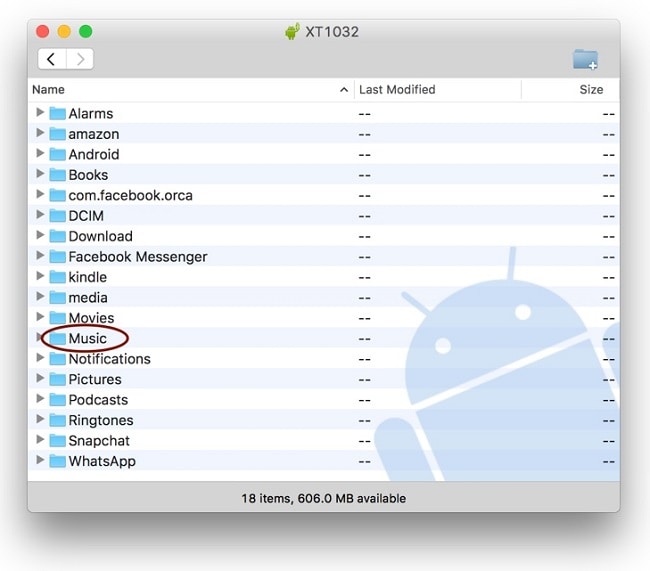
Now, connect your Nokia G42 5G to your Mac and launch Android File Transfer (if it won’t automatically launch already).
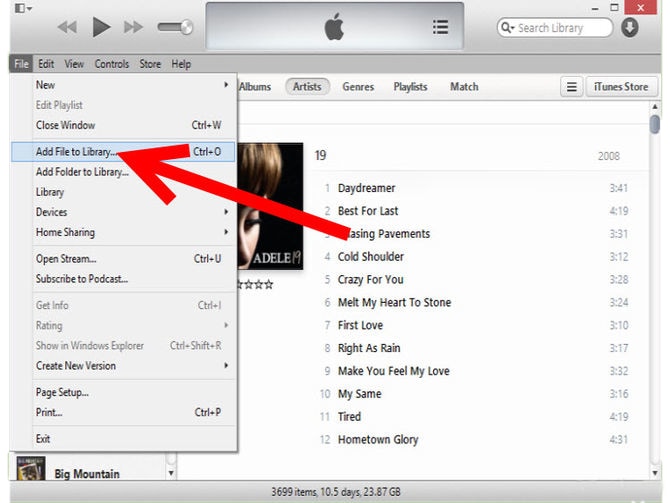
Go to the Music folder, copy your favorite songs, and save them to your Mac. After that, you can transfer music from your Nokia G42 5G to your Mac.
Great! You are halfway there. Launch iTunes on your Mac and add the newly transferred music to it. You can drag and drop it from the Finder to iTunes. Alternatively, you can also go to its options and click on “Add files to Library”. In this way, you can manually add new music to your iTunes library.
Once you have transferred the newly added music to iTunes, connect your target iPhone to the system, and let iTunes detect it automatically.
Select your iPhone from the Nokia G42 5G devices and go to its “Music” tab. From here, you can enable the “Sync Music” options. Select the playlists and songs you wish to move and click on the “Apply” button to initiate the process.

Needless to say, the process is a bit complicated. Furthermore, you might face some compatibility issues between your devices and iTunes as well. To avoid all this unwanted hassle, you can simply take Dr.Fone applications’ assistance and transfer music from Nokia G42 5G to iPhone effortlessly. In this way, you can learn how to send music from Nokia G42 5G to iPhone through iTunes and Android File Transfer.
Part 4: How to transfer streaming music from Nokia G42 5G to iPhone?
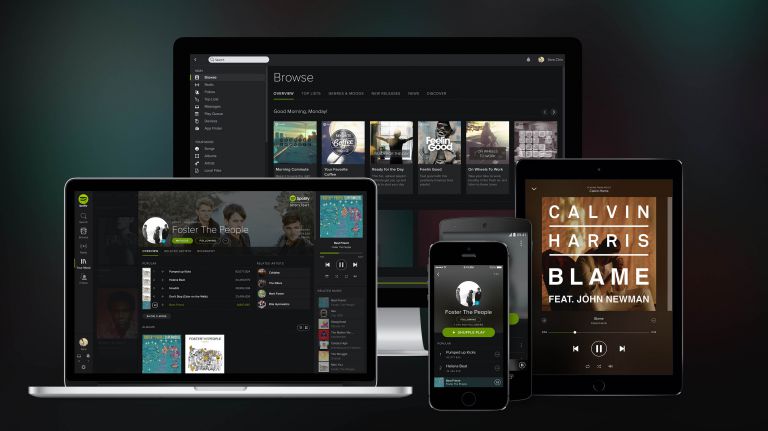
These days, many people use streaming services like Apple Music, Google Play Music, Spotify, etc., to listen to their favorite songs without the hassle of downloading them. The good thing about these streaming services is that you can access your music from multiple devices. For instance, let’s consider the example of Spotify.
Once you have created a playlist on your Spotify account, you can access it from any other device. You can even access your music by visiting its website because it will be stored on Spotify’s server and not your device itself.
If you are moving from an Android to an iPhone, you can follow these steps to ensure your Spotify music won’t be lost.
- Launch Spotify on your Nokia G42 5G and go to the Playlist tab. From here, you can create a playlist. Later, you can add your favorite songs to this playlist as well. You can even create multiple playlists on the app.

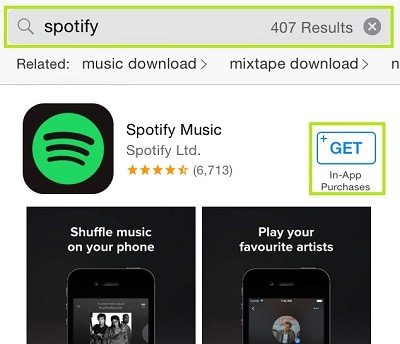
- Afterward, unlock your iPhone and go to the App store. Look for the music streaming app and download it on your phone.
- Once you log in to your Spotify account using your credentials, you can access “My Music” and access all your saved playlists.
The same drill can be followed for all the other streaming services as well. While you can sync your music using these streaming services, the songs you have made available offline will not be listed here. Therefore, you need to make sure that you have saved them in a playlist beforehand.
When you know how to move music from Nokia G42 5G to iPhone, you can easily make this transition. Go ahead and pick a preferred option to transfer music from Nokia G42 5G to iPhone. For a one-click transfer of data, you can use Dr.Fone - Phone Transfer , while to make a selective transfer, you can try Dr.Fone - Phone Manager (Android) . Both of these are user-friendly and reliable tools that will come handy to you on numerous occasions.
Best 3 Software to Transfer Files to/from Your Nokia G42 5G via a USB Cable
If you are worried about deleting important information from your Nokia G42 5G, you may wish to simply transfer it up to your computer to keep it. Or you may simply want to transfer the photos from your day at the beach onto your computer.
However, due to the open nature of the Google Android operating system, there are several software available that aim to help you manage your Nokia G42 5G through your computer. In this article, we will look at some of the best Android software management software available. Note that all the software enables you to connect Android to PC for file transfer , as well as allowing the selection of specific files onto your computer. But, some are better than other.
Wondershare Dr.Fone
Wondershare Dr.Fone
One-Stop Solution for Android USB File Transfer
- Transfer files between Android and computer, including contacts, photos, music, SMS, and more.
- Manage, export/import your music, photos, videos, contacts, SMS, Apps, etc.
- Easily integrate the entire iTunes library with a click.
- Work much faster and incredibly stable.
- Transfer iTunes to Android (and vice versa).
- Manage your Nokia G42 5G on your computer.
- Fully compatible with the latest Android version.
4,761,338 people have downloaded it
Refer to the following guide for Android USB file transfer:
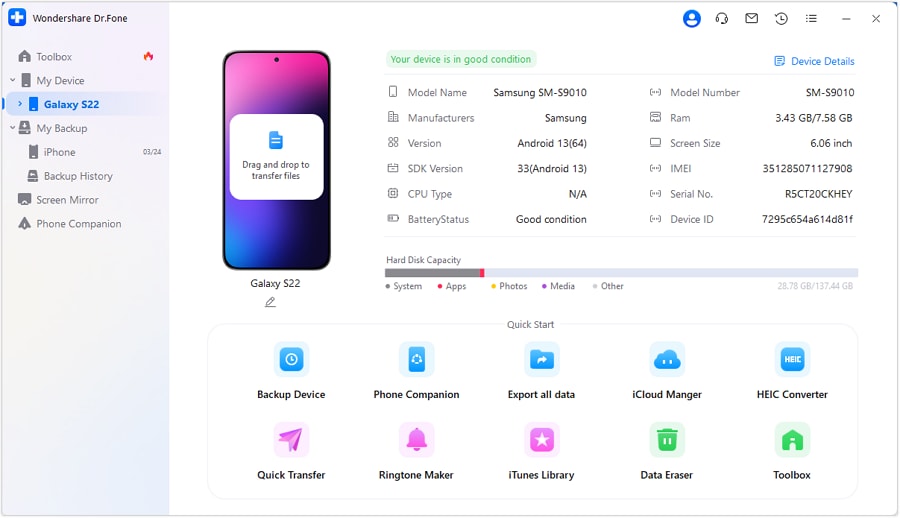
Step 1. Download Dr.Fone and install it on your computer. Connect your Nokia G42 5G to your PC with USB Cable. Notice how it displays the same image that is on the screen of your device.

Step 2. Click on your Nokia G42 5G, such as Galaxy S22 > Export All Data among other options. The following main interface for Wondershare Dr.Fone will be displayed.
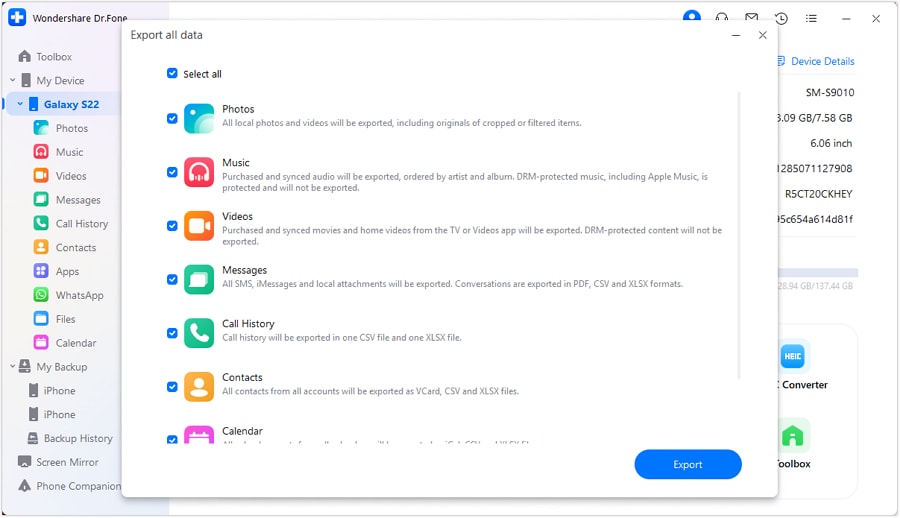
Step 3. You can select the file type you want to transfer to the computer or select all file types. Then, click “Export”. Wait for the transfer process to complete.

Video Guide: How to Achieve Android USB File Transfer with PC?
Wondershare Dr.Fone also features other helpful tools, such as the De-Duplicate option, which automatically scans all your contacts for any repetitions, which is always a nuisance (you often end up with duplicate contacts if you sync your contacts with Facebook, as well as already having them on your device, for example).
Mobogenie Android USB File Transfer
Advantages:
- Uninstall stock apps in batches.
- Easy-to-use interface.
- Easily download and manage apps.
- Easily transfer multiple files from your PC to your Android, and vice versa.
- Free of charge.
Disadvantages:
- USB only.
- Only connect one Android device at a time.
- Does not have integrated music sharing.
Overview:
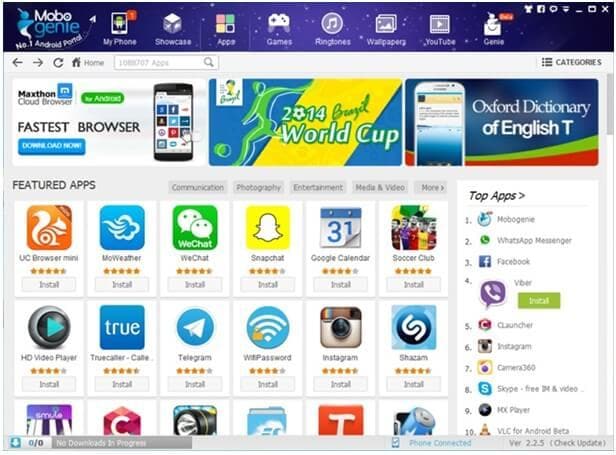
Download Mobogenie and run it, and connect your Nokia G42 5G to the computer. Once your device has been connected, you will be prompted to install the driver for your device so that the application is automatically downloaded onto it. Once you have completed this process, you will be taken to the home screen:
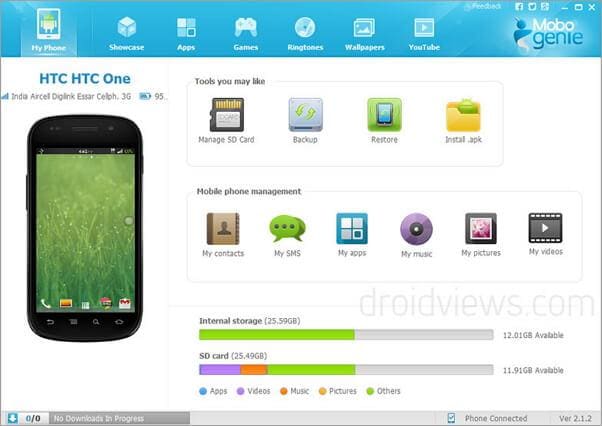
As with other data management software, you can download and install apps onto your Nokia G42 5G from your PC. The advantage of this is that apps can be downloaded quickly, and also without costing you in terms of data roaming charges.
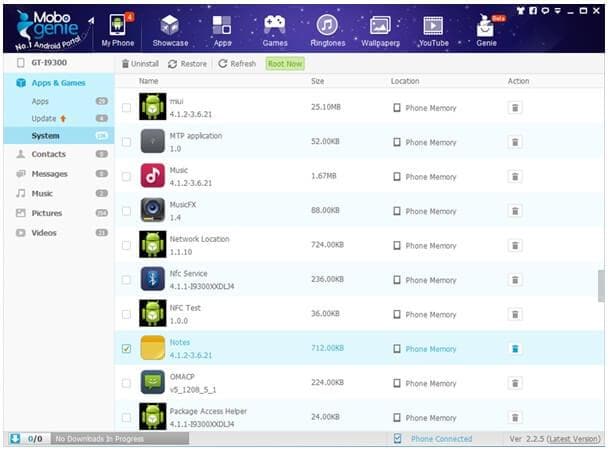
A neat feature is the ability to uninstall apps that came preloaded on the phone as often we find ourselves with apps that we never use that we cannot delete.
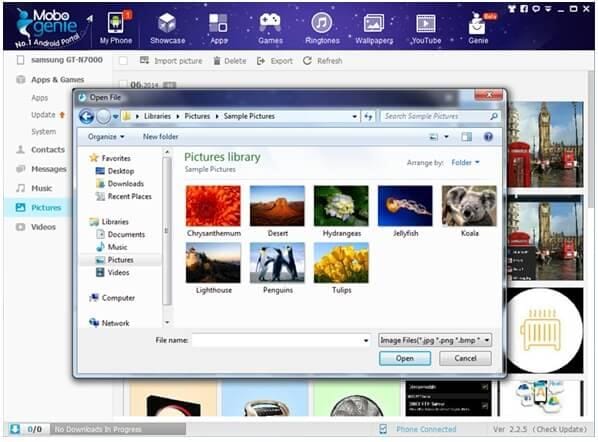
The transfer of photo files is straightforward, and several photos can be selected from your computer to import onto your device at once, or vice versa.
Features:
- Free.
- Support wireless connection of devices on the same network (although temperamental).
- Support multiple devices.
- Download apps onto it through app store.
- Simple to use.
Overview:
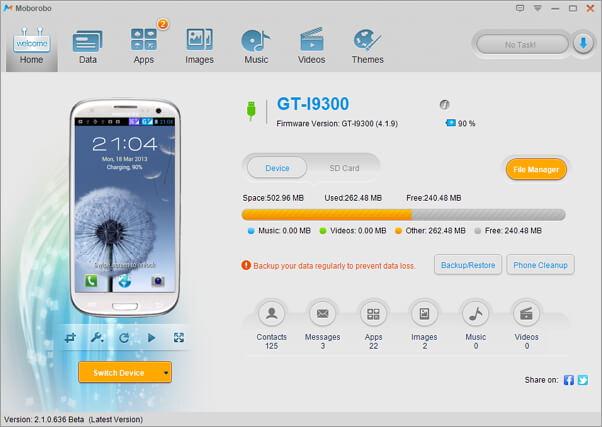
Download MoboRobo and install this Android USB file transfer tool on your computer. Upon opening it, you will be prompted to connect your Nokia G42 5G with a USB cable or over WiFi, and then once connected, you will be asked permission to install the app on your Nokia G42 5G as well.
Once connected, you will be brought to this home page, notice the options to use different devices as well as connected through Wi-Fi.
As with Mobogenie, once you are on the software, it is fairly easy to navigate around, and you can do everything from sending SMS from your PC to transferring apps and contacts. However, a drawback is that the management of your music requires you to have all your MP3 files on your PC and move them on to the software- not extremely inconvenient, but as we will see much easier solutions exist.
We recommend the use of Wondershare Dr.Fone, as it is more reliable and provides a simple user-friendly interface that allows you to manage your Nokia G42 5G with ease. You can also transfer files between Android and Mac easily.
How I Transferred Messages from Nokia G42 5G to iPhone 12/XS (Max) in Seconds
Recently, I got a new iPhone 12/XS (Max) with so much excitement. But, the one thing that was driving me crazy was how to transfer messages from my old Android device to this iPhone 12/XS (Max), as I have always been an Android phone user till then. So, I was scared to transfer anything to the new iPhone and ruin it. You can have numerous solutions to transfer text messages from Nokia G42 5G to iPhone 12/XS (Max) after setup.
Well! If you are in a similar situation as me, then I would recommend you go through this article. I have finally opted to import SMS to iPhone 12/XS (Max) from Android.
2 Apps to Transfer Messages from Nokia G42 5G to iPhone 12/XS (Max) without Computer
How to transfer Android messages to iPhone 12/XS (Max) using Move to iOS app
The first method to transfer text messages from Nokia G42 5G to iPhone 12/XS (Max) is using the official Move to iOS app from Apple. Message history, call logs, contacts, web bookmarks, apps, etc. can be transferred from your Android to any iOS device. Though, I have noticed the app was acting strangely during data transfer. My Wi-Fi got some issues, and Move to iOS couldn’t properly complete the transfer.
Guide for Move to iOS to transfer messages from Nokia G42 5G to iPhone 12/XS (Max)
Download, install, and launch Move to iOS on your Nokia G42 5G.
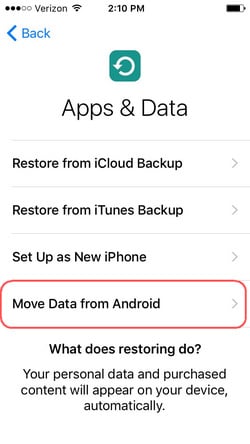
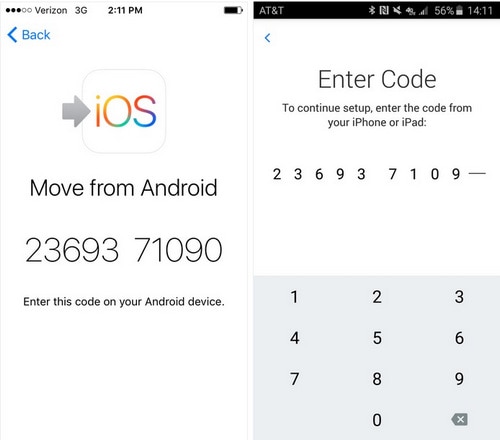
Get the iPhone 12/XS (Max) and configure the setup and then connect to Wi-Fi. Browse to the ‘Apps & Data’ option, click ‘Move Data from Android’ thereafter. Click the ‘Continue’ button and note the passcode.
On your Nokia G42 5G, click ‘Continue’ and then press ‘Agree’. When prompted for a passcode, enter the one you got from iPhone 12/XS (Max).
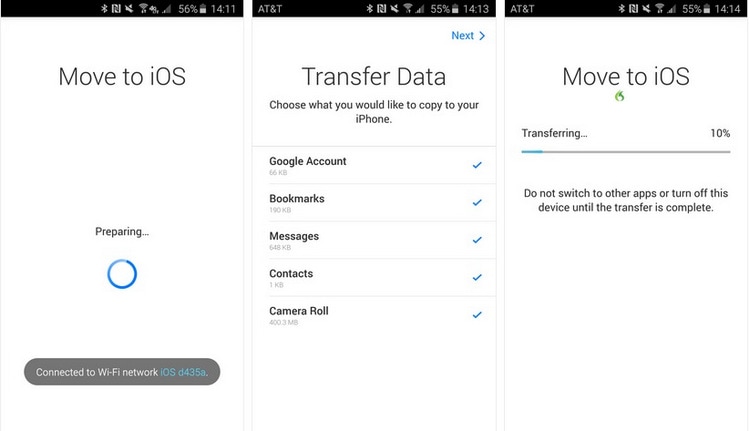
Ensure that the Android phone is also connected to Wi-Fi. Now, click on ‘Messages’ from the ‘Data Transfer’ option. Click ‘Next’ and wait a while to finish the data transfer. Hit the ‘Done’ button afterward once the iPhone 12/XS (Max) gets synched with these messages, set up your iCloud account, and view the messages.
How to transfer Android messages to iPhone 12/XS (Max) using SMS Backup+
You can learn how to transfer messages from Nokia G42 5G to iPhone 12/XS (Max) without a computer using the SMS Backup+ app. It can automatically backup the SMS, call logs, MMS using a different label in Google Calendar and Gmail. Remember that MMS can’t be restored later.
Here is how to transfer messages from Nokia G42 5G to iPhone 12/XS (Max) with SMS Backup+:
- Get the Android phone and sign in to your ‘Gmail account’ and press ‘Settings’. Go to ‘Forwarding and POP/IMAP’. Now, tap ‘Enable IMAP’ and click ‘Save Changes’.
- Download SMS Backup+ on your Nokia G42 5G from Google Play Store and launch it. Tap ‘Connect’ choose the recently used Gmail account. Now, allow the app to backup the SMS to your Gmail account and hit ‘Backup’.
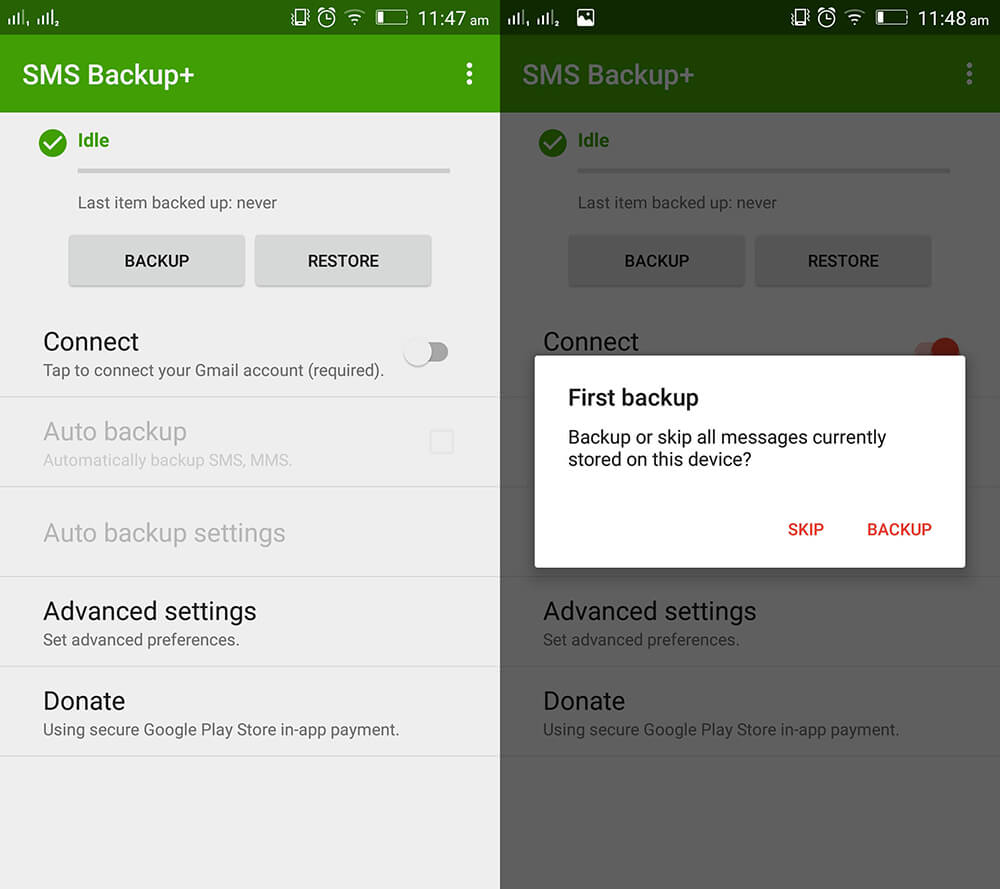
- Now, since you’ve backed up your messages to Gmail, you can simply access and view them from any device. Simply launch Gmail with the same account, and you’ll be able to get hold of all your messages right on your iPhone 12/XS (Max).
Note: The messages will be enclosed in an Email attachment. That implies you won’t be able to import your messages to your iMessage app. If you want to transfer SMS to the default messages app, try Dr.Fone - Phone Transfer. It’s a one-click and reliable desktop software.
2 Methods to Transfer Messages from Nokia G42 5G to iPhone 12/XS (Max) with a PC
How to transfer all messages to iPhone 12/XS (Max) at a time
For transferring messages from your Nokia G42 5G to iPhone 12/XS (Max), opting for Dr.Fone - Phone Transfer is a great idea. Speak of transferring contacts, photos, music, text messages, etc. from Nokia G42 5G to iOS devices or vice versa, it has a proven record of credibility.
This is how to import SMS to iPhone 12/XS (Max) from Android –
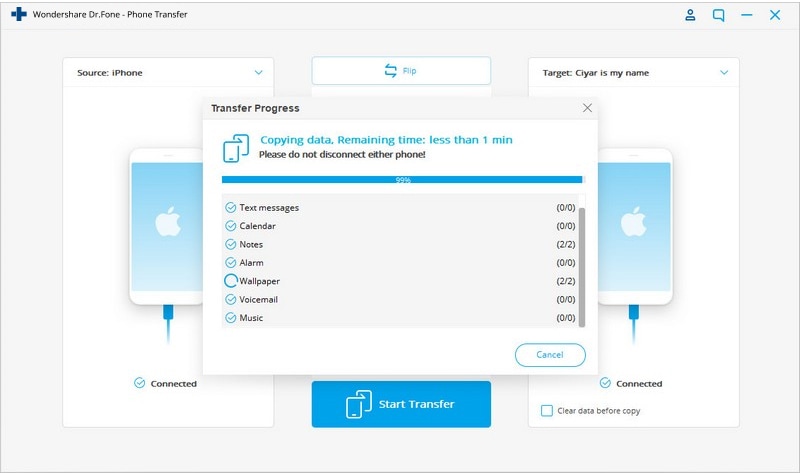
Step 1: Download Dr.Fone - Phone Transfer on your PC and then install and launch it. Connect your Android and iPhone 12/XS (Max) using respective USB cables.

Step 2: Hit the ‘Switch’ tab from the Dr.Fone window. Select the Android phone as the source and iPhone 12/XS (Max) as the destination over here. Use the ‘Flip’ button in case you have altered the selection.
Note: Selecting the ‘Clear Data before Copy’ option completely deletes everything from the target.

Step 3: In this section, tap on ‘Messages’ and select the ones you want to selectively transfer. Hit the ‘Start Transfer’ button and then wait a while. Click ‘OK’ once the transfer process is over.

How to transfer only selected messages iPhone 12/XS (Max)
Alternatively, you can opt for Dr.Fone - Phone Manager for selectively transferring messages from your Nokia G42 5G to your iPhone. Managing your iPhone is easy with such an effective desktop tool.
Dr.Fone - Phone Manager (iOS)
Quickly and Selectively Transfer Messages from Nokia G42 5G to iPhone 12/XS (Max)
- Managing your iPhone data got easier by exporting, delete, and add data with this software.
- It is compatible with the most recent iOS firmware. It requires no internet connectivity to carry out the data transfer.
- When you are looking for a quick transfer of SMS, videos, music, contacts, etc. to your iPhone 12/XS (Max), this tool is a gem.
- The best-known alternative to iTunes to connect your PC and iPhone.
3981454 people have downloaded it
Here comes the guide to import SMS to iPhone 12/XS (Max) from Android selectively:
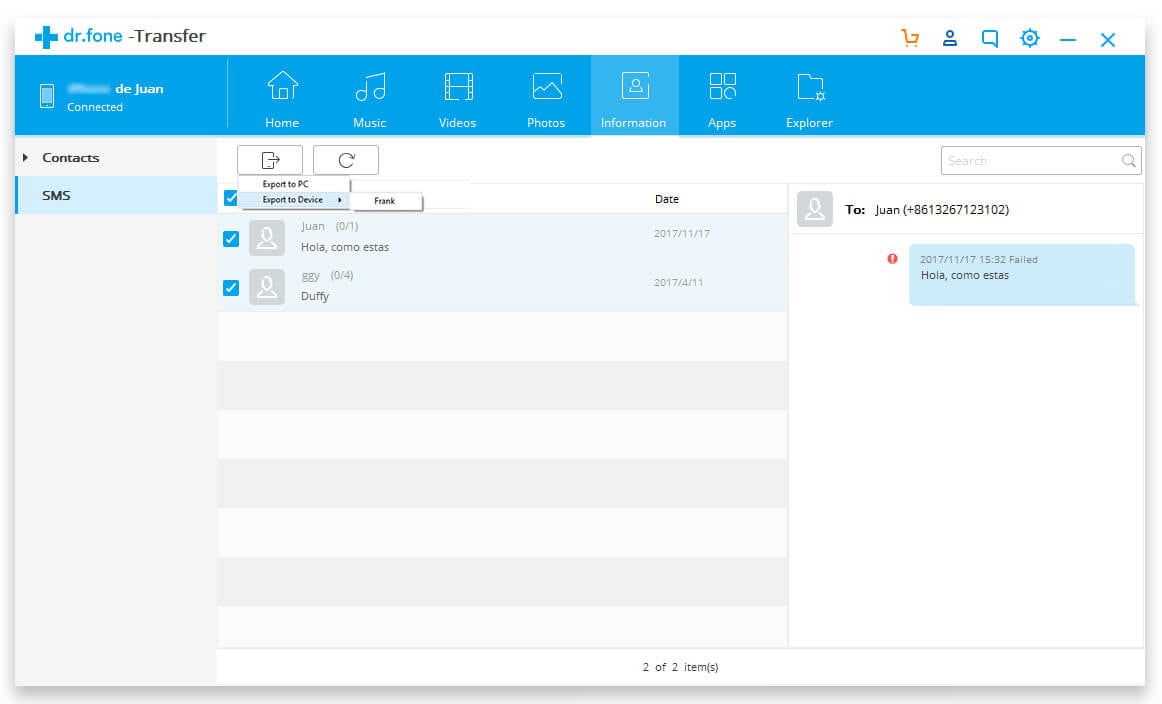
Step 1: Get Dr.Fone - Phone Manager installed and launched on your PC. Now, press the ‘Phone Manager’ tab.
Step 2: Use respective USB cables to connect your Android and iPhone 12/XS (Max) with the computer and then pick Android as the source device. Then, select the ‘Information’ tab displayed on the top.
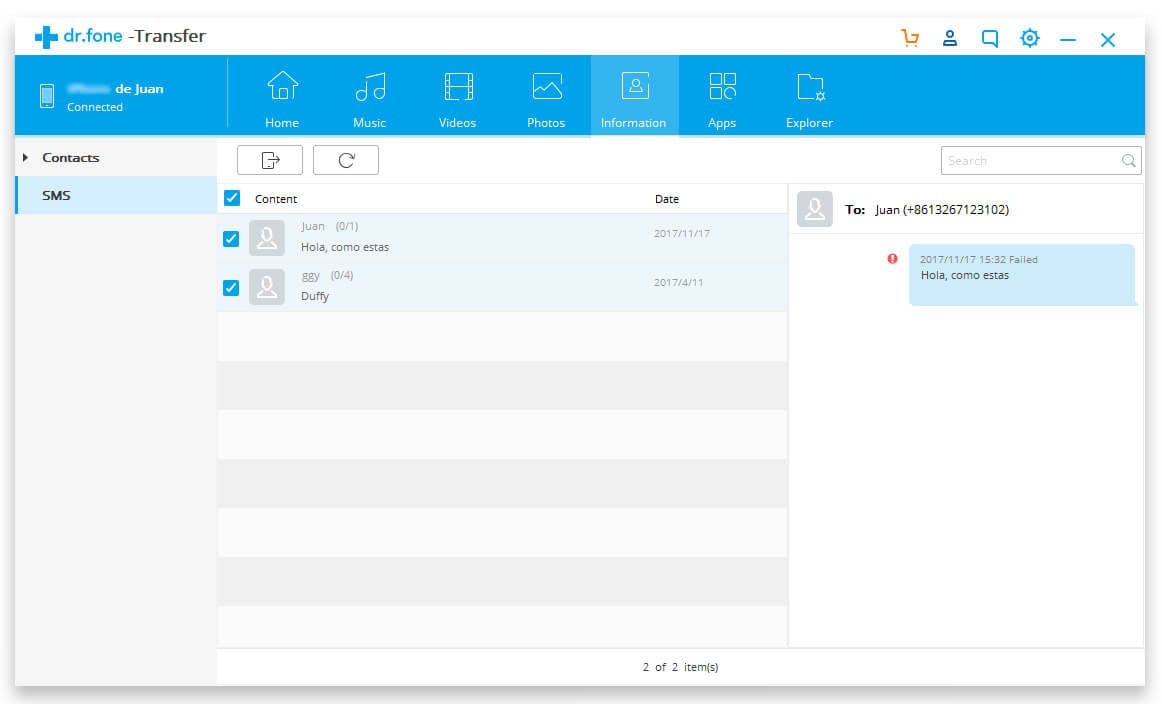
Step 3: From the list of messages, choose the desired text messages and hit the ‘Export’ button. Click the ‘Export to device’ button consecutively and complete the process with the onscreen guide.
Conclusion
I hope, this article brought you answers to your messages and data transfer queries. From my own experience, I found Dr.Fone Toolkit as the most viable option. If you are looking for a solution that leads to no data loss, then you can go for either Dr.Fone - Phone Transfer or Dr.Fone - Phone Manager .
- Title: In 2024, 4 Ways to Transfer Music from Nokia G42 5G to iPhone | Dr.fone
- Author: Emma
- Created at : 2024-07-17 21:33:28
- Updated at : 2024-07-18 21:33:28
- Link: https://android-transfer.techidaily.com/in-2024-4-ways-to-transfer-music-from-nokia-g42-5g-to-iphone-drfone-by-drfone-transfer-from-android-transfer-from-android/
- License: This work is licensed under CC BY-NC-SA 4.0.