
In 2024, 5 Techniques to Transfer Data from Google Pixel 7a to iPhone 15/14/13/12 | Dr.fone
5 Techniques to Transfer Data from Google Pixel 7a to iPhone 15/14/13/12
It comes as no surprise that the new iPhone 15 series is turning heads and making a splash worldwide. Well, why not? These recently launched Apple devices are packed with highly advanced features that offer an unparalleled mobile experience to everyone. Among them are the USB-C port for faster charging and the improved A16 Bionic chip for smoother performance. Therefore, it’s fair to say that any model from the iPhone 15 catalog is worthy of ultimate consideration.
Switching to a brand-new smartphone requires plenty of work. You first need to set up the new device and configure your digital accounts. But with regard to data transfer and file synchronization, you don’t have to worry a lot. There are many ways you can try to quickly transfer data from Google Pixel 7a to iPhone 15.
In this article, we’ll talk about the essential factors involved in data migration of two devices with different operating systems. We will also provide a few tutorials on how to transfer data from Google Pixel 7a to iPhone 15 conveniently. Continue reading below to learn more.
Factors to Consider When Transferring Data From Google Pixel 7a to iPhone
It’s probably true to say that data migration is a major procedure. It’s not just a simple file-sharing method that can be completed in no time. A lot of things are involved when data is transferred from one device to another. To help you understand it better, below is a list of factors affecting the quality and speed of data migration.
File Size
The size of files being transferred affects the process in general. This is because the Google Pixel 7a device on the receiving end needs to allocate the data individually to the available space. That’s why the procedure often takes some time to complete if the volume of files is quite large. On the hand one hand, data migration gets completed in a snap if the file size is smaller.
### File TypeThe type of files involved in the data transfer is also a factor. Why so? The simplest explanation is that compatibility matters a lot in any form of file transfer. For instance, the procedure will likely fail if the receiver’s device does not support the data you’re trying to send. But don’t worry. There are lots of methods to transfer data from Google Pixel 7a to iPhone 15 if your first try doesn’t work out.

Device Storage
Device storage is definitely the first thing you should check before going ahead with the data transfer. It is important that the receiver’s device has adequate memory to accommodate the incoming files. Otherwise, the transfer will likely not push through.

Operating Systems
Migrating files between two smartphones with the same operating system is convenient. It’s because these two devices share an identical data-sharing structure. On the one hand, data migration between two smartphones with different operating systems is almost similar to the former. It’s just that the steps for the latter are quite longer. But don’t sweat it. There are many tutorials that can help you transfer data from Google Pixel 7a to iPhone 15 conveniently.
5 Various Ways to Transfer Data From Google Pixel 7a to iPhone 15
Sharing files between Android and iOS smartphones has become a lot easier today than ever before. In fact, you can actually complete the entire process in just a matter of minutes. No need for any advanced intervention or external assistance. Just initiate the specific technique that perfectly matches your circumstances. With that said, listed below are the top five methods to transfer data from Google Pixel 7a to iPhone 15.
Method 1: Transfer contacts from Google Pixel 7a to iPhone 15 using iCloud
Do you need to transfer contacts from Google Pixel 7a to iPhone 15? Well, you can easily do that by importing your Android contacts to iCloud. Don’t worry. The steps are very simple. Here’s how to do it quickly and easily.
- Step 1: On your Google Pixel 7a smartphone, go to the Contacts app.
- Step 2: Click Fix & Manage.
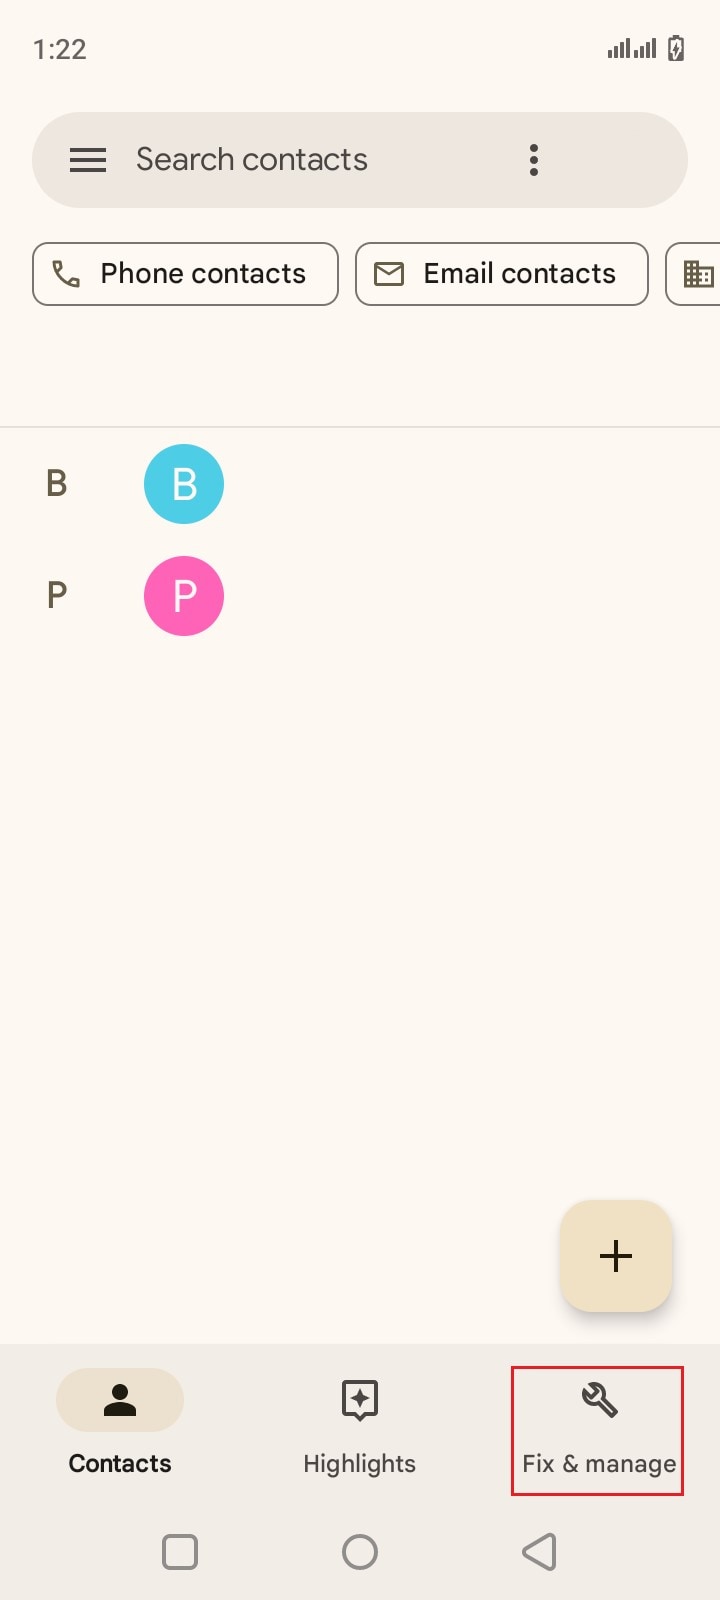
- Step 3: Click Export to File.
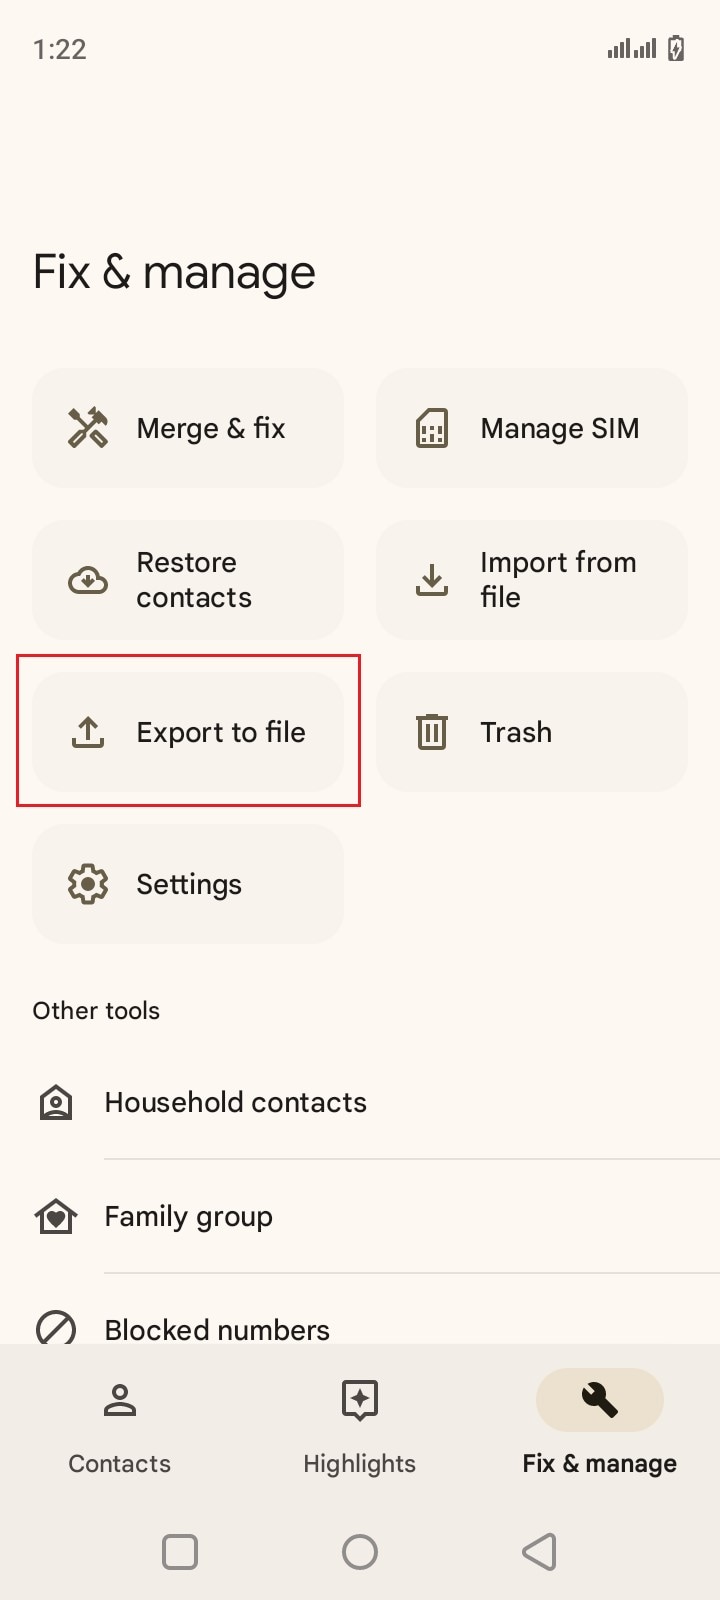
- Step 4: Choose the specific account that contains the contact list you want to export.
- Step 5: Then, click Save.
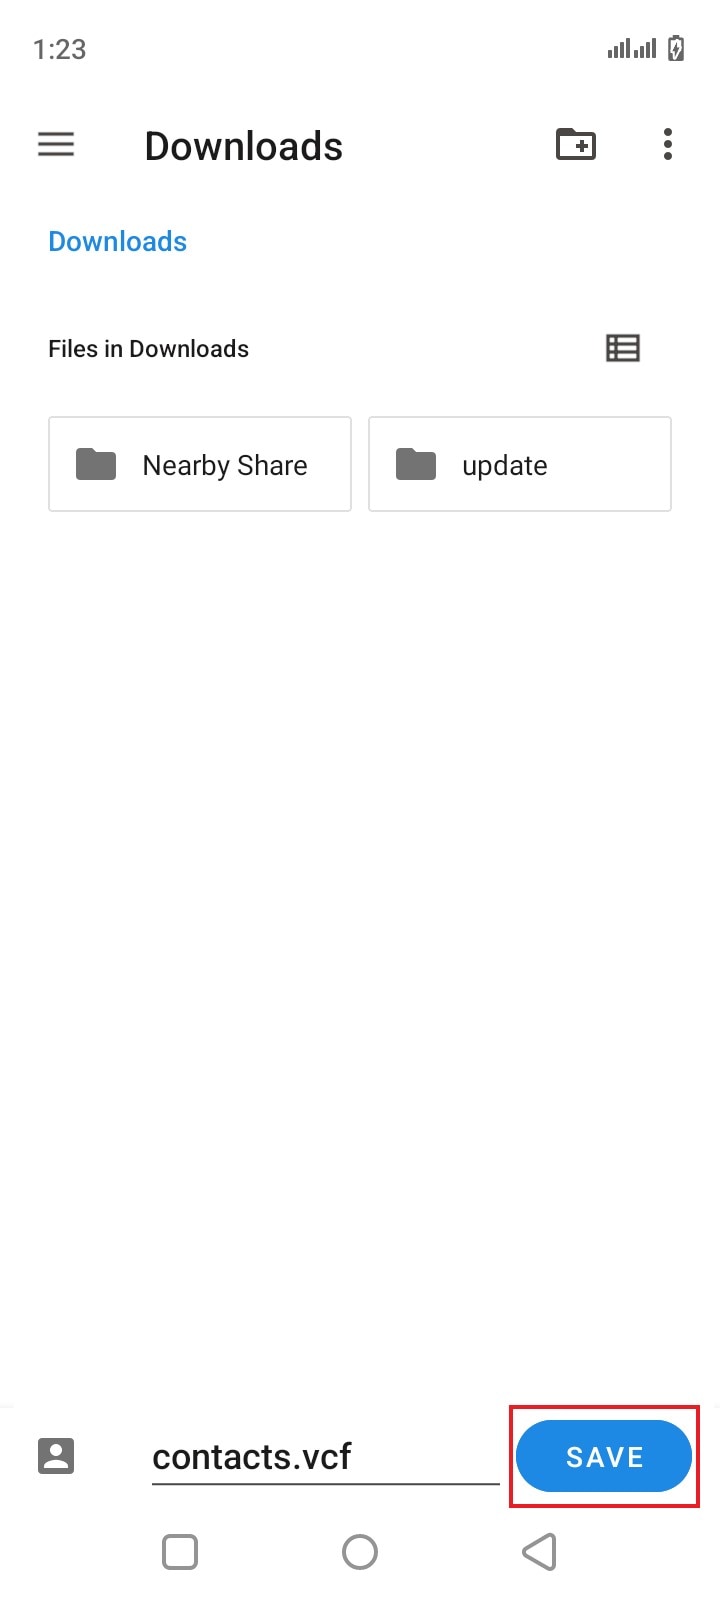
- Step 6: Launch the Browser app on your Google Pixel 7a smartphone.
- Step 7: Visit icloud.com and then log in to the iCloud account you’re currently using on your iPhone 15. From there, import the VCF file.
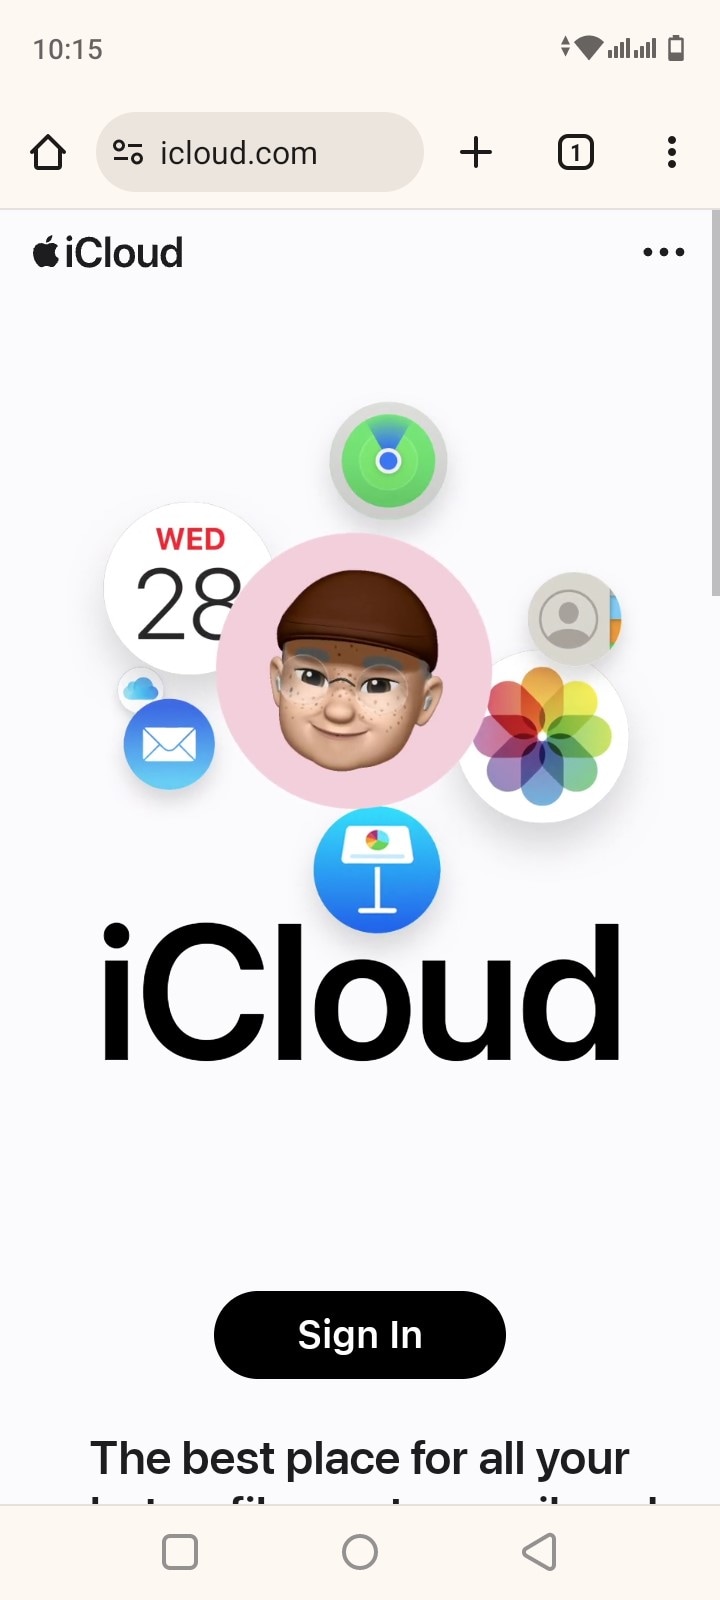
- Step 8: Once the contact list has been imported successfully, check the Contact app on your iPhone and then find the newly uploaded contacts.
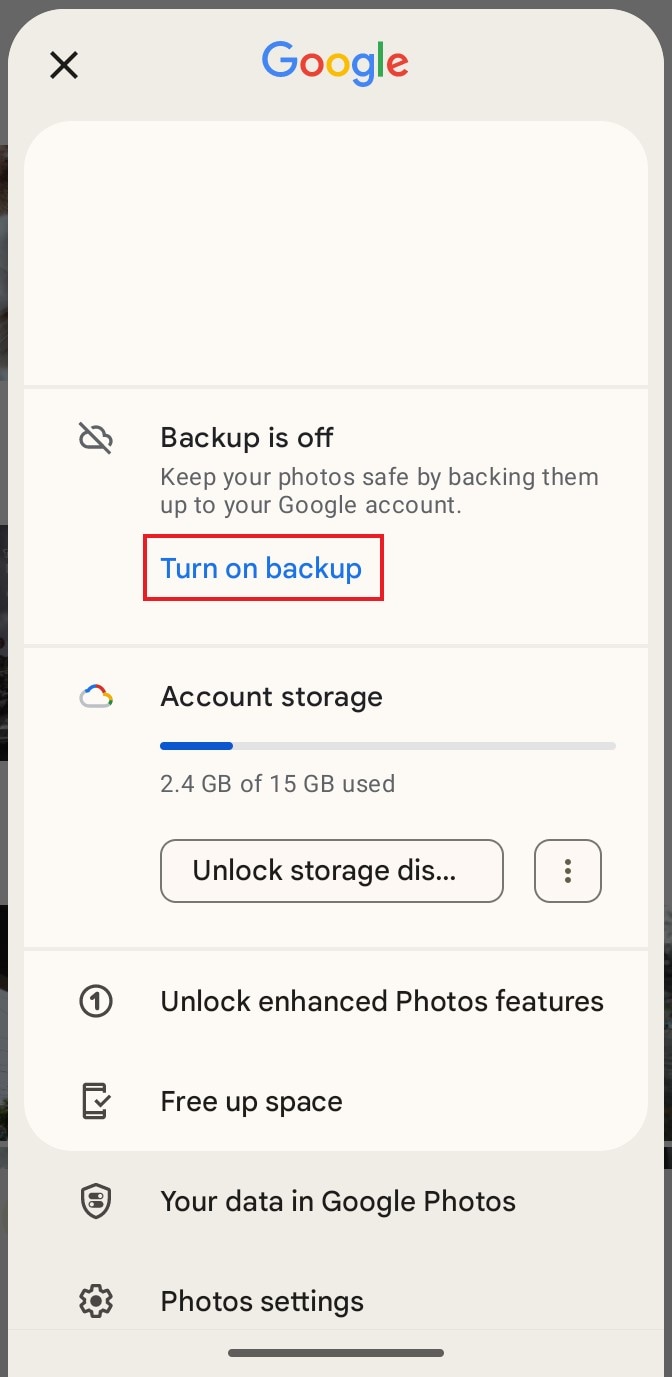
Method 2: Transfer photos from Google Pixel 7a to iPhone 15 using Google Photos
Google Photos is not just a mere gallery application that allows users to view media files. It can also aid in the data migration between two devices since Google Photos stores the files online. Do you want to try it now? Here’s the guide on how to transfer data from Google Pixel 7a to iPhone 15 using Google Photos.
- Step 1: Go to the Google Photos application on your Google Pixel 7a smartphone.
- Step 2: Click your Profile icon at the top-right corner of your screen.
- Step 3: Click Back Up Now. At this point, Google Photos will back up your local photos to the Google servers.
- Step 4: On your iPhone, download and install the Google Photos application. Log in to the same Gmail account you use to back up the photos on your Google Pixel 7a device. From there, access the media files and save them to the local storage of your iPhone 15.
Method 3: Transfer emails and calendar details from Google Pixel 7a to iPhone 15 using Gmail
Do you use Gmail to manage your emails and organize your calendar appointments? If so, you can easily transfer data from Google Pixel 7a to iPhone 15 by simply syncing your Gmail account. Here’s a quick guide on how to do it.
- Step 1: Go to the Settings app on your iPhone 15.
- Step 2: Click Mail.
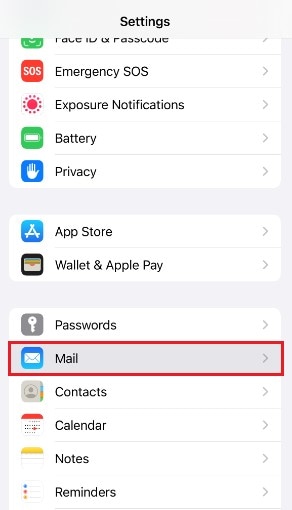
- Step 3: Click Accounts. Right after, click Add Account.
- Step 4: Select Google. From there, log in to your Gmail account.
- Step 5: Toggle on the radio button next to Mail and Calendar.
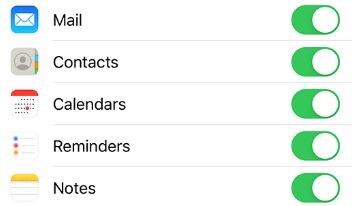
- Step 6: Check your Mail and Calendar applications. Find the Gmail data you’ve just synced.
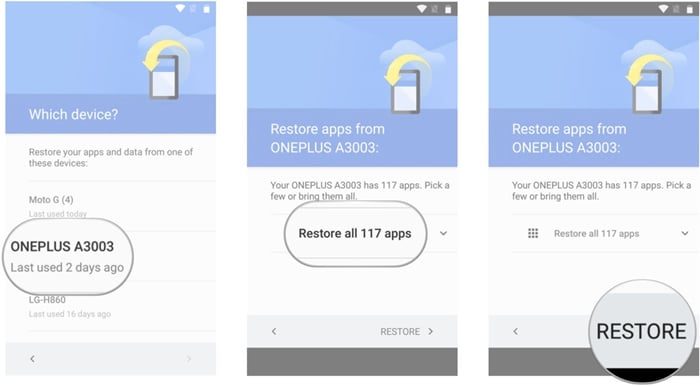
Method 4: Transfer data from Google Pixel 7a to iPhone 15 using Move to iOS
Move to iOS is a mobile application that automates data migration between Android to iOS devices. It’s very simple to navigate and easy to use. In fact, you can complete the entire process within a few minutes. Here’s a short guide on how to transfer data from Google Pixel 7a to iPhone 15 using Move to iOS.
- Step 1: On your Google Pixel 7a, install the Move to iOS application from Google Playstore.
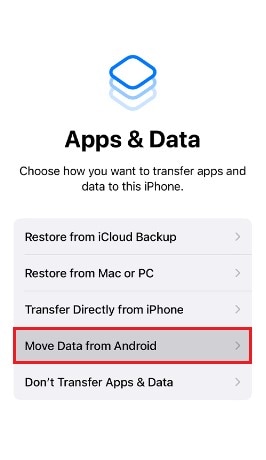
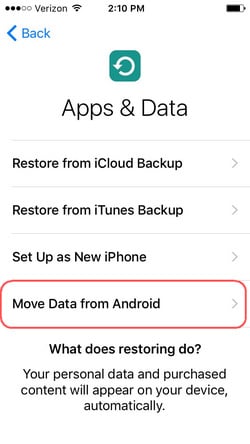
- Step 2: While the application is being downloaded on your Android smartphone, start setting up your new iPhone 15. On the App & Data screen, select Move Data From Android.
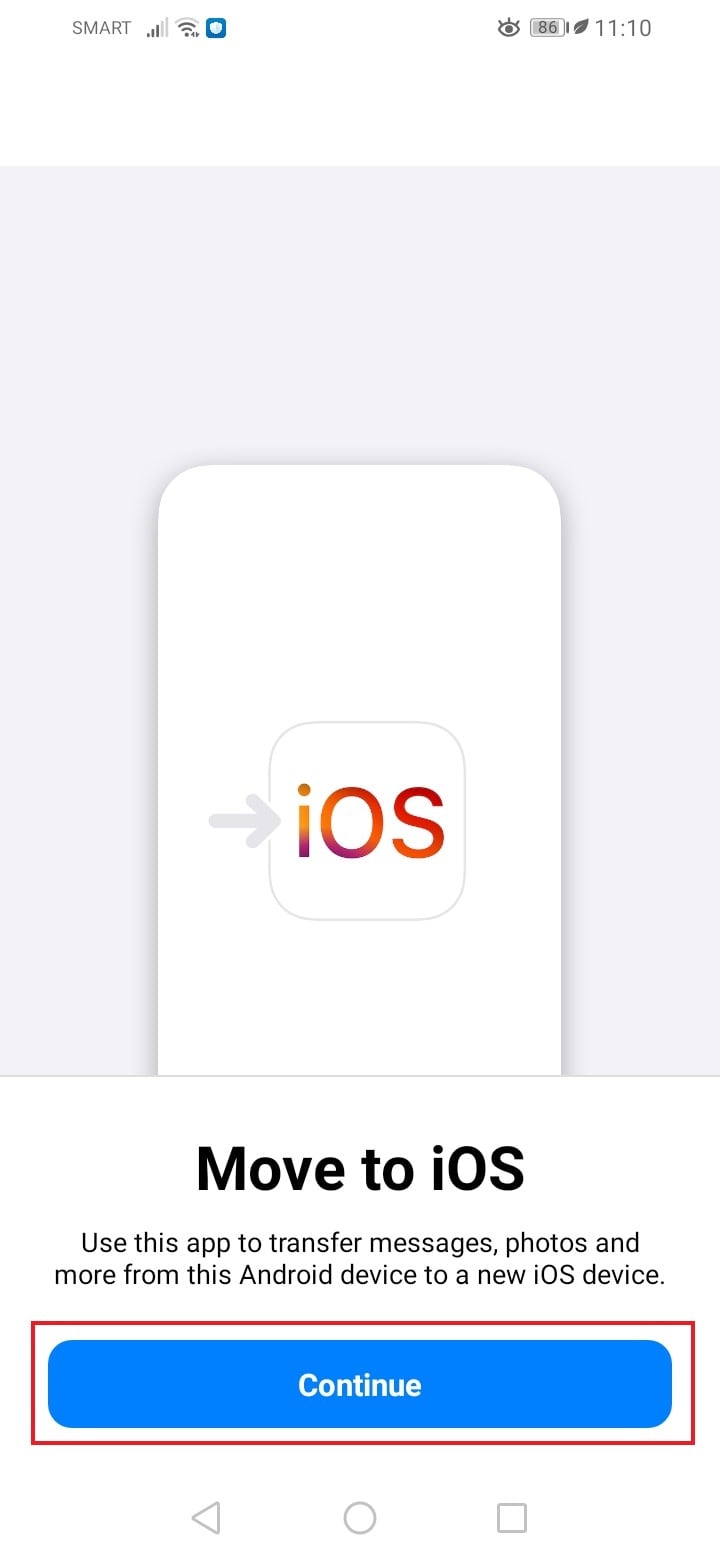
- Step 3: Get back to your Google Pixel 7a smartphone and then launch the newly installed Move to iOS application.
- Step 4: Read Apple’s Terms and Conditions. Right after, click Agree to proceed.
- Step 5: Click Continue.
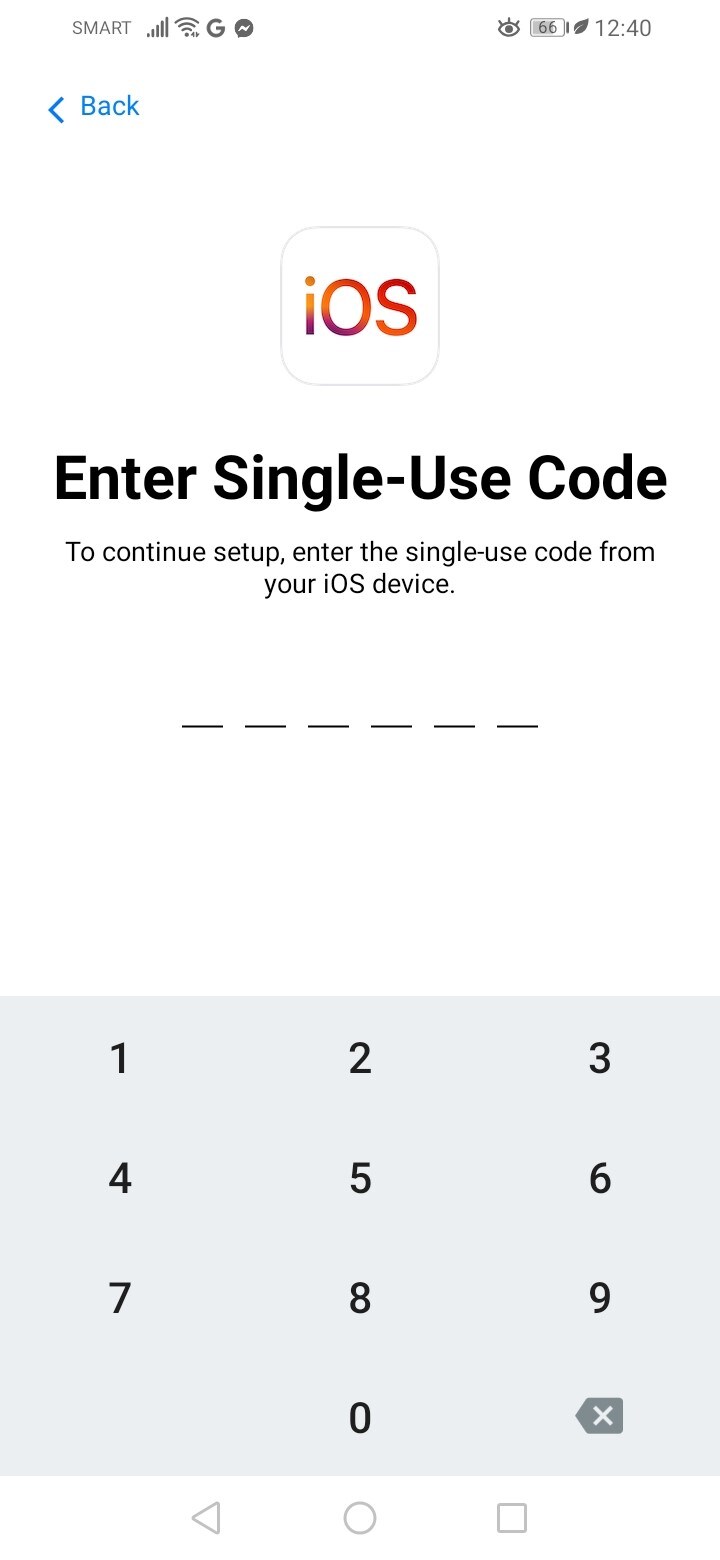
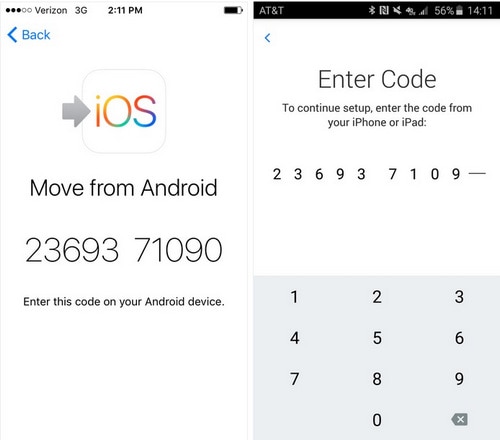
- Step 6: On the Find Your Code page, click Continue to connect your Google Pixel 7a to your new iPhone 15.
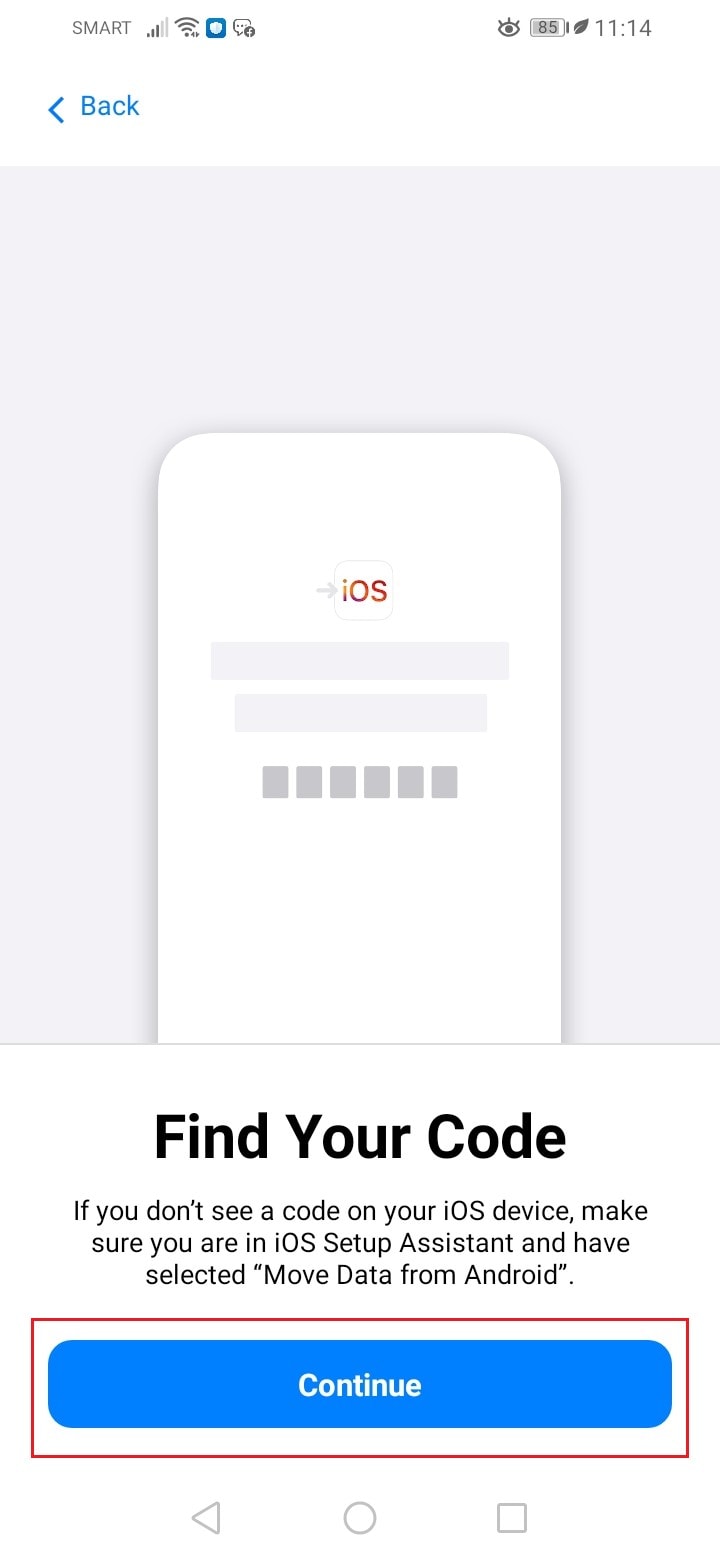
- Step 7: Find the unique code displayed on your iPhone 15 screen. Then, enter it into your Google Pixel 7a smartphone.
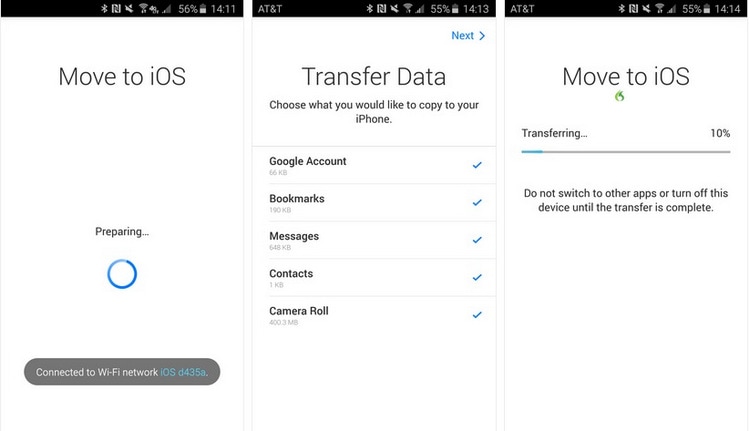
- Step 8: Choose the files you want to transfer. After that, initiate the process. Wait until all the files have been transferred to your new iPhone 15.
Method 5: Transfer data from Google Pixel 7a to iPhone 15 using Wondershare Dr.Fone.
There’s no denying that the first four methods are all effective in this regard. But if you wish to opt for a more convenient option, Wondershare Dr.Fone can absolutely help you with that. It has a powerful data migration feature that can help you transfer data from Google Pixel 7a to iPhone 15. Here’s a short guide to get you started.
- Step 1: Download Wondershare Dr.Fone from its official website. Then, install it on your computer.
- Step 2: Launch the newly installed Wondershare Dr.Fone on your desktop. Once it fully loads up, connect your Google Pixel 7a and iPhone 15 using a data cable.
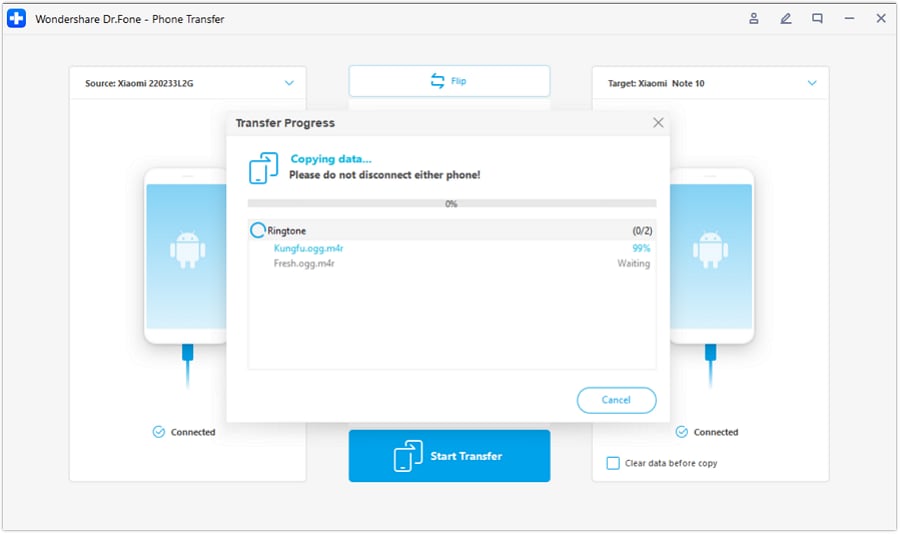
- Step 3: Go to the left-side panel and then click Toolbox. Choose Phone Transfer among the provided options on the main dashboard.

- Step 4: Wondershare Dr.Fone will then ask you to nominate a Source and a Target from your two mobile devices. Set the Google Pixel 7a as the former and the iPhone 15 as the latter. Alternatively, click the Flip button to modify the direction of the transfer based on your preference.

- Step 5: Select the specific categories of files you want to transfer. Right after, click Start Transfer to proceed.

- Step 6: Wait while Wondershare Dr.Fone is facilitating the transfer. If you wish to terminate the progress, simply click Cancel.

- Step 7: After completing the process, click OK to wrap it up. Check your files from their respective locations afterward.

How to Back Up Your Google Pixel 7a Before the Transfer
Data migration by means of the five methods enumerated above is considered safe and secure. However, it doesn’t mean that implementing preventive measures against data loss is no longer necessary. Backing up your device before any major procedure is still highly recommended. That’s why don’t initiate the phone transfer without backing up your files first. Below is the guide on how to back up files using Wondershare Dr.Fone.
- Step 1: Launch the Wondershare Dr.Fone application on your computer. Then, connect your Google Pixel 7a using a data cable.
- Step 2: Access the left-side panel and then click My Backup. On the main dashboard, click Back Up Now.

- Step 3: Follow the on-screen instructions for SMS backup. After that, click OK to proceed.

- Step 4: Wait while Wondershare Dr.Fone is backing up your files.

- Step 5: After completing the backup process, click View Backups or Open in Folder to check your files.

Conclusion
Data migration is the least of your concerns when switching to a new smartphone. Why so? The simplest explanation is that there are phone transfer methods to choose from. Big thanks to modern technology and digital advancements. Refer to the provided guide below if you need to transfer data from Google Pixel 7a to iPhone 15. One of them can help you a lot, depending on your current circumstances. Do you want a more convenient option? The phone transfer feature of Wondershare Dr.Fone is what you’re looking for. Download the application for free and take advantage of its all-in mobile solution features.
## How to Transfer Contacts from Google Pixel 7a to iPhone XS/11When it comes to transferring contacts from Google Pixel 7a to iPhone XS/11, we play enough care to not mess with the process.
Though, there are numerous ways to switch to a new iPhone from an Android device, some of them are really outdated. Consider, transferring contacts from Google Pixel 7a to iPhone XS/11 via Bluetooth for that matter. If you have a huge phone book, then it will take ages to finish moving the contacts. You don’t need to worry at all. We have amazing alternative solutions for you.
In this article, we are going to introduce 4 vital solutions to make your transition from Google Pixel 7a to iPhone a smooth sail.
How to transfer contacts from Google Pixel 7a to iPhone XS/11 in one click
If you want to import contacts to iPhone XS/11 from Android in a single click, there is no better solution than Dr.Fone - Phone Transfer . Not only contacts but a wide range of device data can be transferred from your Android to an iPhone with this tool. Photos, music, text messages, videos, etc. are a few of them.
Dr.Fone - Phone Transfer
Easily transfer contacts from Google Pixel 7a to iPhone XS/11
- Enables you to transfer data between Android, iOS, and WinPhone with a single click.
- Secure and there is no data loss while you transfer data between devices.
- Supports more than 6000 mobile device models from various brands like Apple, Sony, Samsung, HUAWEI, Google, etc.
- Supports all Android and iOS versions.
4,683,556 people have downloaded it
Well! After going through the amazing features of with Dr.Fone - Phone Transfer. How about learning the step-by-step procedure to transfer contacts from Google Pixel 7a to iPhone XS/11 with Dr.Fone - Phone Transfer?
Here is how to transfer contacts from Google Pixel 7a to iPhone XS/11 in 1 click:
Step 1: Download Dr.Fone - Phone Transfer on your computer and then install it. Launch it after installation and hit on the ‘Phone Transfer’ tab on the Dr.Fone software interface.
Step 2: Now, connect both your Google Pixel 7a and iPhone XS/11 to the computer using genuine USB cables.
Step 3: Once the Google Pixel 7a devices get detected, you need to select Android as the source device on the next screen. As you wish to import contacts to iPhone XS/11 from Android, the iPhone XS/11 needs to be selected in place of the target device.

Note: In case of a wrong selection, you can tap the ‘Flip’ button and change the selection.
Step 4: In this step, you have to select the data type you want to move from your Google Pixel 7a to the iPhone XS/11, i.e. ‘Contacts’. Now, push the ‘Start Transfer’ button consecutively to initiate the transfer.

Note: If it’s a used iPhone XS/11, then you can select the ‘Clear Data before Copy’ checkbox for erasing any existing data on it prior to transferring the data.
Step 5: Allow some time to get the process completed. Your contacts are successfully transferred from the Android device to iPhone XS/11.
How to transfer contacts from Google Pixel 7a to iPhone XS/11 using Move to iOS
Move to the iOS app from Apple allows you to make a smooth transition from an Android device to an iOS device. Be it an iPhone, iPad, or iPod Touch, this tool makes transferring content a cakewalk.
It involves quick steps to automatically moving data. Apart from contacts, it supports message history, web bookmarks, camera photos and videos, free apps, etc. It will transfer data to a factory reset or brand new iPhone only.
Step by step guide of Move to iOS app for importing contacts to iPhone XS/11 from Android
- Download the ‘Move to iOS’ app on your Google Pixel 7a. Install and launch it soon after.
- Get your iPhone XS/11 and then set up the language, passcode, touchID. After that connect it to a Wi-Fi network. Browse for the ‘Apps & Data’ and select ‘Move Data from Android’.
- On your Google Pixel 7a, click ‘Continue’ and then ‘Agree’. A prompt asking for a code will appear on your Android mobile.
- Get the iPhone and hit ‘Continue’ and note the displayed code. Enter this on your Google Pixel 7a. When both the Android and iPhone are connected to the Wi-Fi, select ‘Contacts’ from the data types and tap ‘Next’.
- On your Google Pixel 7a, click ‘Done’ as soon as the data transfer is complete. Let the iPhone XS/11 sync the contacts. You need to set up your iCloud account now. Once it is done, you can view the transferred contacts on the iOS device.
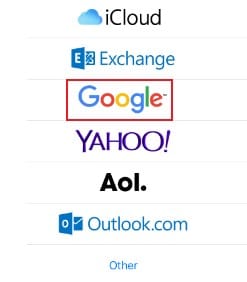
How to transfer contacts from Google Pixel 7a to iPhone XS/11 using Google account
Alternatively, you can import contacts to iPhone XS/11 from Gmail from your Android mobile, as well. to do that, you need to get your Gmail and Android device contacts to get synced first.
Here is the detailed guide to transferring contacts from an Android to an iOS device.
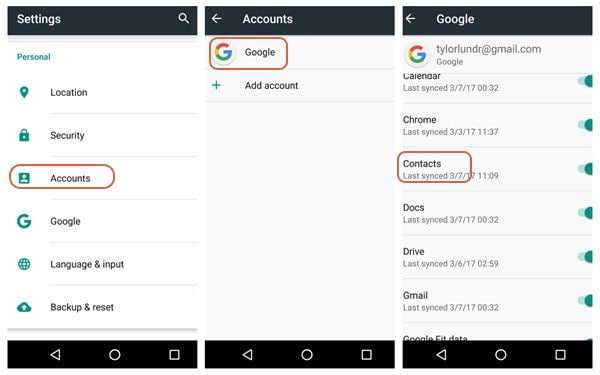
- Go to your Google Pixel 7a and go to the ‘Accounts’ tab and enable syncing of contacts. ‘Settings’ > ‘Accounts’ > ‘Google’ > Turn on ‘Contacts’ switch > tap on ‘3 vertical dots’ > ‘Sync Now’.
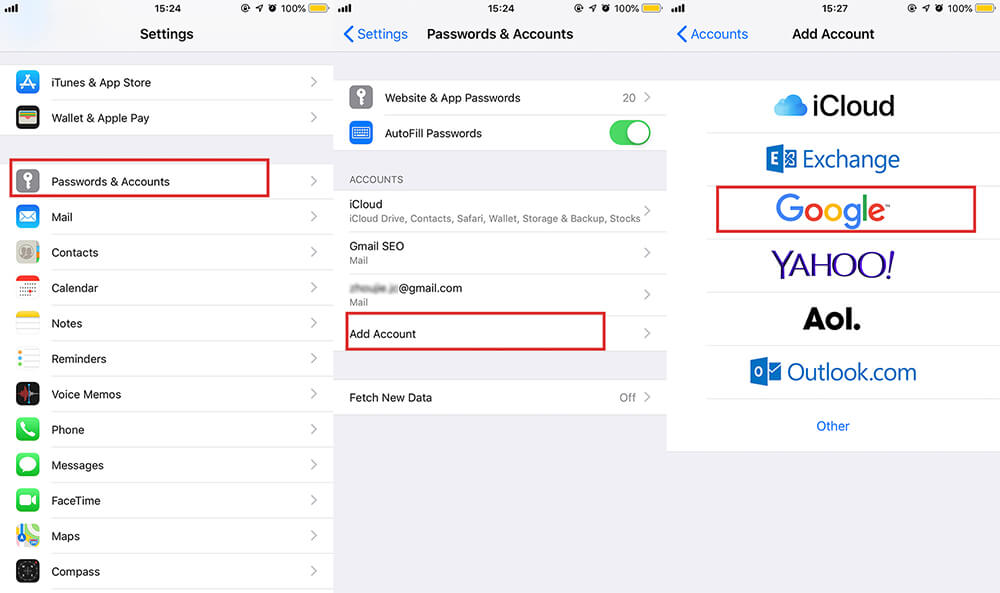
- Now, you need to add the same Gmail account to your iPhone X, in order to sync back contacts from it. For this, head to ‘Settings’ > ‘Passwords & Accounts’ > ‘Add Account’ > ‘Google’. Then, you’re required to punch in the details of the same Gmail account used over Android to sync contacts.
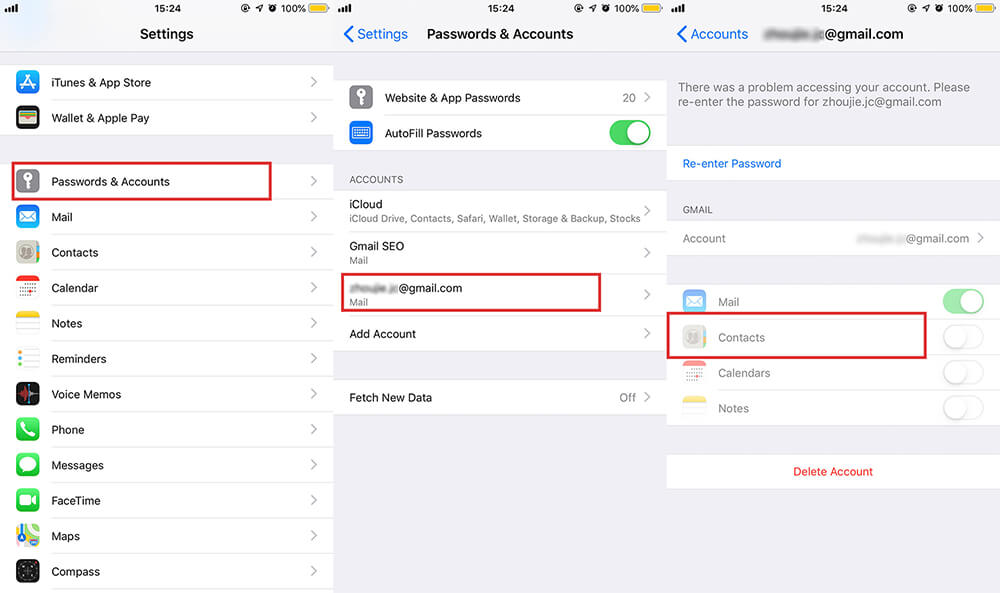
- Lastly, get into ‘Settings’, then ‘Passwords & Accounts’, tap on your Gmail account and ensure that the ‘Contacts’ switch is turned on. Turn it on if it is not already. Within a short span of time, you can find the Android contacts appearing on your iPhone XS/11 after that.
How to transfer contacts from Google Pixel 7a to iPhone XS/11 using SIM card
As you know the SIM card itself can hold a certain number of contacts, depending on the carrier and phone make and model.
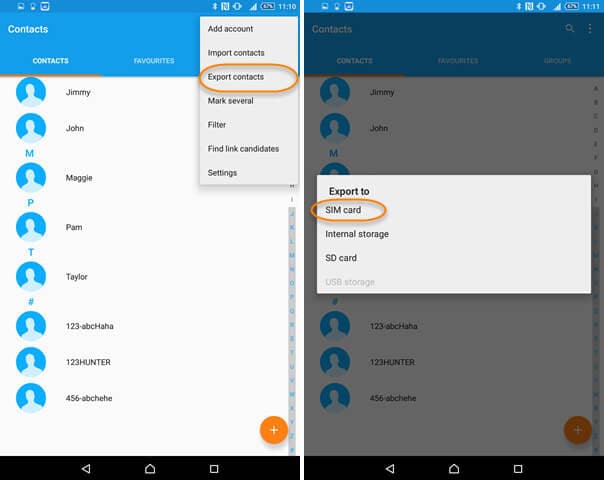
- Open the ‘Contacts’ app and click on ‘More’. Go to the ‘Import/Export’ or simply ‘Export Contacts’ option there.
- Click on ‘Export to SIM’ or ‘SIM card’ and then select the source of contacts i.e. ‘Phone’/’WhatsApp’/’Google’/’Messenger’.
- Then hit ‘Export’ and ‘Continue’ afterward.
- Now, open the SIM card slot of your Google Pixel 7a and unmount the SIM. Insert it on your iPhone XS/11 and turn it on. You can find the contacts on your iPhone.
Note: Though, it’s rare nowadays. In case you happen to own a very old SIM card and your Google Pixel 7a supported the size. You might need to cut it to fit the iPhone XS/11’s micro-SIM slot.

[Easiest Guide] How to Clone Google Pixel 7a Phone? 6 Ways In 2024
Changing Android phones is no longer a tedious job. By using an Android clone app, you can simply transfer your data from one device to another. In this way, you can clone Android phone without the need to maintain multiple accounts Android. In this post, we will teach you how to clone Android phone using five different solutions. So what are you waiting for? Read this guide and clone Android phone without much trouble.
You can watch the video below to clone Android phone and copy its data
Part 1: How to clone Android phone using Dr.Fone - Phone Transfer?
To clone an Android phone in a fast and secure manner, simply take the assistance of Dr.Fone - Phone Transfer . It is a part of the Dr.Fone toolkit and can be used to transfer all sorts of data directly from one device to another. For instance, you can transfer your photos, videos, music, messages, contacts, notes, and multiple accounts to Android detail as well. It is compatible with all the leading Android devices manufactured by brands like Samsung, HTC, Lenovo, Huawei, LG, Motorola, and more. Having an intuitive process, it will let you Android clone in no time. To learn how to clone Android phone using Dr.Fone Switch, follow these steps:
Dr.Fone - Phone Transfer
Transfer Photo from Google Pixel 7a to iPhone in 1 Click Directly!
- Cross-platform data shift between any device of your choice from Android and iPhone.
- Support massive data, including images, videos, music, messages, contacts, apps, and more.
- Works perfectly with almost mobile phones and tablets, such as iPhones, iPad, Samsung, Huawei, etc.
- Fully work with mobile system iOS 17 and Android 13 and computer system Windows 11 and Mac 12.
- 100% safe and risk-free, backup & restore data as the original.
3981454 people have downloaded it
1. Download Dr.Fone - Phone Transfer on your Windows or Mac before changing Android phones. Afterward, you can connect both devices to the computer and launch the Dr.Fone toolbox.
2. Click on the “Phone Transfer” button to view its dedicated interface.
3. As you can see, Dr.Fone will automatically detect your connected devices. One of them would be marked as the source, while the other one would be the target device.
4. If you wish to change their positions before you do Android clone, click the “Flip” button.

5. Now, you can select the kind of data that you wish to transfer from one device to another.
6. Click on the “Start Transfer” button to clone Android phone.
7. Sit back and wait for a while as the application will transfer the selected content from one device to another. Make sure that both devices stay connected to the computer.
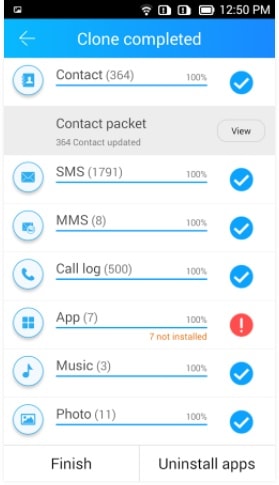
8. Once the cloning process is completed, you will be notified.
In this way, you can easily learn how to clone Android phone in a few seconds. Later, you can disconnect the Google Pixel 7a devices and use them readily. Besides Android, you can also use Dr.Fone - Phone Transfer to transfer data between different platforms as well.
Part 2: Clone Android phone using SHAREit
SHAREit is a popular cross-platform device-sharing app that over 600 million users use. The app can be used to perform a wireless transfer of data at a fast speed. This is done without utilizing your data usage or via Bluetooth. The app uses Wifi directly to clone Android phone. While changing Android phones, use SHAREit the following way:
Download SHAREit: https://play.google.com/store/apps/details?id=com.lenovo.anyshare.gps
1. First, install the SHAREit app on both Android devices. You can get it for free from the Google Play Store.
2. Now, launch the app on the source device and tap on the “Send” option.

3. This will further let you select the data files that you wish to transfer. Click on the “Next” option after selecting your content.
4. Bring the target device in close proximity to the sender and launch the app. Mark it as a receiving device.

5. This will make the phone automatically detect the sending device. Select the Wi-Fi hotspot that is associated with the sending device to form a secure connection.
6. As the connection is made, you can select the receiving device on the source phone. This will initiate the cloning of your data.

Part 3: Clone Android phone using CLONEit
While changing Android phones, users often look for alternatives. Therefore, you can also take the assistance of CLONEit to transfer your files in a batch. The app can also be used to migrate multiple accounts Android without much trouble. To learn how to clone Android phone using CLONEit, follow these steps:
1. Download the CLONEit app on both devices. After installing, launch the app on the Google Pixel 7a devices and turn on their Wifi.
Download CLONEit: https://play.google.com/store/apps/details?id=com.lenovo.anyshare.cloneit
2. Mark the source device as a “Sender” and the target devices as a “Receiver”.

3. In this way, the target device will automatically start looking for the sender. You can view the Wifi hotspot the sender has created to verify the connection.
4. You need to confirm the connection request by tapping on the “Ok” button of the prompt.

5. Once the connection has been established, you can clone Android phone easily. Just go to the source device (sender) and select the data that you wish to transfer.
6. After making your selection, click on the “Start” button to make your target device the Android clone of your old device.
7. Wait for a while as the transfer of data would take place. You will be notified as soon as it is completed successfully.
Part 4: Clone Android phone using Phone Clone
Huawei has also developed a dedicated app – Phone Clone to transfer the data from one Android device to another wirelessly. In this way, you don’t have to set up multiple accounts Android for every phone you buy. The app supports a fast and extensive cloning option with a user-friendly interface. To make your new device an Android clone, follow these steps:
1. Launch the Phone Clone app on both devices. If you don’t have the app, you can download it from Google Play.
Download Phone Clone: https://play.google.com/store/apps/details?id=com.hicloud.android.clone&hl=en
2. After launching the app on the new phone, mark it as a receiver. This will turn your phone into a Wi-Fi hotspot.
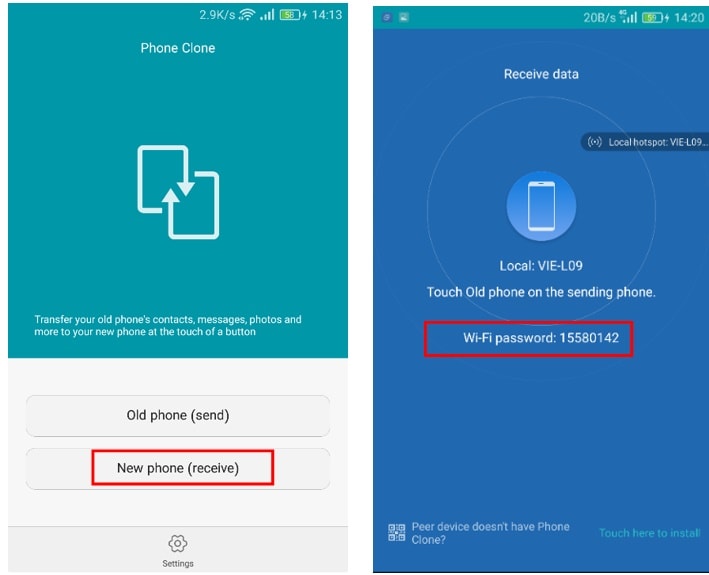
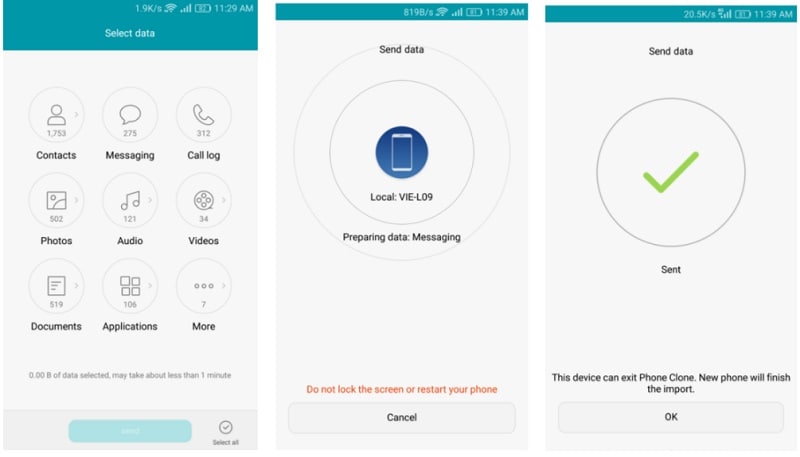
3. Go to the app on the source device and mark it as a sender. It will start looking for the available Wifi networks.
4. Connect it to the hotspot you have recently created and verified the password.

5. Once a secure connection is established, you can clone Android phone by selecting the data from the source device.
6. Tap on the “Send” button and transfer the selected content to the target device wirelessly.
Part 5: Clone Android phone using Google Drive
Google Drive is ideally used to store data on the cloud. However, it can also be used to back up and restore your data. Even though Google Drive transfers the data wirelessly, it consumes a substantial amount of data usage. Also, the process is not as fast or smooth as other options. Nevertheless, you can learn how to clone Android phone using Google Drive by following these steps:
1. Unlock your source Android device and go to Settings > Backup & Reset. From here, you can turn on the option to backup your data.
2. Furthermore, you can verify the account on which you are taking the backup of your data and turn on the option of “Automatic Restore”. This will be of great help if you are managing multiple accounts Android.

3. After taking a complete backup of your data, turn on your brand-new Android to perform its setup.
4. Log in using the credentials of your Google Account. Make sure that the account should be linked to your previous device.

5. After signing in, the Google Pixel 7a device will automatically sync to the account and identify the backup files. Simply select the most recent backup file.
6. Also, you can select the apps and app data that you wish to transfer. Click on the “Restore” button at the end to make your target device an Android clone of your previous phone.
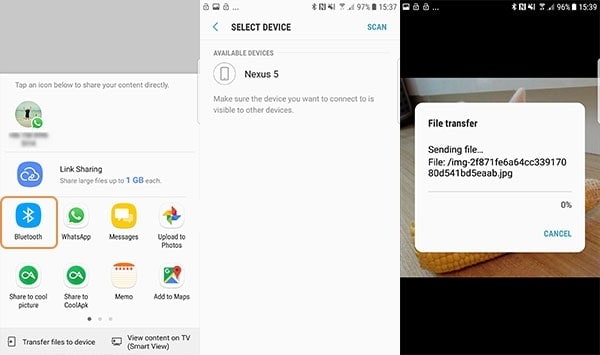
Part 6: Clone Google Pixel 7a Phone Using Bluetooth
Using Bluetooth for cloning an Android phone is not the most efficient method. It is more suitable for transferring specific files than creating a comprehensive clone. Moreover, it’s a slow and manual process that requires you to select and transfer files one by one. Here’s how you can use Bluetooth for this purpose:
1. On both Android devices, turn on Bluetooth and pair the Google Pixel 7a devices. Navigate to the file you want to send on the source device, tap “Share,” and select “Bluetooth.”
2. Now, choose the targeted device to send the file. Move to the other device and “Accept” the incoming file transfer.

FAQs
1. Is Android phone clone safe?
Cloning an Android phone using reputable and trusted methods, apps, or tools is generally safe. Nonetheless, it is of utmost importance to exercise prudence and employ trustworthy software to safeguard your personal data. Be sure to obtain apps and tools exclusively from reputable sources, such as the Google Play Store, and adhere to the best data security practices.
2. Can I clone between different Android phone models or brands?
The ability to clone between different Android phone models or brands depends on the specific method or tool you are using. Dedicated phone transfer apps like Wondershare Dr.Fone - Phone Transfer or Phone Clone are often designed to work across various Android models and brands.
3. What should I do before cloning my Android phone to ensure a smooth process?
Before commencing the cloning procedure for your Google Pixel 7a, creating a backup of your device’s data is crucial. It can be accomplished by using either the integrated backup feature or a trustworthy third-party app.
This precautionary step guarantees the safety of your data should any issues arise during the cloning procedure. Moreover, it’s imperative to verify that both devices are running the most up-to-date software updates and application versions.
Conclusion
Now, when you know six different ways to clone Android phone, you can easily move from one device to another without experiencing any data loss. This guide will certainly help every individual who is changing Android phones. Feel free to share it with your friends and family and let us know about your feedback regarding these solutions as well.
- Title: In 2024, 5 Techniques to Transfer Data from Google Pixel 7a to iPhone 15/14/13/12 | Dr.fone
- Author: Emma
- Created at : 2024-07-17 21:47:45
- Updated at : 2024-07-18 21:47:45
- Link: https://android-transfer.techidaily.com/in-2024-5-techniques-to-transfer-data-from-google-pixel-7a-to-iphone-15141312-drfone-by-drfone-transfer-from-android-transfer-from-android/
- License: This work is licensed under CC BY-NC-SA 4.0.