
In 2024, 5 Ways to Transfer Music from Realme 11 5G to Other Android Devices Easily | Dr.fone
5 Ways to Transfer Music from Realme 11 5G to Other Android Devices Easily
There can be many reasons to transfer music from Realme 11 5G to Other Android Devices, such as the change of the Realme 11 5G device since you bought a new one or want to keep music readily available on multiple devices. Therefore, if you face a dilemma over how to transfer music from one Android device to another, this is the right article for you.
So, keep reading to know about five different ways that will help you transfer your music files easily.

Part 1: How to transfer music from Realme 11 5G to Other Android Devices in 1 click?
The transfer of all music files from one Android phone to another with a single click of the mouse has never been easier. The switch feature on Dr.Fone - Phone Transfer program has made this action a lot simpler and even faster to transfer music from Realme 11 5G to Other Android Devices. It can also transfer other file formats such as other multimedia files, contacts, text messages, call logs, including apps and app data files.
Dr.Fone - Phone Transfer
Transfer Music from Realme 11 5G to Other Android Devices in 1 Click Directly!
- Easily transfer every type of data from Realme 11 5G to Other Android Devices, including apps, music, videos, photos, contacts, messages, apps data, call logs, etc.
- Works directly and transfer data between two cross-operating system devices in real-time.
- Works perfectly with Apple, Samsung, HTC, LG, Sony, Google, HUAWEI, Motorola, ZTE, Nokia, and more smartphones and tablets.
- Fully compatible with major providers like AT&T, Verizon, Sprint, and T-Mobile.
- Fully compatible with iOS 16 and Android 13
- Fully compatible with the latest Windows or Mac version.
3981454 people have downloaded it
Here are the few simple steps required to be carefully followed to transfer music from Realme 11 5G to Other Android Devices.
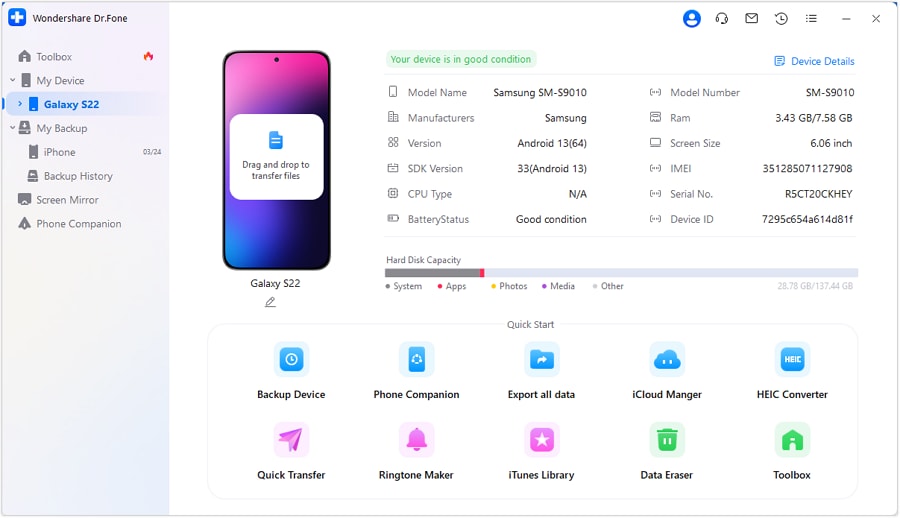
Step 1. The first step is to download the Dr.Fone software from its official website and then run the installer wizard. Once the installation is complete, launch the program.

Step 2. Now, connect both the Android phones via a good USB cable to the PC. Thereafter, go to the Dr.Fone program’s main interface and click on the “Switch” button. You will see the two devices connected with the Source device on the left and the Destination device on the right on the next screen.
If you want the Source device to be the Destination device, click on the “Flip” button at the center of the screen.


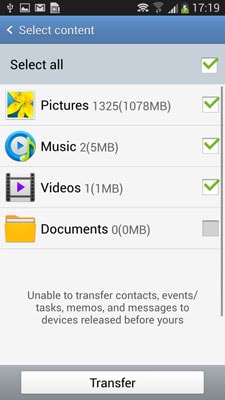
Step 3. You can now select the files to be transferred by checking the corresponding boxes. In this case, check the Music box and then click on “Start Transfer” to transfer music from Realme 11 5G to Other Android Devices.

You should now see your music files being transferred with the overall progress displayed on a dialogue box.
There you go; within a few seconds, your music files will be transferred successfully.

Part 2. How to Transfer Music from Realme 11 5G to Other Android Devices Selectively?
Another way to transfer music from Realme 11 5G to Other Android Devices is by using the transfer feature on Dr.Fone - Phone Manager (Android) . As the name implies, this feature can be used to transfer files from one Android device to another by selecting the particular music file one by one instead of choosing an entire music file.
Dr.Fone - Phone Manager (Android)
Transfer Android Media to Android Devices Selectively
- Transfer files between Android and iOS, including contacts, photos, music, SMS, and more.
- Manage, export/import your music, photos, videos, contacts, SMS, Apps, etc.
- Transfer iTunes to Android (vice versa).
- Manage your iOS/Android device on the computer.
- Fully compatible with the latest iOS and Android version.
3981454 people have downloaded it
Here are a few easy steps to follow on how to transfer music from Realme 11 5G to Other Android Devices.
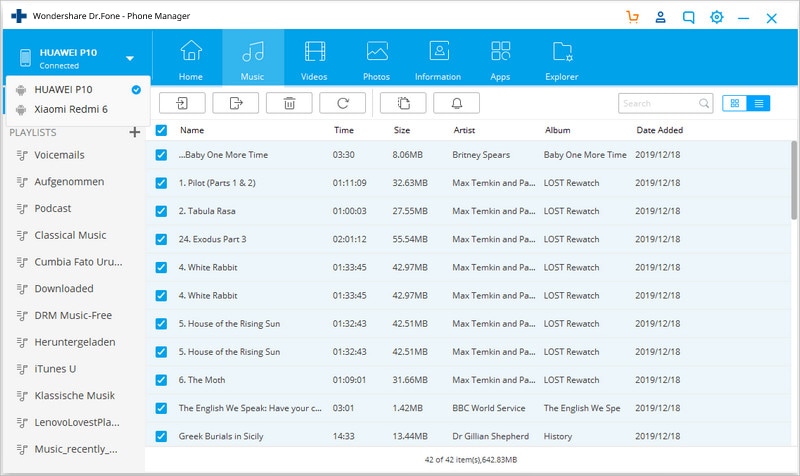
Step 1: After installing Dr.Fone software on your computer and launching it, connect the Android device via USB cable. Now click on the “Music” tab at the top of the screen amongst the other listed options. The program would immediately recognize your device.
Step 2. The moment all the audio files or music files on the connected device are displayed on the Dr.Fone software screen. You can scroll down and select each file you wish to copy or select an entire folder from the left side pane.

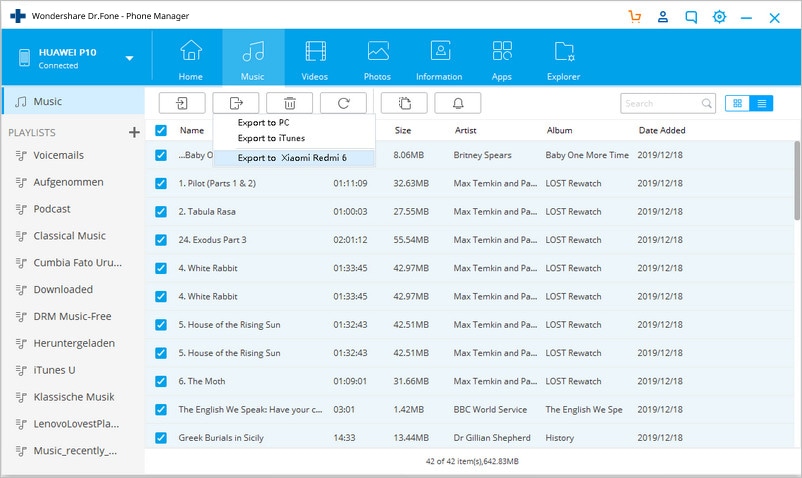
Step 3. After selecting the music files, you wish to copy, click on the “Export” button on the app and then select “Export to Device”. You will see the other device connected; there, click on the Realme 11 5G device’s name to begin the transfer process.
Part 3. How to transfer music from Realme 11 5G to Other Android Devices using Bluetooth?
Bluetooth transfer is one of the oldest methods that can be used to transfer music from Realme 11 5G to Other Android Devices, and it is a simple way to make use of it.
Here are the steps to follow to know how to transfer music from Realme 11 5G to Other Android Devices.
Step 1. There are two ways you can turn on Bluetooth on your Realme 11 5G
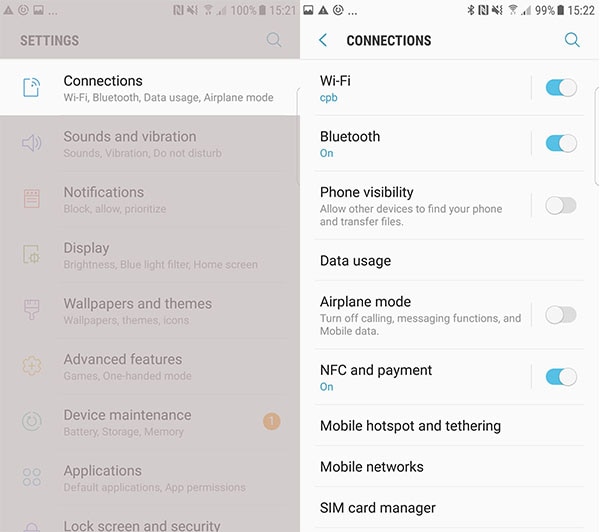
Method 1: The first method is to swipe from top to down on your Realme 11 5G to view the swipe menu on some Android OS. You would be able to view and immediately turn on Bluetooth with a single click.
Method 2: Go to “Connection” from the Settings Menu on your Realme 11 5G, and then in the Connections options, you will see “Bluetooth”. Make sure it is switched on. Also, ensure that the phone’s Bluetooth visibility is enabled so that your device can be seen and easily paired with the other device.
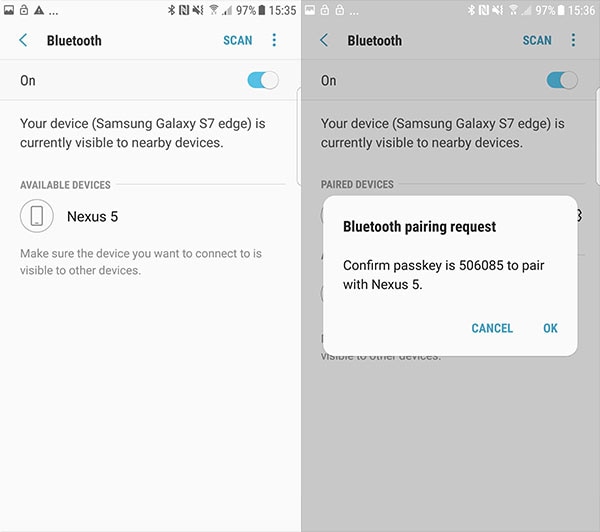
Step 2. Now, switch on the Bluetooth for the destination device as well. Once done, search for your device’s Bluetooth name on the phone and click to pair both Bluetooth devices together.
Mostly, you will be provided with a pair confirmation code that will be displayed on both devices. Click OK to pair both devices successfully.
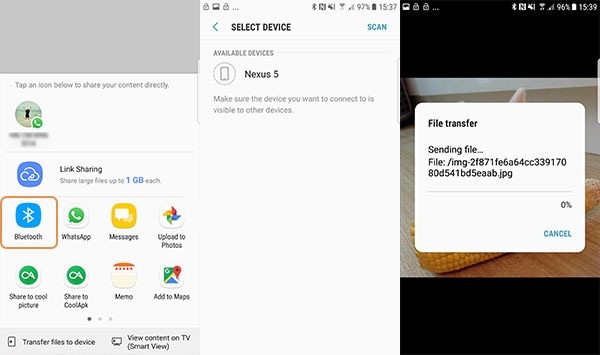
Step 3. The final step is to head to the File Manager app on your phone or go to your Music Player, select the music file you wish to transfer, and then click on your device’s Share button or logo.
Here, scroll until you see the “Bluetooth” option. You will be immediately prompted to select the Realme 11 5G device to share with, click the earlier paired device name, and then click on “Accept” on the other device.
This is how you can transfer music files from Realme 11 5G to Other Android Devices using Bluetooth.
Part 4. How to transfer music from Realme 11 5G to Other Android Devices using NFC?
NFC or Near Field Communication is another wireless means to transfer music from Realme 11 5G to Other Android Devices. Although, unlike Bluetooth, this method requires contact between the two devices making the transfer.
Below are the steps on how to transfer music from Realme 11 5G to Other Android Devices using NFC.
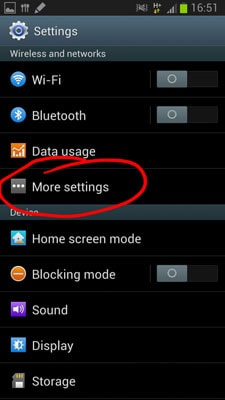
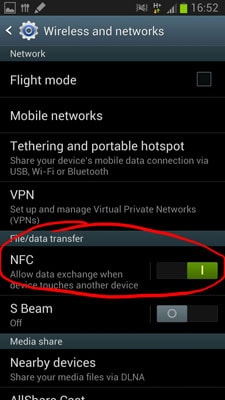
Step 1. First, enable NFC connection on both the Realme 11 5G devices between which you want to transfer the music files. To switch on NFC on Android, go to Phone’s “Settings” and click on “More Settings” under “Wireless and Network” options. Now click on the NFC button to ensure that it is switched On. Do the same on the other Android device as well.
Step 2. Before you begin to transfer, you need to touch the back of both devices (whose NFC has already been turned on), you will notice that both devices vibrate upon a successful connection. This means you can now start transferring your music files.
Step 3. After connecting both the Realme 11 5G devices, you will be provided with media options of files that can be transferred. In this case, select the Music files and then click on “Transfer” to send the music files via NFC.
Part 5. How to transfer music from Realme 11 5G to Other Android Devices using Google Play Music?
Google Play Music is a free Music streaming service provided by Google and available for all users with a Google account. Follow these steps to transfer music files to an Android phone using Google play.
Note: You need a Google account to be able to make use of this service
Step 1. Open Google Play Music on your computer and sign in with your already existing Google account details (Same as on 1st Android Device).
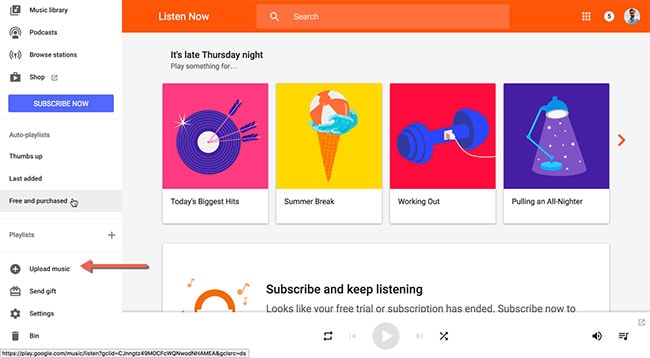
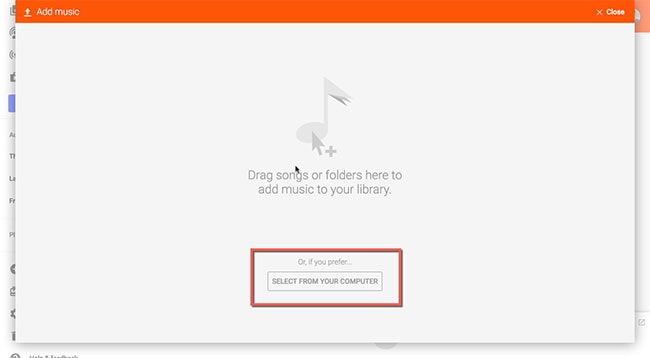
Step 2. You can now upload music files by clicking on the Upload button at the left corner of the screen to view the main Panel of the page. At the bottom of the page, click on “Select From Your Computer” to upload music files from your computer to Google Play.
Step 3. After the upload has been completed, download the “Google Play Music” app on your other Android phone and then log in to the app with the same Google credentials. You will see all the recently uploaded tracks on your Google Play account. You can now stream or download them easily.
At last, we hope that you now know how to transfer music from Realme 11 5G to Other Android Devices devices safely and securely through the above article. In fact, you have got two very good options to perform the transfer in the form of Dr.Fone - Phone Transfer and Dr.Fone - Phone Manager (Android) . Well, choose the most convenient one for you and make sure that you proceed with the guided steps mentioned for each way.
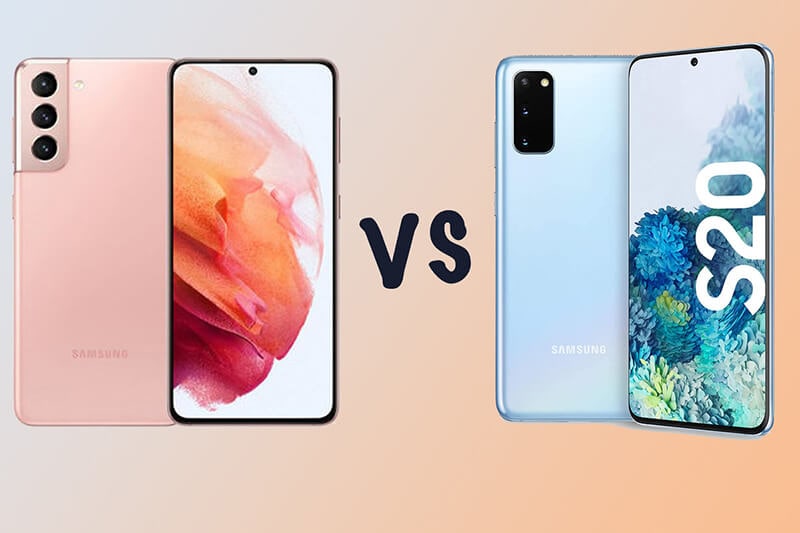
How to Transfer Photos From Realme 11 5G to Samsung Galaxy S21 Ultra
Samsung is one of the leading brands in the technology market, and Samsung Galaxy S21 Ultra is the latest device released by them. Among all the gadgets and smartphones released by Samsung, S21 Ultra is really a remarkable creation that is amazingly filled with all the latest technology. If you are thinking about getting a brand new Samsung S21 Ultra, you are in the right place.
In this article, we will talk about the Samsung Galaxy S21 Ultra price and all its details with proper dissection that will help you determine whether this device is worth the value. Also, you’ll definitely get to learn how to transfer photos to Samsung Galaxy S21 Ultra with advanced software that surely does the job well. So let’s get to the details without wasting any time!
Part 1: Samsung Galaxy S21 Ultra Introduction
Samsung Galaxy S21 Ultra is the new model of the Samsung Galaxy series. This amazing device has so many features, the best quality camera, and 5G connectivity. This model of the Samsung Galaxy series has a pro-grade camera. Using its camera, you can take the best shots of anything. You can record video like a professional by using the camera. The camera has multi-lens with zoom-in features. You cannot take a perfect zoomed shot using another device because they don’t have these zoom-in features.
Record your life’s best moment with the Samsung Galaxy S21 Ultra 8k video feature. With this camera, you can also make GIFs, record short videos, slow-motion videos, etc. Galaxy S21 Ultra has a 108MP resolution. When it comes to the battery, you should know it has one lithium battery. Once you charge the Realme 11 5G device, it’s ready to go for a long day. Now share your life moment on social media and enjoy your favorite game with Galaxy Ultra 5G. This device is available in multiple colors, including Phantom Black, Phantom Silver, Phantom Titanium, Phantom Navy, and Phantom Brown.
Part 2: The Differences among S21, S21+, and S21 Ultra
We all know how amazing the Samsung Galaxy S21 series is. Their features and quality make us fall in love with these devices. Though Samsung Galaxy S21, S21+, and S21 Ultra have many common features, there are still many differences among these. So, let’s find out what those are:
Price:
Among Samsung Galaxy S21, S21 Plus, and S21 Ultra, Samsung Galaxy S21 has the lowest price in town. It costs only $799. After S21, here comes S21 plus. The price of this model starts at $999. Now when it comes to Galaxy S21 Ultra, it begins at $1299. So, comparatively, Galaxy S21 Ultra is an expensive model. Among these three models, ultra has the best quality features, camera, and RAM capacity.
Design:
Though three of these have the same design of camera and position, the real difference is in size. Galaxy S21 comes in 6.2 inches screen, Galaxy S21 Plus has a 6.7-inch screen, and Galaxy S21 Ultra has a 6.8-inch screen. Galaxy S21 Ultra comes with a wide camera bump that fits the extra sensors. Galaxy S21 Ultra fits better in hands because of its curved edges.
Display:
As mentioned, the difference of screen measurements. Besides this, there are some other differences in the display. Galaxy S21 and S21 Plus come in FHD resolution displays, where Galaxy S21 Ultra has QHD resolution. That means you can see the details on the Galaxy S21 Ultra. Galaxy S21 and S21 Plus change the refresh rate between 48Hz and 120Hz, where Galaxy S21 Ultra can go 10Hz and 120Hz.
Camera:
Galaxy S21 and S21 Plus have three cameras: a 12MP main camera and a 12MP ultra-wide camera with a 64MP telephoto camera. The front camera comes in 10MP. On the other side, Galaxy S21 Ultra comes with a 108MP main camera, 12MP ultra-wide, and two 10MP telephoto cameras. Among these two telephoto cameras, one has 3x zoom capacity, and the other has 10X zoom capacity. S21 Ultra has a laser autofocus sensor that will track the subject and take the perfect shot. For video recording, three of these models have great video features. However, S21 Ultra is offering you the bright night sensor so you can record and take pictures in low light.
Battery and Charging:
Regarding the battery performance and charging system, there are many differences among Samsung Galaxy S21, Galaxy S21 Plus, and S21 Ultra. Samsun Galaxy S21 has 4000 mAh battery capacity, Galaxy S21 Plus comes in 4800 mAh, and Galaxy S21 Ultra has 5000 mAh. So, comparatively, Galaxy S21 Ultra has the best quality battery. The charging system is the same for all of these three models. It needs 25W on a wired connection. You can also charge them wireless on 15W.
Connectivity:
In these three models, you will get 5G. So, there is no argument about this. However, Galaxy S21 Plus and S21 Ultra have been manufactured with Ultra-Wide Band (UWB) chips. It is a new feature that will provide hands-free control. Using these features, you can unlock your car or find the SmartTag tracker. Among these, S21 Ultra offers you more. It has Wi-Fi 6E compatibility, which is the fastest and lowest latency for Wi-Fi connection.
## Pro tips: How to Transfer Photos to S21 Ultra?Most of the time, after purchasing a new phone, we cannot transfer photos or other data to that device easily. At that moment, if you can use amazing data recovery software to transfer all your photos to the new Samsung Galaxy S21 Ultra, that would be a great solution. Well, we have the best solution for you. We are going to introduce you to an amazing software: Dr.Fone - Phone Transfer . It is a brilliant data recovery software that you can use for both iOS and Android systems. It has many amazing features. You can recover your data, transfer your photos and files, unlock Apple’s ID and lock screen, repair the Android or iOS system, switch data from one phone to another phone, keep backup, restore data and erase data permanently from a device. Using this amazing software, you can transfer your photos to Samsung Galaxy S21 Ultra within one single click. Let’s follow the guideline to know how to do this.
Step 1: Download & Install Program
Download and install the software on your computer. Then start the Dr.Fone - Phone Transfer, and you’ll get the program’s home page. Now click on the “Switch” option to proceed forward.
Step 2: Connect Android and iOS Device
Next, you can connect your Samsung Galaxy S21 Ultra and an iOS device to the computer (you can also use an Android device here). Use a USB cable for the Android device and a lightning cable for the iOS device. You’ll get an interface like below when the program detects both devices. You can use the “Flip” button to change devices as the target device and the sender device. You can also choose the file types here to transfer.
Step 3: Start Transfer Process
After choosing the desired file types (Photos for this case), click on the “Start Transfer” button to start the transfer process. Keep patience until the process ends and make sure both Android and iOS devices stay connected properly during the process.
Step 4: Finish Transfer and Check
Within a short time, all your selected photos will be transferred to the Samsung Galaxy S21 Ultra. Then disconnect the Realme 11 5G devices and check if everything is okay.
Here is the video tutorial for you:
Important Note: New Samsung Galaxy S21 Ultra has new software to transfer all files to another device, called Smart switch. This feature is used for keeping the backup and restoring the files. Though it is good software, it has many cons. So, before using that app, check these cons.
- Smart Switch has a low-speed transfer problem. It shows up when you transfer data with wireless connectivity.
- After transferring the data, the smart switch does not back up the data. It is quite hard to recover the data using this app.
- Using the Smart Switch app, you can only transfer the data from Samsung to Samsung. You can’t use it for other devices.
Conclusion
Samsung Galaxy S21 Ultra has amazing features for the bottom line and is more updated than other models. It has the best quality camera, better battery capacity, and other new features. The design and the display are way better than the other models. After purchasing the Samsung Galaxy S21 Ultra, if you get stuck transferring your photos to the Realme 11 5G device, then you don’t have to worry. We have introduced you to Dr.Fone - Phone Transfer in this article. Using this software, you can recover any files and keep data backup and restore them later. To transfer your photos to Galaxy S21 Ultra, you can use Dr.Fone Switch app by following the steps we provided. It’s definitely better software than Smart Switch.
Two Ways to Sync Contacts from Realme 11 5G to Gmail
If you have ever lost your phone, you will agree that getting all the information that used to be on your misplaced device back can be a very trouble-laden venture, which can sometimes end in heartbreak.
One of the most important stuff you can keep on your phone is your contacts, the information about the people in your life, as well as their phone numbers. This can prove to be the most difficult data to get back after a phone is lost. Therefore, this article will tell you ways to keep your contacts updated by synchronizing contacts from Realme 11 5G to Google mail account. As with almost everything in the tech world, there is more than one way to skin a cat, and this is especially true about synchronizing contacts on Android phones.
There are two major ways to transfer contacts from Android phone to Gmail. So, shall we begin to discuss this?
Part 1: How to Sync Contacts from Realme 11 5G to Gmail? (Easier way)
One of the best ways to synchronize contacts from the phone to Gmail is to use a handy tool known as Dr.Fone - Phone Manager (Android) . It is one of the widely used and accepted tools for managing and transferring your Realme 11 5G contact details to another platform.
Dr.Fone - Phone Manager (Android)
One-Stop Solution to Sync Contacts from Realme 11 5G to Gmail
- Transfer, manage, export/import your music, photos, videos, contacts, SMS, Apps, etc.
- Backup your music, photos, videos, contacts, SMS, Apps, etc. to computer and restore them easily.
- Highlighted features such as 1-click root, gif maker, ringtone maker.
- Fully compatible with 3000+ Android devices (Android 2.2 - Android 8.0) from Samsung, LG, HTC, Huawei, Motorola, Sony, etc.
3981454 people have downloaded it
To use this safe and reliable way to synchronize contacts with Gmail on Android, follow these steps:
- 1. First of all, download the Dr.Fone software on your Windows PC and follow the installation instructions, then launch the software after the application has successfully installed.
- 2. Click on the “Phone Manager” option to continue to the next screen of the software.
- 3. Connect your phone to your PC via a USB cable. Ensure that USB debugging is enabled on your phone
- 4. Now click on the “Information” tab at the top of the interface of the software.
- 5. On the left side pane, click on the “Contacts” option to view the contacts available on your device.
- 6. You can select the contacts you wish to transfer to your PC or just simply select all and uncheck unwanted contacts.
- 7. Click on the “Export” button and choose “to vCard file” as your export format.

- 8. You will be taken to a page to select where you want the file to be saved on your PC, select the location, and click on OK to start exporting your contacts.
Once your contacts have been successfully saved to your PC as a vCard or in.VCF format can be easily imported into your Gmail account right from your computer by following these steps.
- 1. Open browser on your PC and Login to your Gmail account.
- 2. On the left side pane, click on the Gmail drop-down arrow to see and click on the “Contacts” option.
- 3.Tap on the “More” button and select “Import” from the list. Gmail will open a pop-up for you to select the location of the previously saved.VCF or vCard file.
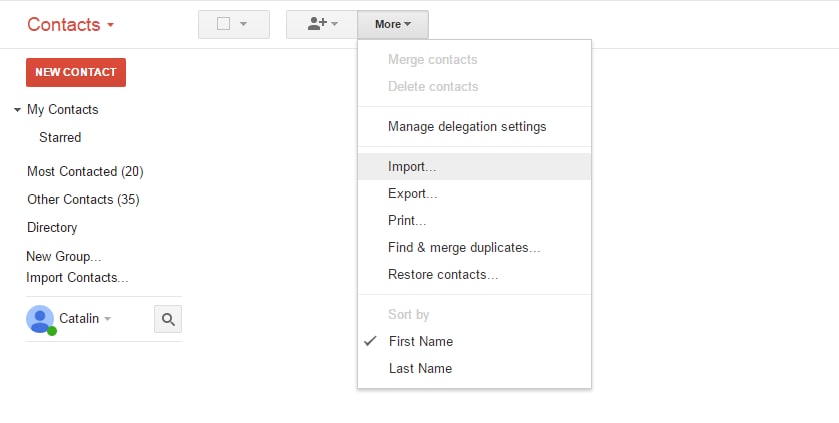
- 4. Select the vCard and then hit the “Import” button. Your contacts will be imported into your Gmail account in no time.
If you followed these steps, you would not only have synced your contacts with your computer, and you would also have synchronized them with your Gmail account.
Thus, by using Dr.Fone - Phone Manager (Android), you can not only easily transfer contacts from the phone to the Gmail account but also keep them safe from any data loss.
Part 2. How to Sync Contacts from Realme 11 5G to Gmail? (Official Way)
There is also a way whereby you can sync your contacts to your Gmail account on Android using just Your Realme 11 5G. You can do this simply by following these steps:
- 1. The first thing would be to ensure that Gmail is installed on your phone. If it is not, go to Play Store and install the Gmail App on your phone.
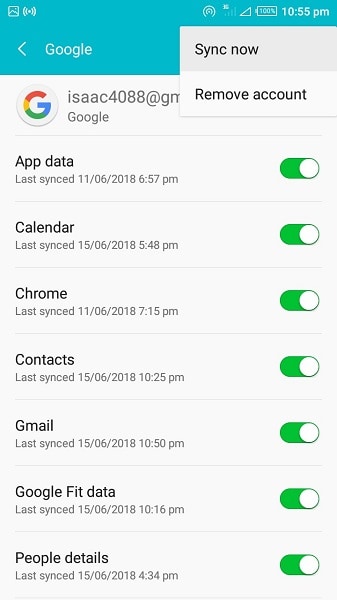
- 2. Now, go to your phone Settings, then tap on the “Accounts and Sync” option.
- 3. Tap on the Accounts and Sync service on the next screen.
- 4. Choose your Gmail account from the email accounts setup page.

- 5. Enable the “Sync Contacts” option.
- 6. Tap on the Options tab and then on the “Sync Now” button and wait until your Contacts have been successfully synchronized with your Google mail account. You will know that the Contacts have successfully completed synchronization when the “Sync” icon disappears.
And that’s it! You have successfully transferred your contact from the phone to your Gmail account. Also, when you initially add and set up a Gmail account on your mobile device, the “Automatically Sync” option should be switched on by default. If this does not occur for some reason, there are ways by which the error can be dealt with. These methods of fixing the error shall be addressed in the latter portion of this article.
Parental Control Software
## Part 3. Other Ways to Backup Android ContactsSmartphone users as a whole never want to lose their contacts; however, sometimes, due to human error or a program glitch or sheer mistake, it does happen. So it is pertinent for you to desire to have a backup of your contacts before entrusting the rest into the hands of an online backup program, in this case, your Gmail accounts. It is not about being paranoid; it is just a case of taking precautions to avoid the loss of contacts while you sync Android to Gmail account.
Although there has been no record of such occurrence in the past from users who export contacts from Realme 11 5G to Gmail, it is still advisable to perform a backup.
Another way to back up your contacts before you sync contacts from Realme 11 5G to Gmail can be found in this article: Four Ways to Backup Android Contacts Easily .
Part 4. Basic Solutions to Fix Google Contacts Syncing Issues on Android
In the above parts, you have learned how to transfer contacts from Realme 11 5G to Gmail. So what if your contacts have, for some reason, refused to sync? Well, don’t panic; here are some of the possible fixes for the problem.
Ensure that the Sync option is turned on for your device. To do this, simply:
- Tap on Settings for your device
- Go to Data Usage, then go to Menu.
- Ensure that the “Auto-Sync data” option is active on your device, if not, activate it.
- If it is already turned on, try toggling it on and off a few times, then proceed to Sync your Contacts.
Ensure that Google Contacts sync is turned on. To do this, simply:
- Once again, go to Android Settings.
- Go to the “Accounts” option.
- Go to the Google Account that you have used as your backup preference.
- Make sure that the “Contacts” option for the sync data is turned on.
- If it is already on and is still not working, try toggling the option on and off a few times.
Make sure that you have an active Internet connection, and that background data is switched off. The importance of checking your Internet connection before proceeding to more extreme measures for all issues cannot be ignored. The issues that may be disturbing you might be due to an issue with your device’s connection to the Internet
- Switch Off and Switch On your Data Connection.
- Go to Settings, then go to “Data Usage” and ensure that Restricting Background Data is disabled on your device.
Clear the App Cache for Google Contacts.
- Go to Settings
- Then tap on “Apps” or “Apps Manager,” depending on your device and Android version.
- Go to all Apps and find Contact Sync.
- Select Clear Cache and also Clear Data.
- This should knock the Contacts sync back to normal and ensure that your sync goes on without a hitch from there on out.
Remove your Google Account and set up again. The issue you are facing might be due to a malfunctioning Google Account setup. To fix this:
- Go to Settings.
- Go to Accounts, then proceed to your Google Account.
- Select the Remove Account option
- Then proceed to set up your email account again.
As a last-ditch fix, some users have reported that an account merging for the contacts fixed the problems of the contacts not syncing. To do this, do the following steps:
- Go to Contacts
- Tap on the menu, then tap on “Contacts to Display” option
- Select “Only Device”. Note that this will make only the contacts saved on the Realme 11 5G device to display.
- Tap on “Menu” and then on “Merge Accounts”
- Select Google Merge. This will merge all your Contacts with Google.
- Go back and select Menu again, this time selecting “Contacts to Display”, then “All Contacts”
- This should make all the contacts on your device to appear, and your sync problem should also be solved.
These fixes should ensure that your sync of contacts with the Google Account is now fixed, and you are now able to backup and sync your contacts to your Gmail Account. It is also worthy of note that if you want new contacts to be saved automatically to your Google account, you have to select the Google Account option when prompted on where to save the new contact, or else, the contact will not be automatically synced to your Gmail account, and you will have to create an export to add it to your Google Contacts.
Also, keep in mind that it might take a longer period of time for the contacts to synchronize to Google on a slower network connection, in deviance to a fast network connection, so you might need to exercise some patience if you’re on a slower Internet connection.
It can sometimes be bewildering and baffling when people probably lose their phones, and then they complain of loss of contacts. However, you need not worry about such loss of information again in this technological age since there are several ways to backup contacts. All the methods mentioned above are easy to execute and will help you transfer contacts from the phone to Gmail in a snap.
Lastly, you can also use Dr.Fone - Phone Manager (Android) for smoothly exporting contacts from Realme 11 5G to Gmail.
- Title: In 2024, 5 Ways to Transfer Music from Realme 11 5G to Other Android Devices Easily | Dr.fone
- Author: Emma
- Created at : 2024-07-17 22:17:29
- Updated at : 2024-07-18 22:17:29
- Link: https://android-transfer.techidaily.com/in-2024-5-ways-to-transfer-music-from-realme-11-5g-to-other-android-devices-easily-drfone-by-drfone-transfer-from-android-transfer-from-android/
- License: This work is licensed under CC BY-NC-SA 4.0.