
In 2024, Android to Apple How To Transfer Photos From Vivo Y78+ (T1) Edition to iPad Easily | Dr.fone
Android to Apple: How To Transfer Photos From Vivo Y78+ (T1) Edition to iPad Easily
If you are an Android user and have recently switched to an iPad, you might be wondering how to transfer photos from Vivo Y78+ (T1) Edition to iPad. It is a common question that many people ask when they switch from one device to another. Fortunately, there are several ways to transfer photos from Vivo Y78+ (T1) Edition to iPad easily. In this article, we will show you how to do it using different methods.
We are living in a world where capturing memories is at our fingertips, and the need to share photos across different devices is more prevalent than ever. Whether you’re looking to share your photos with friends or ensure a secure backup, transferring photos from your Android to your iPad shouldn’t be a hassle.
This article is your ultimate guide to executing photo transfer with no problems. We’ll walk you through the process of how to transfer photos from Vivo Y78+ (T1) Edition to iPad as well as iPhone, highlight common mistakes to avoid, and make sure your cherished moments are transferred seamlessly.
Part 1. How Can I Transfer Photos From Vivo Y78+ (T1) Edition to iPad Directly?
For a straightforward photo transfer from Vivo Y78+ (T1) Edition to iPad, Apple’s Move to iOS app can be an excellent choice. It’s important to note, though, that your iPad must be in setup mode for this method to work. If it’s not in setup mode, you’ll need to perform a reset on your iPad before proceeding with the transfer.
How can I transfer photos from Vivo Y78+ (T1) Edition to iPad? Follow the steps below.
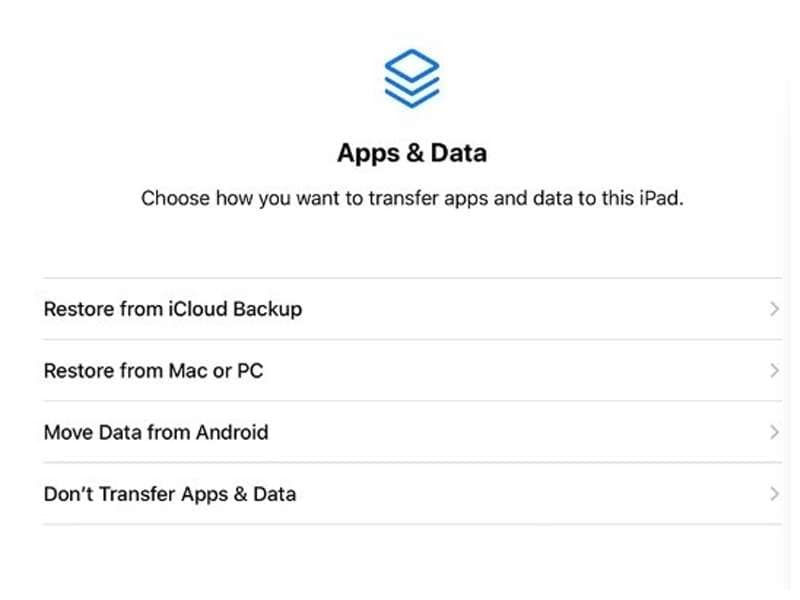
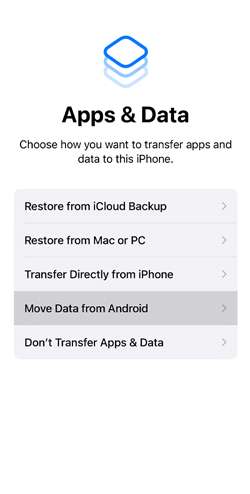
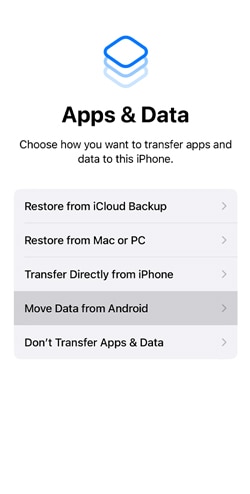
Step 1: Set Up Your iPad.
As you set up your iPad, reach the “Apps & Data” screen and select “Move Data from Android.”
Step 2: Install and launch Move to iOS on your Vivo Y78+ (T1) Edition.
Install Move to iOS and open the app on your Android. Review the terms and conditions and press “Agree” to proceed.
Step 3: Enter the code.
A six to ten-digit code will be displayed on your iPad screen. Enter this code when prompted on your Vivo Y78+ (T1) Edition.
Step 4: Select photos to transfer.
In the Move to iOS app, choose “Photos” to transfer your images. Then, tap “Continue” to initiate the transfer process. Remember to keep your devices close to each other and connected to power until the transfer process is completed for quicker transfer.
Step 5: Transfer complete.
Allow the app to complete the transfer process. Once the transfer is complete, you will be prompted to finish setting up your iPad. Follow the instructions to complete the setup process.
Part 2. How to Transfer Photos from Vivo Y78+ (T1) Edition to iPad Using Cloud Services (Google Drive)
In addition to dedicated apps like Move to iOS, you can also use cloud-based storage services such as Google Drive to transfer photos from Vivo Y78+ (T1) Edition to iPad.
Because it’s stored in the cloud, you can find your photos from any device as long as there is an internet connection. Just upload your photos to Google Drive and later download them on your iPad. It’s also suitable for backup purposes. Google provides its users a 15 GB of free storage.
How to transfer photos from Vivo Y78+ (T1) Edition to iPad with Google Drive:
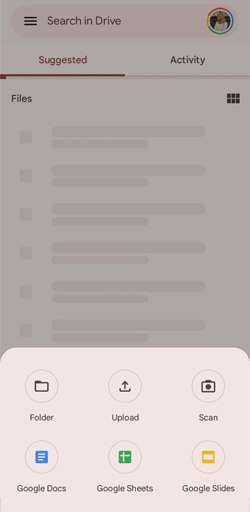
Step 1: Upload photos to Google Drive.
Open Google Drive on your Vivo Y78+ (T1) Edition, navigate to the “+” icon, and select “Upload.” Choose the photos you want to transfer and upload them to your Google Drive.
Step 2: Access Google Drive on iPad.
On your iPad, download and install Google Drive if you haven’t. Log in with the same Google account used on your Vivo Y78+ (T1) Edition.
Step 3: Download Photos to iPad.
Locate the uploaded photos in Google Drive on your iPad. Tap on each photo or select multiple photos, then click download to save them directly to your iPad.
Part 3. How to Share Pics From iPhone to Android with Dr.Fone
In addition to transferring photos from Vivo Y78+ (T1) Edition to iPad, you might also be interested in sharing pictures from iPhone to Android. Although both iPad and iPhone belong to the same Apple ecosystem, they function on slightly distinct operating systems— iPads utilize iPadOS, whereas iPhones operate on iOS.
For an efficient transfer of pictures from iPhone to Android, Wondershare Dr.Fone comes into play. This versatile tool features a dedicated Phone Transfer tool that enables comprehensive sharing of photos and other media content.
This method is particularly well-suited for streamlined bulk photo transfers, making it an ideal choice for individuals seeking a more encompassing solution for data transfer.
Dr.Fone Basic
Backup & Restore iOS Data Turns Flexible.
- One-click to back up the whole iOS device to your computer.
- Preview and selectively restore files to any device with simplicity.
- Export what you want from the backup to your computer.
- Your device’s data remains intact during the restore process.
- Supports iPhone, iPad, iPod touch, and the latest iOS version.
4,781,237 people have downloaded it
How to share pics from iPhone to Android with Dr.Fone Phone Transfer tool:
Step 1: Open Dr.Fone’s Phone Transfer tool
Make a connection between your iPhone and your Vivo Y78+ (T1) Edition on your computer. Launch Wondershare Dr.Fone on your computer and navigate to Toolbox > Phone Transfer.
Parental Control Software
Step 2: Specify the source and destination devices
After connecting them, the platform will identify the connected devices and load their data. Choose iPhone as the source and Android as the destination device to set the transfer path. Use the Flip button to alter the transfer direction.


Step 3: Choose photos for the transfer
Proceed to select the types of data you wish to transfer. Checkmark photos and click the Start Transfer button. If you want to remove existing data from the destination device, you can select “Clear data before copy.”

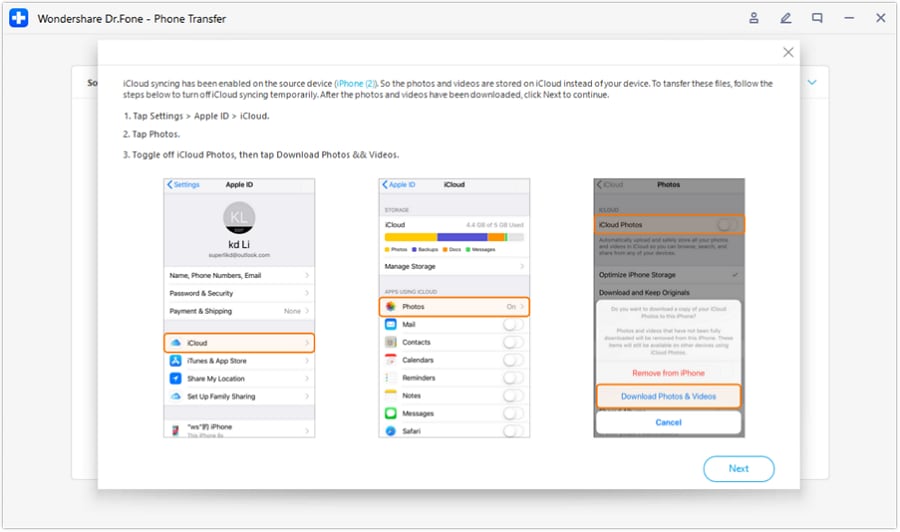
Step 4: Disable iCloud syncing
Now, Dr. Fone’s Phone Transfer tool should prompt you to disable iCloud syncing. Follow the instructions.
Step 5: Monitor data transfer progress
The progress of the data transfer will be displayed in a pop-up window. Once completed, click OK to conclude the process.

Part 4. Mistakes to Avoid When Transferring Photos from Vivo Y78+ (T1) Edition to iPad/iPhone
Transferring photos from your Vivo Y78+ (T1) Edition to an iPad or iPhone holds the promise of seamless photo sharing. However, several factors can contribute to the failure of file transfer processes. To address them, it’s essential to navigate through common mistakes that users often encounter so you won’t make the same errors.
1. Insufficient battery levels
Users often attempt photo transfers with low battery levels on either device. For a successful process, it is crucial to make sure that both your Android and iPad/iPhone have sufficient battery levels or are connected to power sources during the transfer.
2. Limited storage space
Overlooking available storage space on the iPad/iPhone is a common oversight. To avoid transfer failures, check and clear sufficient space on your iPad/iPhone to accommodate the photos you intend to transfer.
3. Interference from Third-Party Apps:
Allowing interference from other apps during the transfer. Close unnecessary apps on both devices to prevent potential conflicts and ensure a smoother transfer process.
4. Ignoring file compatibility:
Apple and Android devices often have varying file compatibilities. For example, iPhones commonly employ the HEIC format, which may pose recognition challenges on Android devices. So, verify that the photo formats are compatible with both Android and iOS devices. If necessary, convert files to ensure a trouble-free transfer.
5. Skipping App Permissions:
When you use apps to transfer files, they usually ask for permission to access your media files. While it’s common for users to overlook this step or hesitate to do it, not granting access can actually lead to transfer failures. The app needs permission to access and transfer files securely.
Conclusion
Although they work in different operating systems, transferring photos between Android and Apple devices, including iPad and iPhone, can be accomplished through various methods. Apps like Move to iOS and Dr.Fone provide straightforward solutions, while cloud services like Google Drive offer convenient alternatives.
How to Transfer Music from Vivo Y78+ (T1) Edition to iPod
If you’re among the fortunate few still holding onto a functioning iPod, consider yourself lucky, as Apple officially bid farewell to the iPod product line in 2022. While this iconic device may no longer be in production, its legacy lives on.
However, if your cherished iPod is showing signs of wear or experiencing issues, it becomes important to safeguard the music collection you’ve accumulated over the years. To address this, some of us wonder, can I transfer iPod music to Android? The answer is yes. Absolutely. We are here to show you how.
- Can I Transfer iPod Music to Android?
- Part 1. Transfer Music from iPod to Android via Bluetooth
- Part 2. How to Transfer Music from Vivo Y78+ (T1) Edition to iPod with Move to iOS App
- Part 3. How To Transfer Music From iPod to Android/Android to iPod With Easy Software
- Conclusion
Can I Transfer iPod Music to Android?
Can you transfer music from an iPod to an Android phone? Despite the fact that the iPod is an Apple product, transferring its music to an Android device is indeed possible. Apple’s ecosystem may be renowned for its exclusivity, but with the right methods, you can seamlessly bridge the gap between your iPod and an Android device.
One of the most straightforward ways to transfer music from your iPod to an Android device is by using Bluetooth. It’s worth noting that Bluetooth transfer capability is present in all iPod Touch models but not in older iPod models. Bluetooth support for iPod Touch was introduced with the 2nd Generation and iOS 3.0, while iPod Nano gained support from the 7th Generation onward.
Alternatively, other methods involve employing a dedicated app and third-party software as an intermediary. Rest assured; the upcoming sections will comprehensively cover these approaches, providing you with the necessary guidance for a smooth music transfer process.
Part 1. Transfer Music from iPod to Android via Bluetooth
Bluetooth technology serves as a versatile means for wirelessly connecting devices, and in this case, it provides a convenient avenue for transferring music from your iPod to an Android device. This wireless approach simplifies the process, allowing for seamless data exchange between the two devices.
But first, you still need to check Bluetooth compatibility. Ensure that both your iPod and Android devices can do Bluetooth transfer. This method is also applicable when you wonder how to download music from an iPod to an Android phone.
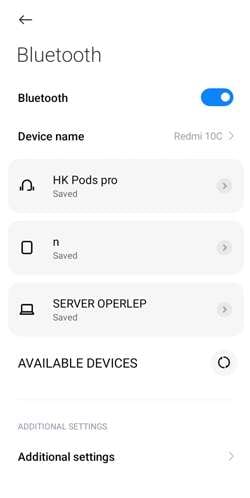
Step 1: Enable Bluetooth on both Devices.
On your iPod, navigate to the Settings menu and select Bluetooth. Enable Bluetooth on the Android device by accessing its settings as well. Make sure that you have set both devices to discoverable mode.
Step 2: Pair the Vivo Y78+ (T1) Edition devices.
Search for available Bluetooth devices on your Vivo Y78+ (T1) Edition, and select your iPod from the list. Likewise, confirm the pairing request on your iPod.
Step 3: Initiate file transfer.
Once paired, locate the music files on your iPod that you wish to transfer. Use the sharing or send via Bluetooth option (this may vary depending on your iPod model) to send the selected music files to your Vivo Y78+ (T1) Edition.
Step 4: Accept the files on Android.
Accept the incoming Bluetooth transfer request from the iPod. The music files will then be transferred wirelessly from your iPod to the Android device.
Step 5: Verify transfer success.
Confirm the successful transfer by checking the music library on your Vivo Y78+ (T1) Edition. The transferred songs should now be available and ready to play.
Part 2. How to Transfer Music from Vivo Y78+ (T1) Edition to iPod with Move to iOS App
For those looking to transfer music from an Android device to an iPod, the Move to iOS app provides a user-friendly solution.
While this app is designed for iOS devices, this approach is limited to iPod touch models and may not be compatible with all iPod devices. Users with older iPod models may need to explore alternative methods for transferring music between devices, which we will introduce in the next section.
Before starting the transfer, you need to download and install the Move to iOS app on the Google Play Store. Now, how to transfer music from Vivo Y78+ (T1) Edition to iPod:
Step 1: Set Up Your iPod:
As you set up your iPod for the first time, reach the “Apps & Data” screen and choose “Move Data from Android.”
Step 2: Agree to Terms and Conditions
Open Move to iOS on your Vivo Y78+ (T1) Edition. Review the terms and conditions and press “Agree” to proceed.
Step 3: Enter the Code
On your iPod, a six to ten-digit code will be displayed. Enter this code when prompted on your Vivo Y78+ (T1) Edition.
Step 4: Select Content to Transfer
In the Move to iOS app, choose “Music” to transfer your music files specifically. Then, tap “Continue” to initiate the transfer process. Remember to keep your devices close to each other and connected to power until the transfer process is completed for quicker transfer.
Step 5: Transfer complete.
Allow the app to complete the transfer process. Once the transfer is complete, you will be prompted to finish setting up your iPod. Follow the instructions to complete the setup process.
Part 3. How To Transfer Music From iPod to Android/Android to iPod With Easy Software
Now, for a more comprehensive and versatile solution, using software like Wondershare Dr.Fone provides a streamlined process to transfer music not only from Vivo Y78+ (T1) Edition to iPod but also from iPod to Android.
Dr.Fone offers a Phone Transfer tool, a user-friendly tool that simplifies the transfer of data between different devices, offering a wide range of compatibility. It is the answer to your “**Can I transfer music from an iPod to an Android phone?**” question. It’s all possible with Dr.Fone’s Phone Transfer tool.
The software is designed with a user-friendly interface, ensuring that even those without technical expertise can even navigate and use it effectively.
Dr.Fone Basic
Backup & Restore iOS Data Turns Flexible.
- One-click to back up the whole iOS device to your computer.
- Preview and selectively restore files to any device with simplicity.
- Export what you want from the backup to your computer.
- Your device’s data remains intact during the restore process.
- Supports iPhone, iPad, iPod touch, and the latest iOS version.
4,802,453 people have downloaded it
How to transfer music from iPod to Android:
Step 1: Open Dr.Fone’s Phone Transfer tool
Make a connection between your iPod and your Vivo Y78+ (T1) Edition on your computer. Launch Wondershare Dr.Fone on your computer and navigate to Toolbox > Phone Transfer.

Step 2: Specify the source and destination devices
After connecting them, the platform will identify the connected devices and load their data. Choose the Source and Destination devices to set the transfer path. Use the Flip button to alter the transfer direction (for example, when you want to transfer from Vivo Y78+ (T1) Edition to iPod instead).
Step 3: Choose the music category for the transfer
Proceed to select the types of data you wish to transfer. Checkmark music and click the Start Transfer button. If you want to remove existing data from the destination device, you can select “Clear data before copy.”
Step 4: Disable iCloud syncing
Now, Dr. Fone’s Phone Transfer tool should prompt a specific operation on the window. Follow the instructions to turn off iCloud syncing.
Step 5: Monitor data transfer progress
The progress of the data transfer will be displayed in a pop-up window. Once completed, click OK to conclude the process.
Conclusion
Transferring music seamlessly between iPod and Android devices, and vice versa, has become more accessible than ever with the right tools and methods. Bluetooth technology serves as a wireless bridge, allowing users to effortlessly move their favourite music from an iPod to an Android device.
On the other hand, there are also apps like Move to iOS and Dr.Fone Basic that facilitate the transfer of music depending on your needs. These options empower users to break through the traditional barriers of device exclusivity and seamlessly enjoy their music collections across different ecosystems.
Tips of Transferring Messages from Vivo Y78+ (T1) Edition to iPhone 14/15
Are you switching your phone to the latest iPhone 14 or 15 and wondering how to transfer your important text messages from your Vivo Y78+ (T1) Edition? Unlike transferring photos, moving texts poses a unique challenge as the options available are relatively limited.
Transferring your messages allows you to keep your important messages intact, preserving cherished conversations and important information. Be it a heartfelt message from a loved one or crucial details in a business conversation, some of your text messages must hold significant sentimental and practical value.
This article will guide you through effective and easy methods to transfer texts from Vivo Y78+ (T1) Edition to iPhone. Let’s explore together the best ways to transfer texts and overcome the hurdles that come with this process.
When it comes to seamlessly transferring SMS from Vivo Y78+ (T1) Edition to iPhone, Apple’s official app, “Move to iOS,” can be a reliable and straightforward solution. This app is designed to streamline the transfer process, allowing you to move not only your text messages but also other essential data to your iPhone.
To use this Move to iOS app, you need to download it from the Google Play Store first on your Vivo Y78+ (T1) Edition. Then, follow the steps to transfer SMS from Vivo Y78+ (T1) Edition to iPhone here:
- Step 1: Setup your iPhone. Power up your new iPhone 14 or 15 and progress through the initial setup until you reach the “Apps & Data” screen. At this point, select the option that reads “Move Data from Android.”
- Step 2: Agree to Terms and Conditions. Open Move to iOS on your Vivo Y78+ (T1) Edition. Then, review and tap “Agree” to Terms and Conditions to proceed.
- Step 3: Enter the Code. On your Vivo Y78+ (T1) Edition, a screen will appear, requesting a 6–10-digit code. This code will be generated on your iPhone. Enter the displayed code on your Vivo Y78+ (T1) Edition to make a secure connection between the two devices.
- Step 4: Select Content to Transfer. With the Vivo Y78+ (T1) Edition devices now connected, you can choose the types of content you wish to transfer. Select “Text Messages” and any other data you want to move to your new iPhone. Tap “Continue” to initiate the transfer process.
**Tip:**Keep your devices close to each other and connected to power until the transfer process is completed.
- Step 5: Once the transfer is complete, you will be prompted to finish setting up your iPhone. Follow the instructions to complete the setup process, and you’re done.
How To Move Text Messages From Vivo Y78+ (T1) Edition to iPhone Quickly with Computer
If you’re looking for a swift and reliable way to move text messages from Vivo Y78+ (T1) Edition to iPhone, third-party software like Wondershare Dr.Fone can be the perfect go-to solution.
Packed with a user-friendly interface, this software streamlines the process, ensuring a quick and efficient transfer of your messages through its Phone Transfer feature. Dr.Fone Phone Transfer supports seamless data transfer between Android and iOS devices and vice versa. It also regularly updates so that compatibility won’t be an issue.
How to transfer texts from Vivo Y78+ (T1) Edition to iPhone with Dr.Fone
- Step 1: Open Wondershare Dr.Fone from its official website , and find the phone transfer tool.
.
- Step 2: Specify the source and destination devices. After connecting to your devices, Dr.Fone will identify the connected devices and load their data onto the platform. Choose your Android as the Source device and your iPhone as the Destination device to set the transfer path. Use the Flip button if necessary to alter the transfer direction.

- Step 3: Choose text messages as data types for transfer. Proceed to select the types of data you wish to transfer. Checkmark the text messages category and click the Start Transfer button. If you want to remove existing data from the destination device, you can select “Clear data before copy.”

- Step 4: Monitor music transfer progress. The progress of the data transfer will be displayed in a pop-up window. Once completed, click OK to conclude the process.

Troubleshoot Why I Can’t Transfer Texts from Vivo Y78+ (T1) Edition to iPhone
Even with the reliable methods mentioned earlier, there may be instances where you encounter difficulties in transferring texts from your Android to your iPhone. Don’t worry; we’ve got you covered with solutions to common issues that might hinder a smooth transfer.
- 1. Interrupted transfer
The transfer process may be interrupted if you use other apps, receive a phone call, or navigate away from the transfer screen on your Vivo Y78+ (T1) Edition before it completes. So, make sure that both devices are left undisturbed until the transfer process is complete.
If you navigate away from the “Move to iOS” app on your Android or receive a phone call during the transfer, it may disrupt the process. Restart the transfer and keep both devices active until completion.
- 2. Problems with Wi-Fi connection
Wi-Fi connection issues on the Android device can hinder the transfer process. This may be caused by apps or settings affecting Wi-Fi, such as Sprint Connections Optimizer or the Smart Network Switch.
To address it, you can turn off apps or settings that might affect Wi-Fi on your Vivo Y78+ (T1) Edition, forget known Wi-Fi networks, and retry the transfer. It’s important to maintain a stable Wi-Fi connection on both devices throughout the transfer.
- 3. Partial content transfer or iOS device full message
Users may encounter situations where only some content is transferred, or the iOS device appears full despite an incomplete transfer. This can lead to potential data loss.
For this issue, you can consider erasing your iOS device and starting the transfer again. Make sure that the available space on your iPhone accommodates the Android content. Delete unnecessary data or apps on your iPhone to free up space if needed.
Bonus: How to Back Up Messages with Google Drive
In addition to seamless transfers between devices, backing up your text messages becomes equally important. Fortunately, Google Drive offers a convenient solution by allowing you to back up your messages with ease. Turning on backup on Google Drive ensures that your valuable SMS history remains safe and accessible whenever you need it.
- Step 1: Open your Vivo Y78+ (T1) Edition’s Settings. Start by opening your Android “Settings” and navigate to the “System,” “System & Updates,” or “About phone” section.
- Step 2: Select “Backup” or “Backup & Restore”. Within the “System” settings, look for the “Backup” or “Backup & Restore” option. Tap to access the backup settings for your device.
- Step 3: Choose a Google account. Under the backup settings, you’ll find the option to select the Google account to which you want to back up your data. Make sure that you are signed in with the Google account you want to use for the backup.
- Step 4: Turn on backup. Your phone will show you that turning on backup will include backing up your text messages. Tap “Turn on” to proceed with the backup.

Conclusion
Switching phones to the latest model is an exciting occurrence. However, the challenge of transferring crucial data, especially text messages, from an Android to a new iPhone can be challenging.
Fortunately, armed with the insights from this article, we’ve delved into two effective methods for seamlessly transferring text messages: using Apple’s official “Move to iOS” app and leveraging third-party software like Wondershare Dr.Fone. With these methods, you can bid farewell to any complications associated with message transfers.
- Title: In 2024, Android to Apple How To Transfer Photos From Vivo Y78+ (T1) Edition to iPad Easily | Dr.fone
- Author: Emma
- Created at : 2024-07-17 22:45:40
- Updated at : 2024-07-18 22:45:40
- Link: https://android-transfer.techidaily.com/in-2024-android-to-apple-how-to-transfer-photos-from-vivo-y78plus-t1-edition-to-ipad-easily-drfone-by-drfone-transfer-from-android-transfer-from-android/
- License: This work is licensed under CC BY-NC-SA 4.0.