In 2024, Best 3 Software to Transfer Files to/from Your Vivo Y100t via a USB Cable | Dr.fone

In 2024, Best 3 Software to Transfer Files to/from Your Vivo Y100t via a USB Cable | Dr.fone

Emma Lv12

Best 3 Software to Transfer Files to/from Your Vivo Y100t via a USB Cable

If you are worried about deleting important information from your Vivo Y100t, you may wish to simply transfer it up to your computer to keep it. Or you may simply want to transfer the photos from your day at the beach onto your computer.

However, due to the open nature of the Google Android operating system, there are several software available that aim to help you manage your Vivo Y100t through your computer. In this article, we will look at some of the best Android software management software available. Note that all the software enables you to connect Android to PC for file transfer , as well as allowing the selection of specific files onto your computer. But, some are better than other.

Wondershare Dr.Fone

Wondershare Dr.Fone

One-Stop Solution for Android USB File Transfer

  • Transfer files between Android and computer, including contacts, photos, music, SMS, and more.
  • Manage, export/import your music, photos, videos, contacts, SMS, Apps, etc.
  • Easily integrate the entire iTunes library with a click.
  • Work much faster and incredibly stable.
  • Transfer iTunes to Android (and vice versa).
  • Manage your Vivo Y100t on your computer.
  • Fully compatible with the latest Android version.

4,761,338 people have downloaded it

Refer to the following guide for Android USB file transfer:

Step 1. Download Dr.Fone and install it on your computer. Connect your Vivo Y100t to your PC with USB Cable. Notice how it displays the same image that is on the screen of your device.

Android USB file transfer with Dr.Fone

Step 2. Click on your Vivo Y100t, such as Galaxy S22 > Export All Data among other options. The following main interface for Wondershare Dr.Fone will be displayed.

Android USB file transfer main screen

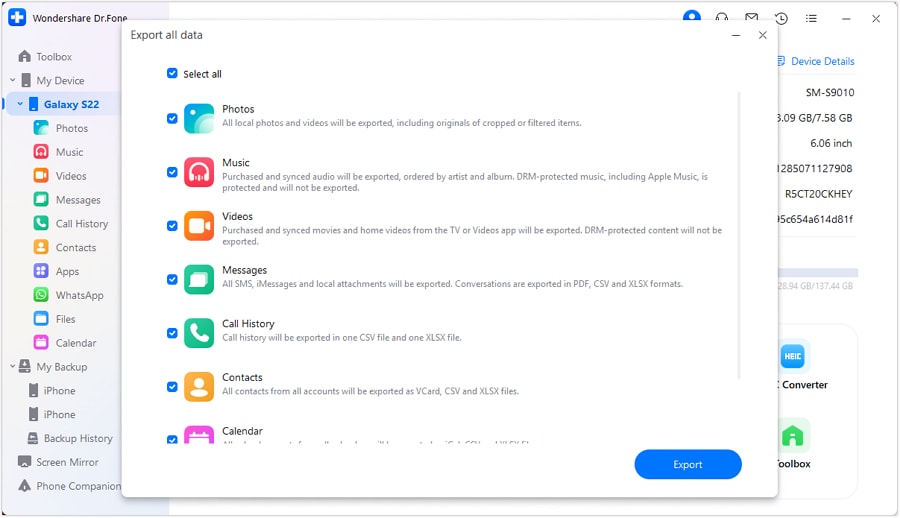
Step 3. You can select the file type you want to transfer to the computer or select all file types. Then, click “Export”. Wait for the transfer process to complete.

select files for Android USB file transfer

Video Guide: How to Achieve Android USB File Transfer with PC?

Try It Free Try It Free

Wondershare Dr.Fone also features other helpful tools, such as the De-Duplicate option, which automatically scans all your contacts for any repetitions, which is always a nuisance (you often end up with duplicate contacts if you sync your contacts with Facebook, as well as already having them on your device, for example).

Mobogenie Android USB File Transfer

Advantages:

  • Uninstall stock apps in batches.
  • Easy-to-use interface.
  • Easily download and manage apps.
  • Easily transfer multiple files from your PC to your Android, and vice versa.
  • Free of charge.

Disadvantages:

  • USB only.
  • Only connect one Android device at a time.
  • Does not have integrated music sharing.

Overview:

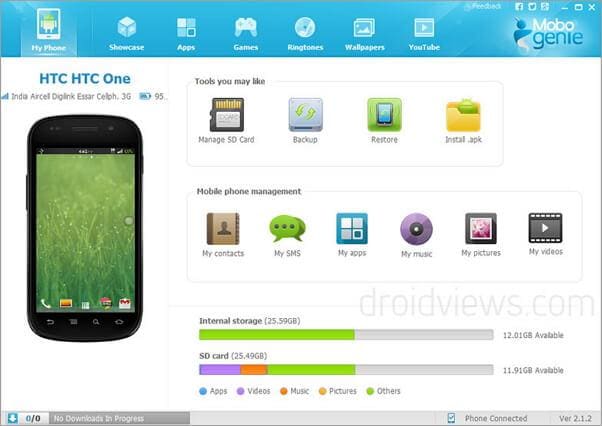
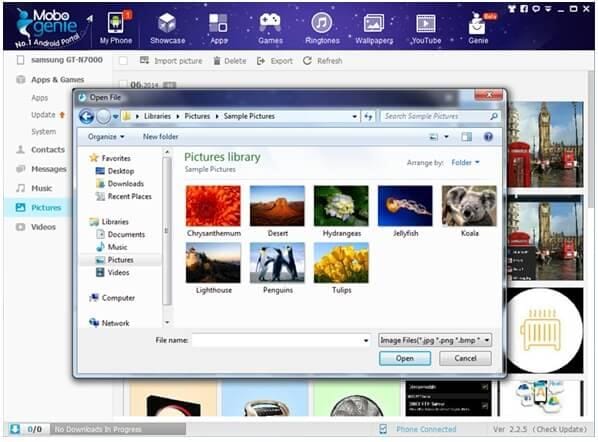
Download Mobogenie and run it, and connect your Vivo Y100t to the computer. Once your device has been connected, you will be prompted to install the driver for your device so that the application is automatically downloaded onto it. Once you have completed this process, you will be taken to the home screen:

bluetooth android file transfer

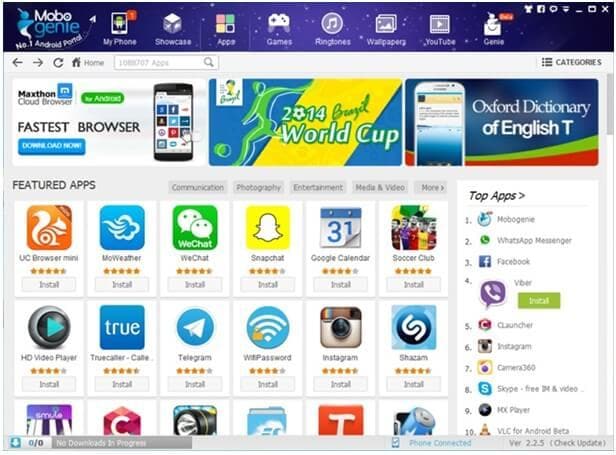
As with other data management software, you can download and install apps onto your Vivo Y100t from your PC. The advantage of this is that apps can be downloaded quickly, and also without costing you in terms of data roaming charges.

usb android file transfer

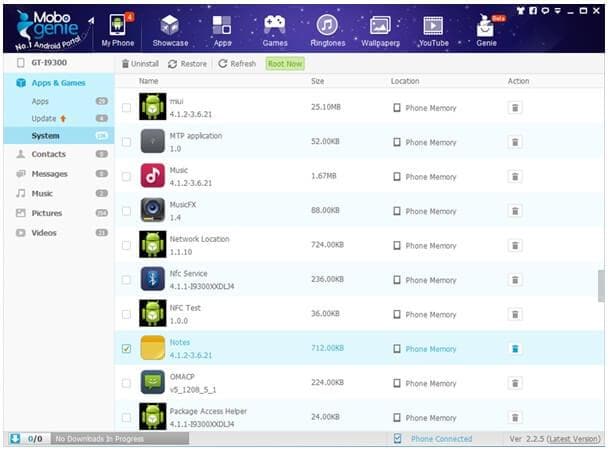
A neat feature is the ability to uninstall apps that came preloaded on the phone as often we find ourselves with apps that we never use that we cannot delete.

use transfer android file

The transfer of photo files is straightforward, and several photos can be selected from your computer to import onto your device at once, or vice versa.

usb to android file transfer

Features:

  • Free.
  • Support wireless connection of devices on the same network (although temperamental).
  • Support multiple devices.
  • Download apps onto it through app store.
  • Simple to use.

Overview:

Download MoboRobo and install this Android USB file transfer tool on your computer. Upon opening it, you will be prompted to connect your Vivo Y100t with a USB cable or over WiFi, and then once connected, you will be asked permission to install the app on your Vivo Y100t as well.

Once connected, you will be brought to this home page, notice the options to use different devices as well as connected through Wi-Fi.

USB android file transfer

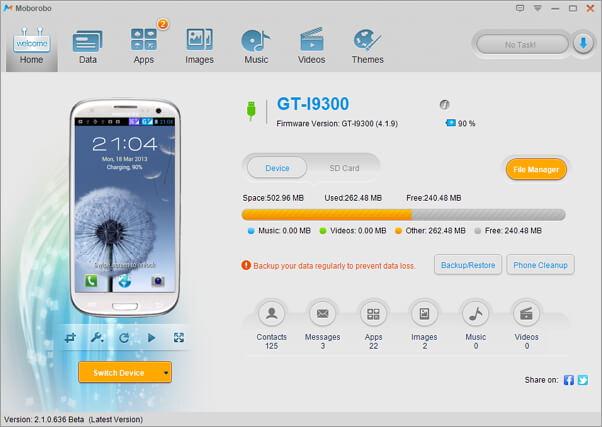
As with Mobogenie, once you are on the software, it is fairly easy to navigate around, and you can do everything from sending SMS from your PC to transferring apps and contacts. However, a drawback is that the management of your music requires you to have all your MP3 files on your PC and move them on to the software- not extremely inconvenient, but as we will see much easier solutions exist.

We recommend the use of Wondershare Dr.Fone, as it is more reliable and provides a simple user-friendly interface that allows you to manage your Vivo Y100t with ease. You can also transfer files between Android and Mac easily.

8 Ways to Transfer Photos from Vivo Y100t to iPhone Easily

Transferring photos from an Android device to an iPhone might seem daunting, given the differences in their operating systems. However, it doesn’t have to be a complicated process. In this guide, we’ll explore easy and efficient methods to transfer your cherished photos smoothly, ensuring that your memories remain intact during the transition from the Android to the iOS ecosystem. Whether you’re switching to an iPhone, sharing photos with a friend, or simply looking to create a backup, we’ve got you covered with practical solutions.

Let’s simplify the process of transferring your photos and keep your precious moments safe.

Part 1: How to Transfer Photos from Vivo Y100t to iPhone in One Click?

If you are confused over which method you should choose for transferring photos from Vivo Y100t to iPhone, then compare the quality and the quickness of the selected mode. Well, to be frank, the tool that qualifies all these criteria is the Dr.Fone toolkit, which is a comprehensive solution that is well designed to tackle all mobile-related issues and tasks.

Dr.Fone is perfect because you can transfer across multiple devices regardless of OS. As an example, if you want to transfer photos from Vivo Y100t to iPad /iPhone and vice versa, it can be done quickly by following two ways as mentioned below:

Method 1.1 One-click to Transfer Photos from Vivo Y100t to iPhone using Dr.Fone - Phone Transfer

Dr.Fone - Phone Transfer is a software package that facilitates cross-device transactions, such as transferring photos from Vivo Y100t to iPhone. If you are in the process of replacing your Android with a new iPhone, then use Dr.Fone to transfer all contents to the new phone. The content can include photos, contacts, videos, and social media messages.

Dr.Fone - Phone Transfer

Transfer Photo from Vivo Y100t to iPhone in 1 Click Directly!

  • Cross-platform data shift between any device of your choice from Android and iPhone.
  • Support massive data, including images, videos, music, messages, contacts, apps, and more.
  • Works perfectly with almost mobile phones and tablets, such as iPhones, iPad, Samsung, Huawei, etc.
  • Fully work with mobile system iOS 17 and Android 13 and computer system Windows 11 and Mac 12.
  • 100% safe and risk-free, backup & restore data as the original.

3981454 people have downloaded it

Let us see the steps on how to transfer photos from Vivo Y100t to iPhone using Dr.Fone - Phone Transfer.

Step 1. Download and install Dr.Fone toolkit and launch it. Then select the “Phone Transfer” option from the main interface.

transfer photos from android to iphone

Step 2. Now, connect your Android and iPhone to the computer. As soon as you connect the Vivo Y100t device, it will start recognizing it and mention it as the ‘Source’ phone or ‘Target’ phone accordingly. In this case, make sure the Android phone is the Source and the iPhone is the Target. You can change their position using the Flip button.

transfer photos from android to iphone-make sure the source and destination

Step 3. Finally, select the files you want to transfer (photos) and click on ‘Start Transfer.’ That was it. Soon, it will transfer pictures from Vivo Y100t to iPhone.

transfer photos from android to iphone-start transfer

Method 1.2 Selectively Transfer photos from Vivo Y100t to iPhone using Dr.Fone’s Phone Manager Feature

Another way that can assist you in moving photos from Vivo Y100t to iPhone is the Wondershare Dr.Fone . What is incredibly convenient about Dr.Fone is its ability to transfer photos selectively. You can also use it to transfer contacts, videos, messages, podcasts, and anything else stored on your Android in minutes. Wondershare Dr.Fone is a secure, trustworthy program. Hence you can be reassured that your information will be safe while transferring from one device to another.

Wondershare Dr.Fone

All in one Solution to Transfer Photos from Vivo Y100t to iPhone

  • Transfer, backup, edit, export, import & view the data on your phone easily.
  • Support multiple data on your phone: music, photos, videos, contacts, SMS, Apps, etc.
  • Copy data from one phone to another phone without any data loss.
  • Additional features to help you root your device, and make gif images, and ringtones.
  • Compatible with more than 3,000 Android phones ranging from Samsung to LG, HTC, Huawei, Motorola, Sony, etc.

3981454 people have downloaded it

Here, either you can select the photos that you wish to transfer selectively or select all the images at once. Now, as you want to transfer photos to an iPhone device, connect your iPhone and then click on To Device. The name of your iOS device should appear. Click on the Vivo Y100t device to start transferring photos.

transfer photos from android to iphone-export to device

Part 2: How to Transfer Photos from Vivo Y100t to iPhone Using Move to iOS App

Now, to answer how to transfer photos from Vivo Y100t to iPhone, there is another simple solution that you can make use of. It is called the “Move to iOS app,” which you can download freely from the Google Play store.

Now to proceed, first of all, you need to do some settings on your iPhone device as follows:

  • Step 1: On your iPhone, go to a screen called ‘Apps & Data’ > choose the ‘Move Data from Android’ option.

how to transfer photos from android to iphone-app and data how to transfer photos from android to iphone-move data from android

The next step is to take your Vivo Y100t to complete the transfer process with the “Move to iOS” app.

  • Step 2: Switch to your Vivo Y100t, open the Google Play Store, and search for the ‘Move to iOS’ app.
  • Step 3: Open the ‘Move to iOS’ app to accept permission requests, install it, and open the app.
  • Step 4: At this point, tap Continue on both your iOS and Android devices.

how to transfer photos from android to iphone-move from android to ios

  • Step 5: On your Vivo Y100t, enter the 12-digit code of the iPhone. This is so that the ‘Move to iOS’ app knows which iOS device it has to transfer the data to.

how to transfer photos from android to iphone-enrer the code

  • Step 6: Before the transfer starts, you will be asked several questions, like do you want to transfer Google Account information, Bookmarks, etc. Now, since you only wish to videos and photos, deselect the other options except ‘Camera Roll.’

The above process to transfer pictures from Vivo Y100t to iPhone is suitable for mobile users who are unwilling to invest money in software. However, the method is not perfect because it is time-consuming. The transaction can neither be done quickly nor can it be done with a single click.

Note: This solution only works when you set up the iPhone. If the iPhone is already set up, you need to factory reset it and set it up to restore photos with this App. If you’d like to save existing data after transferring, Dr.Fone - Phone Transfer is a good solution.

Part 3: How to Transfer Photos from Vivo Y100t to iPhone via Bluetooth

Bluetooth is an excellent option to transfer photos and videos across both Android and iPhone devices. This is because Bluetooth is available on both Android and iOS devices, making it widely useful. Furthermore, you don’t have to download a third-party app to transfer pictures via Bluetooth. The process can also be completed quickly with just a few taps on the screen.

  • If you are thinking about how to transfer pictures from Vivo Y100t to iPhone, then follow the process outlined below.
  • 1. Open up Bluetooth on both Android and iOS devices. Both the smartphones should have the option to turn Bluetooth on/off via a sliding panel from the top of the screen.
  • 2. Now, tap on the checkbox to make the Vivo Y100t device visible to other mobile devices.
  • 3. On your Vivo Y100t> Go to your File Manager > DCIM Folder (for Camera content).
  • 4. Tap on the menu button of your Android Smartphone to get a list of the drop-down menu actions. Click on ‘Select.’
  • 5. Each image will now have a checkbox next to it. Tap on the box to select it, or you can select all pictures.
  • 6. Now, select the ‘Share’ icon, scroll down to the ‘Bluetooth’ option, and choose the option.
  • 7. There will be a list of Bluetooth devices visible to your Android. Select your iPhone to start the data exchange. A file transfer window will signify the transaction, and the files will be downloaded one at a time.

how to transfer photos from android to iphone-via bluetooth

It is important to note that the rate of data transfer on Bluetooth is heavily dependent on the version of Bluetooth you use. For example, if you use Bluetooth 2.x data transfer happens at 0.25 MB/s, whereas Bluetooth 5.x transfers data at 6 MB/s.

Part 4: How to Transfer Photos from Vivo Y100t to iPhone Using Google Drive?

Google Drive is cloud storage that is available to those who have a Gmail address. It can store anything ranging from Word Documents to photos and videos. Hence, if you are wondering how to move photos from Vivo Y100t to iPhone, then Google Drive is your answer.

To go with the transfer of photos and videos from Vivo Y100t to iPhone with Google Drive, follow the steps outlined below:

Step 1: First, make sure Google Drive is already installed on the Android device; if not, visit the Play Store to download Google drive. Then, on your Vivo Y100t, visit the Gallery section> select the images> tap on the Share button> and finally choose Share via Drive.

Soon the file will get uploaded.

how to transfer photos from android to iphone-use google drive

Now, move to your iPhone.

Step 2: Here, download and install the Google Drive app onto your iPhone.

how to transfer photos from android to iphone-install the Google Drive app

Step 3: Open the Drive (you must log in with the same Google ID). There you will see all the uploaded media files (Photos). Now, select ‘Save Image’ or ‘Save Video’ depending on your file type.

This way takes some manual steps. If you want a one-click solution, try Dr.Fone - Phone Transfer (iOS&Android) .

Part 5. How to Transfer Photos from Vivo Y100t to iPhone Via Email?

Employing email represents a simple technique for sending a restricted set of photos from an Android device to an iPhone. Nevertheless, it might not be the optimal option for transferring a large assortment of high-resolution images. Still, it acts as a swift solution for exchanging a few pictures. Here is a comprehensive guide illustrating the process of sending photos from an Android device to an iPhone via email:

Step 1: Launch the email app on your Vivo Y100t and tap the compose or new email button to start a new email. Enter your email address or the recipient’s email address in the “To” field.

 add email and other details

Step 2: Look for the “Attachment” icon (usually a paperclip) and select the photos you want to transfer. Attach the selected photos to the email, and once the photos are attached, click the “Send” button.

select photos to transfer

Step 3: Then log in using the same email account on your iPhone. After logging in, access the email with your photos and download the attachments to complete the photo transfer.

receive on other end and download

Part 6: Top 3 Android to iPhone Photo Transfer Apps

Several apps are specifically designed for storing and transferring images from an Android device to an iPhone. We have found the three best apps based on ease of use and accessibility.

PhotoSync

PhotoSync is a free photo-sharing app available on both Android and iOS devices. The app lets you store all your photos on one device and then transfer it to another device through Wi-Fi. PhotoSync is designed to work with several methods besides Android and iOS devices. It works on different platforms, including desktop computers, NAS, and Cloud Services.

You can extract videos and photos directly from the camera and transfer them to another device. You can even access the photos/videos via a web browser. PhotoSync is regularly updated with features to make the experience better support for RAW files and preserves for EXIF-data.

how to transfer photos from android to iphone-PhotoSync

Photo Transfer

The photo transfer app is incredibly popular and with a good reason. You can perform Android to iPhone photo transfer without any cables. You can access Photo Transfer on different platforms, including desktop computers. It allows you to access your photos stored on the app via a web browser. You can easily download multiple images for storage and exchange these photos across various platforms. If you need an intuitive, easy-to-use app to send photos from Vivo Y100t to iPhone then consider using the Photo Transfer app.

how to transfer photos from android to iphone-Photo Transfer

Shareit

Shareit is a specialized application developed to transfer files between two devices. You can use Shareit to transfer pictures from Vivo Y100t to iPhone in seconds. The software is free and completely secure, so you do not have to worry about how to transfer photos from one device to another. You can share individual photos or entire folders on Shareit. However, it should be noted that sharing folders can make slow down the process.

The best part of Shareit is the freedom allowed to users because you can transfer different file types besides photos. Hence, if you are wondering how to transfer video from Vivo Y100t to iPhone, then Shareit is your answer. The software is continuously being updated to make sure it is safe. Therefore, if users need to transfer more than just photos like sensitive information, they can rest assured about Shareit’s reliability.

how to transfer photos from android to iphone-Shareit

Thus, after going through the article, we are sure that you have a wide range of options to choose from to transfer your Vivo Y100t photos to the iPhone. Well, every method is excellent in itself; however, we would like to say that one of the best options for you would be the Dr.Fone tool without a doubt.

How to Copy Data from Samsung to Pixel 8 and Pixel 8 Pro

Getting a new phone is incredibly exciting, but once you realize how much data you need to transfer, the experience can take a sudden turn for the worse. Fortunately, there are now multiple ways to transfer data from your old phone to a new device, and we’re here to help you with these.

Today’s article will teach you how to transfer data from a Samsung to a Google Pixel device with the help of Wi-Fi, USB cables, Google Drive, and a third-party app. Stay with us to learn how to copy data from Samsung to Pixel with these seven incredibly convenient methods.

Transfer Data From Samsung to Pixel 8 and Pixel 8 Pro via Dr. Fone Phone Transfer

wondershare dr.fone phone transfer app

While a third-party data transfer app might not be your first thought, they’re undoubtedly worth checking out as they can make the entire experience flow much more seamlessly. Wondershare Dr.Fone is one such app, and it’s a toolkit designed to help you manage your Vivo Y100t] and other smartphones and make the most out of your journey. It has been on the market for over 17 years, meaning it’s reliable, trustworthy, and highly efficient.

On top of effortless file transfers between phones, the toolkit also offers numerous advanced phone features, such as:

  • Screen Unlock;
  • Data Eraser;
  • Data Recovery;
  • System Repair.

These advanced capabilities make Wondershare Dr.Fone an all-in-one phone manager with everything you’ll ever need. It’s also the best option for data transfers between two devices since it’s compatible with more than 8,000 smartphones and supports all sorts of data types, making the transfer process as easy as possible.

Here’s how you can use Wondershare Dr.Fone to transfer data from a Samsung device to a Pixel 8/Pixel 8 Pro:

  1. Download Wondershare Dr.Fone from the official website and launch it on your PC.

  2. Connect the Samsung and the Pixel 8/Pixel 8 Pro phones to the PC.

  3. Navigate to Toolbox > Phone Transfer.

    start the phone transfer tool

  4. Select the Sourcedevice (Samsung) and your Destination device (Pixel 8/Pixel 8 Pro). You can also use the Flip option to switch the file transfer’s direction if you ever need to.

    select source and destination devices

  5. Select the types of data you want to transfer and hit the Start Transfer.

    select data types to copy

  6. The progress bar will appear. You can click the Cancel button if you wish to pause the process.

data transfer progress bar

  1. You’ll be notified when the process is complete. Tap OK.

    finishing the data transfer

Once you see that the file transfer between your Samsung and Pixel 8/8 Pro devices has been completed, you can disconnect your phones from the PC and start using your new Pixel phone. You should then check if all the data has been transferred.

Transfer Data From Samsung to Google Pixel 8 and Pixel 8 Pro Using Wi-Fi

Users who want to avoid downloading apps can use the built-in file transfer app instead. All Android phones include a data transfer tool that appears when setting up a new device. Using it is incredibly straightforward, and all you need to do is follow the on-screen instructions to initiate a file transfer between your old and new phone over Wi-Fi. Here’s how:

  1. Power on your new Pixel phone and tap the Get startedbutton during the initial setup. Choose to restore from an old phone.

    transfer data to new pixel device

  2. Connect the Vivo Y100t device to a Wi-Fi network.

  3. Choose the “Can’t use old device” option and sign in with your Google account.

    use the cloud restore option

  4. Select which apps and types of data you want to transfer to it and tap Restore.

    restore specific file types

  5. Follow the file transfer instructions and watch as data copies from your old Samsung to your new Pixel 8/8 Pro device.

Your new phone will notify you when the file transfer is complete, and you can continue using your brand-new device right where you left off with the Samsung one.

Copy Data From Samsung to Pixel 8 and Pixel 8 Pro Using USB

If you don’t want to transfer files over a Wi-Fi network, don’t want to waste your mobile data, or wish to complete the file transfer the old-fashioned way with a USB cable, you can follow these steps to transfer data from Samsung to Pixel:

  1. Turn on your new Pixel 8/8 Pro device and launch the built-in data transfer tool that appears when setting up your device.

  2. Hit the Get started button on your Pixel phone and connect to a Wi-Fi network (this is required to initiate a data transfer, regardless of your connection).

  3. Tap on Nextwhen you see the “Copy apps and data” screen. Click Next again when prompted to use your old phone.

    copy apps and data to pixel

  4. Connect the USB cable between your old Samsung and new Pixel 8/8 Pro phones and tap Next.

  5. Confirm data transfer on your old phone, select what you want to transfer, and hit Copy.

    transfer data from samsung to pixel

  6. Follow the rest of the on-screen instructions and transfer data between your old and new phones.

Give your phones a few minutes to transfer data from Samsung to Pixel, and remember that it can even take several hours, depending on your phone’s internal storage size and filled space. The built-in file transfer app will notify you once it completes everything.

Transfer Files to Pixel 8 and Pixel 8 Pro via PC

Using a computer as an intermediary device for transferring files is another excellent idea, and it’ll even let you organize your old phone’s data before you copy it to your new device. You’ll need to follow these steps to transfer data from your old phone to your PC and from your PC to your new Pixel 8/8 Pro device:

  1. Connect your old Samsung device to your PC via USB.

  2. Tap the phone’s notification and select File Transferunder the “Use USB for” option.

  3. Access its memory through the computer’s File Explorer.

  4. Select the files and folders you want to copy and transfer them to a new folder on your PC. You can then go through these files on your PC, delete what you don’t need, and organize everything before transferring the data to your new Pixel 8 device, but this is optional.

    copy data to the pc

  5. Disconnect the old phone from the computer.

  6. Connect your new Pixel phone to the PC.

  7. Once again, click the phone’s notification and select the File Transfer

  8. Transfer the contents of your computer’s folder onto the new device.

  9. Disconnect the new device after your files have been copied.

You’ll need to consider which types of files go into which folders. For example, you’ll need to ensure that music data goes into Android’s Music folder, pictures and videos go into Camera or DCIM folders, and documents and downloads have their respective folders, which are typical on Android.

Copy Data From Samsung to Pixel 8 Pro via Quick Switch

Another excellent option for transferring files to any Pixel phone is with Google’s Quick Switch adapters. These free OTG devices are included in every Pixel phone box and are designed to help you transfer data from an old phone to a new Pixel device.

A Quick Switch adapter connects to your Pixel phone, and you can insert a Samsung-compatible USB cable on the other end to start the transfer process.

Here’s what you’ll need to do:

  1. Power on your new Pixel 8/8 Pro phone and click Start.

  2. Plug the Quick Switch adapter into the Pixel device and connect the USB cable with the USB-A end into the Quick Switch. Connect the other end to the Samsung phone.

  3. Unlock your Samsung device and click the Copy

  4. Select the type of data you want to transfer and hit Copy.

    copy data with quick switch adapter

  5. Once the process is complete, click Next > Done.

Before you start the file transfer process using a Quick Switch, you should ensure both devices are fully charged. Furthermore, you should also update your Samsung device to the latest software version to avoid potential transfer issues, such as data corruption or incomplete transfers.

Transfer Data From Samsung to Pixel Using Google Drive

Being an Android user requires a Google account, granting you access to 15 GB of free storage space on Google Drive, making the app an excellent way to transfer files from your old phone to your new one. Here’s how you can use it:

  1. Using your old Samsung phone, navigate to Settings> Accounts and Backup> Back up data under Google Drive.

    back up google drive data

  2. Change the Backup detailsand add the types of data you want to back up.

  3. Hit the Back up nowbutton and give your phone time to upload everything to Google Drive. You can watch the progress at the top of your screen.

  4. Power on your new Pixel 8/8 Pro device and follow the on-screen setup instructions.

  5. Log in with the same Google account you used on the Samsung phone.

  6. The new device will immediately recognize older backups.

    restore from a google drive backup

  7. Choose the latest backup made on your Samsung phone and tap Restoreto copy data from Samsung to Pixel.

It’s worth noting that Google Drive users aren’t limited to 15 GB of storage space, as paid plans also include 100 GB and 200 GB options for a few dollars per month, making this type of transfer incredibly efficient.

Transfer Data From Samsung to Google Pixel 8, 8 Pro Using Email

Although it’s not as effective as the abovementioned methods, email is also an option for transferring data between phones. Using it is as straightforward as sending emails, meaning that this method is effortless, and anyone can do it. Here’s how:

  1. Open your old Samsung phone’s email app and compose a new email.

  2. Hit the attachment icon and add your files to the email. Send it to whomever you like or to your secondary email account.

    transfer data via email attachments

  3. Launch the email app on your new Google Pixel 8 or 8 Pro device.

  4. Download the email attachments you’ve just sent.

Please note that while email providers like Gmail, Yahoo, or Hotmail might not have restrictions on the number of files you can send, they do restrict emails to 25MB in size. It essentially means that this method will work for smaller files but isn’t viable if you need to transfer large sets of data.

Conclusion

Transferring data from one smartphone to another can be challenging, especially if you’re new to the whole thing or do it manually. To help you out, we’ve prepared the top seven methods for handling data transfers from Samsung to Google Pixel, which include the built-in data transfer tool during device setup, USB cables, Quick Switch adapter, Google Drive, email, and a dedicated third-party app – Wondershare Dr.Fone.

As you can see, it’s your safest bet, ensuring the most straightforward and fastest data transfer between your old and new device. This way, you won’t need to organize and transfer anything manually or risk losing data, and Wondershare Dr.Fone can be used even after the initial device setup.


  • Title: In 2024, Best 3 Software to Transfer Files to/from Your Vivo Y100t via a USB Cable | Dr.fone
  • Author: Emma
  • Created at : 2024-03-20 23:33:39
  • Updated at : 2024-03-22 20:52:46
  • Link: https://android-transfer.techidaily.com/in-2024-best-3-software-to-transfer-files-tofrom-your-vivo-y100t-via-a-usb-cable-drfone-by-drfone-transfer-from-android-transfer-from-android/
  • License: This work is licensed under CC BY-NC-SA 4.0.
On this page
In 2024, Best 3 Software to Transfer Files to/from Your Vivo Y100t via a USB Cable | Dr.fone