
In 2024, Easiest Guide How to Clone Nokia C12 Phone? | Dr.fone
[Easiest Guide] How to Clone Nokia C12 Phone? 6 Ways In 2024
Changing Android phones is no longer a tedious job. By using an Android clone app, you can simply transfer your data from one device to another. In this way, you can clone Android phone without the need to maintain multiple accounts Android. In this post, we will teach you how to clone Android phone using five different solutions. So what are you waiting for? Read this guide and clone Android phone without much trouble.
You can watch the video below to clone Android phone and copy its data
Part 1: How to clone Android phone using Dr.Fone - Phone Transfer?
To clone an Android phone in a fast and secure manner, simply take the assistance of Dr.Fone - Phone Transfer . It is a part of the Dr.Fone toolkit and can be used to transfer all sorts of data directly from one device to another. For instance, you can transfer your photos, videos, music, messages, contacts, notes, and multiple accounts to Android detail as well. It is compatible with all the leading Android devices manufactured by brands like Samsung, HTC, Lenovo, Huawei, LG, Motorola, and more. Having an intuitive process, it will let you Android clone in no time. To learn how to clone Android phone using Dr.Fone Switch, follow these steps:
Dr.Fone - Phone Transfer
Transfer Photo from Nokia C12 to iPhone in 1 Click Directly!
- Cross-platform data shift between any device of your choice from Android and iPhone.
- Support massive data, including images, videos, music, messages, contacts, apps, and more.
- Works perfectly with almost mobile phones and tablets, such as iPhones, iPad, Samsung, Huawei, etc.
- Fully work with mobile system iOS 17 and Android 13 and computer system Windows 11 and Mac 12.
- 100% safe and risk-free, backup & restore data as the original.
3981454 people have downloaded it
1. Download Dr.Fone - Phone Transfer on your Windows or Mac before changing Android phones. Afterward, you can connect both devices to the computer and launch the Dr.Fone toolbox.
2. Click on the “Phone Transfer” button to view its dedicated interface.


3. As you can see, Dr.Fone will automatically detect your connected devices. One of them would be marked as the source, while the other one would be the target device.
4. If you wish to change their positions before you do Android clone, click the “Flip” button.

5. Now, you can select the kind of data that you wish to transfer from one device to another.
6. Click on the “Start Transfer” button to clone Android phone.
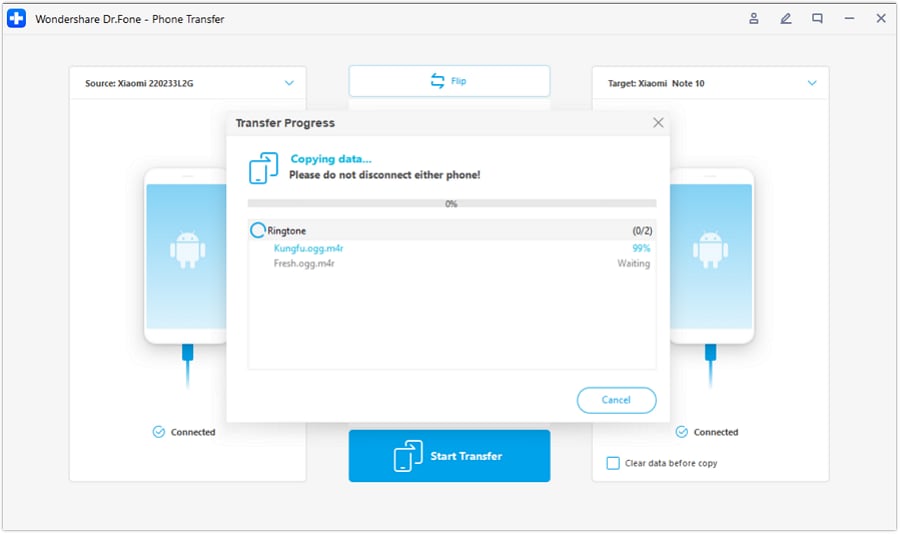
7. Sit back and wait for a while as the application will transfer the selected content from one device to another. Make sure that both devices stay connected to the computer.
8. Once the cloning process is completed, you will be notified.
In this way, you can easily learn how to clone Android phone in a few seconds. Later, you can disconnect the Nokia C12 devices and use them readily. Besides Android, you can also use Dr.Fone - Phone Transfer to transfer data between different platforms as well.
Part 2: Clone Android phone using SHAREit
SHAREit is a popular cross-platform device-sharing app that over 600 million users use. The app can be used to perform a wireless transfer of data at a fast speed. This is done without utilizing your data usage or via Bluetooth. The app uses Wifi directly to clone Android phone. While changing Android phones, use SHAREit the following way:
Download SHAREit: https://play.google.com/store/apps/details?id=com.lenovo.anyshare.gps
1. First, install the SHAREit app on both Android devices. You can get it for free from the Google Play Store.
2. Now, launch the app on the source device and tap on the “Send” option.

3. This will further let you select the data files that you wish to transfer. Click on the “Next” option after selecting your content.
4. Bring the target device in close proximity to the sender and launch the app. Mark it as a receiving device.

5. This will make the phone automatically detect the sending device. Select the Wi-Fi hotspot that is associated with the sending device to form a secure connection.
6. As the connection is made, you can select the receiving device on the source phone. This will initiate the cloning of your data.


Part 3: Clone Android phone using CLONEit
While changing Android phones, users often look for alternatives. Therefore, you can also take the assistance of CLONEit to transfer your files in a batch. The app can also be used to migrate multiple accounts Android without much trouble. To learn how to clone Android phone using CLONEit, follow these steps:
1. Download the CLONEit app on both devices. After installing, launch the app on the Nokia C12 devices and turn on their Wifi.
Download CLONEit: https://play.google.com/store/apps/details?id=com.lenovo.anyshare.cloneit
2. Mark the source device as a “Sender” and the target devices as a “Receiver”.


3. In this way, the target device will automatically start looking for the sender. You can view the Wifi hotspot the sender has created to verify the connection.
4. You need to confirm the connection request by tapping on the “Ok” button of the prompt.

5. Once the connection has been established, you can clone Android phone easily. Just go to the source device (sender) and select the data that you wish to transfer.
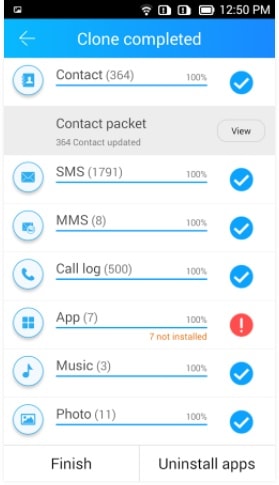
6. After making your selection, click on the “Start” button to make your target device the Android clone of your old device.
7. Wait for a while as the transfer of data would take place. You will be notified as soon as it is completed successfully.
Part 4: Clone Android phone using Phone Clone
Huawei has also developed a dedicated app – Phone Clone to transfer the data from one Android device to another wirelessly. In this way, you don’t have to set up multiple accounts Android for every phone you buy. The app supports a fast and extensive cloning option with a user-friendly interface. To make your new device an Android clone, follow these steps:
1. Launch the Phone Clone app on both devices. If you don’t have the app, you can download it from Google Play.
Download Phone Clone: https://play.google.com/store/apps/details?id=com.hicloud.android.clone&hl=en
2. After launching the app on the new phone, mark it as a receiver. This will turn your phone into a Wi-Fi hotspot.
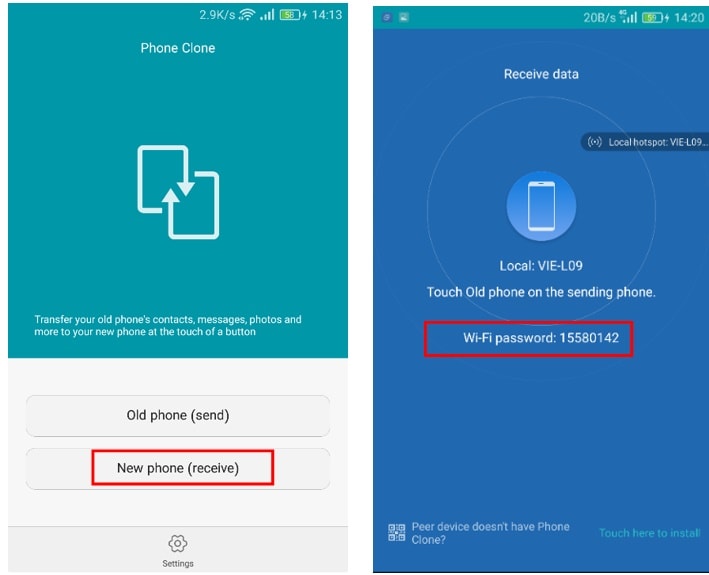
3. Go to the app on the source device and mark it as a sender. It will start looking for the available Wifi networks.
4. Connect it to the hotspot you have recently created and verified the password.

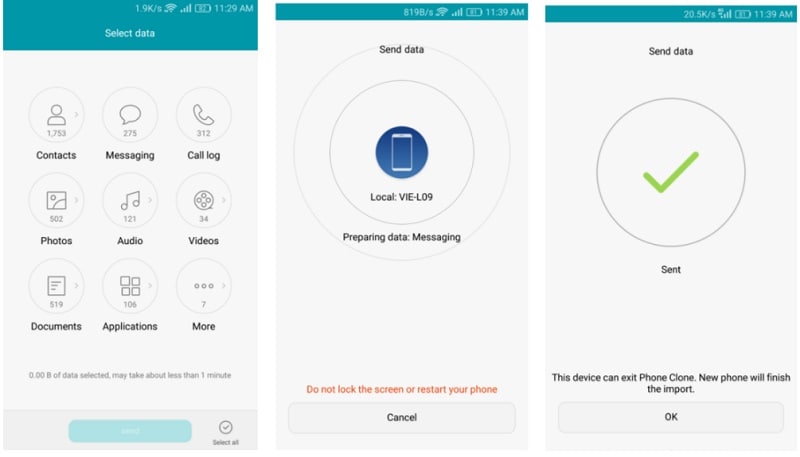
5. Once a secure connection is established, you can clone Android phone by selecting the data from the source device.
6. Tap on the “Send” button and transfer the selected content to the target device wirelessly.
Part 5: Clone Android phone using Google Drive
Google Drive is ideally used to store data on the cloud. However, it can also be used to back up and restore your data. Even though Google Drive transfers the data wirelessly, it consumes a substantial amount of data usage. Also, the process is not as fast or smooth as other options. Nevertheless, you can learn how to clone Android phone using Google Drive by following these steps:
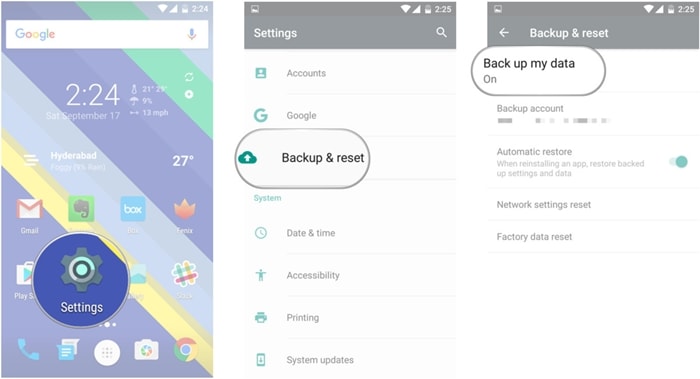
1. Unlock your source Android device and go to Settings > Backup & Reset. From here, you can turn on the option to backup your data.
2. Furthermore, you can verify the account on which you are taking the backup of your data and turn on the option of “Automatic Restore”. This will be of great help if you are managing multiple accounts Android.

3. After taking a complete backup of your data, turn on your brand-new Android to perform its setup.
4. Log in using the credentials of your Google Account. Make sure that the account should be linked to your previous device.

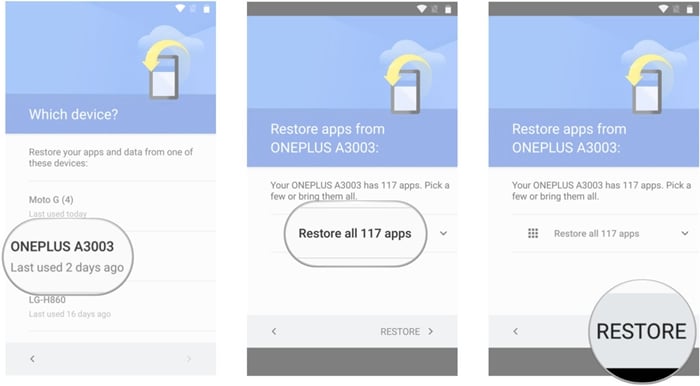
5. After signing in, the Nokia C12 device will automatically sync to the account and identify the backup files. Simply select the most recent backup file.
6. Also, you can select the apps and app data that you wish to transfer. Click on the “Restore” button at the end to make your target device an Android clone of your previous phone.

Part 6: Clone Nokia C12 Phone Using Bluetooth
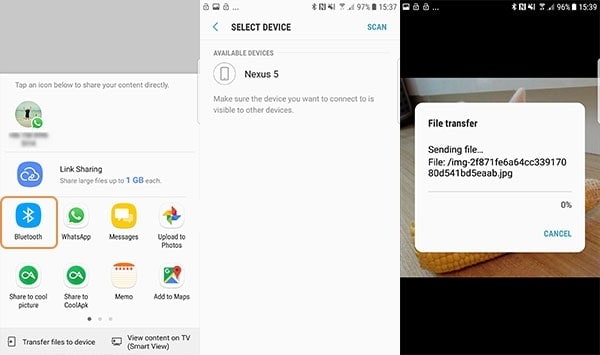
Using Bluetooth for cloning an Android phone is not the most efficient method. It is more suitable for transferring specific files than creating a comprehensive clone. Moreover, it’s a slow and manual process that requires you to select and transfer files one by one. Here’s how you can use Bluetooth for this purpose:
1. On both Android devices, turn on Bluetooth and pair the Nokia C12 devices. Navigate to the file you want to send on the source device, tap “Share,” and select “Bluetooth.”
2. Now, choose the targeted device to send the file. Move to the other device and “Accept” the incoming file transfer.
FAQs
1. Is Android phone clone safe?
Cloning an Android phone using reputable and trusted methods, apps, or tools is generally safe. Nonetheless, it is of utmost importance to exercise prudence and employ trustworthy software to safeguard your personal data. Be sure to obtain apps and tools exclusively from reputable sources, such as the Google Play Store, and adhere to the best data security practices.
2. Can I clone between different Android phone models or brands?
The ability to clone between different Android phone models or brands depends on the specific method or tool you are using. Dedicated phone transfer apps like Wondershare Dr.Fone - Phone Transfer or Phone Clone are often designed to work across various Android models and brands.
3. What should I do before cloning my Android phone to ensure a smooth process?
Before commencing the cloning procedure for your Nokia C12, creating a backup of your device’s data is crucial. It can be accomplished by using either the integrated backup feature or a trustworthy third-party app.
This precautionary step guarantees the safety of your data should any issues arise during the cloning procedure. Moreover, it’s imperative to verify that both devices are running the most up-to-date software updates and application versions.
Conclusion
Now, when you know six different ways to clone Android phone, you can easily move from one device to another without experiencing any data loss. This guide will certainly help every individual who is changing Android phones. Feel free to share it with your friends and family and let us know about your feedback regarding these solutions as well.
How to Migrate Android Data From Nokia C12 to New Android Phone?
While getting a brand new smartphone is certainly exciting, the process of phone migration is pretty tiresome. Too many times, users spend a lot of time and efforts to migrate Android to a new smartphone. If you wish to Android migrate to new phone without experiencing any data loss then you can take the assistance of a dedicated tool. There are plenty of ways to migrate Android to Android. In this guide, we will teach you how to migrate Android in three different ways.
Part 1: How to migrate Android using Google Drive?
Since Google Drive is already available on all the Nokia C12 devices, it can readily be used to migrate Android to Android without much trouble. Firstly, you need to sync your data from the source device and later log-in to the same account to sync your new phone with the Drive. To perform phone migration using Google Drive, follow these steps:
1. To start with, go to Settings > Backup & Reset on the source device and turn on the option of “Backup my Data”.
2. Furthermore, you can select the kind of data you wish to sync with your Google Drive. You can simply turn on the feature for Automatic backup to make the most of the space on Google Drive.
3. Wait for a while as your device will backup its content on the Drive. You can even go to your account’s Drive to view the backup.
4. Now, in order to Android migrate to new phone, simply turn on the target device and proceed to perform its setup.
5. Agree to the terms and conditions and sign-in to your Google account. Make sure this is the same account that is linked to your source device.

6. As you would sign-in to the account, it will display a list of available backup files. Simply select the recent backup file.
7. Furthermore, you can pick the apps that you wish to restore from here or restore all content at once.
8. To migrate Android to Android, just click on the “Restore” button and move your data from your old to new device.

Part 2: How to migrate Android data using Dr.Fone - Phone Transfer?
One of the most secure and fastest ways to migrate Android device to another phone is by using Dr.Fone Switch . Compatible with all the major Android, iOS, and Windows devices, it can easily be used to perform phone migration between different platforms. The tool performs a direct phone to phone transfer. It can Android migrate to new phone all kinds of data like contacts, call logs, bookmarks, messages, photos, videos, music, and more. To migrate Android to Android with no data loss, perform these steps:
Dr.Fone - Phone Transfer
Migrate Android Data to New Android Phone in 1 Click.
- Easy, fast, and safe.
- Move data between devices with different operating systems, i.e iOS to Android.
- Supports iOS devices that run the latest iOS
- Transfer photos, text messages, contacts, notes, and many other file types.
- Supports over 8000+ Android devices. Works for all models of iPhone, iPad and iPod.

3981454 people have downloaded it
1. Firstly, download Dr.Fone - Phone Transfer on your Windows PC or Mac from its official website. In order to perform Android phone migration, connect your old and new device to the system and wait for them to be detected.
2. Launch Dr.Fone toolkit and select the option of “Switch” from the welcome screen. Make sure that both the Nokia C12 devices are connected to your system in a secure way.

3. This will provide the following interface. As you can see, Dr.Fone will intuitively detect the source and the target device. Though, you can click on the “Flip” button to interchange the position of the Nokia C12 devices as well.
4. Select the kind of data you wish to move from the source to the destination device. You can even erase all the content on the target device by selecting the “Clear data before copy” option.
5. After selecting the type of data you wish to move, click on the “Start Transfer” button. This will initiate the phone migration process by moving your selected content to the target device.
6. Wait for a while as Dr.Fone will migrate Android device to any other phone. Don’t close this window or disconnect the Nokia C12 device during this stage.
7. Once your Android migrate to new phone, you will be notified by displaying the following prompt.
That’s it! After following these steps, you would be able to migrate Android to Android easily. Just disconnect your Nokia C12s safely and use them the way you like.
Part 3: How to migrate Android data manually?
By using Dr.Fone Switch or Google Drive, you would be able to perform phone migration in an effortless manner. Nevertheless, if there is no free space on your Drive and you wish to manually migrate Android, then you can also make it work. Following are certain ways to migrate Android to Android using different tools and techniques.
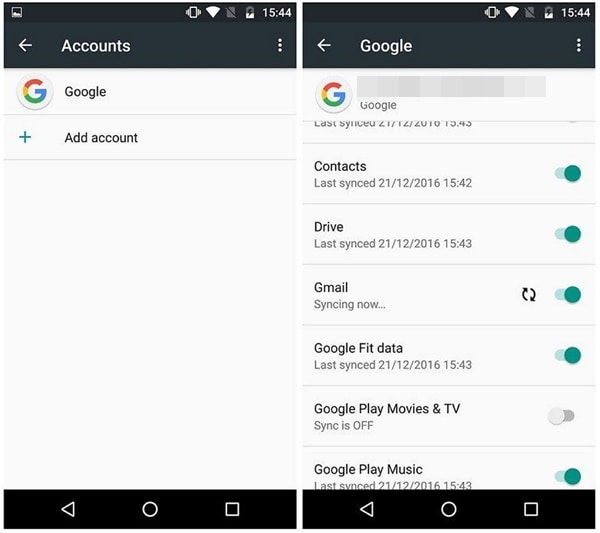
Contacts, Gmail, Fit Data, Play Store, etc.
To migrate Android device’s crucial content like its contacts, Google Fit data, Google Play Store data, Music data, etc. you can go to the respective Account and turn on the sync option. Later, you can use the same account and sync these files to the new device.
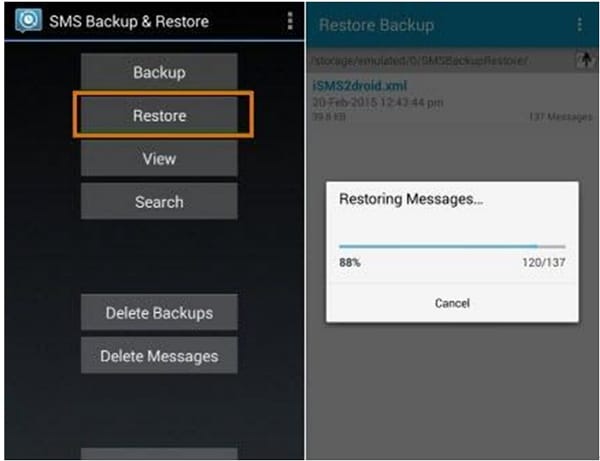
SMS transfer
There are plenty of ways to move your messages from one device to another. Just download a reliable SMS Backup & Restore app from Google Play store and sync your messages. Install the app on the new device to complete phone migration.
SMS Backup & Restore Download URL: https://play.google.com/store/apps/details?id=com.riteshsahu.SMSBackupRestore&hl=en
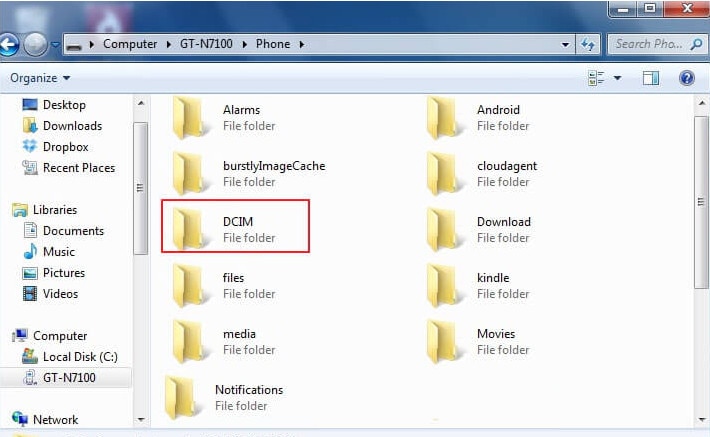
Media content
The smartest way to Android migrate to new phone your media files (like photos, videos, music, etc.) is by syncing them with Google Drive. If your Drive has limited free space, then you need to manually transfer this data. Connect your device to your system and open its storage. From here, you can manually copy the files having your media content and paste them to a safe location (or directly to the new device’s storage).
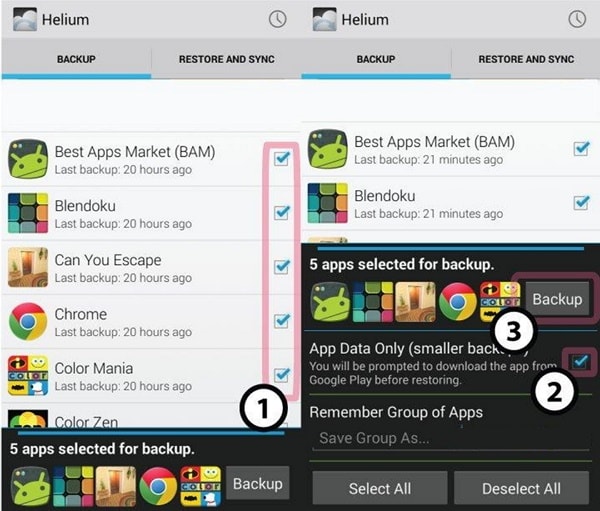
Transfer apps
You can also move your important apps while performing phone migration. There are dedicated third-party solutions that you can use for this. For instance, Helium can help you move your important apps and app data from one device to another.
Helium Download URL: https://play.google.com/store/apps/details?id=com.koushikdutta.backup&hl=en
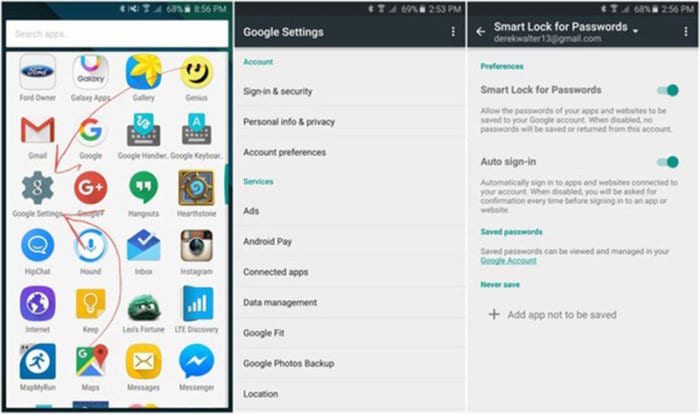
Bookmarks and passwords
If you use Google Chrome to store your passwords and bookmarks, then you can also migrate Android this content. Just go to Google Settings on the Nokia C12 device and turn on the option of “Smart Lock for Passwords”. In this way, you won’t have to enter your passwords over and over again.
As you can see, the manual phone migration method will consume a lot of time and effort of yours. Therefore, we recommend using Dr.Fone Switch to migrate Android to Android without any data loss. It is a highly secure and reliable tool that will let you migrate Android to any other platform without any hassle.
Tips of Transferring Messages from Nokia C12 to iPhone 14/15
Are you switching your phone to the latest iPhone 14 or 15 and wondering how to transfer your important text messages from your Nokia C12? Unlike transferring photos, moving texts poses a unique challenge as the options available are relatively limited.
Transferring your messages allows you to keep your important messages intact, preserving cherished conversations and important information. Be it a heartfelt message from a loved one or crucial details in a business conversation, some of your text messages must hold significant sentimental and practical value.
This article will guide you through effective and easy methods to transfer texts from Nokia C12 to iPhone. Let’s explore together the best ways to transfer texts and overcome the hurdles that come with this process.
When it comes to seamlessly transferring SMS from Nokia C12 to iPhone, Apple’s official app, “Move to iOS,” can be a reliable and straightforward solution. This app is designed to streamline the transfer process, allowing you to move not only your text messages but also other essential data to your iPhone.
To use this Move to iOS app, you need to download it from the Google Play Store first on your Nokia C12. Then, follow the steps to transfer SMS from Nokia C12 to iPhone here:
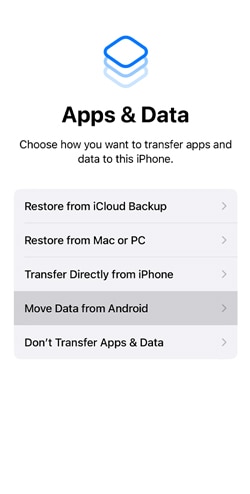
- Step 1: Setup your iPhone. Power up your new iPhone 14 or 15 and progress through the initial setup until you reach the “Apps & Data” screen. At this point, select the option that reads “Move Data from Android.”
- Step 2: Agree to Terms and Conditions. Open Move to iOS on your Nokia C12. Then, review and tap “Agree” to Terms and Conditions to proceed.
- Step 3: Enter the Code. On your Nokia C12, a screen will appear, requesting a 6–10-digit code. This code will be generated on your iPhone. Enter the displayed code on your Nokia C12 to make a secure connection between the two devices.
- Step 4: Select Content to Transfer. With the Nokia C12 devices now connected, you can choose the types of content you wish to transfer. Select “Text Messages” and any other data you want to move to your new iPhone. Tap “Continue” to initiate the transfer process.
**Tip:**Keep your devices close to each other and connected to power until the transfer process is completed.
- Step 5: Once the transfer is complete, you will be prompted to finish setting up your iPhone. Follow the instructions to complete the setup process, and you’re done.

How To Move Text Messages From Nokia C12 to iPhone Quickly with Computer
If you’re looking for a swift and reliable way to move text messages from Nokia C12 to iPhone, third-party software like Wondershare Dr.Fone can be the perfect go-to solution.
Packed with a user-friendly interface, this software streamlines the process, ensuring a quick and efficient transfer of your messages through its Phone Transfer feature. Dr.Fone Phone Transfer supports seamless data transfer between Android and iOS devices and vice versa. It also regularly updates so that compatibility won’t be an issue.
How to transfer texts from Nokia C12 to iPhone with Dr.Fone
- Step 1: Open Wondershare Dr.Fone from its official website , and find the phone transfer tool.
.
- Step 2: Specify the source and destination devices. After connecting to your devices, Dr.Fone will identify the connected devices and load their data onto the platform. Choose your Android as the Source device and your iPhone as the Destination device to set the transfer path. Use the Flip button if necessary to alter the transfer direction.

- Step 3: Choose text messages as data types for transfer. Proceed to select the types of data you wish to transfer. Checkmark the text messages category and click the Start Transfer button. If you want to remove existing data from the destination device, you can select “Clear data before copy.”

- Step 4: Monitor music transfer progress. The progress of the data transfer will be displayed in a pop-up window. Once completed, click OK to conclude the process.

Troubleshoot Why I Can’t Transfer Texts from Nokia C12 to iPhone
Even with the reliable methods mentioned earlier, there may be instances where you encounter difficulties in transferring texts from your Android to your iPhone. Don’t worry; we’ve got you covered with solutions to common issues that might hinder a smooth transfer.
- 1. Interrupted transfer
The transfer process may be interrupted if you use other apps, receive a phone call, or navigate away from the transfer screen on your Nokia C12 before it completes. So, make sure that both devices are left undisturbed until the transfer process is complete.
If you navigate away from the “Move to iOS” app on your Android or receive a phone call during the transfer, it may disrupt the process. Restart the transfer and keep both devices active until completion.
- 2. Problems with Wi-Fi connection
Wi-Fi connection issues on the Android device can hinder the transfer process. This may be caused by apps or settings affecting Wi-Fi, such as Sprint Connections Optimizer or the Smart Network Switch.
To address it, you can turn off apps or settings that might affect Wi-Fi on your Nokia C12, forget known Wi-Fi networks, and retry the transfer. It’s important to maintain a stable Wi-Fi connection on both devices throughout the transfer.
- 3. Partial content transfer or iOS device full message
Users may encounter situations where only some content is transferred, or the iOS device appears full despite an incomplete transfer. This can lead to potential data loss.
For this issue, you can consider erasing your iOS device and starting the transfer again. Make sure that the available space on your iPhone accommodates the Android content. Delete unnecessary data or apps on your iPhone to free up space if needed.
Bonus: How to Back Up Messages with Google Drive
In addition to seamless transfers between devices, backing up your text messages becomes equally important. Fortunately, Google Drive offers a convenient solution by allowing you to back up your messages with ease. Turning on backup on Google Drive ensures that your valuable SMS history remains safe and accessible whenever you need it.
- Step 1: Open your Nokia C12’s Settings. Start by opening your Android “Settings” and navigate to the “System,” “System & Updates,” or “About phone” section.
- Step 2: Select “Backup” or “Backup & Restore”. Within the “System” settings, look for the “Backup” or “Backup & Restore” option. Tap to access the backup settings for your device.
- Step 3: Choose a Google account. Under the backup settings, you’ll find the option to select the Google account to which you want to back up your data. Make sure that you are signed in with the Google account you want to use for the backup.
- Step 4: Turn on backup. Your phone will show you that turning on backup will include backing up your text messages. Tap “Turn on” to proceed with the backup.

Conclusion
Switching phones to the latest model is an exciting occurrence. However, the challenge of transferring crucial data, especially text messages, from an Android to a new iPhone can be challenging.
Fortunately, armed with the insights from this article, we’ve delved into two effective methods for seamlessly transferring text messages: using Apple’s official “Move to iOS” app and leveraging third-party software like Wondershare Dr.Fone. With these methods, you can bid farewell to any complications associated with message transfers.
- Title: In 2024, Easiest Guide How to Clone Nokia C12 Phone? | Dr.fone
- Author: Emma
- Created at : 2024-07-17 22:57:39
- Updated at : 2024-07-18 22:57:39
- Link: https://android-transfer.techidaily.com/in-2024-easiest-guide-how-to-clone-nokia-c12-phone-drfone-by-drfone-transfer-from-android-transfer-from-android/
- License: This work is licensed under CC BY-NC-SA 4.0.