
In 2024, How Can You Transfer Files From Itel P40+ To iPhone 15/14/13? | Dr.fone
How Can You Transfer Files From Itel P40+ To iPhone 15/14/13?
Just got a shiny new iPhone 15/14/13 but don’t want to lose all your file data from your old Android phone? Transferring information from an Android device to an iPhone can seem daunting, but it doesn’t have to be. With the right tools and steps, you can seamlessly move your contacts, photos, videos, apps, and other important files from your Android to your iPhone 15/14/13 in no time.
In this guide, we’ll walk you through the easiest ways to transfer data from an Android smartphone to an iPhone 15/14/13, including both wired and wireless options. Whether you want to move your WhatsApp history, Google Photos library, or entire media collection, we’ve got you covered. With either a direct USB cable transfer, or dedicated mobile transfer app, you’ll have all your Android data on your new iPhone set up just the way you like it.
Follow our simple step-by-step instructions below to get started moving your file data from Itel P40+ to iOS today!
Part 1: Transfer Data From Itel P40+ to iPhone 15/14/13 Using Move To iOS
The easiest way for most people is to use the Move to iOS app that Apple created specifically for switching from Android. Here’s how:
Step 1: On your Itel P40+, download Move to iOS from the Google Play Store.
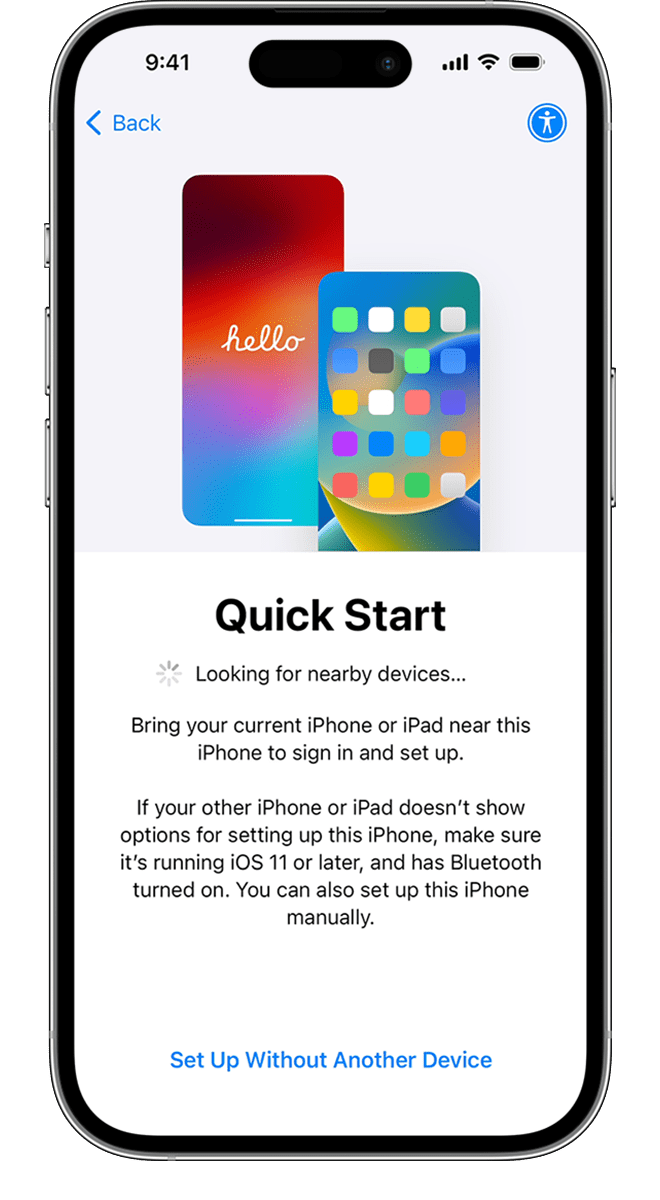
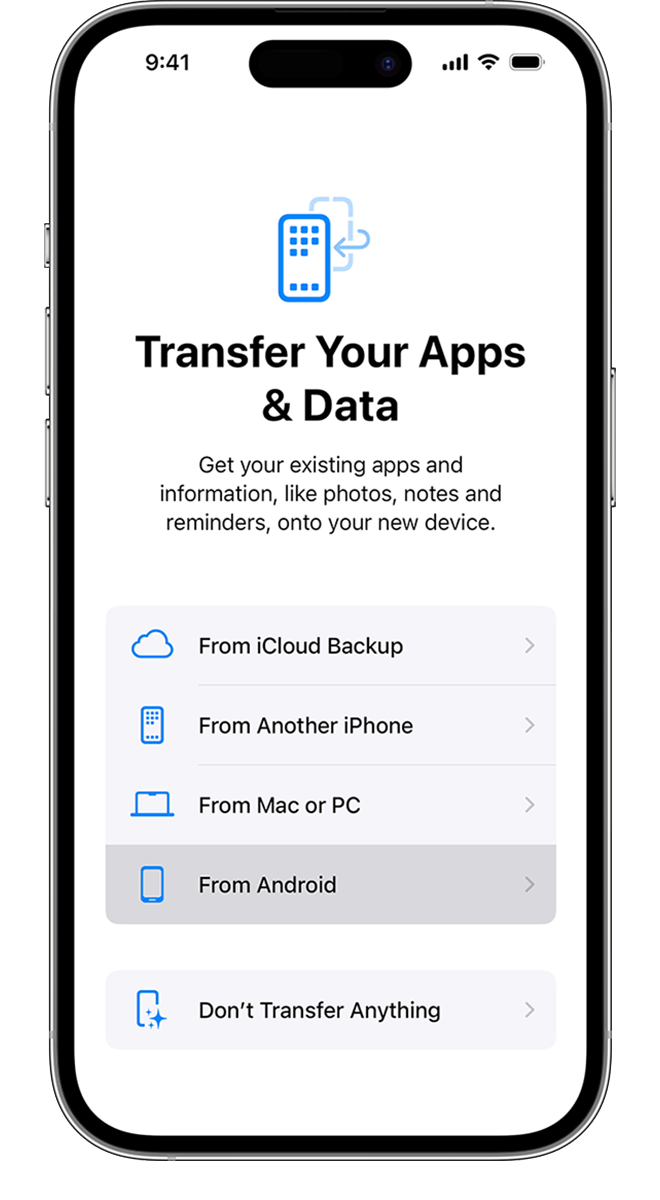
Step 2: When setting up your new iPhone 15/14/13, select the option to transfer data from Android.

Step 3: Open the Move to iOS app on your Itel P40+ and tap Continue.
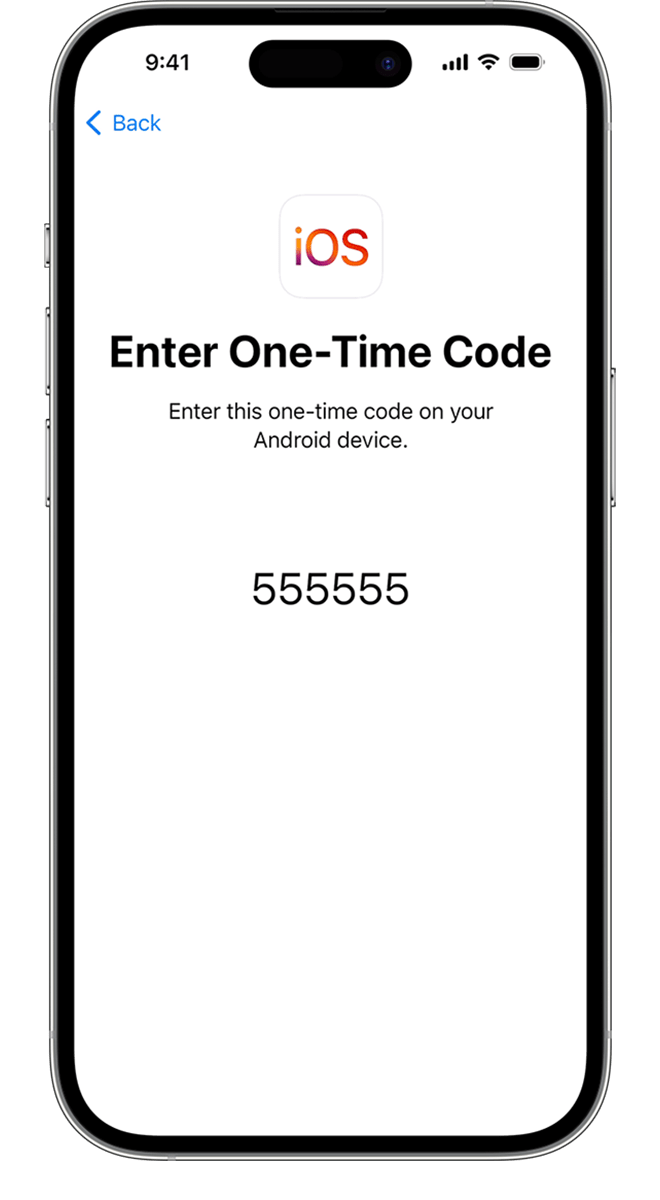
Step 4: Wait for a 6 or 10-digit code to appear on your iPhone and enter it on your Itel P40+.
Step 5: Connect both phones to the same WiFi network that your iPhone created.
Step 6: On Android, select the content you want to transfer like contacts, messages, photos, etc.
Step 7: Wait for the transfer process to finish, then tap Done on Android and Continue on iPhone.
Part 2: Transfer Data From Itel P40+ to iPhone 15/14/13 Using USB Cable
You can also connect your Itel P40+ directly to your new iPhone with the charging cable that came with your iPhone to transfer files:
Step 1: Connect your Itel P40+ to your iPhone with the cable.
Step 2: On your Itel P40+, tap Allow to give permission.
Step 3: On iPhone, select Trust when prompted.
Step 4: In Files on iPhone, select the name of your Itel P40+.
Step 5: Select the content you want to transfer and tap Copy or Move.
Step 6: Choose a location on your iPhone like Photos to transfer the files.
And that’s it! With these simple steps, you can easily move your important info, photos, videos, and other content from your old Android to your slick new iPhone 15/14/13.

Part 3: How Can You Transfer Data From Itel P40+ To iPhone 15/14/13 Using Google Drive?
If you have files stored on Google Drive, you can easily access them on your new iPhone by:
Step 1: Make sure everything you want to transfer is uploaded to Google Drive on your Android.
Step 2: On your iPhone 15/14/13, download the Google Drive app from the App Store.
Step 3: Sign into your Google account in the app and set Google Drive as a storage location.
Step 4: Your Google Drive content will now be available on your iPhone!
Part IV: How To Transfer Particular Data From Itel P40+ To iPhone 15/14/13?
Want to move all your precious data from your Itel P40+ over to your new iPhone 15/14/13? With some simple steps, you can easily transfer your contacts, photos, messages, and other key data.
Method 1: Transfer Contacts Using Sim Card
If you stored all your contacts on your Itel P40+’s SIM card, you’re in luck! This is the easiest way to move them to iPhone 15/14/13. Here’s how:
Step 1: Remove the SIM card from your Itel P40+ and insert it into your iPhone 15/14/13.
Step 2: Open Settings and tap “Contacts Manager”.
Step 3: Choose “Manage SIM Card Contacts”.
Step 4: Tap “Import from SIM Card”.
And it’s done! All your SIM contacts are now safely stored on your iPhone.
Method 2: Transfer Photos Using Google Photos App
The Google Photos app makes it a breeze to transfer all your Android photos and videos over to your shiny new iPhone 15/14/13:
Step 1: Download the Google Photos app on your iPhone 15/14/13 if you haven’t already.
Step 2: In the Google Photos app on your Itel P40+, turn on Backup & Sync in Settings.
Step 3: On your iPhone Google Photos, enable Backup & Sync too.
Step 4: Give it some time, and all your media will transfer automatically from Itel P40+ to iPhone!
Method 3: Transfer Messages Using SendAnywhere
If you use messages a lot, you’ll surely want to move your messaging history from your Android. The SendAnywhere app handles this seamlessly:
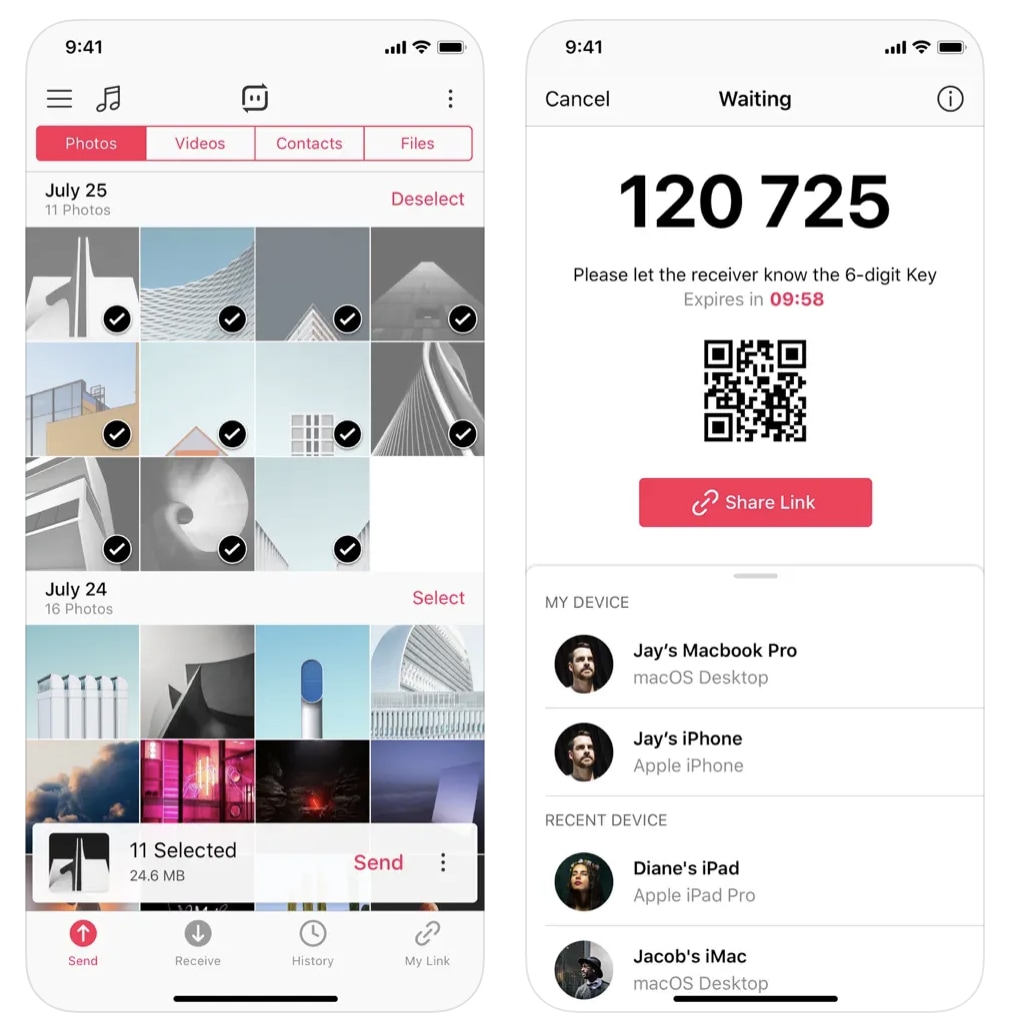
Step 1: Download SendAnywhere on both your Android and iPhone.
Step 2: Choose your Android as the Sender and, iPhone as the Receiver.
Step 3: Select “Messages” when prompted for what data to move.
Step 4: Enter the OTP code displayed on Android into your iPhone.
Step 5: Hit upload on Android and watch your messages move!
Transferring from Itel P40+ to the new iPhone 15/14/13 doesn’t have to be painful. With SIM contacts, Google Photos, SendAnywhere, and other clever tricks, you can make the switch smoothly and focus on enjoying your new phone!
Part V: Transfer Data From Itel P40+ To iPhone 15/14/13 in One Click Using Dr.Fone

If you’re shifting from an Android phone to an Apple device, then this is for you! As you get your brand new iPhone 15/14/13, you may wonder how you can transfer all your data in one go to your new phone. This includes all your contacts, photos, apps, and other vital data from your Itel P40+. But don’t worry, for a hassle-free and easy way to transfer your data you can use the incredible Dr.Fone Phone Transfer ! You can quickly and seamlessly transfer all that important stuff to your slick new iPhone 15/14/13 in no time. So, let’s get right into it and see how you can transfer data from Itel P40+ to iphone 13!
First thing first, get your Itel P40+ and new iPhone 15/14/13 ready them sufficiently charged during the transfer process.
Dr.Fone’s phone transfer feature makes switching data from Itel P40+ to iPhone easier than you can imagine. Just follow these simple steps:
Dr.Fone - Phone Transfer
1 Click to Transfer Data From Itel P40+ To iPhone
- Move data between devices with different OSs, i.e. iOS to Android.
- Transfer contacts, SMS, photos, videos, music, and more types.
- Simple, click-through process
- Compatible with the newest Android and iOS system.
3981454 people have downloaded it
Step 1: Download and install the Dr.Fone software on your Windows PC or Mac computer. Head to the official website drfone.wondershare.com and get the version compatible with your computer’s operating system. Installation takes just minutes.
Step 2: Use the USB cables provided with your Itel P40+ and iPhone to connect both phones to your computer. Dr.Fone will automatically recognize the two connected devices. Make sure to enable USB debugging on the Android device first.

Step 3: Launch the Dr.Fone app on the computer and click on the “Phone Transfer” module. The user-friendly phone switch interface opens up, ready to shift your data.
Step 4: Select your Itel P40+ as the “Source” and your iPhone as the “Destination”. Click “Flip” anytime to change direction. Also, choose what data types to transfer - contacts, messages, photos, videos, music, etc.

Step 5: Finally, hit the “Start Transfer” button and Dr.Fone will seamlessly shift the selected data from Itel P40+ to iOS. The progress is displayed on screen.

And that’s all it takes! In minutes, Dr.Fone securely transfers your essential data making your switch to the iPhone a breeze. Quick, hassle-free, safe - phone transfer doesn’t get easier than this!

So go ahead – move your life to your terrific new iPhone 15/14/13 in minutes with the exceptional data transfer powers of Dr. Fone’s Phone Transfer tool! Bid goodbye to manual processes or slow wireless transfers. For swift, simple, and safe Android to iOS transfer, Dr Fone is your go-to digital companion!
Conclusion
Transferring your precious data to a new iPhone 15/14/13 doesn’t have to be a headache. With smart use of your SIM card, cloud storage apps like Google Photos, file transfer apps like SendAnywhere, or sophisticated switchers like Dr.Fone , you can seamlessly move your contacts, photos, media files, chats, and more from Android to iPhone. Whether you want to transfer a few vital files or the whole data - music, movies, documents and all - you now have several failure-proof methods to choose from.
So go ahead and make the switch to that new iPhone 15/14/13 without compromising any precious data. Use these time-tested techniques to swiftly move key files like WhatsApp data, photos, contacts, and different types of files from Samsung or any Android to your Apple device. Give your new iPhone a rousing welcome by easily transferring all that Android data!
How to Transfer Data from Itel P40+ to Samsung Phone
Samsung is undoubtedly the most widely used smartphone manufacturer today. Cutting edge functionalities in prices that are affordable makes Samsung a favorite. Therefore, more and more users will need to transfer data to Samsung’s devices. In this article, we are going to share how to transfer data from Motorola to Samsung, especially for how to transfer contacts from Motorola to Samsung. Check them out.
If you’re going to buy a new Samsung S23, these solutions work as well.
Part 1: Transfer Data from Motorola to Samsung using Dr.Fone
Dr.Fone - Phone Transfer can be used for transferring data from to phone to another phone like messages, contacts, call logs, calendars, photos, music, video, and apps. Also, you can back up your iPhone and save the data on your PC, for example, and restore it later when you wish. Basically, all your necessary data can be transferred fast from a phone to another phone, including transfer from Motorola to Samsung.
Dr.Fone - Phone Transfer
Migrate all data from Motorola to Samsung quickly
- Easily move 11 types of data like photos, videos, calendars, contacts, messages, music, apps, etc. from Motorola to Samsung.
- You can also transfer between iOS and Android, and iOS and iOS.
- Simple clicks to operate.
- The all-in-one process to read from the source device, transfer, and write to the target device.
4,919,791 people have downloaded it
Steps to Transfer Data from Motorola to Samsung
To transfer data from your Motorola to your Samsung phone, you will require:
- USB Cables x2
- A laptop or a computer
To start transferring data from your Motorola to your Samsung phone you will need to
Step 1. Download Dr.Fone and install it on your laptop or computer.
Step 2. Using the USB cables, attach both of your phones to the computer or laptop that you just installed Dr.Fone. When you run Dr.Fone, you’ll see a screen similar to the one shown below:
Step 3. There will be several modes listed on the screen. Select the “Phone Transfer” mode. Dr.Fone - Phone Transfer will display both of your devices after detecting them.

Step 4. Notice that the menu in the center shows the items to be transferred to the destination device. If you want to transfer the contacts, check the contacts item to transfer contacts from Motorola to Samsung. Check or uncheck the boxes as per your requirement. Click “Start Transfer” when you are done. Dr.Fone - Phone Transfer will begin the transferring process. A menu will appear showing the progress of the transfer.


Step 5. You can cancel the transferring process at any time by hitting the “Cancel” button however, make sure that neither of the Itel P40+ devices gets detached while the transferring process is still underway.
Part 2: Transfer WhatsApp from Motorola to Samsung via WhatsApp Transfer Tool
Looking for a hassle-free way to transfer your WhatsApp data from Motorola to Samsung? If yes, your best bet to complete the transfer without a hitch is Dr.Fone - WhatsApp Transfer . This solution facilitates the smooth transfer of WhatsApp chats, ensuring all attachments are included. Not only can you transfer chats, but you can also effortlessly backup and restore your WhatsApp data,
![]()
Dr.Fone - WhatsApp Transfer
One-click to transfer WhatsApp messages from Itel P40+ to iPhone
- Transfer WhatsApp messages from Itel P40+ to iOS, Android to Android, iOS to iOS, and iOS to Android.
- Backup WhatsApp messages from iPhone or Android on your PC.
- Allow restoring any item from the backup to iOS or Android.
- Completely or selectively preview and export WhatsApp messages from iOS backup to your computer.
- Support all iPhone and Android models.
3,480,561 people have downloaded it
This versatile tool enables effortless transfer of WhatsApp and WhatsApp Business chats between smartphones. Dr. Fone stands as your ultimate answer if you seek a smooth merging of WhatsApp chats between two devices. Here is how you can transfer your WhatsApp data with ease using Wondershare Dr.Fone:
Step 1: Access Transfer WhatsApp Messages in Wondershare Dr.Fone
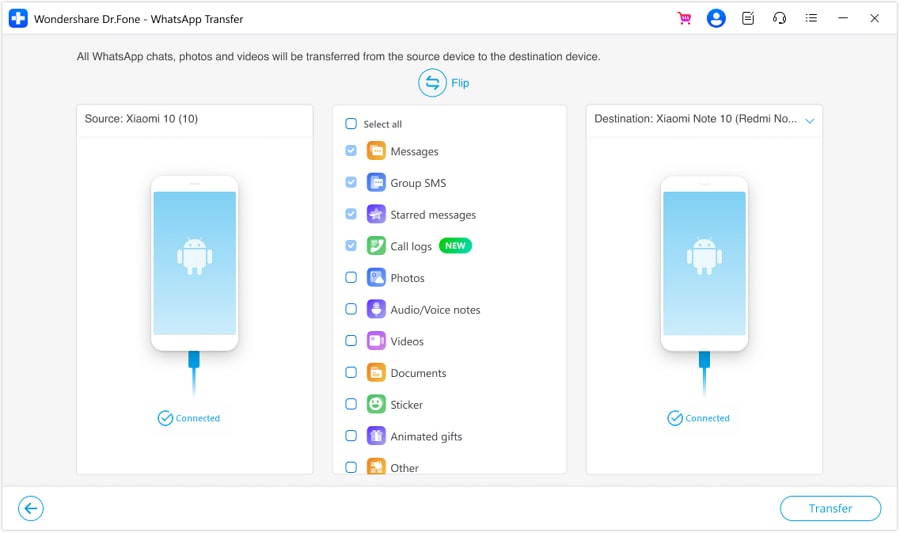
Begin by opening Wondershare Dr.Fone on your computer and proceed to link your Motorola and Samsung devices using a USB cable. Once the Itel P40+ devices are connected, navigate to “Toolbox” and there, tap “WhatsApp Transfer” to proceed. On the following screen, move to the “WhatsApp” tab and click “Transfer WhatsApp Messages.”
Step 2: Assign Correct Positions to Motorola and Samsung Devices
Now, you need to assign the Motorola and Samsung devices to their respective positions. Here, the Motorola phone should be in the “Source” position. In the same way, the Samsung device needs to be in the “Destination” position. Use the “Flip” button in case the assigned positions are incorrect.

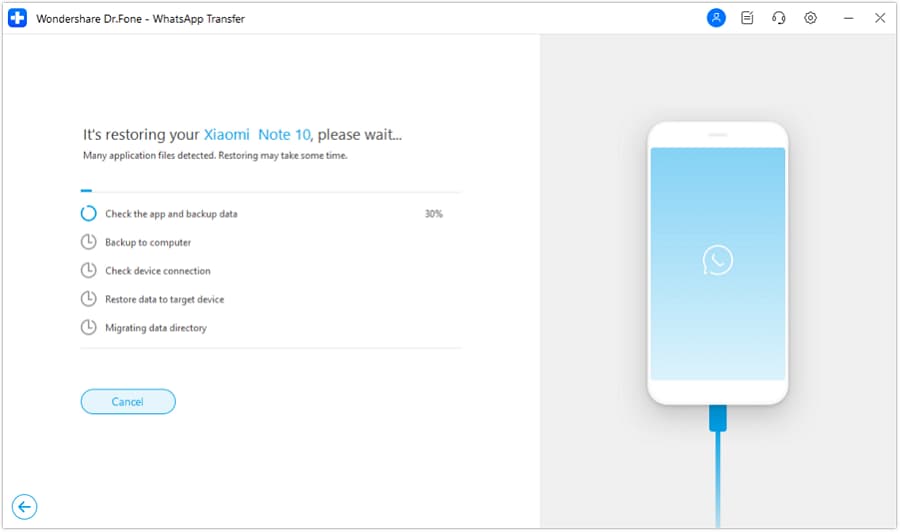
Step 3: Complete the WhatsApp Transfer Process
Afterward, click “Transfer” to commence the WhatsApp transfer process. A prompt will appear asking whether you want to back up WhatsApp data on the destination device. After making your choice, wait for the transfer process to finish, which will take only a few moments.
Part 3. Using Official Tools to Transfer Data from Motorola to Samsung
Samsung Smart Switch is an official tool developed by Samsung. This tool is designed to simplify transferring data from an old device, including non-Samsung devices like Motorola, to a new Samsung smartphone or tablet. This tool supports various data types, such as contacts, photos, messages, videos, calendars, and music. You can use the steps given below to transfer your data from Motorola to Samsung using Smart Switch:
Step 1. Begin with ensuring the Smart Switch app is installed on both devices. It comes pre-installed on Samsung devices, and you can download it from the Google Play Store for Motorola. Now, launch the app on both devices and keep both devices near each other.
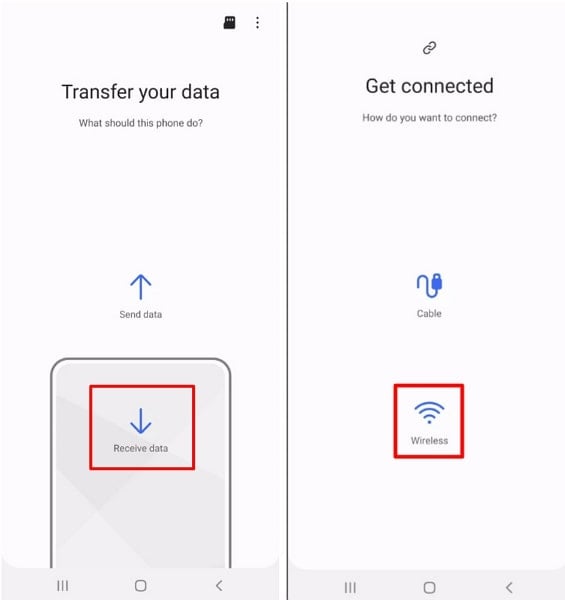
Step 2. On the Motorola device, tap “Send Data” and follow it by pressing “Wireless.” Now move to Samsung and tap “Receive Data,” then press “Galaxy/Android,” and finally tap “Wireless.”
Step 3. Afterward, finalize the connection by selecting “Allow” on the old phone. Then, on your new phone, select the content you wish to transfer and proceed by tapping “Transfer.” Once the transfer finishes, tap “Go to Home Screen” on the new phone, and you’re all set to proceed.

Bonus Tip: Want to Manage Your Itel P40+ Data before Transferring Data?
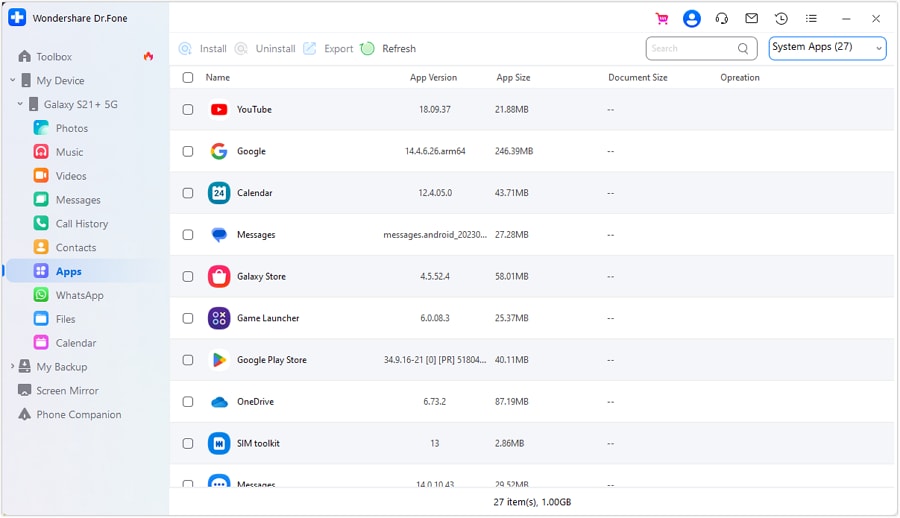
Before initiating data transfer from your Motorola phone to your new Samsung device, it’s a great idea to declutter and organize your data. Wondershare Dr.Fone is your go-to smart solution for managing and transferring Android data. With its intuitive features, you can preview, delete, export, and manage your data. This software facilitates smooth file transfers between your Itel P40+ and computer.
Moreover, it enables easy transfer of media files between iTunes and Android. Dr.Fone also offers the capability to import contacts from iCloud to either your Itel P40+ or computer. Additionally, it allows you to view and manage mobile notifications directly on your PC. It checks how much storage is left and generates a report showing the Itel P40+ device’s history with basic details automatically.
To cater for the above mentioned problems and many other, Dr.Fone - Phone Transfer was developed. Dr.Fone - Phone Transfer is an easy to use tool. It has been designed to assist you to in transferring data from your old phone to your new phone, including transferring contacts from Motorola to Samsung.
2 Ways to Transfer Text Messages from Itel P40+ to iPhone 15/14/13/12/11/X/8/
The biggest dilemma that people face when they buy a new iPhone like iPhone 14/14 Pro (Max) is how to transfer data from the Android or old iPhone. Well, transferring images, audio, videos, etc. is easy as there are lots of apps available that allow doing so.
Aside from this, it is also important that they can transfer messages and contacts to their new phone like iPhone 14/14 Pro (Max). But the process of how to transfer text messages from Itel P40+ to iPhone can get a little more tricky than transferring other data. But don’t worry, as there are some ways available that allow easy transferring of messages from Itel P40+ to iPhone.
Part 1: One-click solution to transfer text messages from Itel P40+ to iPhone
Buying a new iPhone like iPhone 14/14 Pro (Max) is a lot easier than setting it up. Media files like music, images, and video clips are a lot easier to transfer cross-platform. But the part of migrating contacts and text messages especially gets tricky cross-platform due to poor compatibility between Android and iPhone. Though is possible to transfer text messages from android to iPhone, the process can be slower and will need several workarounds than normal.
Want to transfer Android data to the new iPhone 14/13/12/11/X/8 faster and securely? Then one-click transfer solution - Dr.Fone - Phone Transfer can help in the task. It is a powerful transfer tool that lets users transfer messages from android to iPhone real quick and without any risk. It can transfer not only text messages, but also contacts, music, images, videos, and others. With Dr.Fone - Phone Transfer, one can easily transfer phone data from an android, iOS, Symbian, etc. to other Android or iOS devices. You don’t need to install any app on the sending and receiving devices. Just connect the Itel P40+ devices with a USB cable simultaneously and you can transfer data between them very carefully.
Dr.Fone - Phone Transfer
Transfer Text Messages from Itel P40+ to iPhone like iPhone 15/14/14 Pro (Max)
- Easy, fast, and safe.
- Move data between devices with different operating systems, i.e iOS to Android.
- Supports iOS devices that run the latest iOS version
- Transfer photos, text messages, contacts, notes, and many other file types.
- Supports over 8000+ Android devices.
- Works for all models of iPhone, iPad, and iPod.

4,053,382 people have downloaded it
How to transfer SMS from Itel P40+ to iPhone using Dr.Fone - Phone Transfer?
Using Dr.Fone, it is possible to transfer SMS from Itel P40+ to iPhone in a matter of seconds. This one-click method of transferring text messages is way faster and simple than other transfer methods. Follow the steps to learn how to transfer text messages from Itel P40+ to iPhone with Dr.Fone - Phone Transfer:
Step 1: Download the Dr.Fone toolkit and install it on the Windows or Mac computer. Launch the toolkit by double-clicking on the desktop shortcut or from the application directory.
Step 2: Then connect both the Itel P40+ devices i.e. Android and iPhone to the computer with the help of USB cables. Wait for them to be detected by the software.
Step 3: Click on the Switch option on the Dr.Fone utility home screen and it will take you to Dr.Fone - Phone Transfer interface.
Step 4: Both the Android and iPhone will be displayed on the next screen. Select the Android device as the Source and iPhone as the destination using the Flip button.
Step 5: Now, select the data that you want to transfer by checking the respective option. In this case, only check the Text messages checkbox and uncheck everything else.
Step 6: Finally hit the “Start Transfer” button and it will begin to transfer text messages from Itel P40+ to iPhone.
Dr.Fone - Phone Transfer offers a safe and quick way to transfer messages from Itel P40+ to iPhone like iPhone 14/14 Pro (Max). Moreover, it can work both on new and old target iPhone. Dr.Fone - Phone Transfer is also compatible with a variety of iOS devices and iOS versions, so it doesn’t have any restrictions for transferring data.
Part 2: Transfer SMS from Itel P40+ to iPhone using Move to iOS app
Transferring text messages from Itel P40+ to iPhone using Dr.Fone - Phone Transfer is the best and the fastest way. But it requires a computer and physically connecting the Itel P40+ devices via USB cables. What if the person doesn’t have a computer? They won’t be able to transfer any data from their old Android to a new iPhone like iPhone 14/14 Pro (Max). If you want to find another way to transfer messages and other stuff from Itel P40+ to iPhone, then Move to the iOS app can help in this task.
Move to iOS is an Android app developed to make it easier to transfer data from Itel P40+ to iOS devices. It is available for free at Google Play Store and is of the minuscule size of approximately 2.2 MB. One doesn’t need to wait extreme time to install the app. With Move to iOS, you will be able to set up the iOS device easily without needing to connect it with a USB cable. But there are some prerequisites that you have to fulfill before you can transfer data from Itel P40+ to iPhone 14/14 Pro (Max) or an earlier model-
- • The iPhone must have iOS 9/10/11/12/13/14/15/16/17
- • iPhone 5 or later is required
- • Android 4.0 and above
- • The iPhone hasn’t been set up yet or the data has been erased
- • Data doesn’t exceed the storage on iPhone
- • Steady Wi-Fi network is available
How to transfer text messages from Android and iPhone using Move to iOS?
Want to learn how to transfer messages from android to iPhone without USB cables and computers? With the below steps, you can easily transfer messages and other data from Itel P40+ to iPhone like iPhone 14/14 Pro (Max) using Move to iOS -
Step 1: Click on the “Move Data from Android” button on the “Apps and Data” screen during the iPhone setup process. If you have already set up the Itel P40+ device, then you need to erase the data from Settings > General > Reset and then go to Apps and Data screen.

Step 2: On the iPhone, click “Continue” on the Move from Android screen. It will generate the 6-digit or 10-digit code.
Step 3: Now on the Android device, download and install the Move to iOS app and open it.
Step 4: Tap on “Continue” and then “Agree” on the terms and conditions screen and then “Next” on the “Find Your Code” screen.
Step 5: Enter the code generated on the iPhone in the “Enter Code” screen.

Step 6: On the Transfer Data screen, select the content to transfer and click “Next”. It will start the transfer process and will take some time to complete depending on the size of the data.

Step 7: After transferring is complete, finish the iPhone device setup process.
The disadvantage that this method has is that you can’t transfer messages from Itel P40+ to iPhone on an already set up iPhone. It only works on a new device or has to erase the data on the target device. Moreover, as it only works with all versions of iOS, the older devices can’t transfer messages through this method. They can use Dr.Fone - Phone Transfer for the task.
- Title: In 2024, How Can You Transfer Files From Itel P40+ To iPhone 15/14/13? | Dr.fone
- Author: Emma
- Created at : 2024-07-17 23:05:00
- Updated at : 2024-07-18 23:05:00
- Link: https://android-transfer.techidaily.com/in-2024-how-can-you-transfer-files-from-itel-p40plus-to-iphone-151413-drfone-by-drfone-transfer-from-android-transfer-from-android/
- License: This work is licensed under CC BY-NC-SA 4.0.