
In 2024, How to Transfer Apps from Vivo G2 to Another | Dr.fone
How to Transfer Apps from Vivo G2 to Another
Nowadays, the transfer of apps between devices has become an essential task. Switching from one phone to another requires a smooth transfer of applications. It is particularly important when transitioning to an Android device. This comprehensive guide explores how to transfer apps to new Android phones.
Moreover, understanding the app migration process is crucial whether you are moving from an iOS device or another Android phone. This article aims to simplify the journey, offering step-by-step instructions and expert tips.

Part 1: Is It Possible To Transfer Apps from Vivo G2 to Other Android Devices and iPhone to Android?
It is possible to transfer applications from an Android phone to another Android. There are multiple ways that Android offers to move apps between two smartphones. These include using the Google Play Store and signing in with the same Google account. Also, multiple tools and apps can assist you in this context.
By contrast, it is not feasible to transfer apps to a new Android phone from an iPhone. That’s mainly because of the different operating software in the two devices. The applications downloaded in iOS are not compatible with Android. Additionally, Google Play Store does not support these iOS applications. That’s why directly transferring apps from iPhone to Android is impossible. You must download it again from the Google Play Store on your Vivo G2.
Part 2: How To Transfer Apps From One Android Device to Another in 3 Simplified Steps?
You can try Wondershare Dr.Fone - Phone Transfer tool if you are trying to transfer apps from one Android to another. This tool offers an efficient and convenient solution for transferring data between devices. With a one-click method, it simplifies moving various data types, including contacts, apps, photos, videos, and more.
Also, the software supports a wide range of devices, including the latest products of Apple, Samsung, and other famous brands. Notably, it is compatible with the latest iOS 17 and Android 14 versions, ensuring smooth data transfer. This makes it a versatile tool for users seeking a hassle-free and convenient data transfer experience across various devices.
Key Features
- Wondershare Dr.Fone – Phone Transfer tool allows you to select the desired type of files and transfer them with just one click.
- The tool enables the users to transfer within devices in a few minutes. This saves a lot of time and increases the productivity of the users.
- This software is operatable and provides easy navigation for each kind of user. That means you don’t have to be a tech expert to run the tool.
Steps Involved To Transfer Apps From One Android Device to Another Using the Phone Transfer Tool
Wondershare Dr.Fone – Phone Transfer provides a complete solution through a phone transfer process. You can discover the following essential steps in this how to transfer apps to a new Android phone procedure:
- Step 1: Download Dr.Fone and Choose Phone Transfer Tool
Download the Wondershare Dr.Fone toolkit by pressing the “Free Download” provided and install it on your Windows PC or MacBook. Next, choose the “Phone Transfer” tool from the “Toolbox” tab present on the left side.

- Step 2: Device Selection for Android-to-Android Transfer
Start the process by connecting both Android devices to load their data onto the platform. After that, designate the “Source” and “Destination” devices for the transfer. You can also use the “Flip” button to flip the Vivo G2 devices.

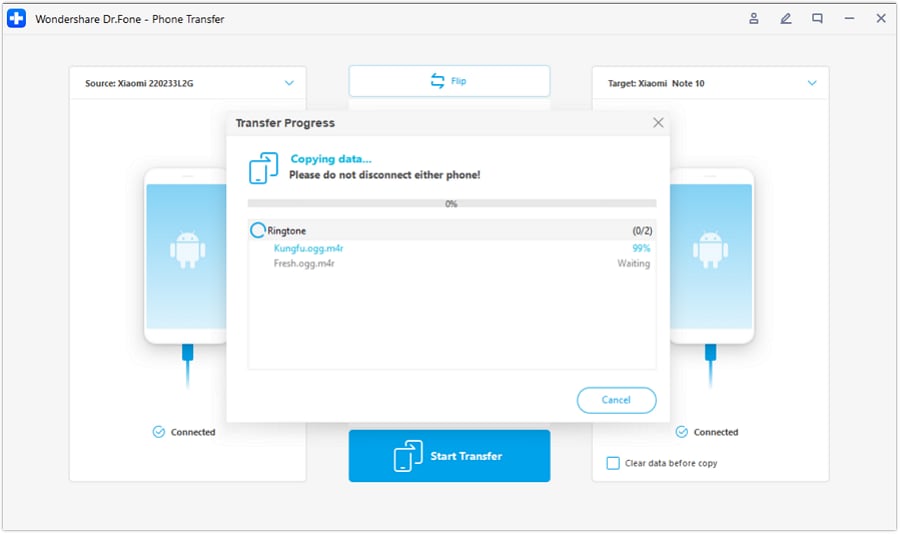
- Step 3: Select the Data Categories for Transfer
Now, you have to select the “Apps” category to be transferred in this process. Proceed by clicking the “Start Transfer” button after selecting it to start the transfer. A window will display the progress of the transfer, where you can view the progress bar. Upon successfully completing the data transfer, a confirmation message will appear on the window. Hit the “OK” button to conclude the transfer process.
Part 3: How To Transfer Apps From Non-Samsung to Galaxy Devices Using Samsung Smart Switch?
Samsung Smart Switch allows you to quickly transfer various contents from your one Android phone to a Galaxy device. Also, it provides you the option to transfer contents selectively. The contents include apps, contacts, messages, media, and more. Here, we’ll transfer apps from a non-Samsung Android phone to a Galaxy device.
- Step 1: First of all, you have to open the Smart Switch application on your Galaxy device. Then, tap “Continue” to agree with the terms and conditions. After that, allow the app’s specific permissions to continue the operation.
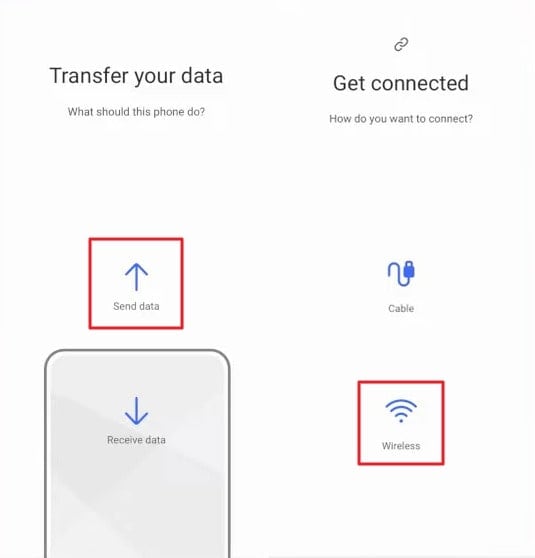
- Step 2: Next, open the Smart Switch app on the old device and tap the “Send Data” option. Then, select the “Wireless” option to start the procedure.
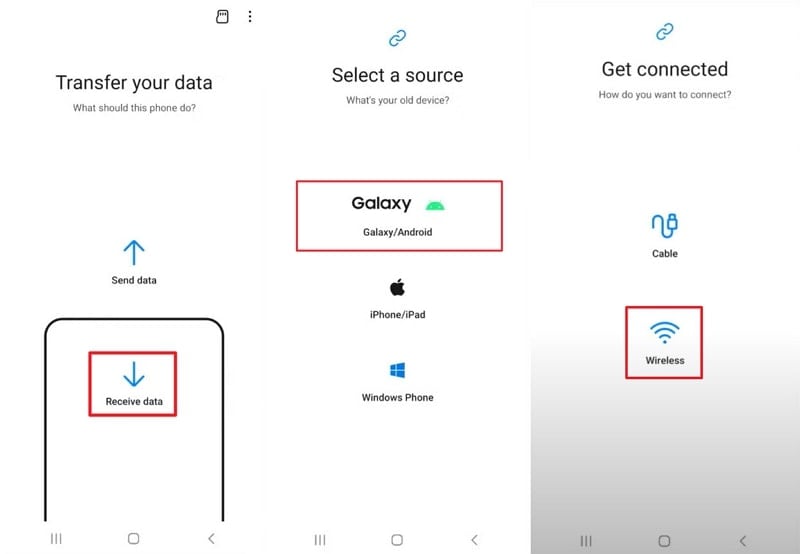
- Step 3: Now, you have to tap the “Receive Data” option on your Galaxy device. Next, select the “Galaxy/Android” option as a data source, followed by the “Wireless” option. Then, you need to “Allow” the connection on the old device that this new device wants to have.
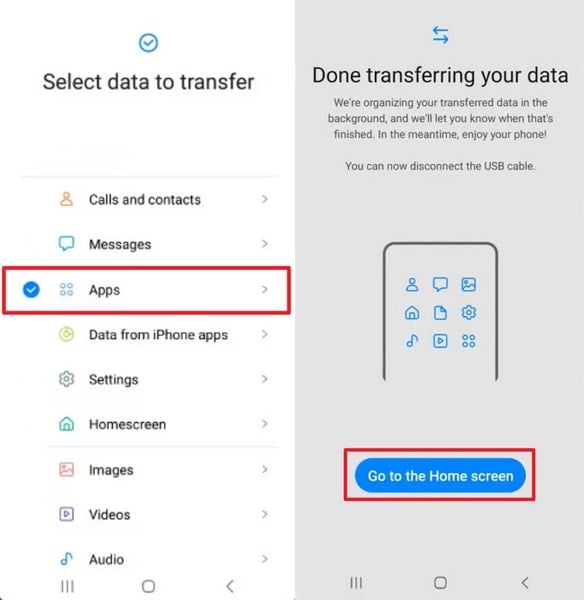
- Step 4: The Galaxy phone will subsequently ask for the data selection. There, you can go into the “Custom” option and select the “Apps” option. Next, choose the applications you want to transfer and hit the “Transfer” option. The transfer process will be complete within a few minutes. You can tap on the “Go to the Home Screen” prompt and find the apps you have just transferred.

Part 4: How To Transfer Apps Between Android Devices With the Help of Google Backup
There is another method that you can try to transfer apps to a new Android phone. This includes restoring a Google backup on a new device. You can back up all of your data, including the applications, to the Google account you have signed in. Later, you can restore the same data on a new device quite easily:
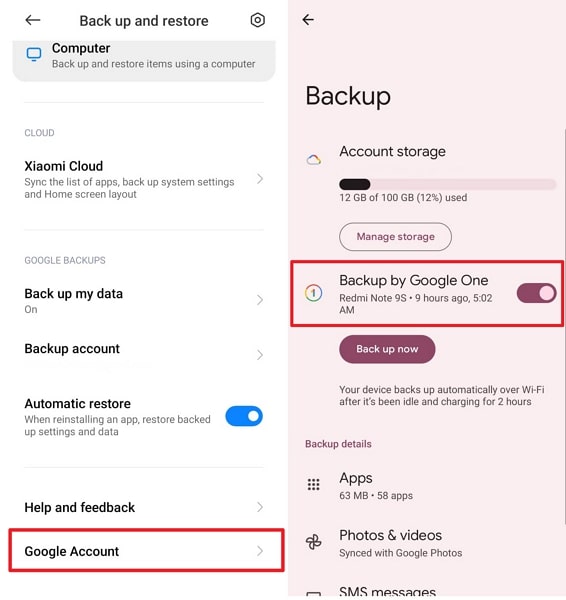
- Step 1: First,access the “Settings” menu on your old Android device and tap on the “Additional Settings.” Then, you need to navigate to and tap on the “Back up and Restore” option.
- Step 2: Next, choose the “Google Account” option and enable the “Backup by Google One” toggle. If the toggle is off, slide it to activate and select “Back up Now.” After that, your data is securely stored when the backup process finishes.
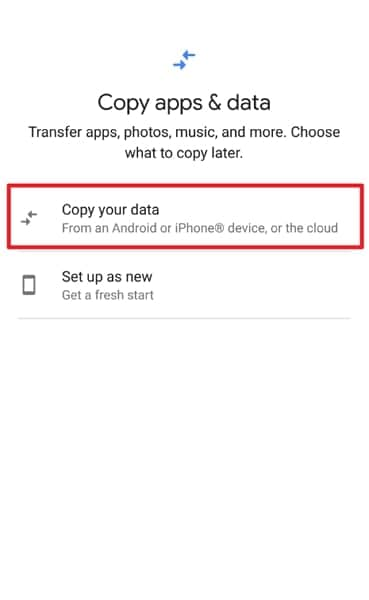
- Step 3: To restore your data, you have to charge and power up your new Android device. Then, follow the on-screen instructions until prompted to restore data from another device. Following this, you will have to choose the Vivo G2 device from which you want to restore data and tap the “Copy Your Data” option.

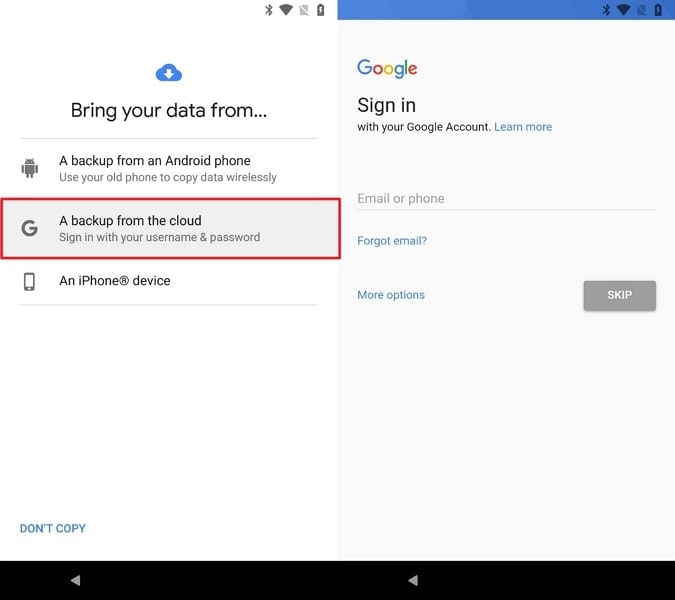
- Step 4: Next,connect your Vivo G2 to the same Wi-Fi network as your old phone is connected. Then, select “A backup from the cloud” from the restoration options. In the next step, sign in to your Google account on your new device using the same account as your old phone. Now, you need to choose the recent backup from your old device.
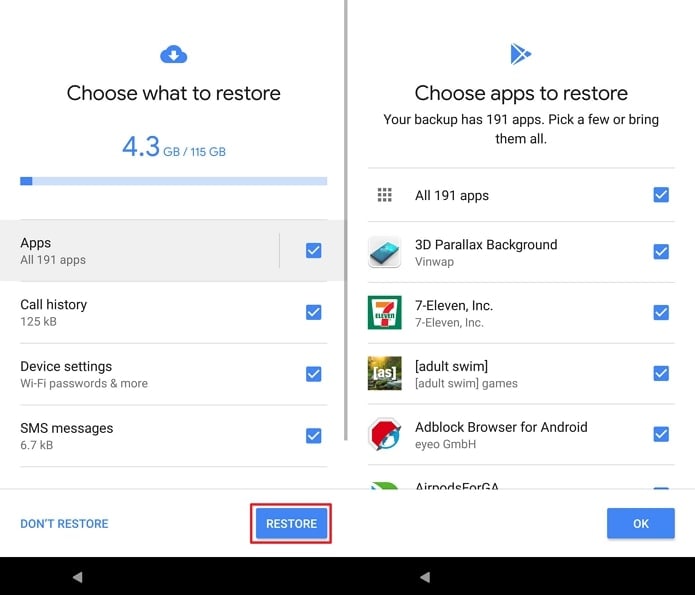
- Step 5: Lastly, you can choose the “Apps” option to pick the apps you want on the new device. Afterward, you have to tap on the “Restore” option to restore your Google backup.
Part 5: How To Transfer and Download Apps From One Phone to Another Using Play Store
You can also transfer apps from one phone to another using the Play Store. It’s more like downloading apps and a time-consuming procedure. This manual method uses the Play Store to detect applications not installed on your new Galaxy device. Then, after the detection process, you can download those applications. The “how to transfer apps to new Android phone” method includes some steps that are described below.
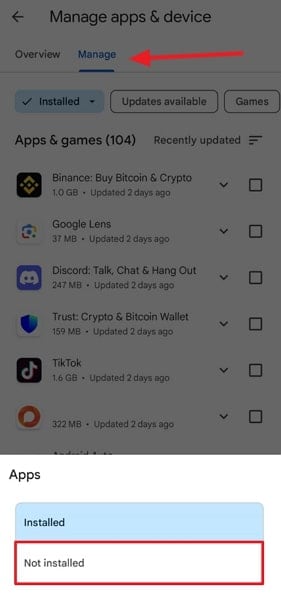
- Step 1: First, access the “Google Play Store” on your new Android device and tap the “Profile” icon situated at the upper right corner of the search bar. Among the displayed options, proceed with choosing “Manage Apps & Device” to proceed.
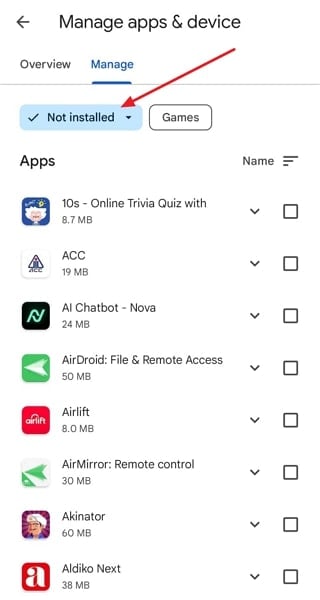
- Step 2: Then, move to the “Manage” section and select the “Installed” drop-down menu. From there, opt for the “Not Installed” category to see all the previously installed apps of your old Android smartphone.
- Step 3: You’ll encounter a list of previously installed apps linked to your Google account but not currently on your new Galaxy device. Choose the desired apps and tap the “Install” button located at the top right to reinstall them.
Conclusion
In a nutshell, you can transfer the applications from your old Android device to a new Galaxy phone using various methods. We have described these effective methods through which you can easily transfer your old apps. However, the Wondershare Dr.Fone – Phone Transfer method stands out as the best technique to transfer apps to new Android phones. The software allows the transfer process to be implemented in simple steps that require a few clicks.
How to Transfer Photos from Vivo G2 to New Android?

The phone industry, for years, has constantly improved on the design and development of mobile phones being released into the market. One of the major developments is the introduction of the camera to mobile phones. The ease of carriage and portability has made mobile phone cameras a preference over digital cameras. As a result we are witnessing more pictures taken with the aid of a phone. This also means most of these photos are stored on the phone memory.
Most of these photos would need to be shared with other people who are either a part of the photo or you would want to transfer them to your new android device. Most users are at a loss about how to transfer their photos from one android device to another. There are several ways to do that successfully without the risk of losing your priced photos. And in this article we have outlined several ways through which you can transfer your photos from your Vivo G2 to your new android device.
Part 1. Transfer Photos from Vivo G2 to New Android with a File Transfer Software
One way of moving your photos between android devices is through the use of file transfer software. This software enables you to connect both android devices together.
Using file transfer software to move your photos from one android device to another android device provides a secure and sure transfer window, ensuring your files won’t be lost. Reliable software you can use for this purpose is the Dr.Fone - Phone Transfer software. Dr.Fone - Phone Transfer file transfer software is topnotch and user friendly. This article will carefully lead you through the process of using this software.
Dr.Fone - Phone Transfer
Transfer Everything from Android/iPhone to New iPhone in 1 Click.
- It supports all the leading iOS devices, including devices running on iOS 11.
- The tool can transfer your photos, videos, contacts, messages, music, call logs, notes, bookmarks, and so much more.
- You can transfer all your data or select the type of content you wish to move.
- It is compatible with Android devices as well. This means you can easily perform a cross-platform transfer (e.g. iOS to Android).
- Extremely user-friendly and fast, it provides a one-click solution
3981454 people have downloaded it
Ensure you have a good PC where you would download and install the Dr.Fone software. When the software has installed, go to desktop home screen and double click on the icon. You can follow the steps below to start a file transfer.
Step 1. Click on “Switch” module after you open Dr.Fone toolkit
Step 2. Connect both phones to PC and select “Photos”
Using a good USB cable, connect both old and new devices to your PC. When that is done, a list of data that can be transferred will appear. Choose “Photos” and this will move your photos from the source device to the destination device. You can also change both device between “source” and “Destination” by using the “Flip” button.
Step 3. Click “Start Transfer”
Click on the button “Start Transfer”. Keep phones connected. Dr.Fone starts to transfer photos. Go to view trabsferred photos on the destination phone until it completes.
Part 2. How to Transfer Photos from Vivo G2 to New Android Using NFC

Near Field Communication(NFC) is a technology that supports Android Beam and is ideal for transferring data between android devices by just pressing their backs together. It is a fast and simple program that requires both devices to NFC-capable. This means they are able to communicate with each other when their fields are near. This communication is made possible through radio frequencies. Most devices have NFC hardware integrated underneath their panel.
NFC can be found in almost every android device. In the past, it was easy to identify devices with NFC as such devices usually had NFC printed somewhere in the back of the Vivo G2 devices, most tines on the battery pack. But since most android devices don’t have a removable back, there is an alternative to checking if your device is NFC enabled.
1. On your Vivo G2, tap on “Settings” and click on “More” located under “Wireless and Networks” .
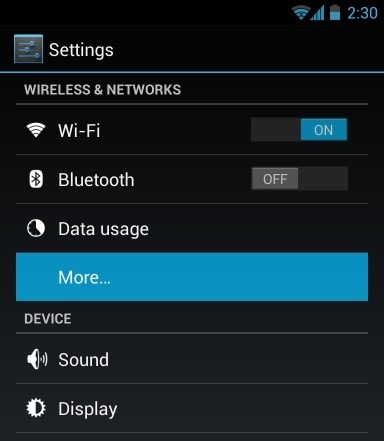
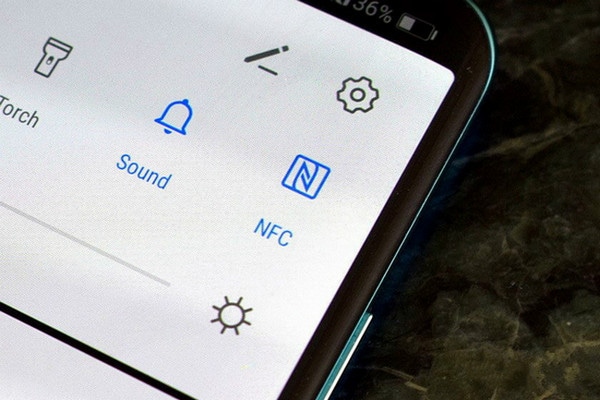
This would take you to a screen where you should find the NFC and android beam options as depicted in the image below. At this stage enable both options if any or both have been disabled. If the NFC option doesn’t appear, it then means your device does not have Near Field Communication (NFC) functionality.
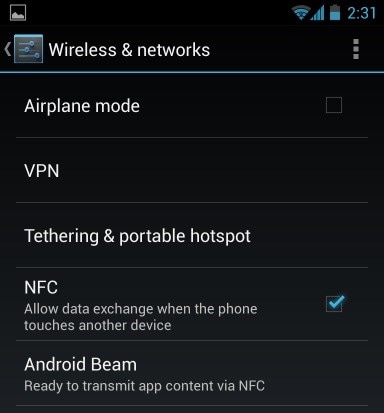
2. Another method of checking is by opening settings menu and tapping on the search icon. Type in “NFC”. If your phone is capable, it will show up. The NFC function works hand-in-hand with the android beam. NFC may not work at optimal levels if android beam is “off”.
To Transfer Photos from your Vivo G2 to a new android device, ensure both devices support NFC using the method explained above. Once this is confirmed, use Android beam to access the photos you want to transfer to your new android device.
1. To select multiple photos, long press on a photo. Then choose the photos you want to transfer to new android device. When you are done selecting, you can begin the beaming process.
2. Next, place both devices against each other, back to back.
3. At this stage, both an audio sound and visual message will appear, acting as confirmation that both devices have found each other’s radio waves.
4. Now, on your Vivo G2, the screen will reduce to a thumbnail and a “Touch to beam” message will pop up at the top.
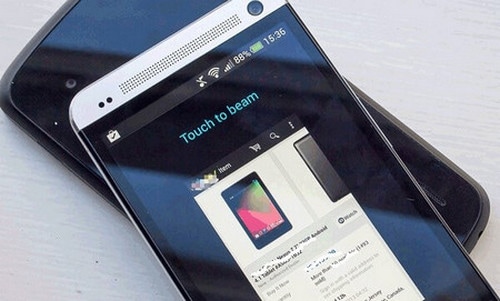
To begin beaming, you must touch the screen on your Vivo G2 from where the photos are been sent. A sound will alert you that beaming has started.
To ensure a successful transfer, make sure devices are not locked neither should the screen be turned off. Also both devices should be kept back-to-back throughout the duration of the transfer.
5. Finally, when the beaming is complete, you will hear an audio sound. This is to confirm completion of the process. Alternatively, instead of an audio confirmation, the application on your new android device to which the photos were sent will automatically launch and display the beamed content.
Part 3. Transfer Photos between Android Phones by Bluetooth
The Presence of Bluetooth technology in phones is as old as android itself. The use of this technology offers another method that you can employ in transferring your photos from your Vivo G2 to your new android device. It is a short and simple method that is known to most android users.
The purpose of this article is to guide you through the process of successfully transferring your photos from your Vivo G2 to your new android device. This process involves navigating to the Bluetooth option on your device, connecting to your new device and initiating transfer. The steps are outlined below
1. Locate the Bluetooth on both devices. Go to your Settings and click on the “Connected device “Option. Under that option, you will find Bluetooth, click on it and toggle it on. Do the same for the receiving device.
2. Your device will start searching for nearby visible devices to pair with. Make Sure your new android device is visible to other devices. When your android device appears on the list of available devices on your old Android, select it to pair.
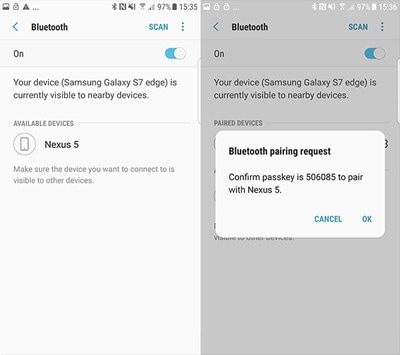
A message will pop up on your new android device, requesting permission to pair with your Vivo G2. Click “Accept “to establish connection.
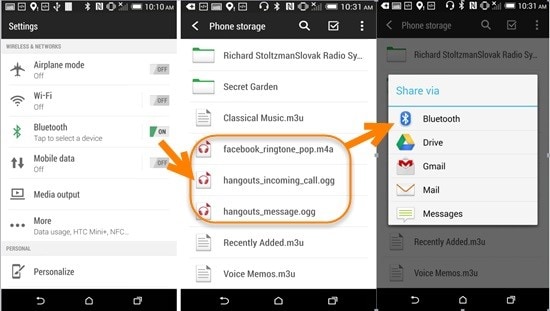
3. After both devices have successfully been paired to each other, go to the folder containing the Photos your want to send to your new Android device. Select the photo or if they are more than one, long press on a photo. This will create a thumbnail. Select the photos you want to transfer and choose the share button normally depicted by this icon
4. A list of option will appear. Choose Bluetooth. This will take you back to The Bluetooth application. Click on your new android device that you have previously paired with. A Message will appear on your new device asking for permission to receive the photos from your Vivo G2. Click “Accept”. This will initiate the transfer process. A progress bar at the top of your screen will show you the Progress of each transfer.
Part 4. Transfer Photos from Old to New Android Phones via Device-Specific App
Samsung Smart Switch
The Samsung smart switch software helps to Transfer Photos either by cable or wireless transfer If your Samsung device does not come with the software, you can download it here .
1. Open the switch app on both Samsung devices. On the sending device, tap “Send data” and on the receiving device, tap “Receive data”.
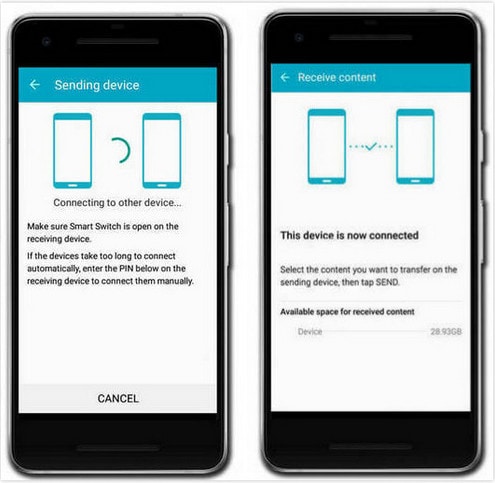
2. Now, choose either the Cable option using an OTG adapter or wireless transfer option.
3. On the old Samsung device, select the data to be transferred to the new Samsung device. When you are done with this, your phone will notify the size and time length of the transfer.

4. Thereafter, click on “Send” to begin the transfer of data from on device to the other.
LG Mobile Switch
LG’s mobile switch software is device specific software that allows for data transfer. Follow the steps below.
1. Switch on your LG device. On the home screen, swipe left. Click on Management and tap “LG Mobile Switch”. Select the data to be transferred and tap on “agree”. A list of options will appear on how to transfer the data; select “Wireless” and tap receive. On the screen that comes up next, tap on “Start”.
2. Now go to your old LG device and open the software. Click on “Send Data” and choose “send data wirelessly”. Next, tap “tap start” and choose the name of your new phone. Then click on “accept” and on the new device, tap on “receive”. Select the data to be sent and tap “Next”. This will start the transfer. When it is completed, the data would have been transferred from your old android to the new android.
Huawei Backup
Huawei devices have HiSuite, an inbuilt manager tool. This app helps users to manage the data on their Huawei devices and also to back up and restore data. To backup and restore on Huawei devices using Hisuite, follow the steps below
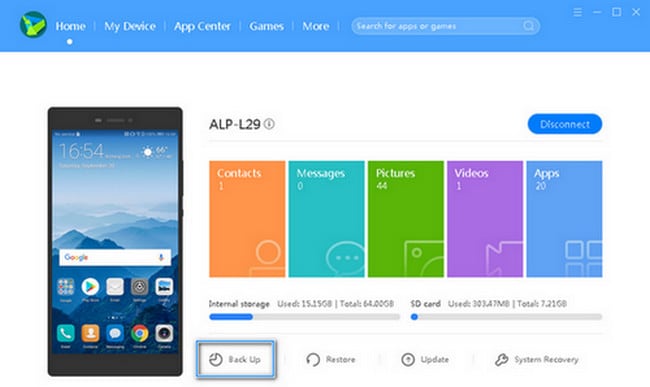
1. Download the tool here and install. This tool is supported by windows only. Then, open the tool and connect your Huawei device to you PC by means of a USB cable.
2. Go to settings app on your android device and click on “advanced settings”. Click on “security” and choose “Allow Hisuite to use HDB”. You will see the “Back Up” and “Restore” options. Click on “Back Up” and select the data you want to back up. You can encrypt your backup with a password. Then click on “Back Up”.
3. Click on “Restore” to retrieve data from previous backups after selecting the backup file you want.

Top 5 from Vivo G2 to iPhone Contacts Transfer Apps and Software
A lot of people switch from Vivo G2 to iPhone due to numerous reasons. For example, switch to the latest iPhone 15. Whenever we move from one smartphone to another, the first thing we do is transfer our contacts. Thankfully, plenty of Android to iPhone contacts transfer software can help you do the same. By taking the assistance of these readily available apps, you can move your data from one smartphone to another in no time. This guide will make you familiar with the 5 best Android to iPhone contacts transfer apps and software. Read on and learn more about these solutions.
Part 1: The best Android to iPhone contacts transfer software: Dr.Fone - Phone Transfer [iPhone 15 Included]
Dr.Fone - Phone Transfer is undoubtedly the best Android to iPhone contacts transfer software that you can use. Since it is compatible with all the leading versions of iOS and Android (including iOS 16 and Android 13), you won’t face any issues using it. It follows an intuitive process and has a user-friendly interface. Here are some other features of this reliable Android to iPhone contacts transfer software.
Dr.Fone - Phone Transfer
Best Android to iPhone Contacts Transfer Software
- Provides a one-click direct phone-to-phone transfer process.
- It supports iOS and Android, allowing a seamless cross-platform transfer.
- Supports iOS devices that run the latest iOS
- Transfer photos, text messages, contacts, notes, and many other file types.
- Supports over 8000+ Android devices. Works for all models of iPhone, iPad, and iPod.

3981454 people have downloaded it
Using this Android to iPhone contacts transfer software is pretty easy. Launch the Dr.Fone and visit the “Phone Transfer” tool. After connecting your Android and iPhone to the computer, the application will automatically detect your devices. The source phone should be Android, and the target should be an iPhone like iPhone 15/14/13. You can use the “Flip” button to change their positions.

Now, select the data you wish to move. Enable “Contacts” and click on the “Start Transfer” button to initiate the process. Your contacts would be moved from your Android to an iOS device like iPhone 15/14/13 within a few seconds.

All of this makes Dr.Fone - Phone Transfer the best Android to iPhone contacts transfer software that you can use. However, if you are looking for alternative methods, you can go through the next section.
Part 2: Top 4 Android to iPhone contacts transfer Apps [iPhone 15 Included]
Dr.Fone is the fastest tool to transfer all kinds of data from one device to another. Nevertheless, if you want to try some other Android to iPhone contacts transfer app, you can give these options a try.
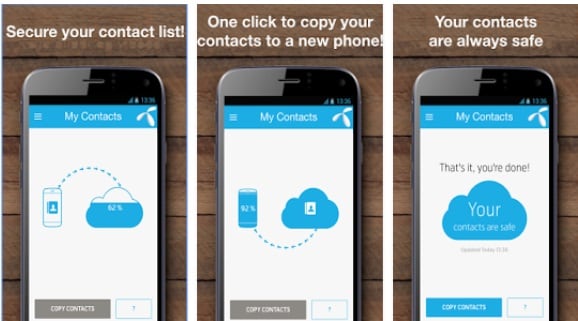
1. My Contacts - Phonebook Backup & Transfer App
If you want to back up your contacts list and move it from one device to another, you can try My Contacts. This Android to iPhone contacts transfer app works on Android and iOS devices like iPhone 15, iPhone 13, 12 Pro, 12 Pro Max. It will also keep your contacts safe on the cloud. Therefore, you can first copy your contacts from Vivo G2 to My Contacts and later use its app on your iPhone to extract them.
- • It is an easy-to-use app that can help you transfer your contacts wirelessly.
- • Besides transferring your contacts, it also keeps them safe by maintaining their backup.
- • You can clean your contacts list by editing them or deleting the duplicate entries.
- • The only drawback is that you can only transfer contacts and no other data type.
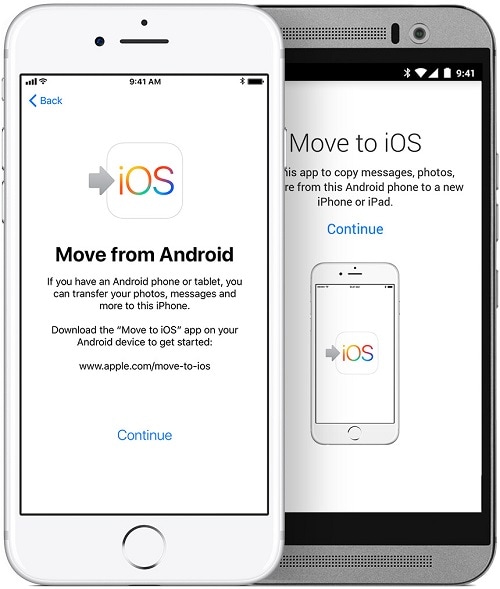
2. Move to iOS
Move to iOS is the official app developed by Apple to help users switch from an Android to an iOS device. Since Apple develops it, it is a highly secure Android to iPhone contacts transfer app. After maintaining a secure private WiFi direct connection, you can easily transfer your data.
- • The app can only be used to transfer your content from Vivo G2 to iOS while setting up a new iOS device.
- • You can transfer photos, bookmarks, contacts, messages, and other important data items.
- • It can transfer your content over the air by establishing a secure private connection.
- • It fully supports all Android devices running on Android 4.0 and later versions.
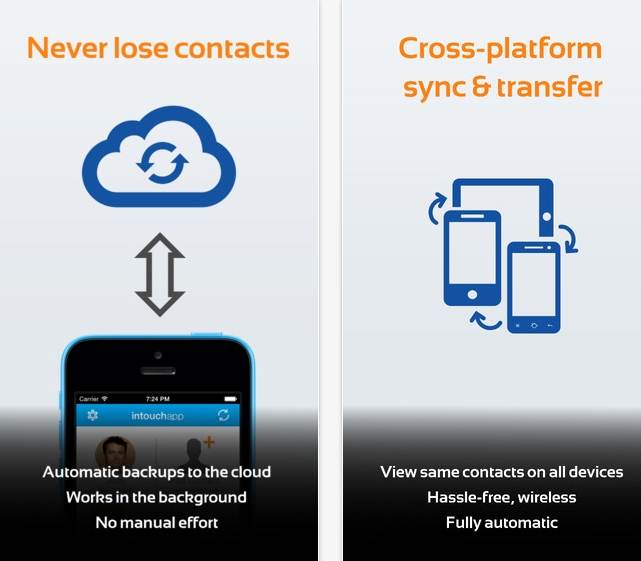
3. Contacts Transfer Backup Sync & Dialer: InTouchApp
Ideally, the InTouchApp is a smart contact management tool that can be used to add “context” to your contact list. You can use it to describe your contacts, search them easily, set reminders, and more. You can also use InTouch as an Android to iPhone contacts transfer app since it supports cross-platform syncing.
- • You can keep your contacts safe by taking their backup using this tool.
- • It can help you manage your contacts and make the most of your list.
- • The app allows a seamless sharing of contacts between different devices.
- • It is compatible with leading iOS, Android, BlackBerry, and Windows phones. Also, you can sync your device’s contacts with Outlook as well.

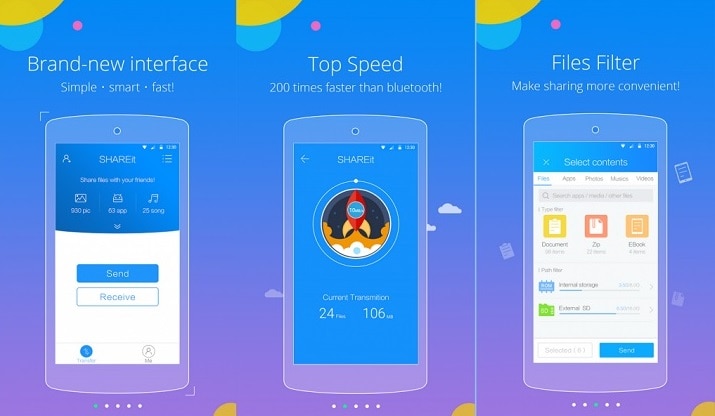
4. SHAREit
Boasting an impressive number of over 1 billion downloads, SHAREit is one of the best ways to move your data from one platform to another. This Android to iPhone contacts transfer app claims to be 200 times faster than Bluetooth and establishes a secure Wi-Fi-direct connection to transfer your data.
- • You can use SHAREit to move your contacts, photos, videos, messages, third-party app data, and other types of content.
- • It has a sleek interface and is extremely easy to use.
- • You can even back up your important content on the SHAREit Vault.
- • Group sharing feature is also provided.
- • The app also has a section to discover video content, music, wallpapers, and more.
- • Compatible with Android, iOS, and Windows phones as well as Mac and Windows PC
After learning about these top 5 Android to iPhone contacts transfer software, you can easily complete the Vivo G2 device transition without any data loss. Out of all the alternatives, we recommend Dr.Fone - Phone Transfer. It provides the fastest and most secure option to move your content directly from one device to another with a single click. Go ahead and give it a try to move from Vivo G2 to iPhone (iPhone 15 included) in a few minutes while keeping your data intact.
- Title: In 2024, How to Transfer Apps from Vivo G2 to Another | Dr.fone
- Author: Emma
- Created at : 2024-07-17 23:35:05
- Updated at : 2024-07-18 23:35:05
- Link: https://android-transfer.techidaily.com/in-2024-how-to-transfer-apps-from-vivo-g2-to-another-drfone-by-drfone-transfer-from-android-transfer-from-android/
- License: This work is licensed under CC BY-NC-SA 4.0.