In 2024, How to Transfer Contacts from Tecno Pova 5 to Other Android Devices Devices? | Dr.fone
How to Transfer Contacts from Tecno Pova 5 to Other Android Devices Devices?
Android, which is developed by the Google, has a very strong mobile operating system. It is totally based on the Linux kernel and specially designed for touch screen mobile devices such as smartphones and tablets. And these Android mobiles are used by millions of people. Some of the users might feel the need to transfer their contacts from one Android device to another due to up gradation or changing of the mobile. There are many methods which can help transfer contacts from Tecno Pova 5 to Other Android Devices.
So for all those who want to know how to transfer contacts from Tecno Pova 5 to Other Android Devices, keep reading to know more.

Part 1: How to transfer contacts from Tecno Pova 5 to Other Android Devices using Dr.Fone toolkit?
One of the most popular toolkit to transfer contacts from Tecno Pova 5 to Other Android Devices is the Dr.Fone toolkit - Phone Transfer . This is a revolutionary application for your entire backup and restores solutions. This application supports over 8000+ Android devices worldwide and with its advanced features, the application allows the user to take backup and restore by selecting their needs and requirements.
Dr.Fone - Phone Transfer
Transfer Everything from Android/iPhone to New iPhone in 1 Click.
- It supports all the leading iOS devices, including devices running on iOS 11.
- The tool can transfer your photos, videos, contacts, messages, music, call logs, notes, bookmarks, and so much more.
- You can transfer all your data or select the type of content you wish to move.
- It is compatible with Android devices as well. This means you can easily perform a cross-platform transfer (e.g. iOS to Android).
- Extremely user-friendly and fast, it provides a one-click solution
3,748,995 people have downloaded it
Ensure you have a good PC where you would download and install the Dr.Fone software. When the software has installed, go to desktop home screen and double click on the icon. You can follow the steps below to start a file transfer.
Step 1. Click on “Phone Transfer” module after you open Dr.Fone toolkit

Step 2. Connect both phones to PC and select “Photos”
Using a good USB cable, connect both old and new devices to your PC. When that is done, a list of data that can be transferred will appear. Choose “Photos” and this will move your photos from the source device to the destination device. You can also change both devices between “source” and “Destination” by using the “Flip” button.

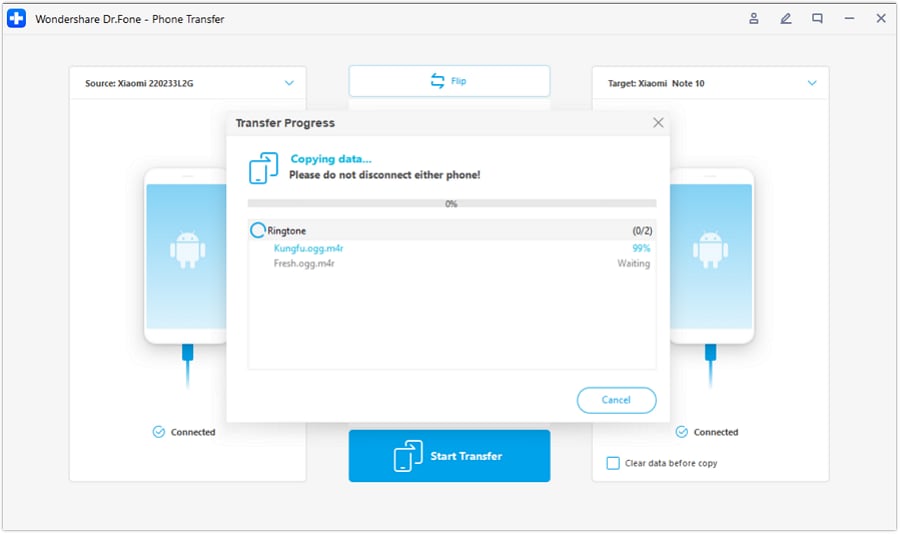
Step 3. Click “Start Transfer”
Click on the button “Start Transfer”. Keep phones connected. Dr.Fone starts to transfer photos. Go to view transferred photos on the destination phone until it completes.
Part 2. How to Transfer Photos from Old Android to New Android Using NFC
Near Field Communication(NFC) is a technology that supports Android Beam and is ideal for transferring data between android devices by just pressing their backs together. It is a fast and simple program that requires both devices to NFC-capable. This means they are able to communicate with each other when their fields are near. This communication is made possible through radio frequencies. Most devices have NFC hardware integrated underneath their panel.
NFC can be found in almost every android device. In the past, it was easy to identify devices with NFC as such devices usually had NFC printed somewhere in the back of the Tecno Pova 5 devices, most tines on the battery pack. But since most android devices don’t have a removable back, there is an alternative to checking if your device is NFC enabled.
- On your Tecno Pova 5, tap on “Settings” and click on “More” located under “Wireless and Networks” .
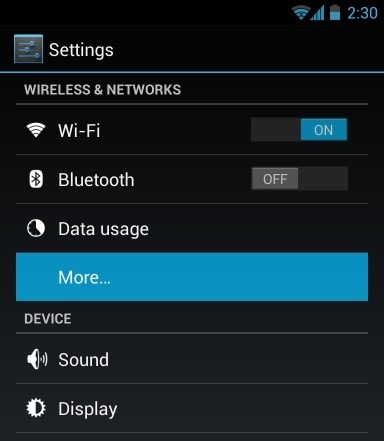
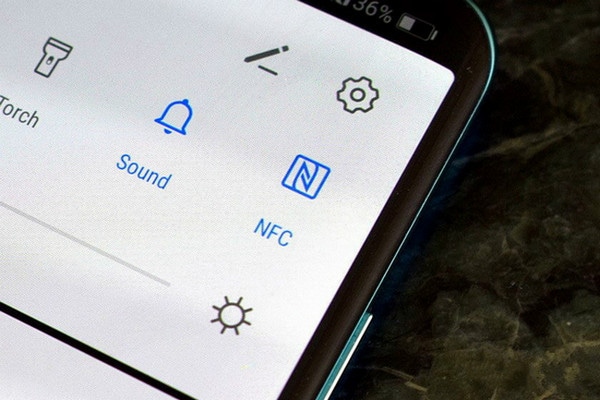
- This would take you to a screen where you should find the NFC and android beam options as depicted in the image below. At this stage enable both options if any or both have been disabled. If the NFC option doesn’t appear, it then means your device does not have Near Field Communication (NFC) functionality.
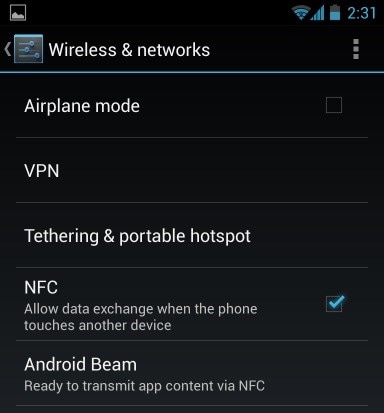
- Another method of checking is by opening the settings menu and tapping on the search icon. Type in “NFC”. If your phone is capable, it will show up. The NFC function works hand-in-hand with the android beam. NFC may not work at optimal levels if the android beam is “off”.
To Transfer Photos from your old android device to a new android device, ensure both devices support NFC using the method explained above. Once this is confirmed, use the Android beam to access the photos you want to transfer to your new android device.
To select multiple photos, long press on a photo. Then choose the photos you want to transfer to new android device. When you are done selecting, you can begin the beaming process.
Next, place both devices against each other, back to back.
At this stage, both an audio sound and visual message will appear, acting as confirmation that both devices have found each other’s radio waves.
Now, on your old android device, the screen will reduce to a thumbnail and a “Touch to beam” message will pop up at the top.
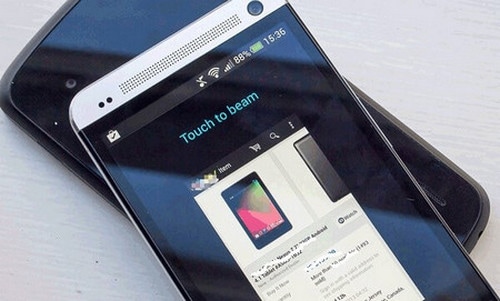
To begin beaming, you must touch the screen on your old android device from where the photos are been sent. A sound will alert you that beaming has started.
To ensure a successful transfer, make sure devices are not locked neither should the screen be turned off. Also, both devices should be kept back-to-back throughout the duration of the transfer.
Finally, when the beaming is complete, you will hear an audio sound. This is to confirm the completion of the process. Alternatively, instead of an audio confirmation, the application on your new android device to which the photos were sent will automatically launch and display the beamed content.
Now, we’ll discuss how to transfer contacts from one Android to another with the help of a SIM card.
Part 2: How to transfer contacts from Tecno Pova 5 to Other Android Devices using SIM card?
Here are the steps which will help you.
- To copy the contacts to your SIM card, you should follow the sequence –
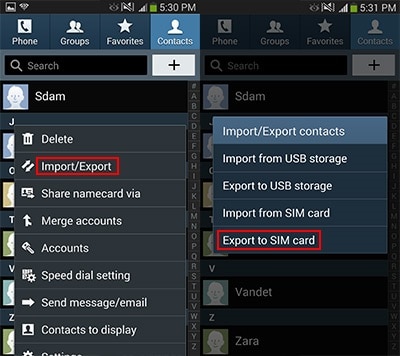
- Go to “contact” on your old device.
- Then tap on “More” and then choose “settings”.
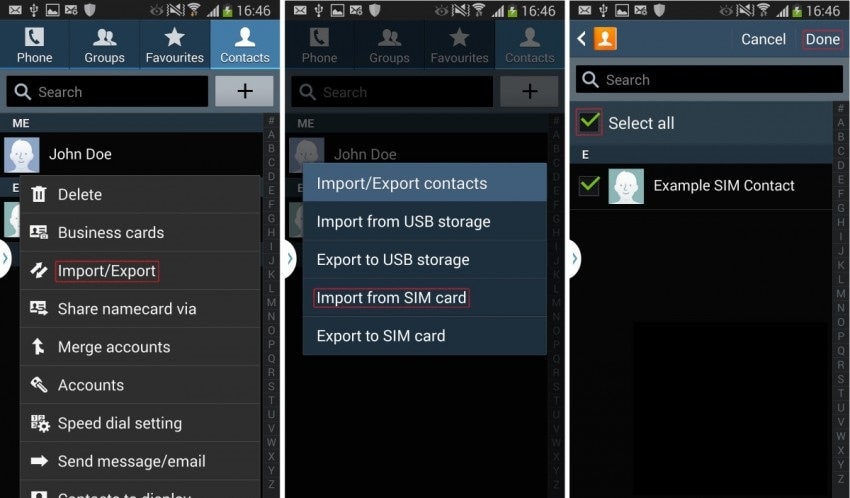
- Here you can find “import / Export” option. Tap on it and then choose “Export” option.
- Now click on “Export to SIM card” option. On choosing this step, all your contacts will be copied to the SIM card in a few minutes. This depending upon the capacity of the SIM card.
Now, pull the SIM card out and insert in on your new device.
• Here follow the same steps above and on “Import / Export” option, choose “Import”. Then it will ask for the option to import from. Choose “SIM Card” here. Now, all your contacts will be imported to your phone memory from the SIM card.
Advantages: This process is easy to use and can be done without any PC.
Disadvantage: It can only transfer the contacts up to the SIM capacity that is 200 to 250 in one time. If you have lots of contacts, it is impossible to transfer by this method.
Part 3: How to transfer contacts from Tecno Pova 5 to Other Android Devices using Bluetooth or Wi-Fi Direct?
To transfer contacts from Tecno Pova 5 to Other Android Devices using Bluetooth or Wi-Fi Direct is one of the easiest methods. For this method, make sure that you should enable “Bluetooth” or “Wi-Fi Direct” on both the Android devices.
The steps:
1. Go to the “Contacts” menu on your old Android device.
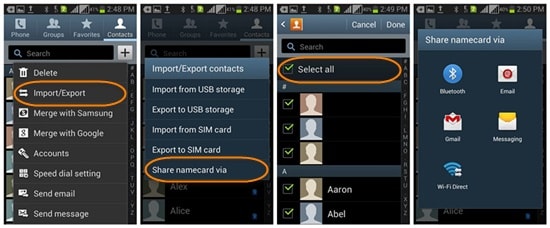
2. Now, find “Import / Export” option. It might be under “More” > “Settings” menu. Tap on it.
3. Now go to “Share namecard via” option from the menu and select all the contacts to transfer process.
4. Now you have two options. Share via “Bluetooth” or ‘Wi-Fi Direct”. Select any option you want and accept from the other device.
5. After successful connection, all the contacts from old Android devices will be transferred to your new Android device.
This method is simple and easy to use.
There is yet another method to transfer contacts from Tecno Pova 5 to Other Android Devices using Samsung’s own app “Smart Switch”.
Advantage: This is a very fast process.
Disadvantage : Sometimes the contacts are not saved automatically. You have to open the name card file one by one to save them. If you have a lot of contacts, this process is very hectic and lengthy.
Part 4: How to transfer contacts from Tecno Pova 5 to Other Android Devices using Samsung Smart Switch?
Samsung launched a new app called “Smart Switch” to allow transfer of content between Android devices. Although, it does not support allAndroid devices.
To transfer contacts from Tecno Pova 5 to Other Android Devices via this app, follow the below method step by step.
1. First of all, download the app on both the mobiles.
2. Then, open this app on new Android device and Start the process by tapping on “Start”.
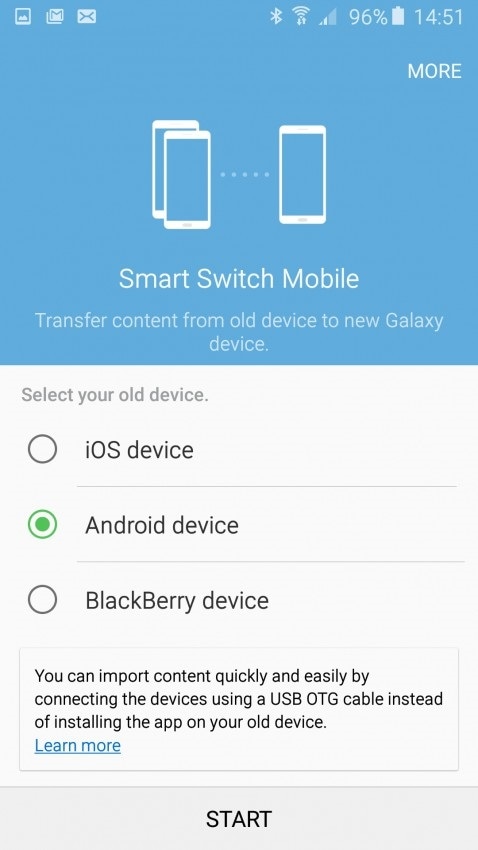
3. Now, Select the new device as ‘Receiving device”
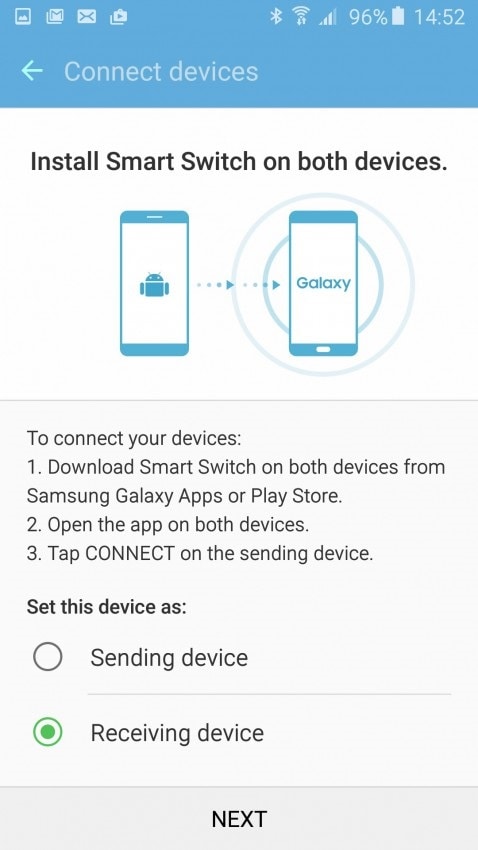
4. Now connect with your old device by opening the app on your old Android mobile. This will prompt to enter the pin number as displayed. Enter the same and hit “Connect” to start the process.
5. Now, select “Contact” on your old device and tap “Send”.
6. You should see a prompt on your new device which asks you to confirm the “receive” of the contact. Tap on “Receive” and all the contacts from your old device will be copied to your new Android device in few minutes.
Advantages: The process is very fast and can transfer all the contacts at once.
Disadvantages: This app is not supported on all the Android devices. Also, the process is lengthy and needs some technical knowledge.
Thus, these were the four best options that you can use to transfer contacts from Tecno Pova 5 to Other Android Devices. However, in our experience, the first method, the Dr.Fone toolkit- Android data backup and restore is by far the best and most secured among all solutions for transferring contacts from Tecno Pova 5 to Other Android Devices. So, if you do not want to lose any data while transfer or worry about the security, use the Dr.Fone toolkit for the best result.
How to Transfer Apps from Tecno Pova 5 to Another
Nowadays, the transfer of apps between devices has become an essential task. Switching from one phone to another requires a smooth transfer of applications. It is particularly important when transitioning to an Android device. This comprehensive guide explores how to transfer apps to new Android phones.
Moreover, understanding the app migration process is crucial whether you are moving from an iOS device or another Android phone. This article aims to simplify the journey, offering step-by-step instructions and expert tips.
Part 1: Is It Possible To Transfer Apps from Tecno Pova 5 to Other Android Devices and iPhone to Android?
It is possible to transfer applications from an Android phone to another Android. There are multiple ways that Android offers to move apps between two smartphones. These include using the Google Play Store and signing in with the same Google account. Also, multiple tools and apps can assist you in this context.
By contrast, it is not feasible to transfer apps to a new Android phone from an iPhone. That’s mainly because of the different operating software in the two devices. The applications downloaded in iOS are not compatible with Android. Additionally, Google Play Store does not support these iOS applications. That’s why directly transferring apps from iPhone to Android is impossible. You must download it again from the Google Play Store on your Tecno Pova 5.
Part 2: How To Transfer Apps From One Android Device to Another in 3 Simplified Steps?
You can try Wondershare Dr.Fone - Phone Transfer tool if you are trying to transfer apps from one Android to another. This tool offers an efficient and convenient solution for transferring data between devices. With a one-click method, it simplifies moving various data types, including contacts, apps, photos, videos, and more.
Also, the software supports a wide range of devices, including the latest products of Apple, Samsung, and other famous brands. Notably, it is compatible with the latest iOS 17 and Android 14 versions, ensuring smooth data transfer. This makes it a versatile tool for users seeking a hassle-free and convenient data transfer experience across various devices.
Key Features
- Wondershare Dr.Fone – Phone Transfer tool allows you to select the desired type of files and transfer them with just one click.
- The tool enables the users to transfer within devices in a few minutes. This saves a lot of time and increases the productivity of the users.
- This software is operatable and provides easy navigation for each kind of user. That means you don’t have to be a tech expert to run the tool.
Steps Involved To Transfer Apps From One Android Device to Another Using the Phone Transfer Tool
Wondershare Dr.Fone – Phone Transfer provides a complete solution through a phone transfer process. You can discover the following essential steps in this how to transfer apps to a new Android phone procedure:
- Step 1: Download Dr.Fone and Choose Phone Transfer Tool
Download the Wondershare Dr.Fone toolkit by pressing the “Free Download” provided and install it on your Windows PC or MacBook. Next, choose the “Phone Transfer” tool from the “Toolbox” tab present on the left side.
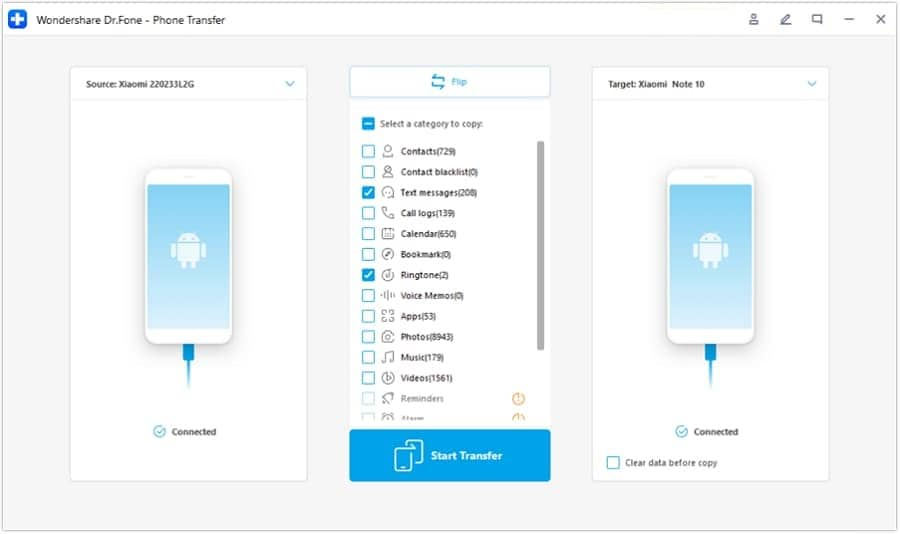
- Step 2: Device Selection for Android-to-Android Transfer
Start the process by connecting both Android devices to load their data onto the platform. After that, designate the “Source” and “Destination” devices for the transfer. You can also use the “Flip” button to flip the Tecno Pova 5 devices.
- Step 3: Select the Data Categories for Transfer
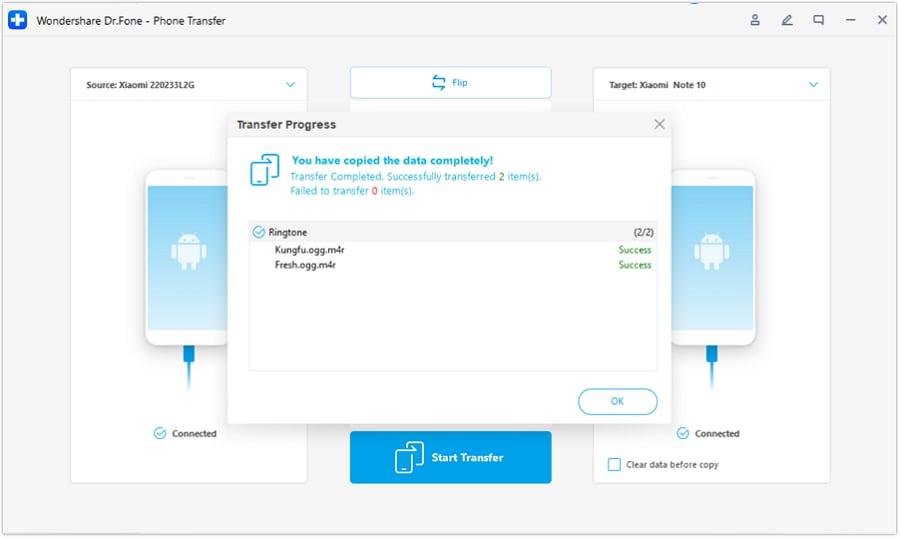
Now, you have to select the “Apps” category to be transferred in this process. Proceed by clicking the “Start Transfer” button after selecting it to start the transfer. A window will display the progress of the transfer, where you can view the progress bar. Upon successfully completing the data transfer, a confirmation message will appear on the window. Hit the “OK” button to conclude the transfer process.
Part 3: How To Transfer Apps From Non-Samsung to Galaxy Devices Using Samsung Smart Switch?
Samsung Smart Switch allows you to quickly transfer various contents from your one Android phone to a Galaxy device. Also, it provides you the option to transfer contents selectively. The contents include apps, contacts, messages, media, and more. Here, we’ll transfer apps from a non-Samsung Android phone to a Galaxy device.
- Step 1: First of all, you have to open the Smart Switch application on your Galaxy device. Then, tap “Continue” to agree with the terms and conditions. After that, allow the app’s specific permissions to continue the operation.
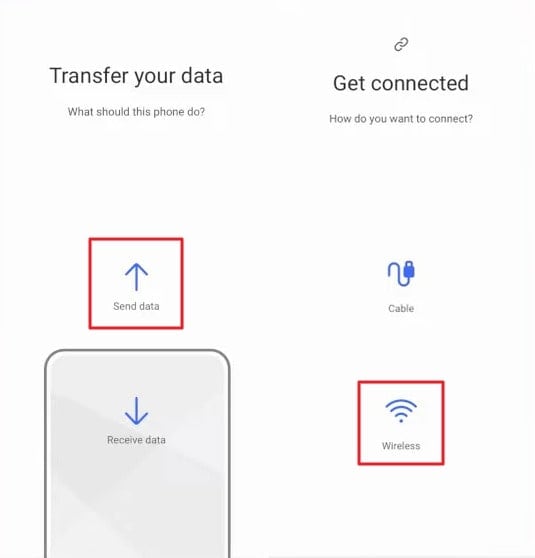
- Step 2: Next, open the Smart Switch app on the old device and tap the “Send Data” option. Then, select the “Wireless” option to start the procedure.
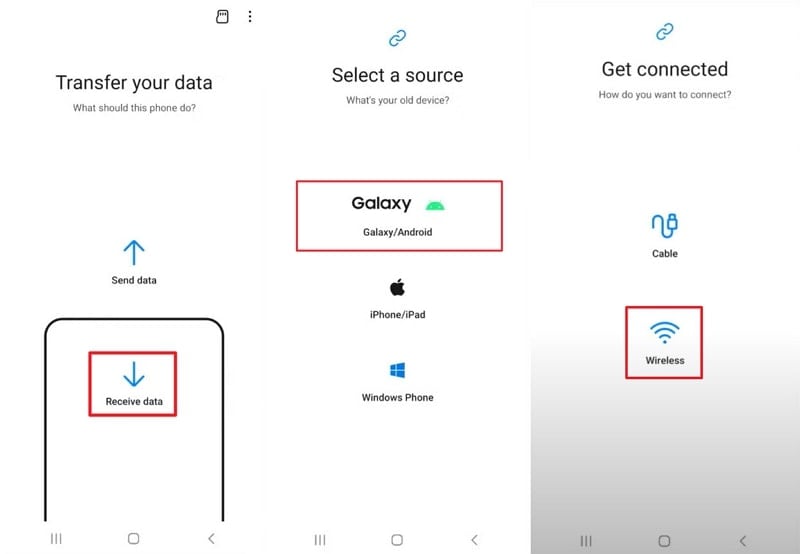
- Step 3: Now, you have to tap the “Receive Data” option on your Galaxy device. Next, select the “Galaxy/Android” option as a data source, followed by the “Wireless” option. Then, you need to “Allow” the connection on the old device that this new device wants to have.

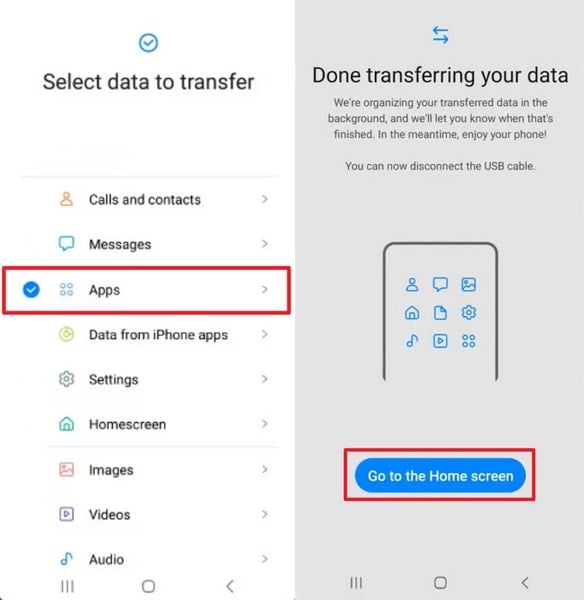
- Step 4: The Galaxy phone will subsequently ask for the data selection. There, you can go into the “Custom” option and select the “Apps” option. Next, choose the applications you want to transfer and hit the “Transfer” option. The transfer process will be complete within a few minutes. You can tap on the “Go to the Home Screen” prompt and find the apps you have just transferred.
Part 4: How To Transfer Apps Between Android Devices With the Help of Google Backup
There is another method that you can try to transfer apps to a new Android phone. This includes restoring a Google backup on a new device. You can back up all of your data, including the applications, to the Google account you have signed in. Later, you can restore the same data on a new device quite easily:
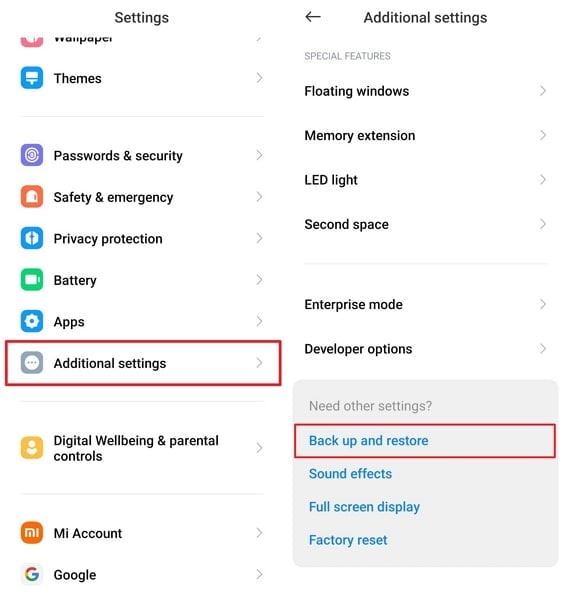
- Step 1: First,access the “Settings” menu on your old Android device and tap on the “Additional Settings.” Then, you need to navigate to and tap on the “Back up and Restore” option.
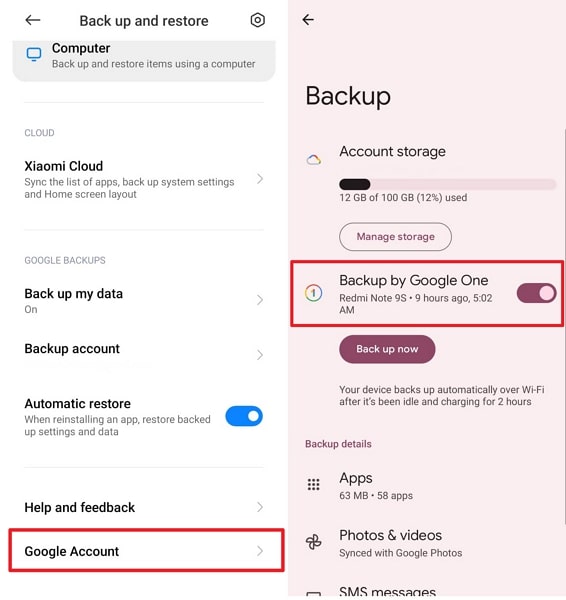
- Step 2: Next, choose the “Google Account” option and enable the “Backup by Google One” toggle. If the toggle is off, slide it to activate and select “Back up Now.” After that, your data is securely stored when the backup process finishes.
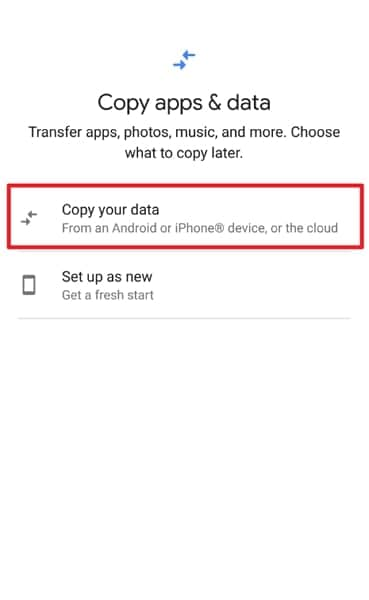
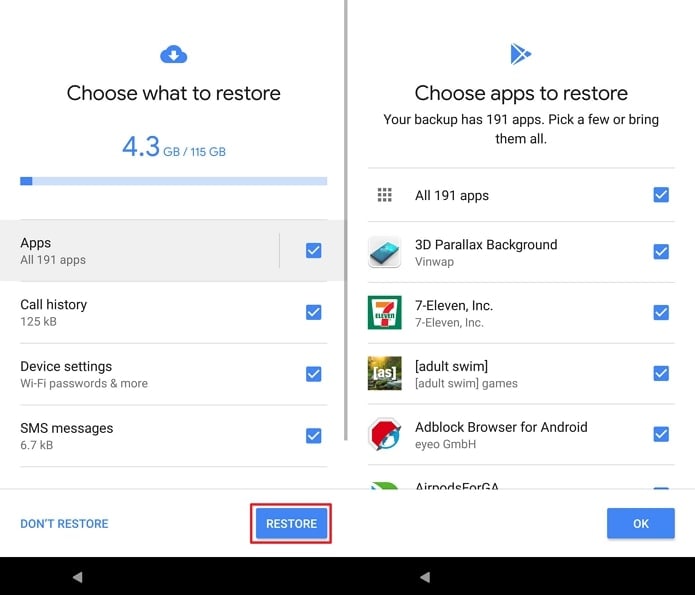
- Step 3: To restore your data, you have to charge and power up your new Android device. Then, follow the on-screen instructions until prompted to restore data from another device. Following this, you will have to choose the Tecno Pova 5 device from which you want to restore data and tap the “Copy Your Data” option.
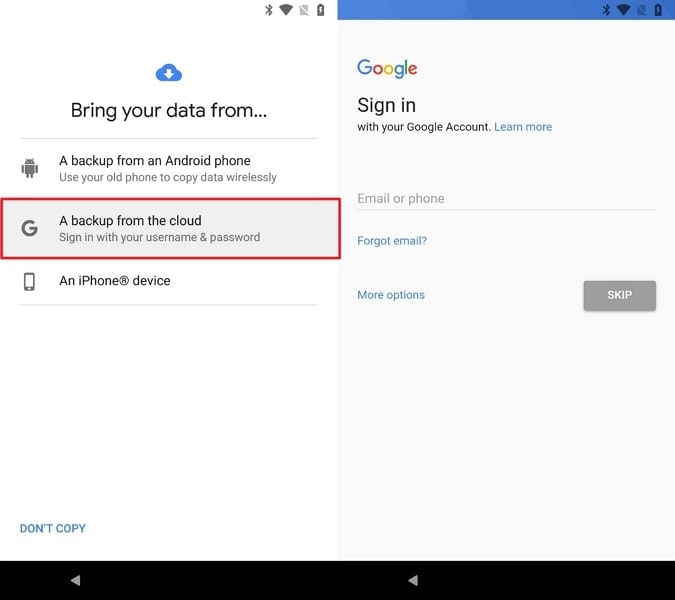
- Step 4: Next,connect your Tecno Pova 5 to the same Wi-Fi network as your old phone is connected. Then, select “A backup from the cloud” from the restoration options. In the next step, sign in to your Google account on your new device using the same account as your old phone. Now, you need to choose the recent backup from your old device.
- Step 5: Lastly, you can choose the “Apps” option to pick the apps you want on the new device. Afterward, you have to tap on the “Restore” option to restore your Google backup.

Part 5: How To Transfer and Download Apps From One Phone to Another Using Play Store
You can also transfer apps from one phone to another using the Play Store. It’s more like downloading apps and a time-consuming procedure. This manual method uses the Play Store to detect applications not installed on your new Galaxy device. Then, after the detection process, you can download those applications. The “how to transfer apps to new Android phone” method includes some steps that are described below.
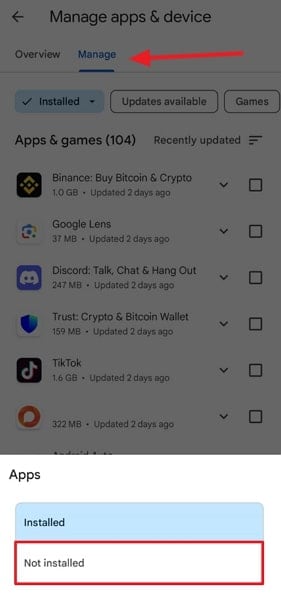
- Step 1: First, access the “Google Play Store” on your new Android device and tap the “Profile” icon situated at the upper right corner of the search bar. Among the displayed options, proceed with choosing “Manage Apps & Device” to proceed.
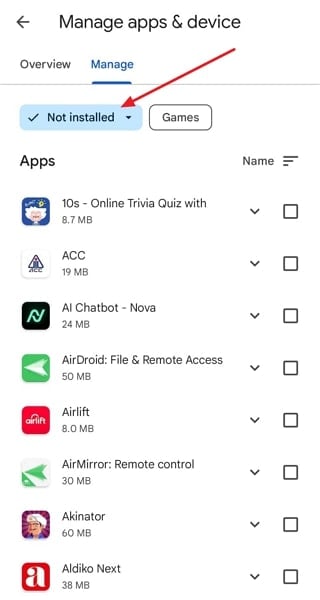
- Step 2: Then, move to the “Manage” section and select the “Installed” drop-down menu. From there, opt for the “Not Installed” category to see all the previously installed apps of your old Android smartphone.
- Step 3: You’ll encounter a list of previously installed apps linked to your Google account but not currently on your new Galaxy device. Choose the desired apps and tap the “Install” button located at the top right to reinstall them.
Conclusion
In a nutshell, you can transfer the applications from your old Android device to a new Galaxy phone using various methods. We have described these effective methods through which you can easily transfer your old apps. However, the Wondershare Dr.Fone – Phone Transfer method stands out as the best technique to transfer apps to new Android phones. The software allows the transfer process to be implemented in simple steps that require a few clicks.
How to Copy Data from Samsung to Pixel 8 and Pixel 8 Pro
Getting a new phone is incredibly exciting, but once you realize how much data you need to transfer, the experience can take a sudden turn for the worse. Fortunately, there are now multiple ways to transfer data from your old phone to a new device, and we’re here to help you with these.
Today’s article will teach you how to transfer data from a Samsung to a Google Pixel device with the help of Wi-Fi, USB cables, Google Drive, and a third-party app. Stay with us to learn how to copy data from Samsung to Pixel with these seven incredibly convenient methods.
Transfer Data From Samsung to Pixel 8 and Pixel 8 Pro via Dr. Fone Phone Transfer

While a third-party data transfer app might not be your first thought, they’re undoubtedly worth checking out as they can make the entire experience flow much more seamlessly. Wondershare Dr.Fone is one such app, and it’s a toolkit designed to help you manage your Tecno Pova 5] and other smartphones and make the most out of your journey. It has been on the market for over 17 years, meaning it’s reliable, trustworthy, and highly efficient.
On top of effortless file transfers between phones, the toolkit also offers numerous advanced phone features, such as:
- Screen Unlock;
- Data Eraser;
- Data Recovery;
- System Repair.
These advanced capabilities make Wondershare Dr.Fone an all-in-one phone manager with everything you’ll ever need. It’s also the best option for data transfers between two devices since it’s compatible with more than 8,000 smartphones and supports all sorts of data types, making the transfer process as easy as possible.
Here’s how you can use Wondershare Dr.Fone to transfer data from a Samsung device to a Pixel 8/Pixel 8 Pro:
Download Wondershare Dr.Fone from the official website and launch it on your PC.
Connect the Samsung and the Pixel 8/Pixel 8 Pro phones to the PC.
Navigate to Toolbox > Phone Transfer.
Select the Sourcedevice (Samsung) and your Destination device (Pixel 8/Pixel 8 Pro). You can also use the Flip option to switch the file transfer’s direction if you ever need to.
Select the types of data you want to transfer and hit the Start Transfer.
The progress bar will appear. You can click the Cancel button if you wish to pause the process.
- You’ll be notified when the process is complete. Tap OK.

Once you see that the file transfer between your Samsung and Pixel 8/8 Pro devices has been completed, you can disconnect your phones from the PC and start using your new Pixel phone. You should then check if all the data has been transferred.
Transfer Data From Samsung to Google Pixel 8 and Pixel 8 Pro Using Wi-Fi
Users who want to avoid downloading apps can use the built-in file transfer app instead. All Android phones include a data transfer tool that appears when setting up a new device. Using it is incredibly straightforward, and all you need to do is follow the on-screen instructions to initiate a file transfer between your old and new phone over Wi-Fi. Here’s how:
- Power on your new Pixel phone and tap the Get startedbutton during the initial setup. Choose to restore from an old phone.
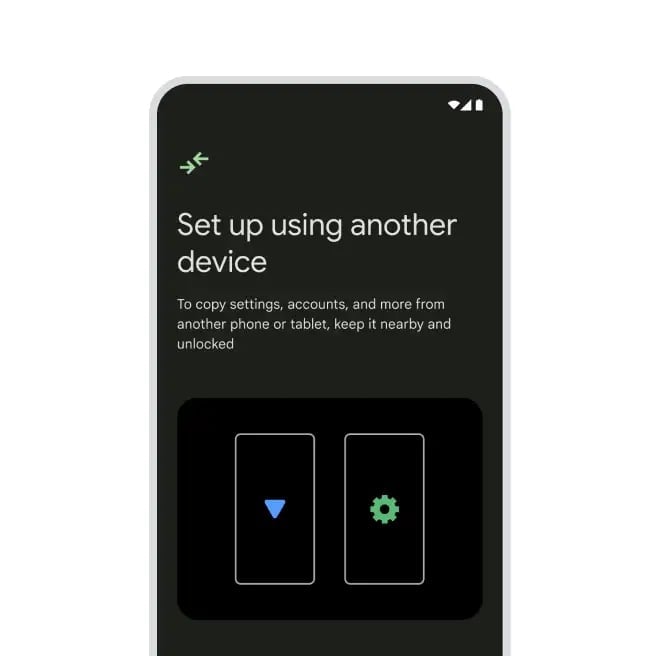
- Connect the Tecno Pova 5 device to a Wi-Fi network.
- Choose the “Can’t use old device” option and sign in with your Google account.

Select which apps and types of data you want to transfer to it and tap Restore.
Follow the file transfer instructions and watch as data copies from your old Samsung to your new Pixel 8/8 Pro device.
Your new phone will notify you when the file transfer is complete, and you can continue using your brand-new device right where you left off with the Samsung one.
Copy Data From Samsung to Pixel 8 and Pixel 8 Pro Using USB
If you don’t want to transfer files over a Wi-Fi network, don’t want to waste your mobile data, or wish to complete the file transfer the old-fashioned way with a USB cable, you can follow these steps to transfer data from Samsung to Pixel:
- Turn on your new Pixel 8/8 Pro device and launch the built-in data transfer tool that appears when setting up your device.
- Hit the Get started button on your Pixel phone and connect to a Wi-Fi network (this is required to initiate a data transfer, regardless of your connection).
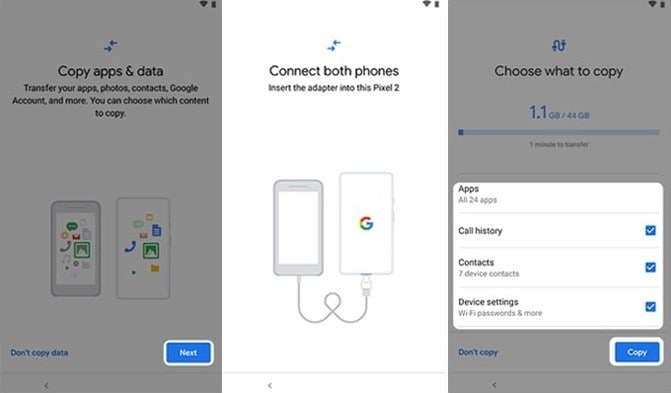
- Tap on Nextwhen you see the “Copy apps and data” screen. Click Next again when prompted to use your old phone.
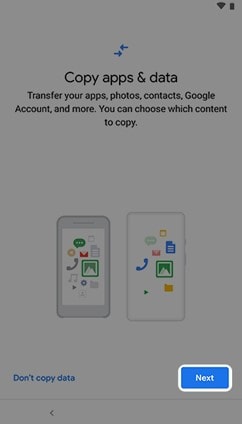
Connect the USB cable between your old Samsung and new Pixel 8/8 Pro phones and tap Next.
Confirm data transfer on your old phone, select what you want to transfer, and hit Copy.
Follow the rest of the on-screen instructions and transfer data between your old and new phones.
Give your phones a few minutes to transfer data from Samsung to Pixel, and remember that it can even take several hours, depending on your phone’s internal storage size and filled space. The built-in file transfer app will notify you once it completes everything.
Transfer Files to Pixel 8 and Pixel 8 Pro via PC
Using a computer as an intermediary device for transferring files is another excellent idea, and it’ll even let you organize your old phone’s data before you copy it to your new device. You’ll need to follow these steps to transfer data from your old phone to your PC and from your PC to your new Pixel 8/8 Pro device:
- Connect your old Samsung device to your PC via USB.
- Tap the phone’s notification and select File Transferunder the “Use USB for” option.
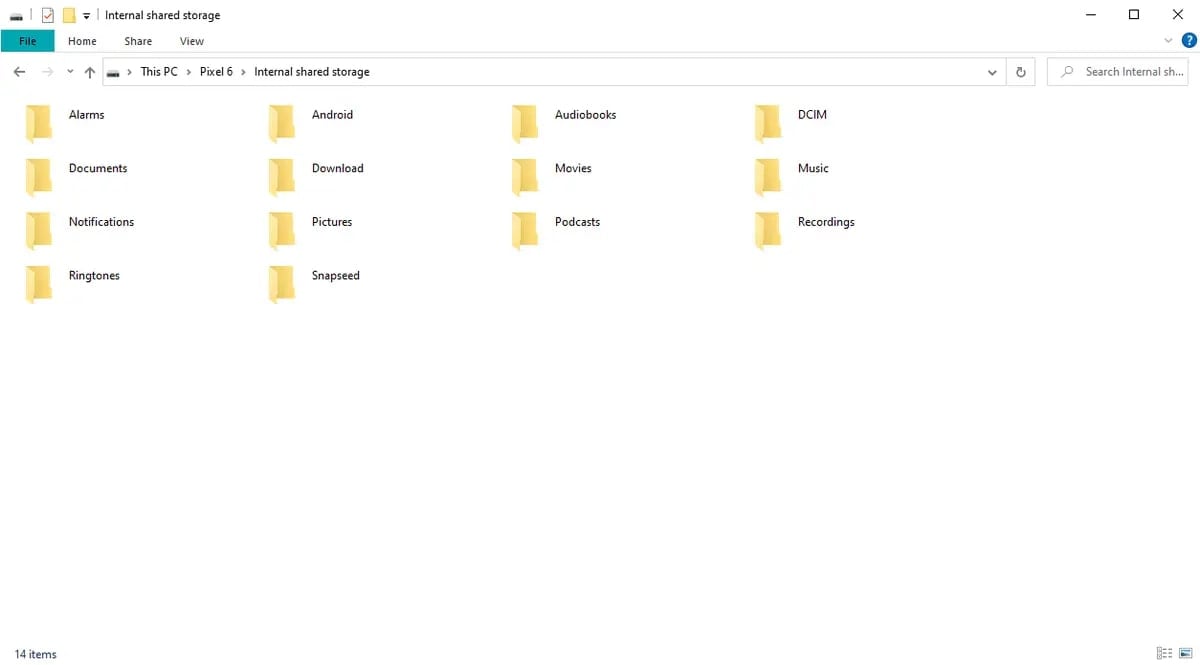
- Access its memory through the computer’s File Explorer.
- Select the files and folders you want to copy and transfer them to a new folder on your PC. You can then go through these files on your PC, delete what you don’t need, and organize everything before transferring the data to your new Pixel 8 device, but this is optional.
- Disconnect the old phone from the computer.
- Connect your new Pixel phone to the PC.
- Once again, click the phone’s notification and select the File Transfer
- Transfer the contents of your computer’s folder onto the new device.
- Disconnect the new device after your files have been copied.
You’ll need to consider which types of files go into which folders. For example, you’ll need to ensure that music data goes into Android’s Music folder, pictures and videos go into Camera or DCIM folders, and documents and downloads have their respective folders, which are typical on Android.

Copy Data From Samsung to Pixel 8 Pro via Quick Switch
Another excellent option for transferring files to any Pixel phone is with Google’s Quick Switch adapters. These free OTG devices are included in every Pixel phone box and are designed to help you transfer data from an old phone to a new Pixel device.
A Quick Switch adapter connects to your Pixel phone, and you can insert a Samsung-compatible USB cable on the other end to start the transfer process.
Here’s what you’ll need to do:
- Power on your new Pixel 8/8 Pro phone and click Start.
- Plug the Quick Switch adapter into the Pixel device and connect the USB cable with the USB-A end into the Quick Switch. Connect the other end to the Samsung phone.
- Unlock your Samsung device and click the Copy
- Select the type of data you want to transfer and hit Copy.
Parental Control Software
- Once the process is complete, click Next > Done.
Before you start the file transfer process using a Quick Switch, you should ensure both devices are fully charged. Furthermore, you should also update your Samsung device to the latest software version to avoid potential transfer issues, such as data corruption or incomplete transfers.
Transfer Data From Samsung to Pixel Using Google Drive
Being an Android user requires a Google account, granting you access to 15 GB of free storage space on Google Drive, making the app an excellent way to transfer files from your old phone to your new one. Here’s how you can use it:
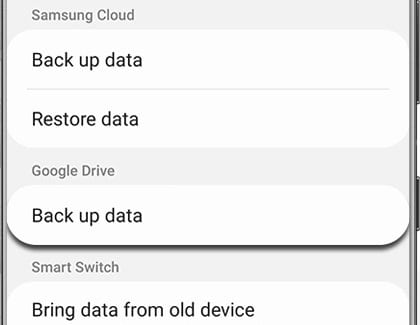
- Using your old Samsung phone, navigate to Settings> Accounts and Backup> Back up data under Google Drive.
Change the Backup detailsand add the types of data you want to back up.
Hit the Back up nowbutton and give your phone time to upload everything to Google Drive. You can watch the progress at the top of your screen.
Power on your new Pixel 8/8 Pro device and follow the on-screen setup instructions.
Log in with the same Google account you used on the Samsung phone.
The new device will immediately recognize older backups.
Choose the latest backup made on your Samsung phone and tap Restoreto copy data from Samsung to Pixel.
It’s worth noting that Google Drive users aren’t limited to 15 GB of storage space, as paid plans also include 100 GB and 200 GB options for a few dollars per month, making this type of transfer incredibly efficient.
Transfer Data From Samsung to Google Pixel 8, 8 Pro Using Email
Although it’s not as effective as the abovementioned methods, email is also an option for transferring data between phones. Using it is as straightforward as sending emails, meaning that this method is effortless, and anyone can do it. Here’s how:
Open your old Samsung phone’s email app and compose a new email.
Hit the attachment icon and add your files to the email. Send it to whomever you like or to your secondary email account.
Launch the email app on your new Google Pixel 8 or 8 Pro device.
Download the email attachments you’ve just sent.
Please note that while email providers like Gmail, Yahoo, or Hotmail might not have restrictions on the number of files you can send, they do restrict emails to 25MB in size. It essentially means that this method will work for smaller files but isn’t viable if you need to transfer large sets of data.
Conclusion
Transferring data from one smartphone to another can be challenging, especially if you’re new to the whole thing or do it manually. To help you out, we’ve prepared the top seven methods for handling data transfers from Samsung to Google Pixel, which include the built-in data transfer tool during device setup, USB cables, Quick Switch adapter, Google Drive, email, and a dedicated third-party app – Wondershare Dr.Fone.
As you can see, it’s your safest bet, ensuring the most straightforward and fastest data transfer between your old and new device. This way, you won’t need to organize and transfer anything manually or risk losing data, and Wondershare Dr.Fone can be used even after the initial device setup.
- Title: In 2024, How to Transfer Contacts from Tecno Pova 5 to Other Android Devices Devices? | Dr.fone
- Author: Emma
- Created at : 2024-07-18 00:08:10
- Updated at : 2024-07-19 00:08:10
- Link: https://android-transfer.techidaily.com/in-2024-how-to-transfer-contacts-from-tecno-pova-5-to-other-android-devices-devices-drfone-by-drfone-transfer-from-android-transfer-from-android/
- License: This work is licensed under CC BY-NC-SA 4.0.