
In 2024, How to Transfer Contacts from Vivo Y100i to iPhone XS/11 | Dr.fone
How to Transfer Contacts from Vivo Y100i to iPhone XS/11
When it comes to transferring contacts from Vivo Y100i to iPhone XS/11, we play enough care to not mess with the process.
Though, there are numerous ways to switch to a new iPhone from an Android device, some of them are really outdated. Consider, transferring contacts from Vivo Y100i to iPhone XS/11 via Bluetooth for that matter. If you have a huge phone book, then it will take ages to finish moving the contacts. You don’t need to worry at all. We have amazing alternative solutions for you.
In this article, we are going to introduce 4 vital solutions to make your transition from Vivo Y100i to iPhone a smooth sail.
How to transfer contacts from Vivo Y100i to iPhone XS/11 in one click
If you want to import contacts to iPhone XS/11 from Android in a single click, there is no better solution than Dr.Fone - Phone Transfer . Not only contacts but a wide range of device data can be transferred from your Android to an iPhone with this tool. Photos, music, text messages, videos, etc. are a few of them.
Dr.Fone - Phone Transfer
Easily transfer contacts from Vivo Y100i to iPhone XS/11
- Enables you to transfer data between Android, iOS, and WinPhone with a single click.
- Secure and there is no data loss while you transfer data between devices.
- Supports more than 6000 mobile device models from various brands like Apple, Sony, Samsung, HUAWEI, Google, etc.
- Supports all Android and iOS versions.
4,683,556 people have downloaded it
Well! After going through the amazing features of with Dr.Fone - Phone Transfer. How about learning the step-by-step procedure to transfer contacts from Vivo Y100i to iPhone XS/11 with Dr.Fone - Phone Transfer?
Here is how to transfer contacts from Vivo Y100i to iPhone XS/11 in 1 click:
Step 1: Download Dr.Fone - Phone Transfer on your computer and then install it. Launch it after installation and hit on the ‘Phone Transfer’ tab on the Dr.Fone software interface.

Step 2: Now, connect both your Vivo Y100i and iPhone XS/11 to the computer using genuine USB cables.
Step 3: Once the Vivo Y100i devices get detected, you need to select Android as the source device on the next screen. As you wish to import contacts to iPhone XS/11 from Android, the iPhone XS/11 needs to be selected in place of the target device.


Note: In case of a wrong selection, you can tap the ‘Flip’ button and change the selection.
Step 4: In this step, you have to select the data type you want to move from your Vivo Y100i to the iPhone XS/11, i.e. ‘Contacts’. Now, push the ‘Start Transfer’ button consecutively to initiate the transfer.

Note: If it’s a used iPhone XS/11, then you can select the ‘Clear Data before Copy’ checkbox for erasing any existing data on it prior to transferring the data.
Step 5: Allow some time to get the process completed. Your contacts are successfully transferred from the Android device to iPhone XS/11.
How to transfer contacts from Vivo Y100i to iPhone XS/11 using Move to iOS
Move to the iOS app from Apple allows you to make a smooth transition from an Android device to an iOS device. Be it an iPhone, iPad, or iPod Touch, this tool makes transferring content a cakewalk.
It involves quick steps to automatically moving data. Apart from contacts, it supports message history, web bookmarks, camera photos and videos, free apps, etc. It will transfer data to a factory reset or brand new iPhone only.
Step by step guide of Move to iOS app for importing contacts to iPhone XS/11 from Android
- Download the ‘Move to iOS’ app on your Vivo Y100i. Install and launch it soon after.
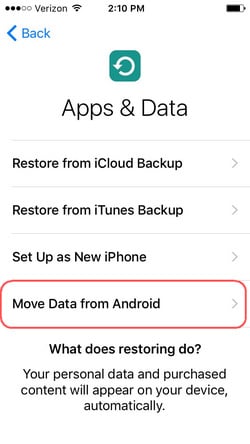
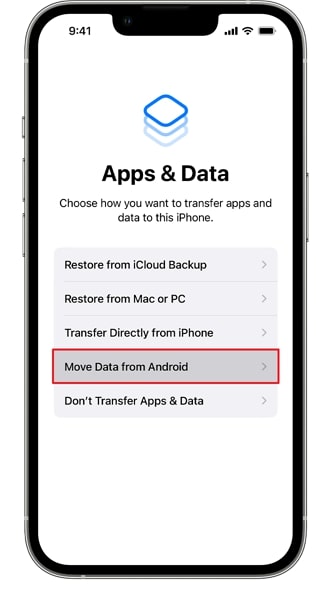
- Get your iPhone XS/11 and then set up the language, passcode, touchID. After that connect it to a Wi-Fi network. Browse for the ‘Apps & Data’ and select ‘Move Data from Android’.

- On your Vivo Y100i, click ‘Continue’ and then ‘Agree’. A prompt asking for a code will appear on your Android mobile.
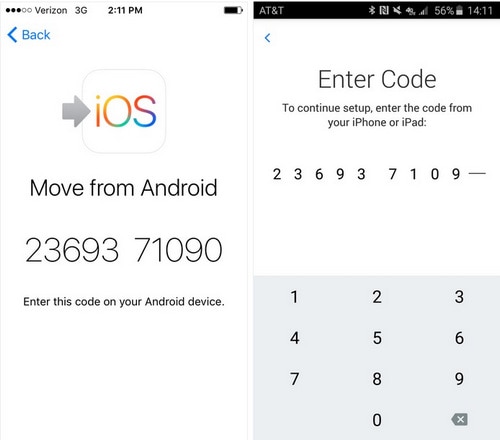
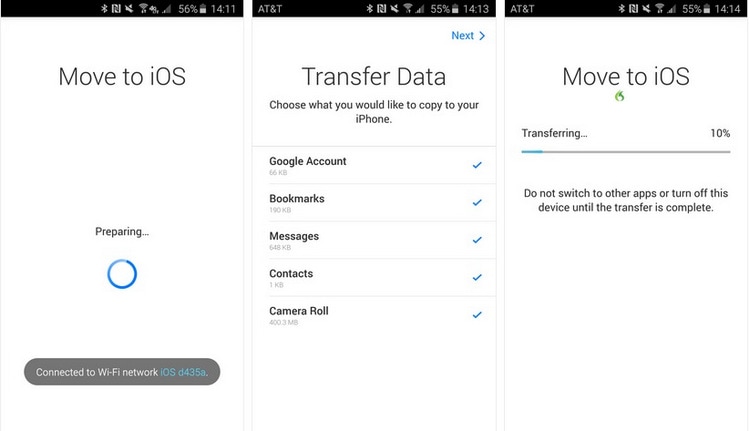
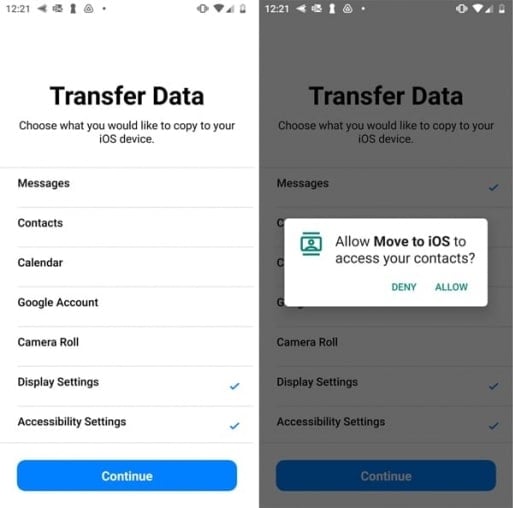
- Get the iPhone and hit ‘Continue’ and note the displayed code. Enter this on your Vivo Y100i. When both the Android and iPhone are connected to the Wi-Fi, select ‘Contacts’ from the data types and tap ‘Next’.

- On your Vivo Y100i, click ‘Done’ as soon as the data transfer is complete. Let the iPhone XS/11 sync the contacts. You need to set up your iCloud account now. Once it is done, you can view the transferred contacts on the iOS device.
How to transfer contacts from Vivo Y100i to iPhone XS/11 using Google account
Alternatively, you can import contacts to iPhone XS/11 from Gmail from your Android mobile, as well. to do that, you need to get your Gmail and Android device contacts to get synced first.
Here is the detailed guide to transferring contacts from an Android to an iOS device.
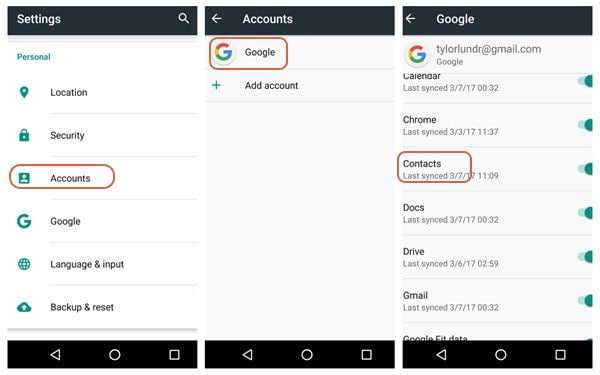
- Go to your Vivo Y100i and go to the ‘Accounts’ tab and enable syncing of contacts. ‘Settings’ > ‘Accounts’ > ‘Google’ > Turn on ‘Contacts’ switch > tap on ‘3 vertical dots’ > ‘Sync Now’.
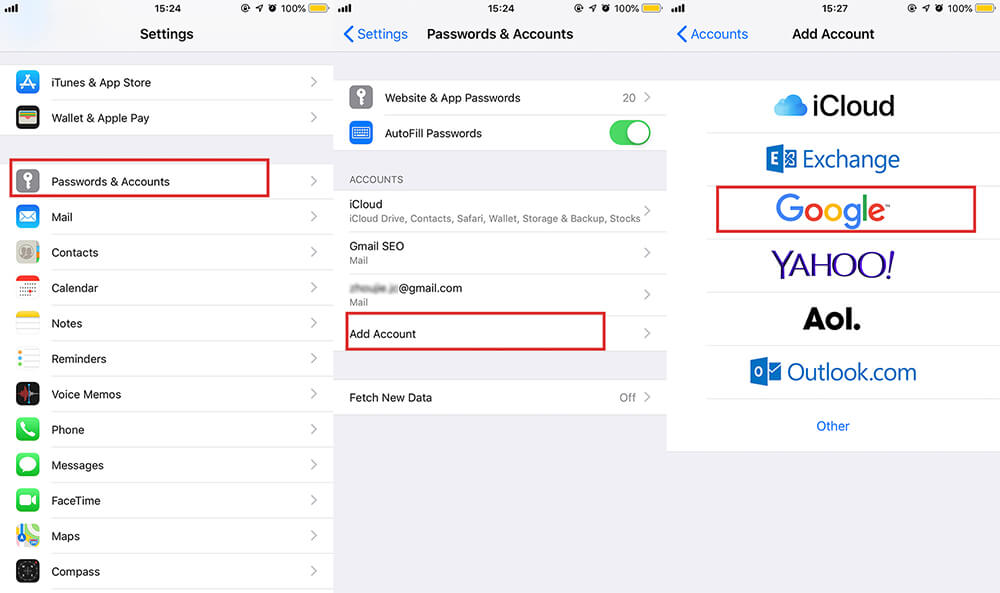
- Now, you need to add the same Gmail account to your iPhone X, in order to sync back contacts from it. For this, head to ‘Settings’ > ‘Passwords & Accounts’ > ‘Add Account’ > ‘Google’. Then, you’re required to punch in the details of the same Gmail account used over Android to sync contacts.
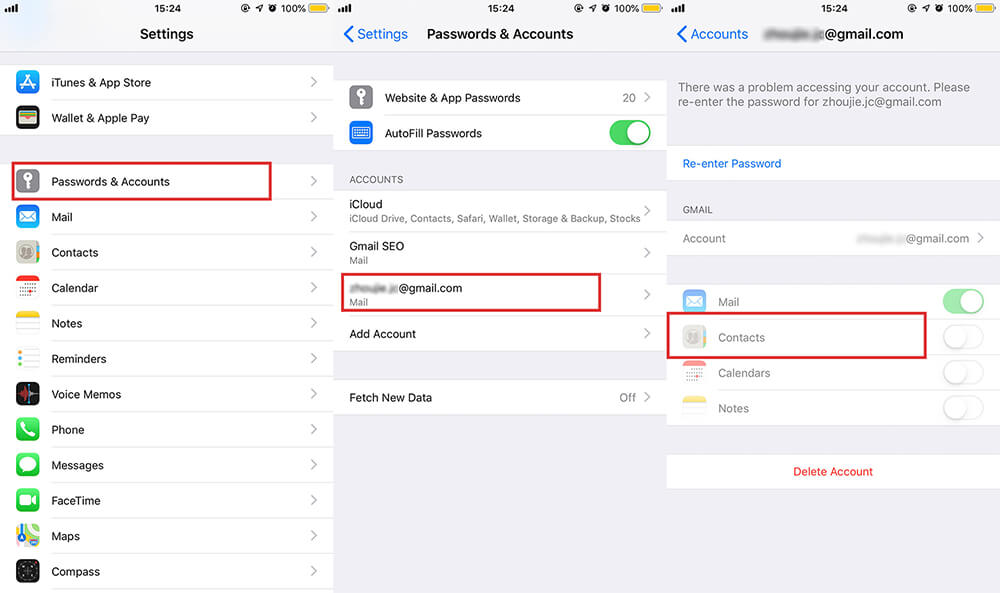
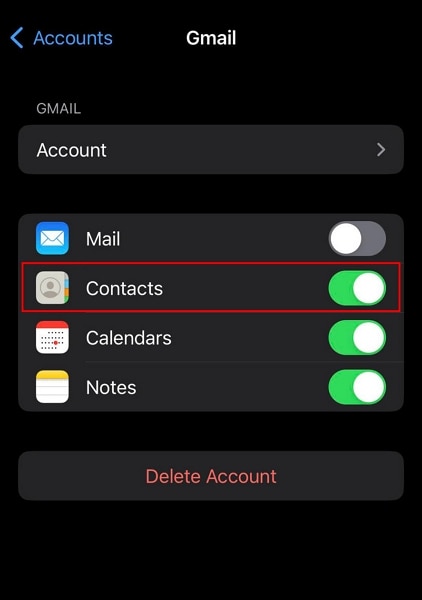
- Lastly, get into ‘Settings’, then ‘Passwords & Accounts’, tap on your Gmail account and ensure that the ‘Contacts’ switch is turned on. Turn it on if it is not already. Within a short span of time, you can find the Android contacts appearing on your iPhone XS/11 after that.
How to transfer contacts from Vivo Y100i to iPhone XS/11 using SIM card
As you know the SIM card itself can hold a certain number of contacts, depending on the carrier and phone make and model.
- Open the ‘Contacts’ app and click on ‘More’. Go to the ‘Import/Export’ or simply ‘Export Contacts’ option there.
- Click on ‘Export to SIM’ or ‘SIM card’ and then select the source of contacts i.e. ‘Phone’/’WhatsApp’/’Google’/’Messenger’.
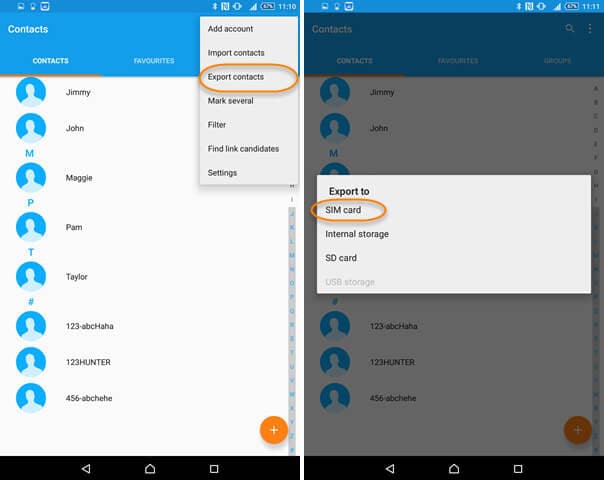
- Then hit ‘Export’ and ‘Continue’ afterward.
- Now, open the SIM card slot of your Vivo Y100i and unmount the SIM. Insert it on your iPhone XS/11 and turn it on. You can find the contacts on your iPhone.
Note: Though, it’s rare nowadays. In case you happen to own a very old SIM card and your Vivo Y100i supported the size. You might need to cut it to fit the iPhone XS/11’s micro-SIM slot.
6 Ways To Transfer Contacts From Vivo Y100i to iPhone
Transitioning from an Android to an iPhone can be an exciting move. However, the process to transfer contacts from Vivo Y100i to iPhone might seem daunting. Thankfully, technological advancements have introduced several hassle-free methods. With these, you can smoothly transfer contacts from an Android device to an iPhone.
This article will delve into 6 effective ways to effortlessly migrate your contacts. It ensures a smooth transition without worrying about losing essential contacts. These step-by-step solutions will guide you through the process, simplifying the task.
Author Recommendation. The Best Method to Transfer Contacts from Vivo Y100i to iPhone
Way 1: Wondershare Dr.Fone
Wondershare Dr.Fone is a powerful and user-friendly tool. It simplifies the process of transferring contacts from an Android device to an iPhone. Dr.Fone offers a robust phone transfer feature that can transfer your contacts and other data in minutes. With its user-friendly interface, the process involves straightforward clicks. This powerful tool efficiently moves data between devices operating on different systems, such as iOS and Android.
Key Features of Wondershare Dr.Fone
- It is compatible with Android 14 and the latest iOS 17.
- The Phone Transfer of Wondershare Dr.Fone is fully compatible with over 8000 devices from all major brands.
- Wondershare Dr.Fone enables the transfer of up to 15 different file types between phones.
Steps To Transfer Contacts From Vivo Y100i to iPhone via Wondershare Dr.Fone
Follow these simplified steps for how to transfer contacts from Vivo Y100i to iPhone using Wondershare Dr.Fone:
- Step 1: Choose Phone Transfer After Launching Dr.Fone
On your computer, download and install the latest version of Wondershare Dr.Fone. Then open it once it is installed and click “Toolbox” from the left sidebar. Proceed to the primary interface and select the option labeled “Phone Transfer.” Then, connect both your Android and iPhone devices to the computer.
- Step 2: Connect Devices and Complete Contacts Transfer
Once devices are detected by Wondershare Dr.Fone, ensure that they are correctly assigned. The Android device will be at the “Source” location. In the same way, assign the “Destination” position to the iPhone. Choose the “Contacts” category among the data options and click “Start Transfer.” Allow the process a few moments to complete.

Way 2: Utilize Move to iOS App
The Move to iOS app is a dedicated solution provided by Apple. It is specifically designed to help the migration of data, including contacts, from an Android device to an iPhone. This official app aims to simplify the transition process. Nevertheless, its utilization is limited to setting up an iPhone for the initial time or following a factory reset. Here is how to transfer contacts from Vivo Y100i to iPhone using Move to iOS app:
- Step 1. Download and set up the Move to iOS application on your Vivo Y100i. Then, start setting up your iPhone until you reach the “Apps & Data” screen. Here, choose “Move Data from Android” and go on to open the Move to iOS app on the Android device.

- Step 2. Proceed by tapping “Continue” on both your devices and consenting to the terms and conditions. Follow it by tapping “Next” and insert the code from the iPhone to the Move to iOS app to establish a connection. From the available data transfer options, ensure to choose “Contacts.” Now, follow the on-screen prompts to complete the transfer process.
Way 3: Sync Contacts to Google Account
Syncing contacts to a Google account serves as a convenient method. It can automatically transfer contacts from an Android device to an iPhone. Moreover, it is an excellent choice if your Android contacts are stored in a Google account. This method operates for both new and already set-up iPhones. Follow these instructions to sync your contacts to your Google account and subsequently access them on your iPhone:
- Step 1. Access the Google Contacts app on your Vivo Y100i and tap on the “Profile” icon at the top right corner. Following this, access the “Contacts Settings” option followed by “Google Contacts sync settings.”

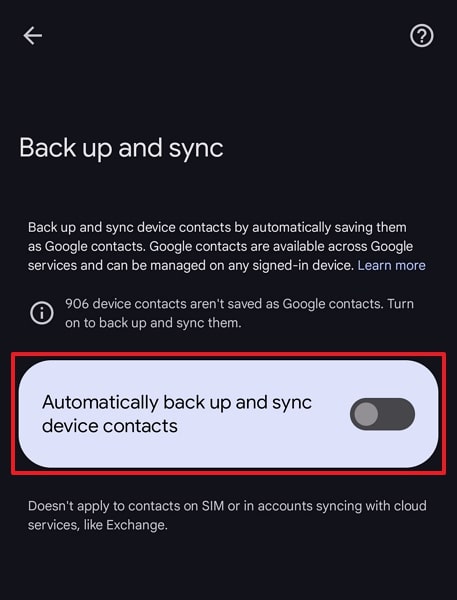
- Step 2. Next, you need to select “Also sync device contacts.” On the following screen, ensure “Automatically back up & sync device contacts” is toggled on. Now, move to your iPhone and access the Settings app.
- Step 3. Go to the “Settings” app and locate the “Contacts” settings. Proceed by scrolling to locate “Accounts” and then tap on it. Afterwards, choose “Add Account” and sign in with your Google Account. Once logged in, make sure to enable the “Contacts” option.
Way 4: Using the SIM Card
Transferring contacts using a SIM card provides a basic yet effective method. This method might be the least convenient option. The reason is it involves physically exchanging SIM cards between the phones. Moreover, you can’t use this method if you use the Google Contacts app. However, some Android brands like Samsung still allow it. Follow these steps for how to move contacts from Vivo Y100i to iPhone via SIM card:
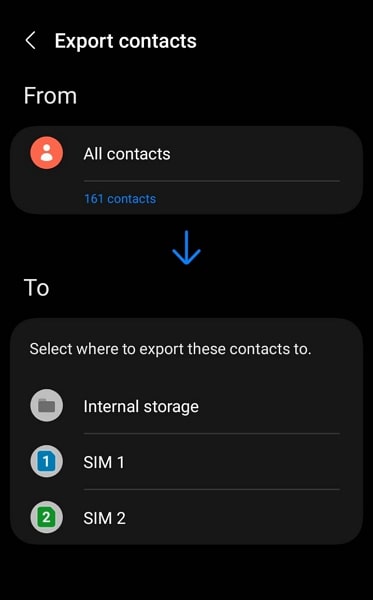
- Step 1. Open the Samsung Contacts app on your Android and tap the “Three Lines” icon to select “Manage Contacts.” Here, tap “Export Contacts,” choose the “SIM Card” as the export location, and select “All” contacts to be exported.
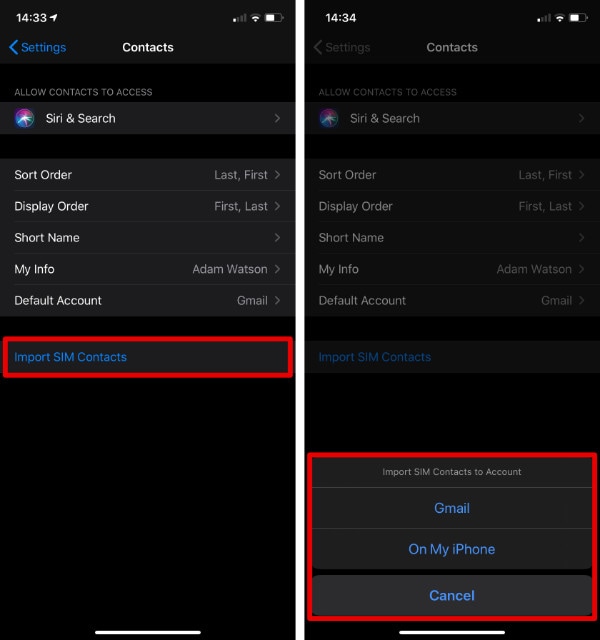
- Step 2. After it is done, insert the SIM card into the iPhone and open Settings. Move to “Contacts” and press “Import SIM Contacts” on the next screen to complete the process of moving contacts from a SIM card on an iPhone or email.
Way 5: Sync Using iTunes/Finder
Syncing contacts from an Android device to an iPhone using iTunes or Finder is another method. It is an indirect transfer by syncing Google contacts from your account to your iPhone. This method enables you to consolidate your contacts from your Google account onto your iPhone. Here is how to send contacts from Vivo Y100i to iPhone via iTunes/Finder:
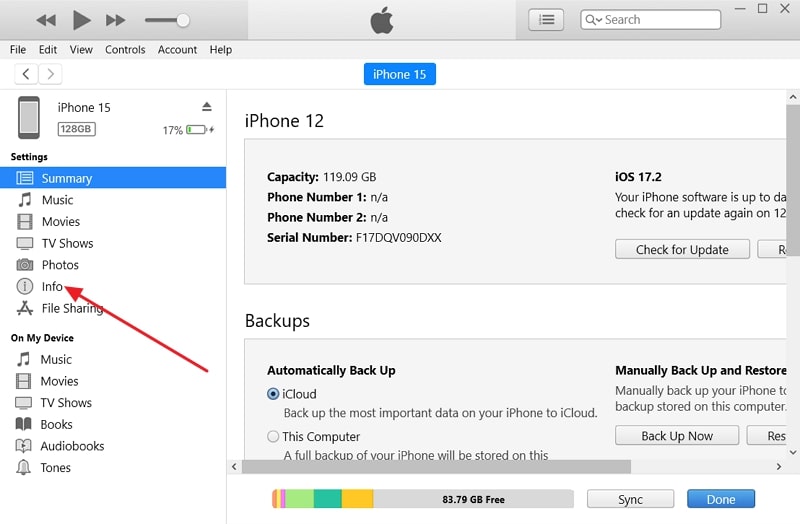
- Step 1. Make sure your Vivo Y100i has its contacts synced with a Google account. Next, download and install the most recent version of iTunes on your computer. Link your iPhone to your computer using a USB cable and launch iTunes. Once your iPhone icon appears in iTunes, click on it and navigate to the “Info” tab in the left sidebar.
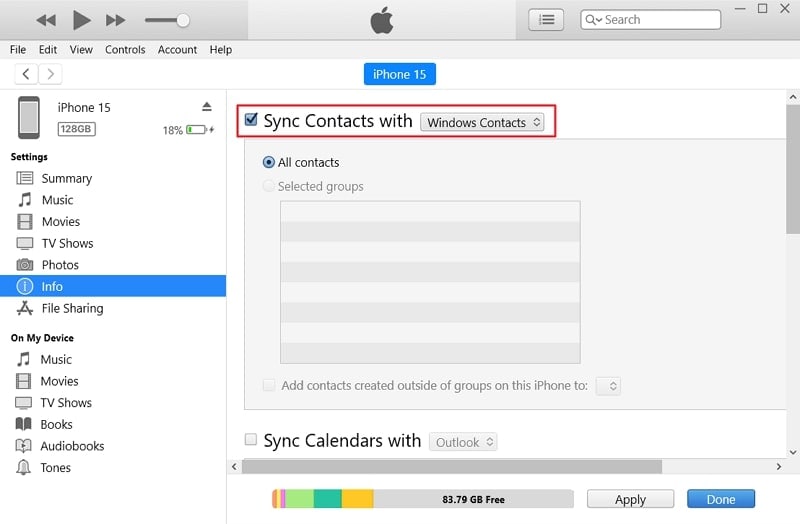
- Step 2. Ensure the box beside “Sync Contacts with” is checked, then pick “Google Contacts” from the drop-down menu. Log in to your Google account and designate the contacts for synchronization. Tap “Apply” in the bottom right to initiate syncing your iPhone with your Google contacts.
Way 6: Import the VCF File
Importing a VCF file directly to your iPhone allows for a simple and direct transfer of contacts. It happens without the need for additional software or complex procedures. This method retains contact details and ensures a smooth transition. Follow these steps to import a VCF file containing your contacts while answering how to move contacts from Vivo Y100i to iPhone:
- Step 1. Access the Contacts app on your Vivo Y100i and hold on to a contact to select. Among the options displayed, opt for “Select All” and proceed by tapping the “Share” option. Now, you need to select a way to share these contacts. Here, we are choosing Gmail as it is the simplest, but you can select any feasible method.
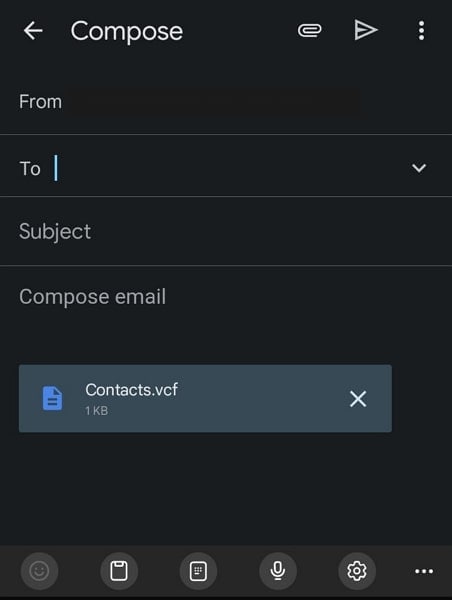
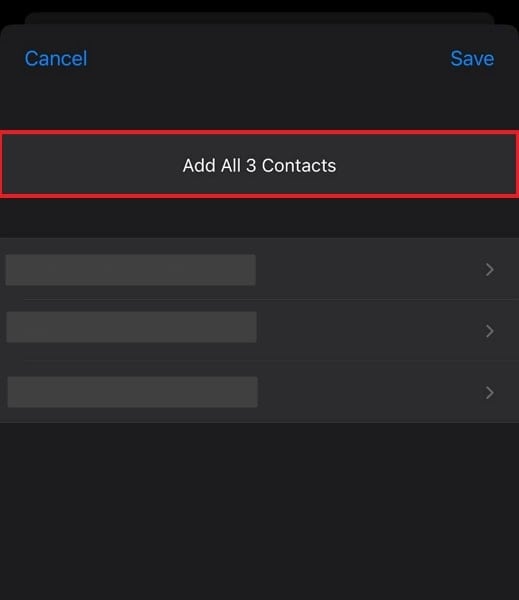
- Step 2. Now move to your iPhone and open the mail with Contacts from the Android device. Press the attached file, choose “Share,” select the “Contacts” app and tap “Add All Contacts.”
Author Recommendation: The Best Method To Transfer Contacts From Vivo Y100i to iPhone
When considering the most efficient and reliable method to transfer contacts from Vivo Y100i to iPhone, our recommendation leans toward using Wondershare Dr.Fone. Among various available methods, Wondershare Dr.Fone offers a comprehensive, user-friendly experience.
It simplifies the transfer process with its intuitive interface and dependable performance. Here’s why we recommend Wondershare Dr.Fone for transferring contacts:
- Ease of Use: Wondershare Dr.Fone’s straightforward interface makes it accessible to users with varying levels of technical expertise. The step-by-step guidance ensures a hassle-free transfer process.
- Comprehensive Transfer Options: Beyond contacts, Wondershare Dr.Fone enables the transfer of various data types. This caters to broader migration needs, including photos, messages, music, videos, etc.
- Reliability and Security: With a solid reputation in data management software, Wondershare Dr.Fone ensures the security and integrity of your data. It prioritizes privacy and reliability during the transfer process.
- Cross-Platform Compatibility: Fone supports transfers between different operating systems. That makes it an ideal choice when migrating from Vivo Y100i to iOS devices like iPhones.
- Efficiency and Speed: The software streamlines the transfer process to an excellent measure. It saves valuable time by swiftly migrating contacts and other data without data loss or errors.
Conclusion
In conclusion, transitioning from an Android device to an iPhone doesn’t have to be a daunting task. It is especially not the case when it comes to how to transfer contacts from Vivo Y100i to iPhone. Throughout this guide, we’ve explored various effective methods. Each one offered its unique approach to simplify the transfer process.
You can opt for the user-friendly interface of Wondershare Dr.Fone, the official Move to iOS app, or sync via Google accounts. Other options include utilizing the SIM card, syncing through iTunes/Finder, or the direct import of a VCF file. Selecting the ideal method often depends on personal preferences. Wondershare Dr.Fone emerges as a standout recommendation due to its versatility, reliability, and ease of use.
How to Use Phone Clone to Migrate Your Vivo Y100i Data?
Dr.Fone - Phone Transfer
Best Tool to Migrate Huawei Phone Data
- Transfers any data between devices.
- Supports all phone models like iPhone, Samsung, Huawei, LG, Moto, etc.
- 2-3x faster transfer process compared to other transfer tools.
- Data kept absolutely secure during the transfer.

The rapid change in the mobile models has made it difficult for us to keep up with the trend. For some, while it might be a matter of owing only the best mobile, for others it’s a matter of enjoying the best of the world at each point of time. Thereby they try to keep up with the mobile trend by getting their hands on the latest mobile whenever possible whether iOS or Android. In such a scenario it becomes difficult to transfer data from one to another. But here is some mobile technology such as Phone Clone that will change it forever. So, let us see how you can use it to your advantage to transfer your valuable information.
Before we move on to see how to transfer data we will first see why someone would like to migrate the information from old phone to new phone:
- - To replace the old phone with a new phone as the primary phone
- - To back up all the info in both the phone
Moving on, in the subsequent section, we will understand how to use Phone Clone Vivo.
Part 1: How to use Phone Clone for Android?
Android has been ruling the world with its open-source technology and compatibility for a wide range of devices. As a result of which, many companies are producing the latest technology in hardware without any worry of OS support. Android phone makers such as Huawei, Samsung, HTC, and many others are at the trend of releasing flagship models at the different budget range on a regular interval. As a result, this has made people run like fans for grabbing a hand on the latest rig, to enjoy the best of the world at every point in time. In such a scenario, it becomes difficult to transfer your data from one phone to another securely. Well in this part, we will be introduced to the Huawei Phone Clone app that will help you to migrate information from one phone to another.
Here are the steps to be followed for Phone Clone Vivo to transfer your data from one phone to another:
1. First, install the app on both the phones, i.e., on both old and new mobiles
2. Open the app on the new phone. Click on the new phone button. A Wi-Fi will be created whose password will be displayed at the time of creation. You will need that password in the next step.
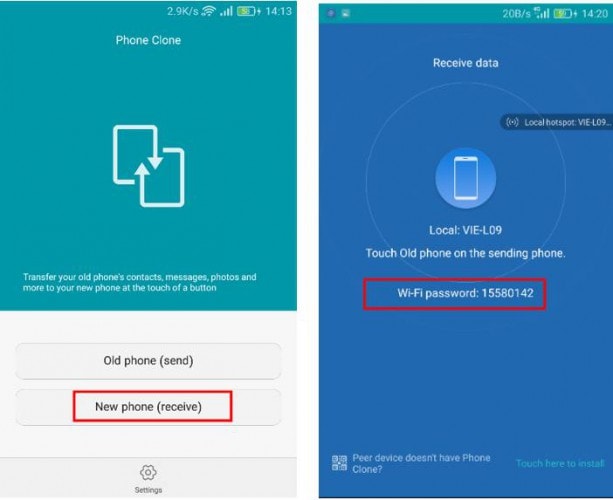
3. Open the app on the old phone. Click on the old phone button. Select the wi-fi network created in the 2nd step and enter the password that you received in the 2nd step.
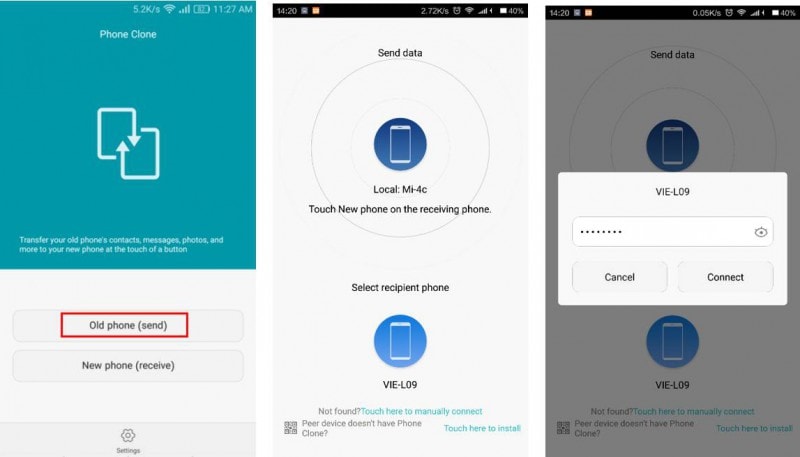
4. Once connected, click the number of tabs on the old phone that you want to send to a new phone.
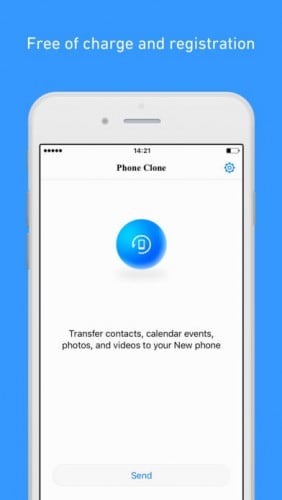
Part 2: How to use Phone Clone for iPhone
The best part of the Huawei Phone Clone is that it supports not only Android but it also supports the iPhone. All the things that you can do while transferring data from one Android to another, you can achieve the same feat while transferring data from one iPhone to another iPhone. It is especially useful when you get that big update to your iPhone version, and most of the apps get useless due to the drastic hardware and software change in old and new iPhones. Thinking about changing your old iPhone to a new one could have been disastrous if not catastrophic if personal data could not have been transferable from one mobile to another. Phone Clone by Huawei lets you simply achieve the task while at the same time saving you a lot of data and time
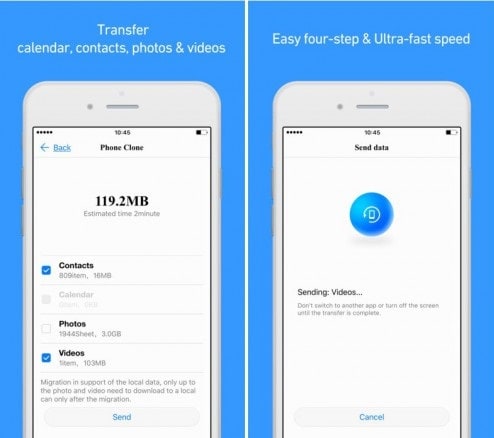
Now, let us take a look at how you can use Phone Clone Vivo app without spending a penny on expensive services and with 4 simple steps:
1. Install the Phone Clone app on old and new iPhone mobile
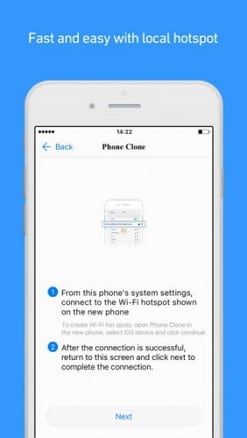
2. Open the app for the new iPhone. Click on the send button. A Wi-Fi hotspot will be created, displaying its name and password.
3. Go to the wi-fi setting of the old iPhone and connect to the Wifi network mentioned in step 2. Open the app on the old iPhone and click on next to complete the connection.
4. Once connected, click on the tabs presented in the old iPhone and select the tab that you want to send to the new iPhone.
Part 3: Best Phone Clone alternative: Dr.Fone - Phone Transfer to migrate iPhone/Android data
While Phone Clone is free of cost and is a great emergency there is still much lagging in the app. It does not connect properly; it sometimes fails to send files completely and many more. To overcome we have with you the best Huawei Phone Clone alternative, called Dr.Fone - Phone Transfer , the easiest way to migrate iPhone/Android data.
Dr.Fone provides one of the best options to switch personal data from one phone to another seamlessly. It supports mobile of all kinds of data and service carriers, so you are not restricted to any particular type of mobile set or carrier service. Enjoy the freedom of information transfer without any loss in security and fast process.
Some of the pros of Dr.Fone - Phone Transfer are as follows:
Dr.Fone - Phone Transfer
1-Click Phone-to-Phone Transfer
- Easy, fast, and safe.
- Move data between devices with different operating systems, i.e. iOS to Android.
- Supports iOS devices that run the latest iOS version
- Transfer photos, text messages, contacts, notes, and many other file types.
- Supports over 8000+ Android devices. Works for all models of iPhone, iPad, and iPod.

3981454 people have downloaded it
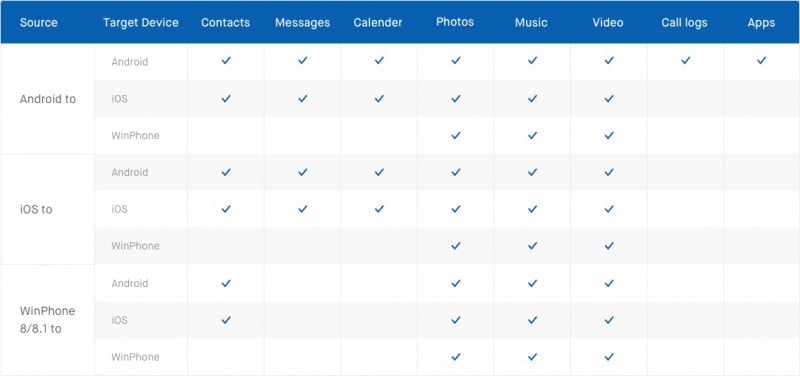
Here is a small comparison of how data transfer from one platform to another platform fares in Dr.Fone
Now let us take a look at how to use Dr. Fone to transfer data between mobiles:
1. Launch the Dr.Fone app on the computer and select Phone Transfer.
2. Connect both the mobile to the computer and select the send and receive side on the computer
3. Select the files and then click on “Start transfer” to complete the transfer process
The best part of Dr.Fone is that you can try it free of cost to check if it suits your requirements. We are sure that its jaw-dropping feature will leave an impression on your mind.
We hope that you learned some of the phone clone methods and applications that you can use to transfer your information from an old phone to a new phone. Use the methods mentioned above and be sure that you are on the safer and faster side of transferring data.
- Title: In 2024, How to Transfer Contacts from Vivo Y100i to iPhone XS/11 | Dr.fone
- Author: Emma
- Created at : 2024-07-18 00:13:05
- Updated at : 2024-07-19 00:13:05
- Link: https://android-transfer.techidaily.com/in-2024-how-to-transfer-contacts-from-vivo-y100i-to-iphone-xs11-drfone-by-drfone-transfer-from-android-transfer-from-android/
- License: This work is licensed under CC BY-NC-SA 4.0.