
In 2024, How to Transfer Data After Switching From Honor Play 7T to Latest Samsung | Dr.fone
How to Transfer Data After Switching From Honor Play 7T to Latest Samsung
Have you finally gotten your hands on the latest smartphone from Samsung’s flagship Galaxy S series? Whether you have the compact S23, the slightly larger S23 Plus, or the sleek S23 Ultra, you’re in for a thrilling ride of exceptional performance and vivid graphics.
What about files on your old Android? Can you transfer data after switching from Honor Play 7T to Samsung S23? Sure thing. We’ll walk you through the seven best methods for Android to Samsung data transfer shortly.
However, can you save all the data? Let’s find out.

Can You Save Your Data After Switching From Honor Play 7T to Samsung S23?
You can save all data after switching from Honor Play 7T to Samsung S23. It doesn’t matter which Android phone you’ve used before buying the latest Samsung model because you have many data transfer options.
Samsung Smart Switch may have features exclusive to Galaxy devices (among other limitations), but all methods let you transfer data seamlessly from Honor Play 7T to Samsung S23. Here’s how each works.
The following methods will help you move data from Honor Play 7T to Samsung S23 within minutes. Each is straightforward, so your choice will depend on your preferences. Let’s dive in.

1. Transfer Data Using Wondershare Dr.Fone Phone Transfer
Wondershare Dr.Fone is an all-in-one phone manager offering multiple tools. Besides moving data between phones, it lets you repair your Android system, recover files and passwords, remove lock screens, and erase data. You can even transfer WhatsApp, Viber, WeChat, and LINE chats and files.
Here’s how to move data from Honor Play 7T to Samsung S23 with Wondershare Dr.Fone:
- Download and install the app on your computer.
- Go to Toolbox > Phone Transfer.

- Connect your old Android and Samsung S23 to the computer with USB cables.
- Set the source and destination devices in Wondershare Dr.Fone Phone Transfer. The app will load data automatically.

- Select the categories to copy to Samsung S23 and click Start Transfer.
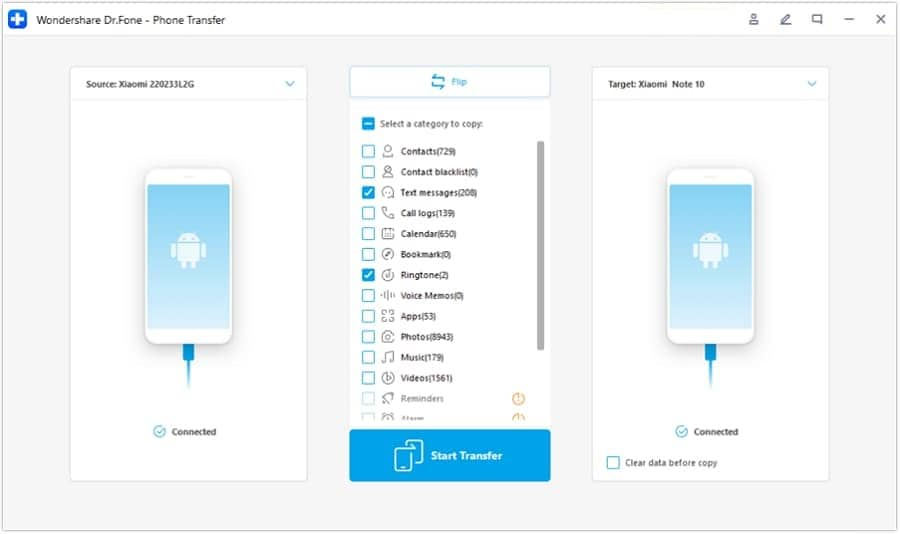
Wondershare Dr.Fone Phone Transfer lets you move apps, contacts, photos, videos, music, ringtones, text messages, voice memos, call logs, bookmarks, and calendar data between Android devices.
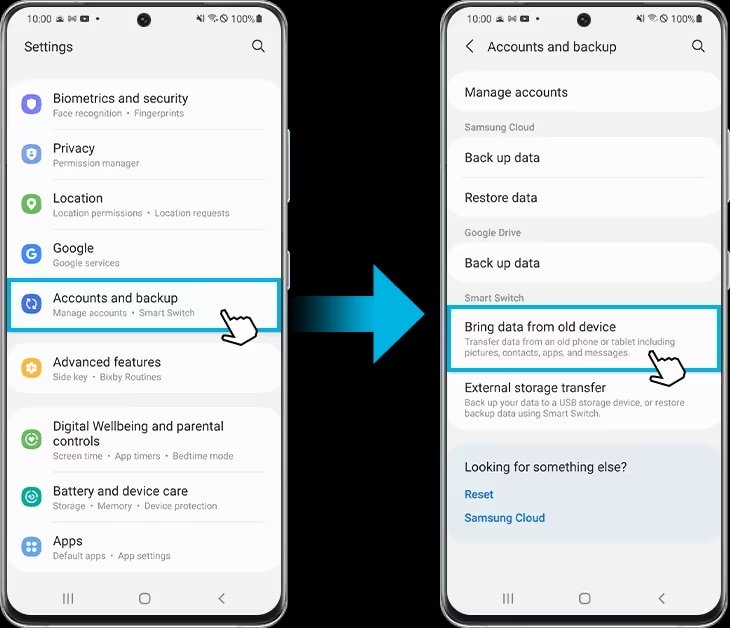
2. Move Data From Honor Play 7T to Samsung Using Smart Switch
Samsung’s Smart Switch app is excellent for moving data (even settings) between Android devices. However, you can only transfer settings, memos (including voice), and app data between Galaxy phones.
Also, you can’t transfer apps you haven’t downloaded from the Play Store or encrypted data like WhatsApp chats. Wondershare Dr.Fone is better if you don’t want to lose your IM conversations.
Here’s how to move data from Honor Play 7T to Samsung S23 with Smart Switch:
- Download and install Smart Switch on both phones and place them next to one another.
- Get your Samsung S23 and go to Settings > Accounts and backup > Bring data from an old device.
- On your Samsung S23, tap Receive dataand choose Galaxy/Android as the source.
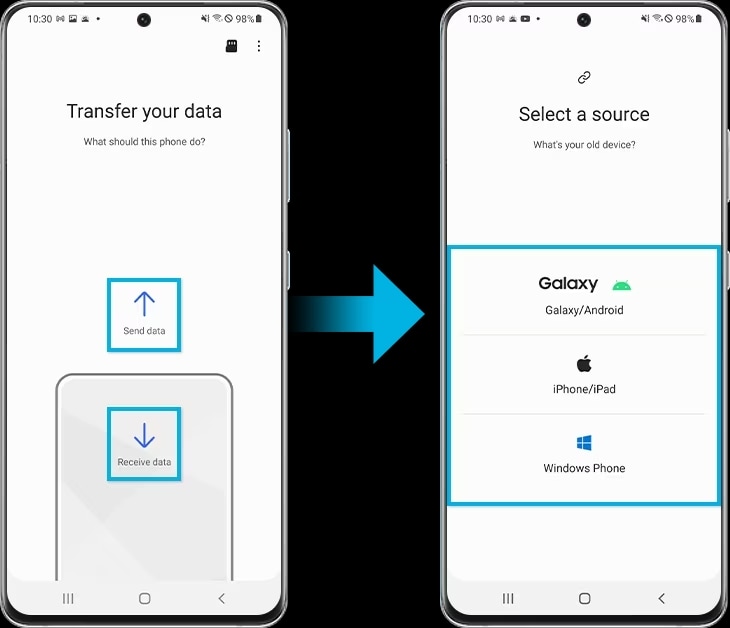
- Tap Send dataon your old phone and select Wireless (it’s faster than a cable connection). Tap Allow to enable data access.
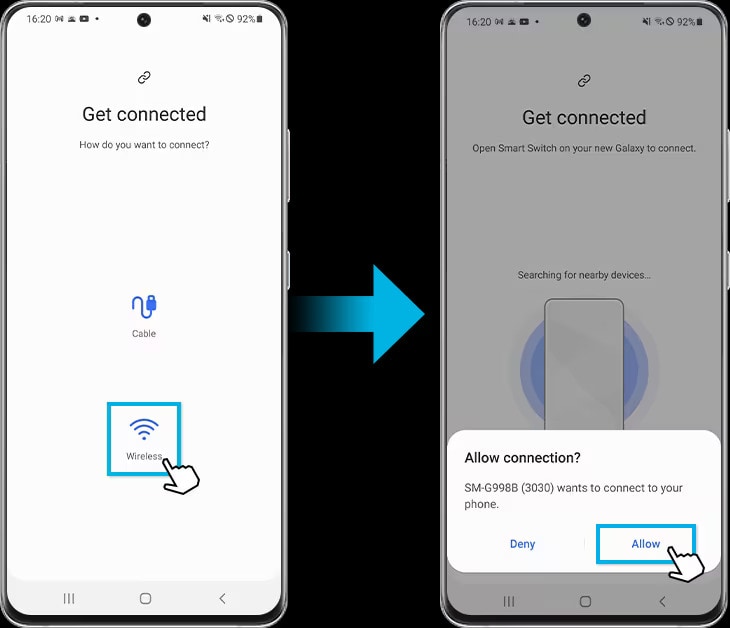
- Choose the desired data using your Samsung S23, tap Transfer, then Go to the Home screenonce everything is on your new phone.
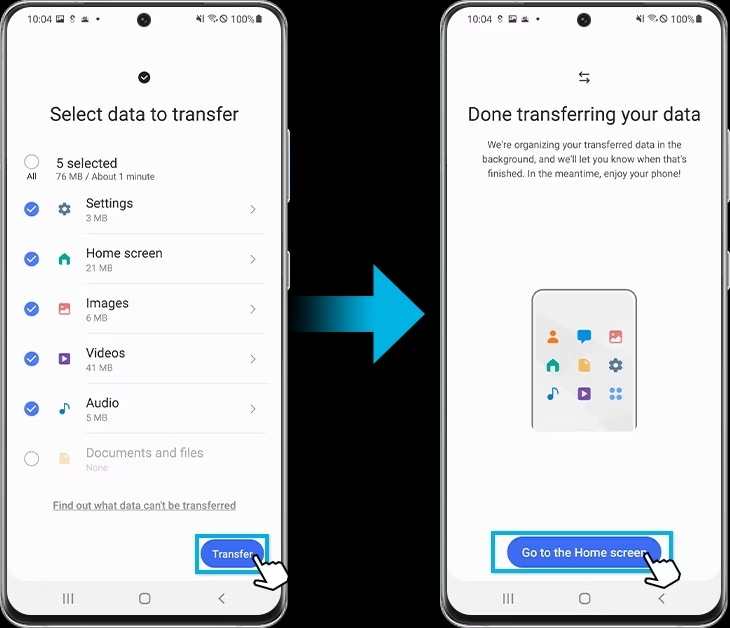
Remember to charge both phones before transferring data or connect them to a power source to ensure the process goes smoothly.
3. Transfer Data Using Google Account Sync
Backing up your Google Account data with Google One means accessing it on any device upon login. The backup includes apps, phone settings, messages, calls, photos, videos, and your chosen Google Account data (e.g., contacts, calendar, emails, and documents).
Here’s how to transfer data to Samsung Galaxy S23 using Google Account synchronization:
- Go to Settings > Google > Backup > Google Account dataon your old Android phone and toggle on the desired switches for synchronization.
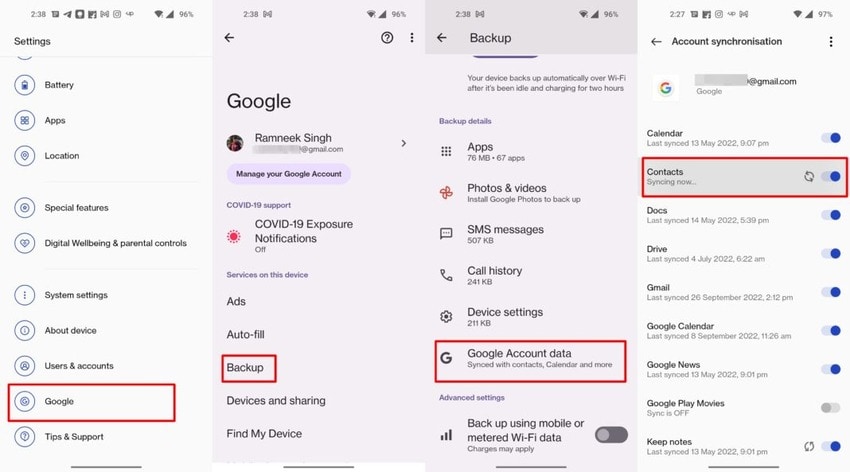
- On your Samsung S23, go to Settings > Googleand log into your backed-up Google Account.
Everything you’ve previously backed up will automatically sync once you log into your Google Account.
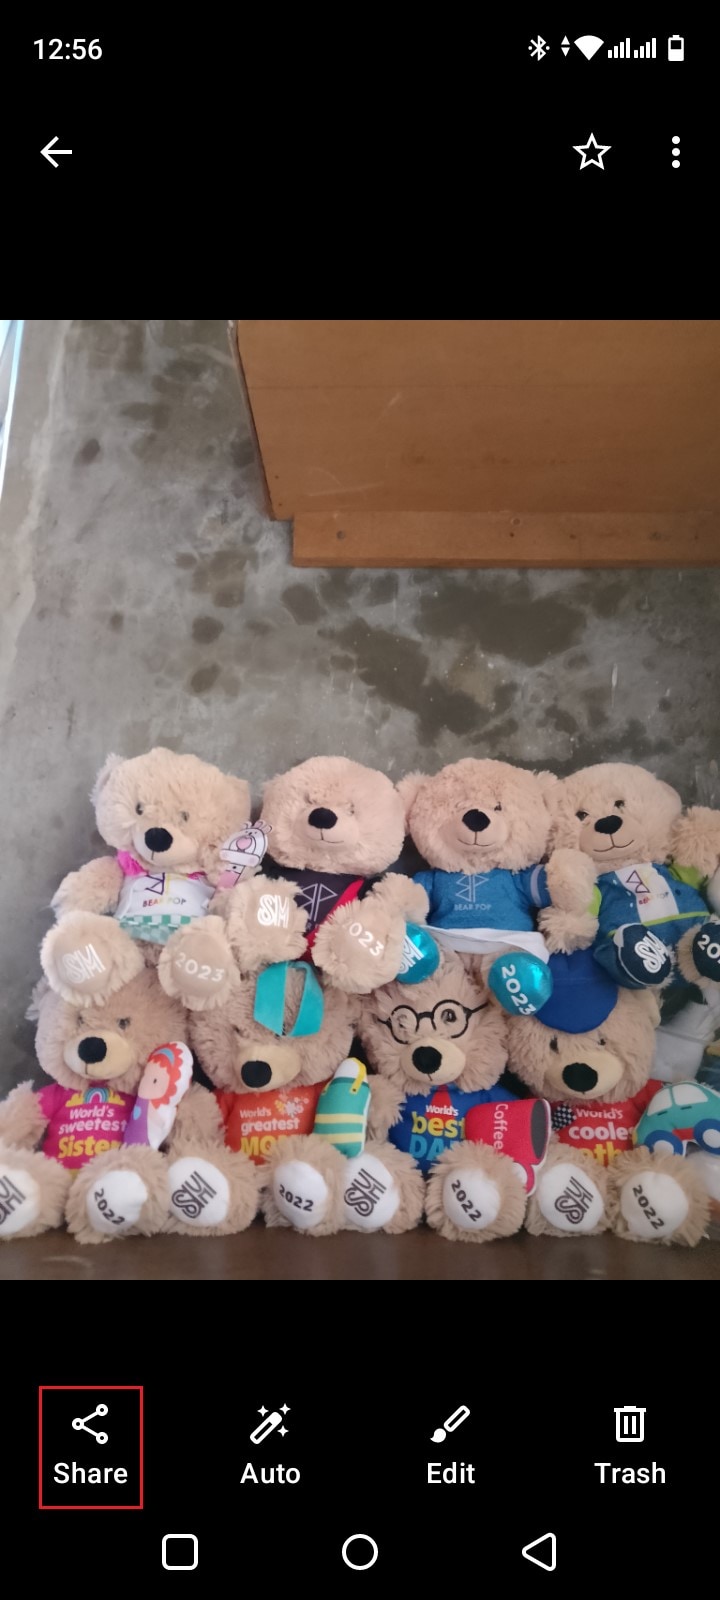
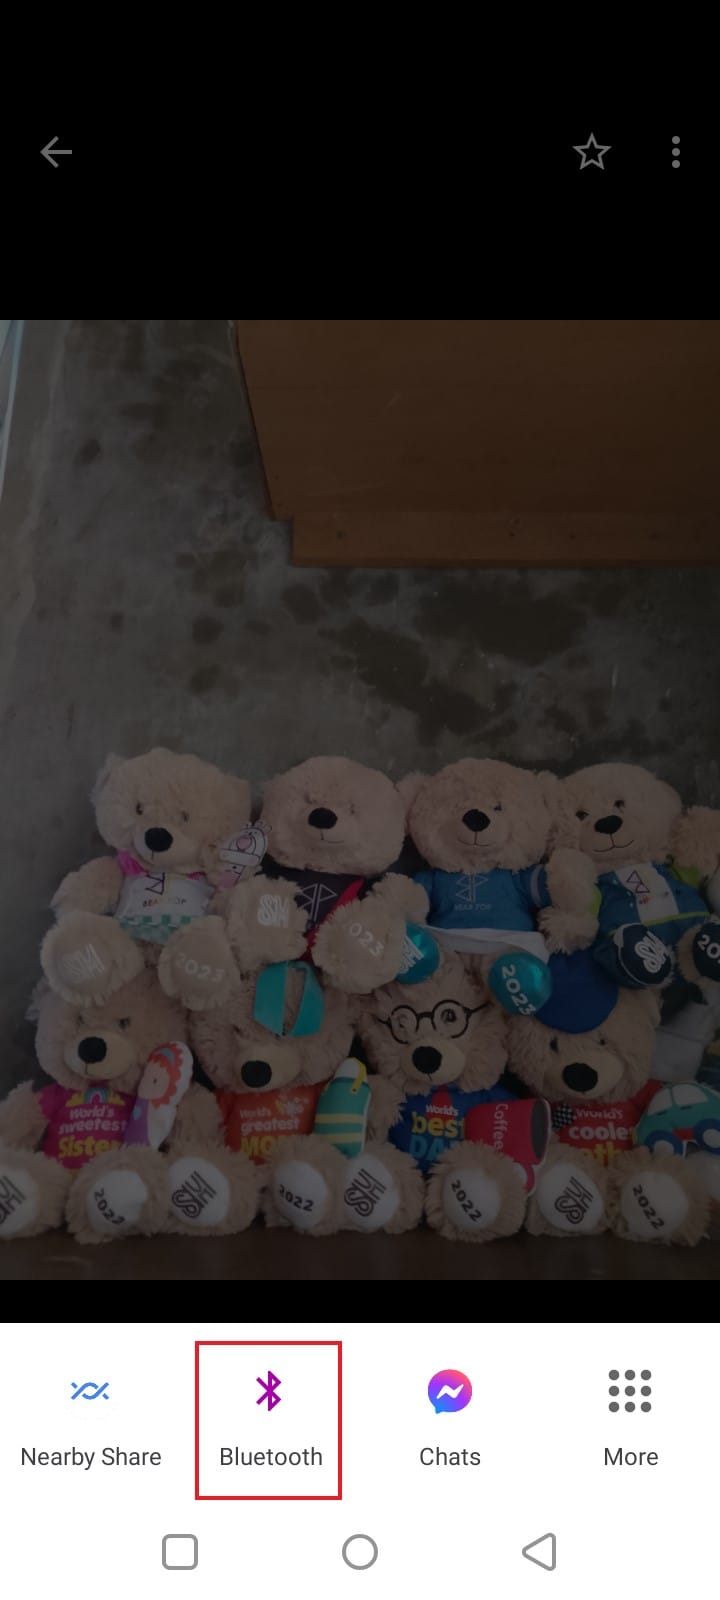
4. Share Data via Bluetooth
Bluetooth may be slower than most data-sharing methods, but its reliability is why we never have to imagine life without it. It may not support transferring settings or downloaded apps, but it’s excellent for moving all your photos, videos, music, and other files.
Here’s how to share data between Android and Samsung S23 via Bluetooth:
- Go to Settings > Connectionsand toggle on the Bluetooth switch on both phones. Alternatively, use a shortcut in the Notification panel.
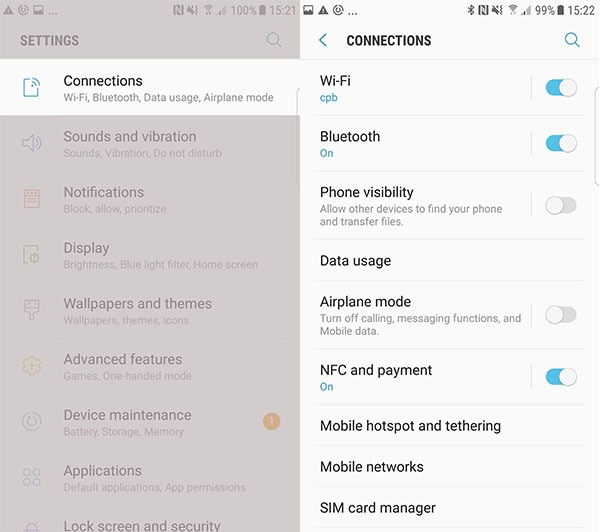
- Pair the phones and select folders or files you wish to transfer to your Samsung Galaxy S23.
- Tap Share > Bluetoothand choose your new phone.
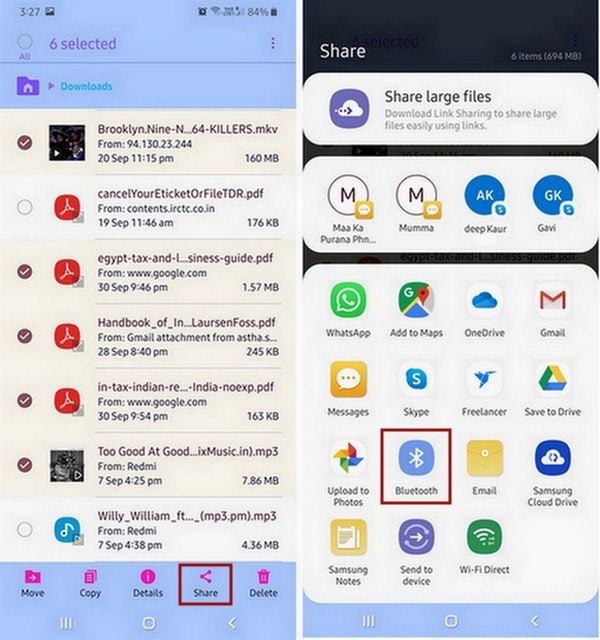
Sharing data via Bluetooth may take a while, but this valuable feature will bring everything you need to your new smartphone.
5. Use Google Drive
Google Drive is a prominent cloud storage and file-sharing platform. You’re missing out if you don’t use it. It lets you synchronize data across devices, access files in the cloud, and create presentation slides, spreadsheets, forms, and documents (online and offline).
Transferring data from Honor Play 7T to Samsung S23 is seamless with Google Drive. Here’s what to do:
- Launch Google Drive on your old Android and tap New > Upload. The Newbutton features only a plus sign on some devices.
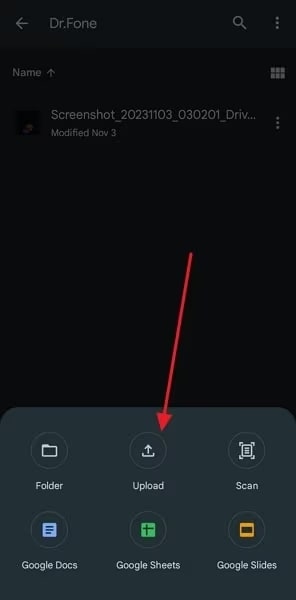
- Add all folders or files you wish to transfer to your new phone.
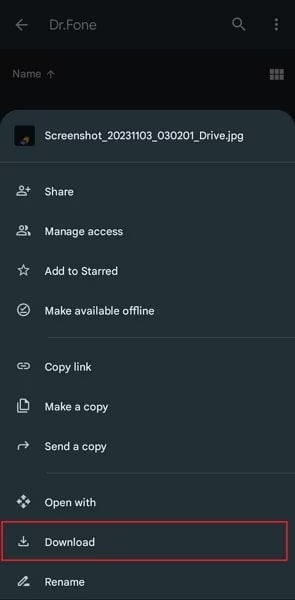
- Open Google Drive on your Samsung S23 and sign into the correct account.
- Select the uploaded data, tap the kebab menu(the three vertical dots in the top right corner), and hit Download.

Google Drive may limit you to 15 GB of free storage, but it’s among the best Google apps for sharing files across devices. You may already use its desktop version to collaborate on docs and spreadsheets, so why not leverage its handy mobile app?
6. Transfer Data Using a USB Cable
USB cables—the unsung heroes of connectivity. Like Bluetooth and Wi-Fi, we can’t imagine life without them. They’re perfect for transferring data between devices.
However, in this instance, we don’t mean the traditional data transfer between your phone and computer (we’ll get to that shortly). This trick involves connecting your old Android phone to your new Samsung Galaxy S23 with a USB cable.
It’s almost like Samsung’s Smart Switch, except you don’t need to download an app and can move more data. You can transfer everything from your old Android device’s internal storage to your new smartphone. Here’s how:
- Connect your phones using a USB-C to USB-C cable. Your Samsung Galaxy S23 came with it.
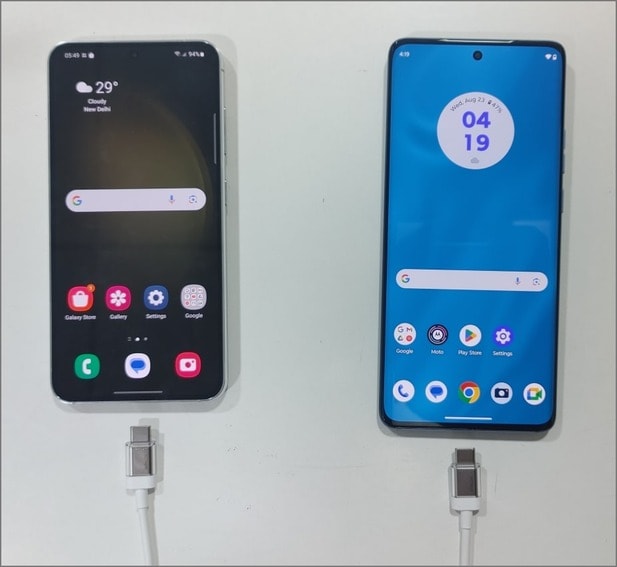
- Tap Connected to Androidon your Galaxy S23 phone and select MTP Host (Media Transfer Protocol).
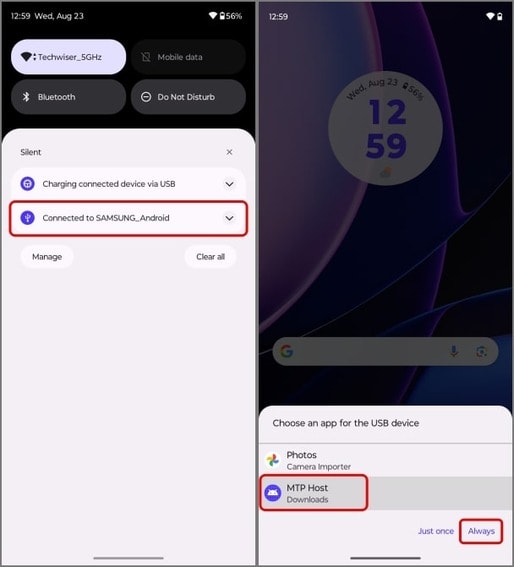
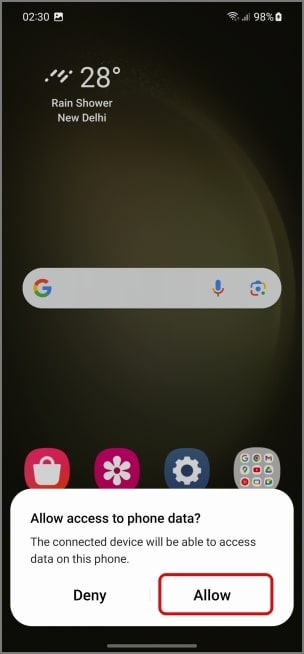
- Tap Allowon your old Android to enable data access.
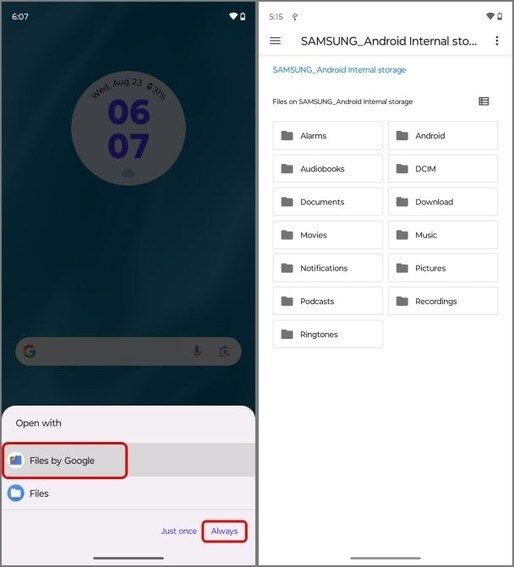
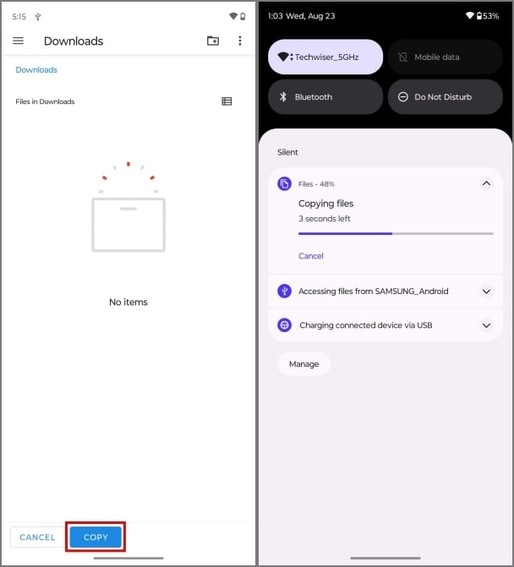
- Choose the desired file manager on your new phone and browse your old Android’s internal storage.
- Choose folders or files to transfer, tap the kebab menufor more options, and select Copy to.
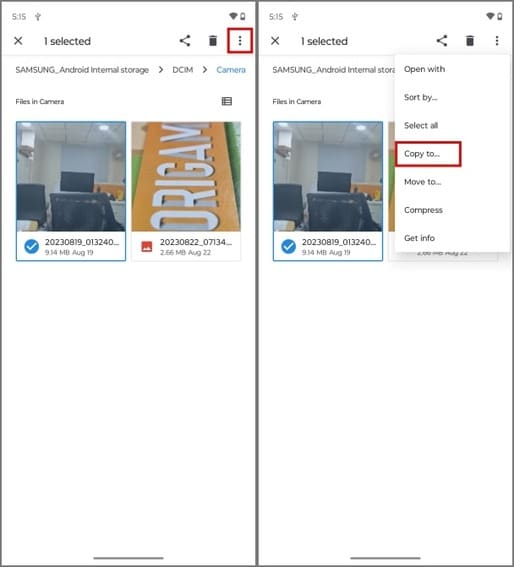
- Pick any location on your Samsung S23 phone (e.g., the Downloadsfolder for quick access) and tap Copy.
Moving data between phones using a USB cable is faster than Bluetooth but offers the same functionality. However, charge your devices beforehand because the data transfer may take a while (if you have many sizable files).
7. Use an SD Card
We can almost see you fumbling with your Samsung S23, looking for an SD or microSD card slot. Newsflash: there isn’t one. Like its predecessors, S21 and S22, the Galaxy S23 series doesn’t support expandable storage.
How can you transfer data from an SD card, then? Well, there’s always your computer. You can migrate your SD card data to your desktop or laptop before moving it to your new Galaxy phone.
It may not be as straightforward as the methods above, but it’s ideal for keeping precious files from your old Android’s SD card. Here’s what to do:
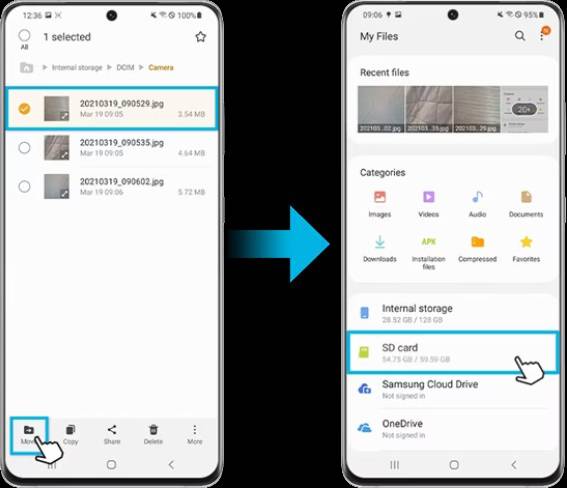
- Select the desired files or folders on your old Android, tap Move, and choose your SD card.
- Connect the Android to your computer with a USB cable.
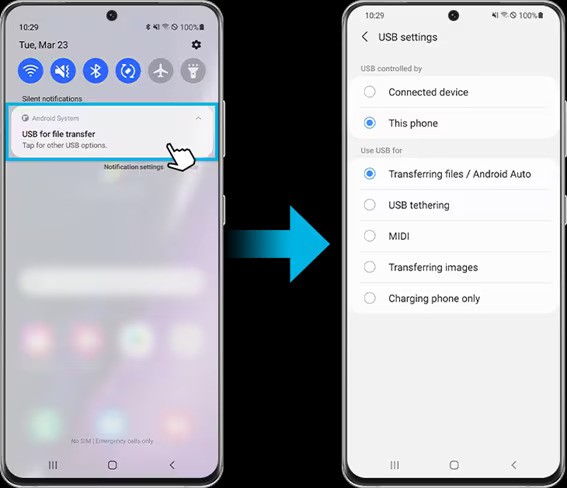
- Tap USB for file transferin the Notification panel and select Transferring files / Android Auto.

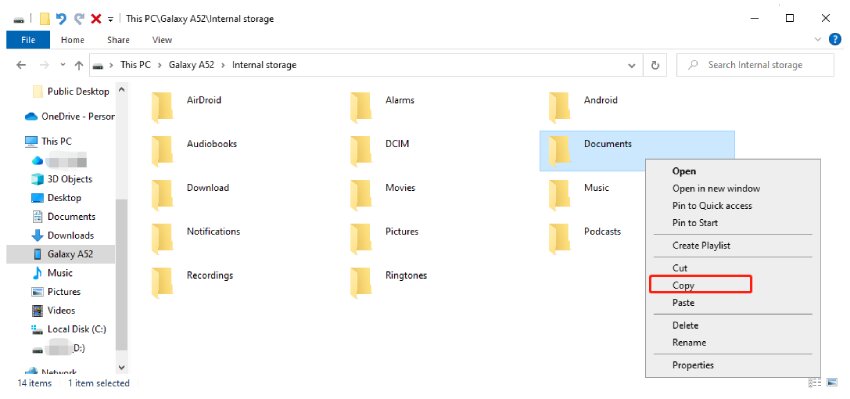
- Go to This PCin File Explorer and open your phone under Devices and drives.
- Right-click the folders or files you wish to move, select Copy, and paste them to any location on your computer.
- Once you move the data, safely disconnect your old Android and connect your Samsung S23 to the PC.
- Go to the folder with your newly saved data and copy-paste it to your Samsung S23.
This method is best for transferring photos, videos, and other files from an SD card you might not use anymore. After all, smartphone manufacturers increasingly ditch SD card slots for sleek, more compact designs.
Conclusion
Switching from Honor Play 7T to Samsung S23 is a breeze because you have many data transfer options. Besides Samsung’s Smart Switch, you can use your synced Google Account, Google Drive, Bluetooth, or a USB-C to USB-C cable. You can also migrate data from your old Android SD card to your computer before transferring it to your new phone.
However, Wondershare Dr.Fone Phone Transfer might be your best option. Besides transferring files, it features many tools for seamless phone management, making it a fantastic addition to your digital toolbox.
How I Transferred Messages from Honor Play 7T to iPhone 12/XS (Max) in Seconds
Recently, I got a new iPhone 12/XS (Max) with so much excitement. But, the one thing that was driving me crazy was how to transfer messages from my old Android device to this iPhone 12/XS (Max), as I have always been an Android phone user till then. So, I was scared to transfer anything to the new iPhone and ruin it. You can have numerous solutions to transfer text messages from Honor Play 7T to iPhone 12/XS (Max) after setup.
Well! If you are in a similar situation as me, then I would recommend you go through this article. I have finally opted to import SMS to iPhone 12/XS (Max) from Android.
2 Apps to Transfer Messages from Honor Play 7T to iPhone 12/XS (Max) without Computer
How to transfer Android messages to iPhone 12/XS (Max) using Move to iOS app
The first method to transfer text messages from Honor Play 7T to iPhone 12/XS (Max) is using the official Move to iOS app from Apple. Message history, call logs, contacts, web bookmarks, apps, etc. can be transferred from your Android to any iOS device. Though, I have noticed the app was acting strangely during data transfer. My Wi-Fi got some issues, and Move to iOS couldn’t properly complete the transfer.
Guide for Move to iOS to transfer messages from Honor Play 7T to iPhone 12/XS (Max)
Download, install, and launch Move to iOS on your Honor Play 7T.
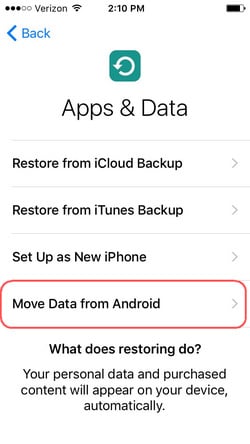
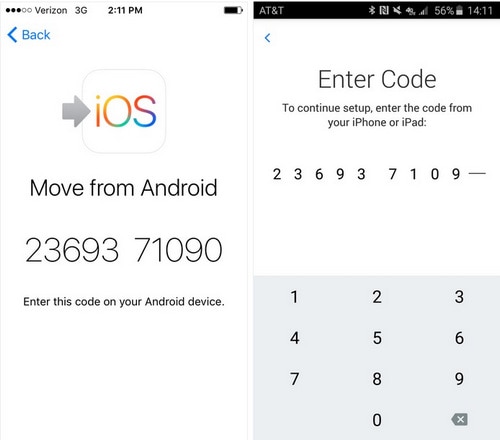
Get the iPhone 12/XS (Max) and configure the setup and then connect to Wi-Fi. Browse to the ‘Apps & Data’ option, click ‘Move Data from Android’ thereafter. Click the ‘Continue’ button and note the passcode.
On your Honor Play 7T, click ‘Continue’ and then press ‘Agree’. When prompted for a passcode, enter the one you got from iPhone 12/XS (Max).
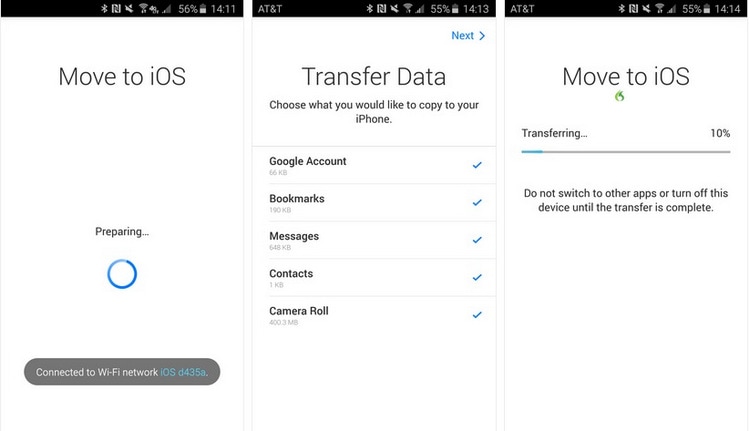
Ensure that the Android phone is also connected to Wi-Fi. Now, click on ‘Messages’ from the ‘Data Transfer’ option. Click ‘Next’ and wait a while to finish the data transfer. Hit the ‘Done’ button afterward once the iPhone 12/XS (Max) gets synched with these messages, set up your iCloud account, and view the messages.
How to transfer Android messages to iPhone 12/XS (Max) using SMS Backup+
You can learn how to transfer messages from Honor Play 7T to iPhone 12/XS (Max) without a computer using the SMS Backup+ app. It can automatically backup the SMS, call logs, MMS using a different label in Google Calendar and Gmail. Remember that MMS can’t be restored later.
Here is how to transfer messages from Honor Play 7T to iPhone 12/XS (Max) with SMS Backup+:
Get the Android phone and sign in to your ‘Gmail account’ and press ‘Settings’. Go to ‘Forwarding and POP/IMAP’. Now, tap ‘Enable IMAP’ and click ‘Save Changes’.
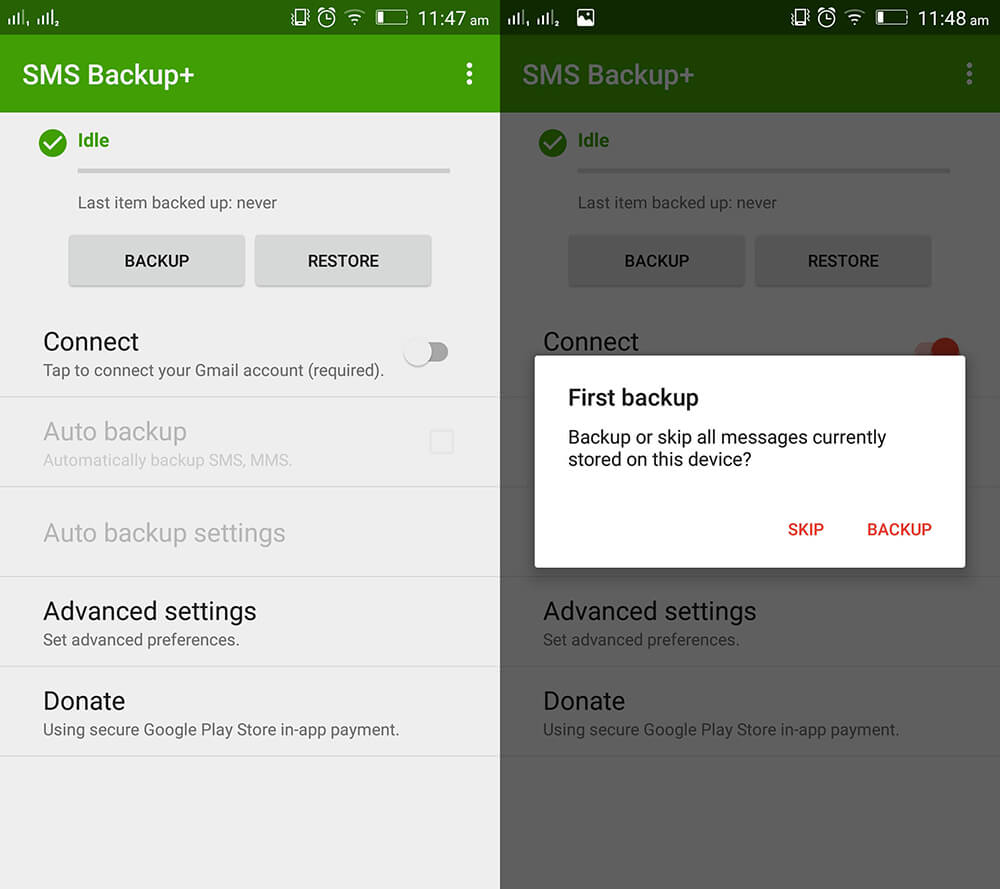
Download SMS Backup+ on your Honor Play 7T from Google Play Store and launch it. Tap ‘Connect’ choose the recently used Gmail account. Now, allow the app to backup the SMS to your Gmail account and hit ‘Backup’.
Now, since you’ve backed up your messages to Gmail, you can simply access and view them from any device. Simply launch Gmail with the same account, and you’ll be able to get hold of all your messages right on your iPhone 12/XS (Max).
Note: The messages will be enclosed in an Email attachment. That implies you won’t be able to import your messages to your iMessage app. If you want to transfer SMS to the default messages app, try Dr.Fone - Phone Transfer. It’s a one-click and reliable desktop software.
2 Methods to Transfer Messages from Honor Play 7T to iPhone 12/XS (Max) with a PC
How to transfer all messages to iPhone 12/XS (Max) at a time
For transferring messages from your Honor Play 7T to iPhone 12/XS (Max), opting for Dr.Fone - Phone Transfer is a great idea. Speak of transferring contacts, photos, music, text messages, etc. from Honor Play 7T to iOS devices or vice versa, it has a proven record of credibility.
This is how to import SMS to iPhone 12/XS (Max) from Android –
Step 1: Download Dr.Fone - Phone Transfer on your PC and then install and launch it. Connect your Android and iPhone 12/XS (Max) using respective USB cables.
Step 2: Hit the ‘Switch’ tab from the Dr.Fone window. Select the Android phone as the source and iPhone 12/XS (Max) as the destination over here. Use the ‘Flip’ button in case you have altered the selection.
Note: Selecting the ‘Clear Data before Copy’ option completely deletes everything from the target.

Step 3: In this section, tap on ‘Messages’ and select the ones you want to selectively transfer. Hit the ‘Start Transfer’ button and then wait a while. Click ‘OK’ once the transfer process is over.
How to transfer only selected messages iPhone 12/XS (Max)
Alternatively, you can opt for Dr.Fone - Phone Manager for selectively transferring messages from your Honor Play 7T to your iPhone. Managing your iPhone is easy with such an effective desktop tool.
Dr.Fone - Phone Manager (iOS)
Quickly and Selectively Transfer Messages from Honor Play 7T to iPhone 12/XS (Max)
- Managing your iPhone data got easier by exporting, delete, and add data with this software.
- It is compatible with the most recent iOS firmware. It requires no internet connectivity to carry out the data transfer.
- When you are looking for a quick transfer of SMS, videos, music, contacts, etc. to your iPhone 12/XS (Max), this tool is a gem.
- The best-known alternative to iTunes to connect your PC and iPhone.
3981454 people have downloaded it
Here comes the guide to import SMS to iPhone 12/XS (Max) from Android selectively:
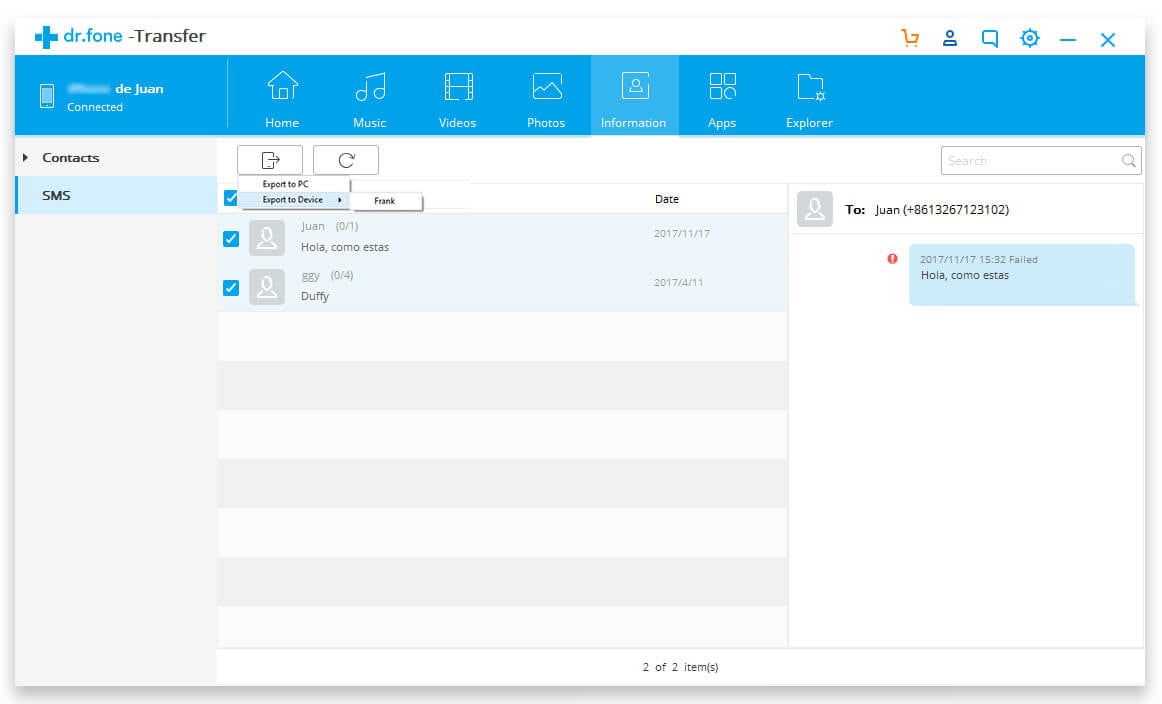
Step 1: Get Dr.Fone - Phone Manager installed and launched on your PC. Now, press the ‘Phone Manager’ tab.
Step 2: Use respective USB cables to connect your Android and iPhone 12/XS (Max) with the computer and then pick Android as the source device. Then, select the ‘Information’ tab displayed on the top.
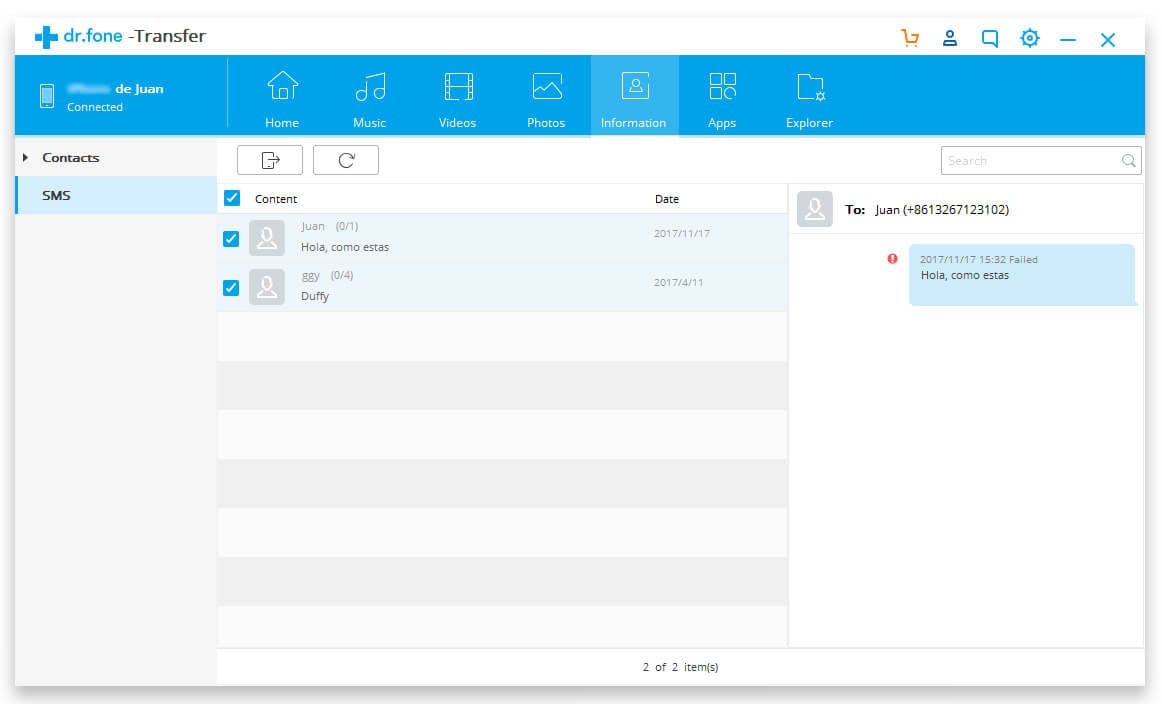
Step 3: From the list of messages, choose the desired text messages and hit the ‘Export’ button. Click the ‘Export to device’ button consecutively and complete the process with the onscreen guide.
Conclusion
I hope, this article brought you answers to your messages and data transfer queries. From my own experience, I found Dr.Fone Toolkit as the most viable option. If you are looking for a solution that leads to no data loss, then you can go for either Dr.Fone - Phone Transfer or Dr.Fone - Phone Manager .
How to Transfer Photos from Honor Play 7T to Laptop Without USB
Moving your photos on a computer comes with lots of benefits. Among them is the larger screen itself, which allows you to inspect the image details in a more thorough manner. Another thing is that the computer also serves as a great backup storage for your dearly cherished photos. You can be sure that the image folders you create in the computer’s local memory are highly secure. Just organize each file with labels to avoid unnecessary confusion. Simply put, our computers have a lot to offer with regard to file organization and data management.
Many people assume that copying your files to a computer is a bit of a hassle. Well, it’s somewhat true unless you’re going to opt for wireless data transfer. Yes. That’s possible. There are many tutorials out there on how to copy files from your phone to your laptop without USB. Simply choose a particular method that works best in your situation.
In this article, we will provide a short guide on how to organize your computer files easily and quickly. We will also list down a few tutorials on how to transfer photos from your phone to your laptop without USB. Continue reading below to learn more.
How to Organize the Photos on Your Computer
While smartphones offer convenience for snapping photos on the go, viewing your pictures is doubtlessly much better on a computer. Why not? Computers apparently have larger screens that increase image quality to another level. However, finding a specific photo in your desktop storage can be a daunting experience if your files are unorganized. Don’t worry. Listed below are some useful organization techniques that can help you a lot in this regard.
Add the Image Folders to the Photos Application
Many operating systems have a built-in Photos application to help you organize and view your pictures more efficiently. You may use it to organize your photos in separate folders and create a centralized hub for browsing.
Add Tags to Your Photos
Tagging your photos is a versatile way to categorize and organize them based on themes, events, or people. Most photo management applications allow you to add descriptive tags that make it easy to search the media files later. This is particularly useful for quickly locating pictures of specific occasions or individuals.
Keep Your Photos in Separate Folders
Make it a habit to create separate folders for different events, locations, or time periods. This organization method helps you maintain a clear structure for your photo collection. For example, you might have folders for vacations, family gatherings, or special occasions. Organizing photos this way simplifies navigation and ensures that each set of pictures is kept properly.
Rename Your Photo
Give your photos descriptive and unique filenames that reflect either their content or context. Organizing your files by their respective labels helps you find them easily instead of relying solely on visual cues. Consider including dates, locations, or key details in the filenames to make your photos easily identifiable.
NOTE: By incorporating these organization techniques, you can surely enjoy your memory collection on the larger canvas of your computer screen. Take advantage of these methods to transform your digital photo library into a well-ordered and easily accessible archive. Moreover, these are prerequisites for the tutorials on how to transfer photos from your phone to your laptop without USB.

How to Transfer Photos From Phone to Laptop Without USB in Easy Steps
Copying photos from smartphones to laptops has become significantly more straightforward today than in the past. In fact, the entire data migration process can be completed within a few minutes. No need to resort to advanced interventions and external assistance. Just choose a particular tutorial below on how to transfer photos from your phone to your laptop without USB. Initiate each step carefully and complete the procedure in no time. Check out the list below to get started.
Method 1: Transfer photos from phone to laptop using iCloud web
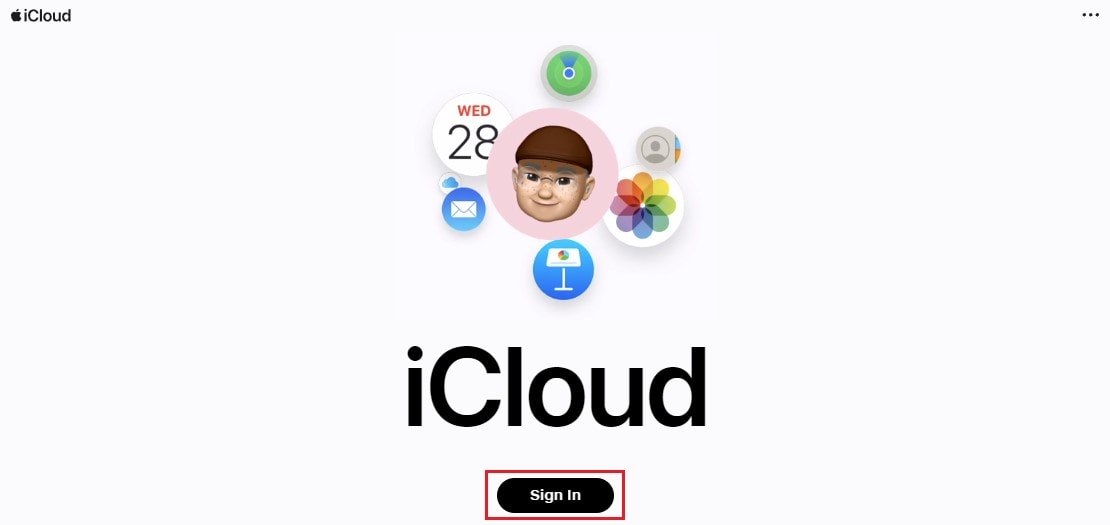
If you’re an Apple user, you can easily transfer photos from your phone to your computer via iCloud. Don’t worry. It’s a very simple data transfer procedure you can definitely complete with little to no effort. Here’s a short guide on how to transfer photos from your phone to your laptop without USB using iCloud.
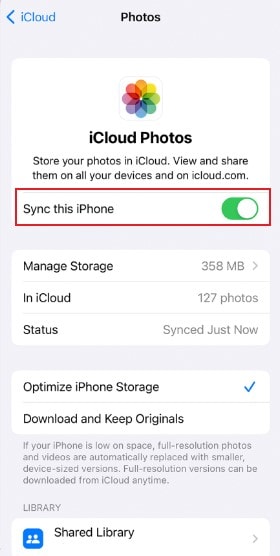
- Step 1: First and foremost, make sure that your iPhone is syncing your photos to iCloud. To check it, go to Settings > Apple ID > iCloud > Photos. Toggle on the radio button next to Sync This iPhone.
- Step 2: On your computer, launch the Browser.
- Step 3: Visit icloud.com. Once it fully loads up, click Sign In. Log in to the Apple ID account you’re currently using on your iPhone.
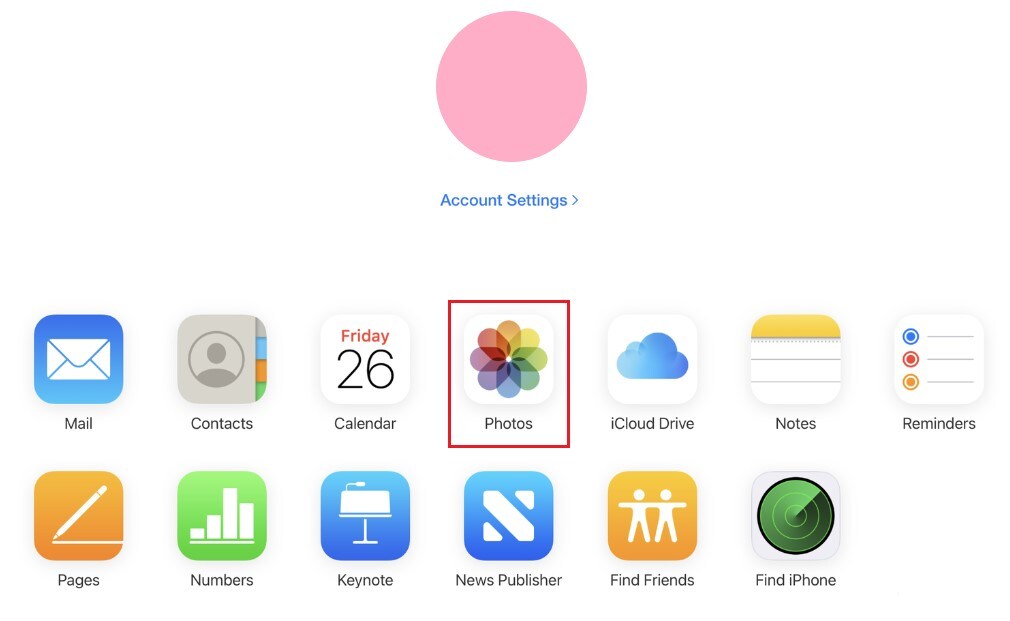
- Step 4: Click on the Photos icon.
- Step 5: Select the photos you want to transfer to your computer. After that, click the Download icon at the top-right corner of your screen.
NOTE: How to transfer videos from your phone to your laptop without USB? This data migration technique also works in this regard.
Method 2: Transfer photos from phone to laptop using Google Photos
Google Photos is simply the iCloud’s substitute for Android smartphone. Like iCloud, you can sync your Android photos to Google Photos and access them from your computer. Don’t worry. It’s very easy to facilitate. Here’s how to transfer photos from your phone to your laptop without USB using Google Photos.
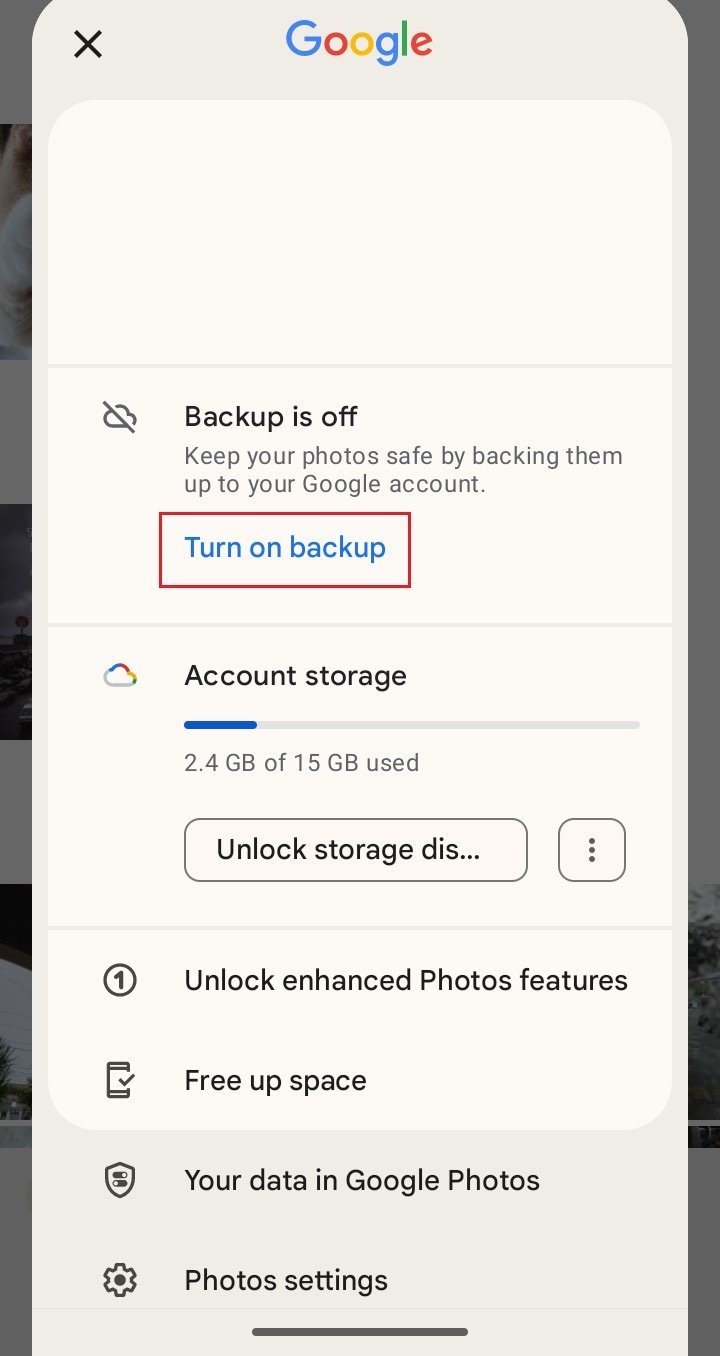
- Step 1: Before anything else, back up your Android smartphone first to Google Photos. Go to Google Photos > Profile icon > Turn On Backup. Once enabled, Google Photos will copy your photos from the local storage to the Google server.
- Step 2: Launch the Browser on your computer. Go to google.com.
- Step 3: Click the Nine-dotted menu icon next to your profile. Make sure that you’re logged in to the same Gmail account you’re currently using on your smartphone.
- Step 4: Choose Photos.

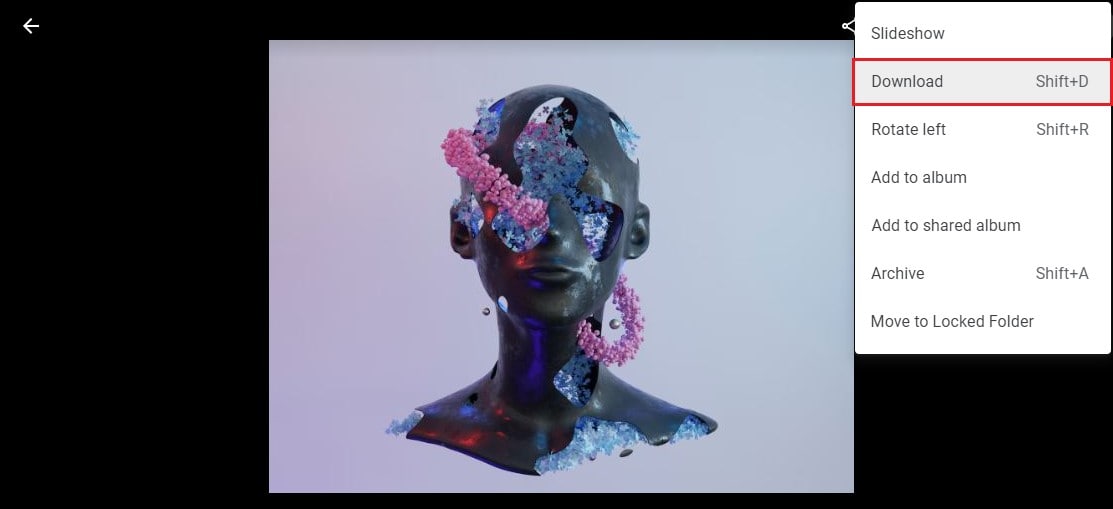
- Step 5: Click the images you want to save on your computer. From there, click the Three-dotted menu icon. Find and click Download or press SHIFT + D on your keyboard.
NOTE: How to transfer videos from your phone to your laptop without USB? This data migration technique also works in this regard.
Method 3: Transfer photos from phone to laptop using Bluetooth
Does your laptop have a Bluetooth connectivity feature? If so, try to use it for the photo transfer. Just connect your smartphone to the computer via Bluetooth and go ahead with the migration. Here’s a short guide on how to transfer photos from your phone to your laptop without USB via Bluetooth.
- Step 1: Turn on the Bluetooth connection on your smartphone and your computer.
- Step 2: On your smartphone, select the photos you want to transfer. Click on it.
- Step 3: Click Share.
- Step 4: Click Bluetooth. Select your computer from the list. Then, click on it. Wait for the transfer to be completed in a few seconds.
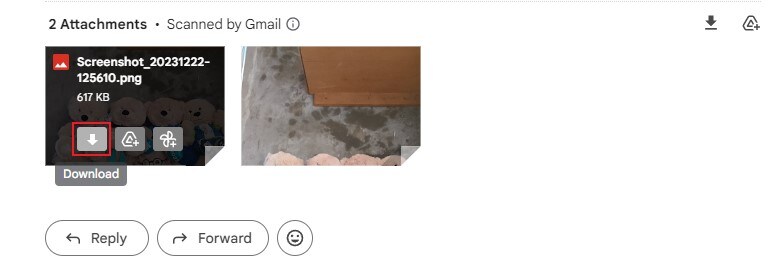
Method 4: Email the photos from the phone to the laptop
If you’re only sending a few photos to your laptop, emailing them from your smartphone will certainly work great. Here’s how to transfer photos from your phone to your laptop without USB via email.
- Step 1: Launch the Gmail application on your smartphone. From there, click Compose.
- Step 2: Key in the recipient’s email address to the To field. Make sure that it is currently logged in to the browser on your computer.
- Step 3: Click the Attachment icon on the top-right corner of your screen. After that, choose the photos you want to transfer.
- Step 4: Click the Send button.
- Step 5: On your computer, launch the browser and sign in to the Gmail account delegated as the receiver of the transfer.
- Step 6: Find and click the Email to view them. From there, hover the mouse cursor over the photo attachment you want to download. Lastly, click the Download icon.
NOTE: How to copy files from your phone to your laptop without USB? This data migration technique also works in this regard.
Method 5: Transfer photos from phone to laptop using AirDrop
Are you using an iPhone and a Macbook? No problem. You may use AirDrop to move your photos between these two devices. Here’s a short guide on how to transfer photos from your phone to your computer without USB via AirDrop.
- Step 1: Activate AirDrop on your iPhone and Macbook.
- Step 2: On your iPhone, go to the Photos application.
- Step 3: Choose the media files you want to transfer. After that, click the Share icon at the bottom-left corner of your screen.
- Step 4: Choose AirDrop.
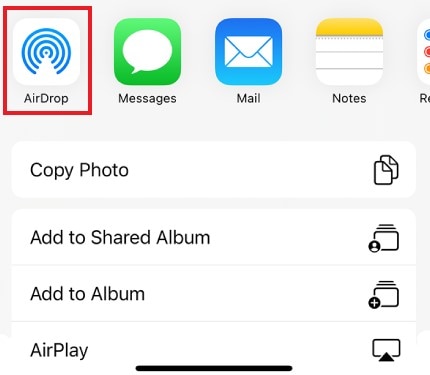
- Step 5: Select your Macbook as the recipient.
- Step 6: On your Macbook, click Accept.
BONUS TIP: How to Copy Files From One Smartphone to Another?
As a bonus, it is important to know that transferring files from one device to another in a secure environment is significant. It safely copies the documents and lowers the risk of data loss and corruption.
With the holidays fast approaching and the abundance of noteworthy photos, videos, and moments coming your way, having a steadfast solution is crucial. This is where Wondershare brings a compact yet efficient tool to help you. Wondershare Dr.Fone lets you quickly transfer photos and files to another mobile device in no time. To back this up, here is a quick, comprehensive guide on how to do it in a few simple steps.
Suppose you’re upgrading to an IOS device and need a quick way to transfer files from your old Android device. Then here’s your go-to guide using Wondershare Dr.Fone.
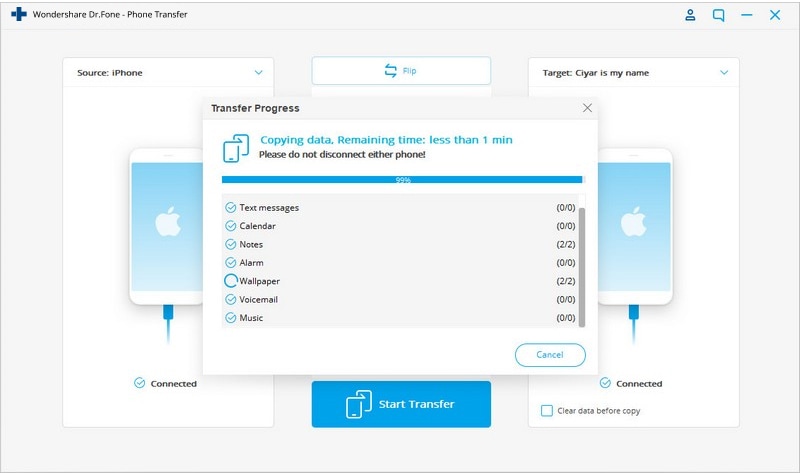
- Step 1: Open Wondershare Dr.Fone on your computer and navigate to the Toolbox section. Select the Phone Transfer tool.
- Step 2: Once opened, set the Source and Destination devices for the data transfer. Use the Flip button to change the transfer direction between the Honor Play 7T devices.

- Step 3: Set the transfer direction from Honor Play 7T to iOS. Select the specific data types you want to transfer. Checkmark the desired items and click Start Transfer.

- Step 4: A new window will show the progress of the transfer. If you want to stop the operation, click Cancel.

- Step 5: Once completed, click OK to close the window.

Conclusion
Navigating the digital landscape of photo organization and transfer has become increasingly vital in our fast-paced era. This article showcased various wireless methods, from iCloud to Bluetooth, and offered a step-by-step guide on how to transfer photos from phone to laptop without USB cables. As a valuable bonus, Wondershare Dr.Fone emerges as a trustworthy solution for efficiently transferring photos and files between mobile devices, ensuring a hassle-free experience. As we approach the holiday season, where memories are plentiful, having a reliable tool like Wondershare Dr.Fone can enhance the management of our digital archives, making it easier to cherish and share moments with friends and family.
- Title: In 2024, How to Transfer Data After Switching From Honor Play 7T to Latest Samsung | Dr.fone
- Author: Emma
- Created at : 2024-07-18 00:19:41
- Updated at : 2024-07-19 00:19:41
- Link: https://android-transfer.techidaily.com/in-2024-how-to-transfer-data-after-switching-from-honor-play-7t-to-latest-samsung-drfone-by-drfone-transfer-from-android-transfer-from-android/
- License: This work is licensed under CC BY-NC-SA 4.0.