
In 2024, How to Transfer Data from Vivo V30 to Any iOS Devices | Dr.fone
How to Transfer Data from Vivo V30 to Any iOS Devices

If you are a proud owner of smartphones running on two different operating systems such as Windows and iOS, you might face the challenging task of transferring the data from your Windows phone to iPhone. Transferring the data between the two devices running the OS of the different platforms is not as easy as it is when you have devices with a common platform. This article aims to guide you through two simple routes that you can follow to transfer the data stored in your Windows phone such as Vivo V30 to iPhone or other iOS devices. You don’t need to worry about how to transfer from Vivo V30 to iPhone or How to transfer contacts from Vivo V30 to iPhone anymore after reading this article. Read them on.
- 1. You can rely on some program/online service/website such as Outlook, CSV file format, Google Contacts, etc.
- 2. You may experience issues while transferring data from your Vivo V30 phone to iPhone.
Part 1: Transfer Data Wirelessly via Microsoft ID
Windows phones such as Vivo V30 depend on a Microsoft ID to back up your important data such as contacts, text messages, calendar, and device preferences. Once you have configured the data on your Vivo V30 smartphone, you can add the same Microsoft email address to your iPhone and then sync the data to it. Given below are the step-by-step instructions on how to transfer from Vivo V30 to iPhone via Microsoft ID:
Step 1: Make an account on Outlook.com.
1. Open www.outlook.com on the web browser on your smartphone or PC.
2. Once you are redirected to the website, tap the “Sign up” option from the top-right corner.
3. Enter the required information in the available fields to create an account.
Step 2: Sync the data on your Vivo V30 to Microsoft’s Outlook.com account.
1. Switch on your Vivo V30 smartphone.
2. Scroll through the Home screen to find the “Settings” option.
3. Once located, tap the “Settings” option to open it.
4. On the “Settings” window, locate and tap the “email+accounts” option to open it.
5. From the opened window, tap the “add an account” option.
6. After the “ADD AN ACCOUNT” window opens, tap “Outlook.com” from the available options.
7. Tap the connect button from the bottom-left corner of the OUTLOOK.COM window.
8. Once you are redirected to the outlook.com website, in the available fields, enter the credentials of your Microsoft account that you created earlier.
9. Tap the “Log in” button when done.
10. Wait till the data on your Vivo V30 automatically gets synchronized with your Outlook account.
Step 3: Import the data from your Outlook account to the iPhone.
1. Switch on your iPhone and scroll through the Home screen to locate the “Settings” option.
Note: Make sure your device is connected to the Internet.
2. Once located, tap to launch the “Settings” app.
3. On the opened “Settings” window, tap the “Mail, Contacts, Calendars” option.
4. After the “Mail, Contacts, Calendars” window opens, tap the “Add Account” Add Account option under the “ACCOUNTS” section.
5. From the available options, tap “Step two”Outlook.com.
6. Once the “Outlook” window opens, enter your Outlook account credentials, and tap “Next” from the top-right corner.
7. Wait till your device verifies your account.
8. Once your account details are verified and a list of transferrable data types is displayed on the screen, tap to slide the switch to the right for the data that you want to import.
Note: After you slide the switch to transfer the Contacts, iPhone provides you with an option to keep the contacts that are already stored in your device or delete them altogether before importing the new ones from your Outlook account. You can choose any option as per your requirement.
9. Once you have selected the data that you want to import, tap the “Save” button from the top-right corner.
10. Wait till the data gets imported to your iPhone.
Pros:
- You can transfer your data for free using this method and the only requirement is Internet connectivity.
- You are saved from downloading a third-party application to transfer your data.
- You can easily transfer the data wirelessly without the need to make your PC as a go-between
Cons:
- It is a time-consuming process.
- You cannot transfer photos and media files by following this method.
Part 2: Transfer Data Using PhoneCopy
With PhoneCopy you can easily export data from your Vivo V30 to the PhoneCopy server, and then import the data from the PhoneCopy server to your new iOS device. It is easy to transfer contacts from Vivo V30 to iPhone with PhoneCopy. What you need is PhoneCopy iPhone Vivo V30.
In order to do so, you need:
A registered PhoneCopy account.
1. On your computer, open any web browser of your choice and go to https://www.phonecopy.com/en/ .
Note: Make sure your device is connected to the Internet.
2. From the right section of the opened web page, click “REGISTER NOW.”
3. On the “REGISTRATION” page, populate the available fields with the correct values and click “CONTINUE” from the bottom.
4. Follow the on-screen instructions thereafter to complete the account creation process.
Note: You may need to activate your account using the confirmation mail that you would receive while completing the account creation process.
The PhoneCopy app on your Windows phone.
1. Power on your Vivo V30 smartphone.
Note: Make sure that the phone is connected to the Internet.
2. From the Home screen, locate and tap the Store icon to open the Windows App Store.
Note: You must use your Microsoft account to sign in to Windows Store before the phone allows you to download the apps.
3. Once you are on the “store” interface, search for and tap the “PhoneCopy” app
4. On the next window that appears, tap “Install” pato install PhoneCopy on your Windows phone.
After you have successfully installed PhoneCopy on your Vivo V30, it is now time to export all your contacts to the PhoneCopy server. You can do so by following the steps given below:
Step 1: Export data to the PhoneCopy server.
1. On your Windows phone, locate and tap to launch the “PhoneCopy” app.
2. On the displayed interface, in the available fields provide your PhoneCopy account credentials (username and password) that you used to create your PhoneCopy account earlier.
3. Once done, tap the”Export to phonecopy.com” button and wait till all your contacts are exported to the PhoneCopy server.
Step 2: Import data to the iPhone from the PhoneCopy server.
1. Power on your iPhone.
Note: Make sure that your phone is connected to the Internet.
2. From the Home screen, locate and tap the Apple App Store icon.
Note: Ensure that you are signed in to the App Store using your Apple ID.
3. Search for, locate, download, and install the “PhoneCopy” app on your iPhone
4. Once installed, tap the “PhoneCopy” icon on your iOS device to launch the program.
5. When asked for, provide the same PhoneCopy credentials that you used to export the data from your Vivo V30 phone in the previous step.
6. After you are signed in to your PhoneCopy account on your iPhone, click the “Synchronize” button to import all the data from the PhoneCopy server to your new iPhone.
Although PhoneCopy does a great job when it comes to transferring data between the phones from different platforms, the app comes with a few pros and cons which include:
Pros:
Registering and using PhoneCopy is free.
PhoneCopy can back up your calendar events, SMS, tasks, and notes and can help you import them on a different phone (typically on iPhone).
Cons:
Only up to 500 contacts, SMS, tasks, and notes can be synched while using the Basic version (free account) of PhoneCopy. To remove this restriction, you must buy the Premium version for which PhoneCopy charges $25 annually.
The archived data is auto-deleted from the PhoneCopy server after one month when using the Basic version, and after 1 year when using the Premium version.
Bonus Tip: Best Way to Transfer data between Android and iPhone
Dr.Fone - Phone Transfer lets you transfer data from Vivo V30 to iPhone or iPhone to Android in 1 Click. It supports almost all mobiles, including iPhone, Android Samsung, LG, Sony, HTC, etc. Dr.Fone - Phone Transfer can transfer music, videos, contacts, messages, call logs, and apps between mobiles. If you want to transfer data between Android and iPhone, it must be the best solution for you. Try it free. Follow the steps below to know how to transfer data between Android and iPhone.
Dr.Fone - Phone Transfer
Transfer Data between Android and iPhone in One Click.
- 1 CLick to transfer contacts from Vivo V30 to iPhone.
- Easily transfer photos, videos, calendar, contacts, messages, and music from Vivo V30 to iPhone/iPad.
- Works perfectly with Apple, Samsung, HTC, LG, Sony, Google, HUAWEI, Motorola, ZTE, Nokia, and more smartphones and tablets.
- Fully compatible with major providers like AT&T, Verizon, Sprint, and T-Mobile.
- Supports iPhone, iPad, iPod touch and the latest iOS version.
- Fully compatible with the latest Windows or Mac version.
3981454 people have downloaded it
Note: If you have no computer at hand, you can also get the Dr.Fone - Phone Transfer (mobile version) from Google Play, with which you could log into your iCloud account to download the data, or transfer from iPhone to Vivo V30 using an iPhone-to-Android adapter.
Step 1. Download Dr.Fone - Phone Transfer to transfer from Vivo V30 to iPhone
Launch Dr.Fone. You will see “Phone Transfer”. Click it.

Step 2. Connect Phones and select files
Connect your Android and iPhone. Dr.Fone will detect it soon. Then select the files and click Start Transfer. It can transfer almost all files, contacts, apps, messages, photos, music, videos, etc. If you just want to transfer contacts from Vivo V30 to iPhone, then it is also ok. Just check the Contacts option to transfer contacts from Vivo V30 to iPhone easily.
Conclusion
Regardless of the fact that many free solutions are there that can help you transfer data from your Vivo V30 to iPhone. If you also have an Android device, the Dr.Fone - Phone Transfer always has an upper hand when it comes to providing hassle-free migration between iPhone and Android devices.
Tips of Transferring Messages from Vivo V30 to iPhone 14/15
Are you switching your phone to the latest iPhone 14 or 15 and wondering how to transfer your important text messages from your Vivo V30? Unlike transferring photos, moving texts poses a unique challenge as the options available are relatively limited.
Transferring your messages allows you to keep your important messages intact, preserving cherished conversations and important information. Be it a heartfelt message from a loved one or crucial details in a business conversation, some of your text messages must hold significant sentimental and practical value.
This article will guide you through effective and easy methods to transfer texts from Vivo V30 to iPhone. Let’s explore together the best ways to transfer texts and overcome the hurdles that come with this process.
When it comes to seamlessly transferring SMS from Vivo V30 to iPhone, Apple’s official app, “Move to iOS,” can be a reliable and straightforward solution. This app is designed to streamline the transfer process, allowing you to move not only your text messages but also other essential data to your iPhone.
To use this Move to iOS app, you need to download it from the Google Play Store first on your Vivo V30. Then, follow the steps to transfer SMS from Vivo V30 to iPhone here:
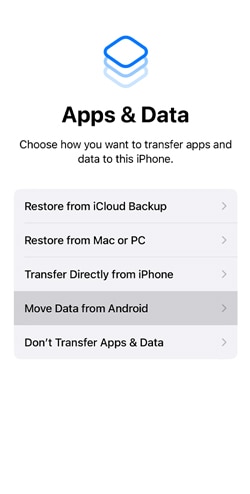
- Step 1: Setup your iPhone. Power up your new iPhone 14 or 15 and progress through the initial setup until you reach the “Apps & Data” screen. At this point, select the option that reads “Move Data from Android.”
- Step 2: Agree to Terms and Conditions. Open Move to iOS on your Vivo V30. Then, review and tap “Agree” to Terms and Conditions to proceed.
- Step 3: Enter the Code. On your Vivo V30, a screen will appear, requesting a 6–10-digit code. This code will be generated on your iPhone. Enter the displayed code on your Vivo V30 to make a secure connection between the two devices.
- Step 4: Select Content to Transfer. With the Vivo V30 devices now connected, you can choose the types of content you wish to transfer. Select “Text Messages” and any other data you want to move to your new iPhone. Tap “Continue” to initiate the transfer process.
**Tip:**Keep your devices close to each other and connected to power until the transfer process is completed.
- Step 5: Once the transfer is complete, you will be prompted to finish setting up your iPhone. Follow the instructions to complete the setup process, and you’re done.
How To Move Text Messages From Vivo V30 to iPhone Quickly with Computer
If you’re looking for a swift and reliable way to move text messages from Vivo V30 to iPhone, third-party software like Wondershare Dr.Fone can be the perfect go-to solution.
Packed with a user-friendly interface, this software streamlines the process, ensuring a quick and efficient transfer of your messages through its Phone Transfer feature. Dr.Fone Phone Transfer supports seamless data transfer between Android and iOS devices and vice versa. It also regularly updates so that compatibility won’t be an issue.
How to transfer texts from Vivo V30 to iPhone with Dr.Fone
- Step 1: Open Wondershare Dr.Fone from its official website , and find the phone transfer tool.
.
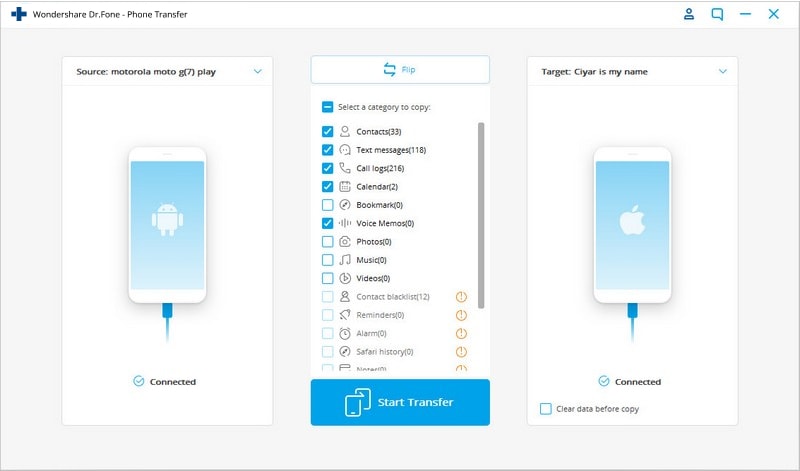
- Step 2: Specify the source and destination devices. After connecting to your devices, Dr.Fone will identify the connected devices and load their data onto the platform. Choose your Android as the Source device and your iPhone as the Destination device to set the transfer path. Use the Flip button if necessary to alter the transfer direction.

- Step 3: Choose text messages as data types for transfer. Proceed to select the types of data you wish to transfer. Checkmark the text messages category and click the Start Transfer button. If you want to remove existing data from the destination device, you can select “Clear data before copy.”

- Step 4: Monitor music transfer progress. The progress of the data transfer will be displayed in a pop-up window. Once completed, click OK to conclude the process.

Troubleshoot Why I Can’t Transfer Texts from Vivo V30 to iPhone
Even with the reliable methods mentioned earlier, there may be instances where you encounter difficulties in transferring texts from your Android to your iPhone. Don’t worry; we’ve got you covered with solutions to common issues that might hinder a smooth transfer.
- 1. Interrupted transfer
The transfer process may be interrupted if you use other apps, receive a phone call, or navigate away from the transfer screen on your Vivo V30 before it completes. So, make sure that both devices are left undisturbed until the transfer process is complete.
If you navigate away from the “Move to iOS” app on your Android or receive a phone call during the transfer, it may disrupt the process. Restart the transfer and keep both devices active until completion.
- 2. Problems with Wi-Fi connection
Wi-Fi connection issues on the Android device can hinder the transfer process. This may be caused by apps or settings affecting Wi-Fi, such as Sprint Connections Optimizer or the Smart Network Switch.
To address it, you can turn off apps or settings that might affect Wi-Fi on your Vivo V30, forget known Wi-Fi networks, and retry the transfer. It’s important to maintain a stable Wi-Fi connection on both devices throughout the transfer.
- 3. Partial content transfer or iOS device full message
Users may encounter situations where only some content is transferred, or the iOS device appears full despite an incomplete transfer. This can lead to potential data loss.
For this issue, you can consider erasing your iOS device and starting the transfer again. Make sure that the available space on your iPhone accommodates the Android content. Delete unnecessary data or apps on your iPhone to free up space if needed.
Bonus: How to Back Up Messages with Google Drive
In addition to seamless transfers between devices, backing up your text messages becomes equally important. Fortunately, Google Drive offers a convenient solution by allowing you to back up your messages with ease. Turning on backup on Google Drive ensures that your valuable SMS history remains safe and accessible whenever you need it.
- Step 1: Open your Vivo V30’s Settings. Start by opening your Android “Settings” and navigate to the “System,” “System & Updates,” or “About phone” section.
- Step 2: Select “Backup” or “Backup & Restore”. Within the “System” settings, look for the “Backup” or “Backup & Restore” option. Tap to access the backup settings for your device.
- Step 3: Choose a Google account. Under the backup settings, you’ll find the option to select the Google account to which you want to back up your data. Make sure that you are signed in with the Google account you want to use for the backup.
- Step 4: Turn on backup. Your phone will show you that turning on backup will include backing up your text messages. Tap “Turn on” to proceed with the backup.

Conclusion
Switching phones to the latest model is an exciting occurrence. However, the challenge of transferring crucial data, especially text messages, from an Android to a new iPhone can be challenging.
Fortunately, armed with the insights from this article, we’ve delved into two effective methods for seamlessly transferring text messages: using Apple’s official “Move to iOS” app and leveraging third-party software like Wondershare Dr.Fone. With these methods, you can bid farewell to any complications associated with message transfers.
5 Ways to Transfer Music from Vivo V30 to Other Android Devices Easily
There can be many reasons to transfer music from Vivo V30 to Other Android Devices, such as the change of the Vivo V30 device since you bought a new one or want to keep music readily available on multiple devices. Therefore, if you face a dilemma over how to transfer music from one Android device to another, this is the right article for you.
So, keep reading to know about five different ways that will help you transfer your music files easily.
Part 1: How to transfer music from Vivo V30 to Other Android Devices in 1 click?
The transfer of all music files from one Android phone to another with a single click of the mouse has never been easier. The switch feature on Dr.Fone - Phone Transfer program has made this action a lot simpler and even faster to transfer music from Vivo V30 to Other Android Devices. It can also transfer other file formats such as other multimedia files, contacts, text messages, call logs, including apps and app data files.
Dr.Fone - Phone Transfer
Transfer Music from Vivo V30 to Other Android Devices in 1 Click Directly!
- Easily transfer every type of data from Vivo V30 to Other Android Devices, including apps, music, videos, photos, contacts, messages, apps data, call logs, etc.
- Works directly and transfer data between two cross-operating system devices in real-time.
- Works perfectly with Apple, Samsung, HTC, LG, Sony, Google, HUAWEI, Motorola, ZTE, Nokia, and more smartphones and tablets.
- Fully compatible with major providers like AT&T, Verizon, Sprint, and T-Mobile.
- Fully compatible with iOS 16 and Android 13
- Fully compatible with the latest Windows or Mac version.
3981454 people have downloaded it
Here are the few simple steps required to be carefully followed to transfer music from Vivo V30 to Other Android Devices.
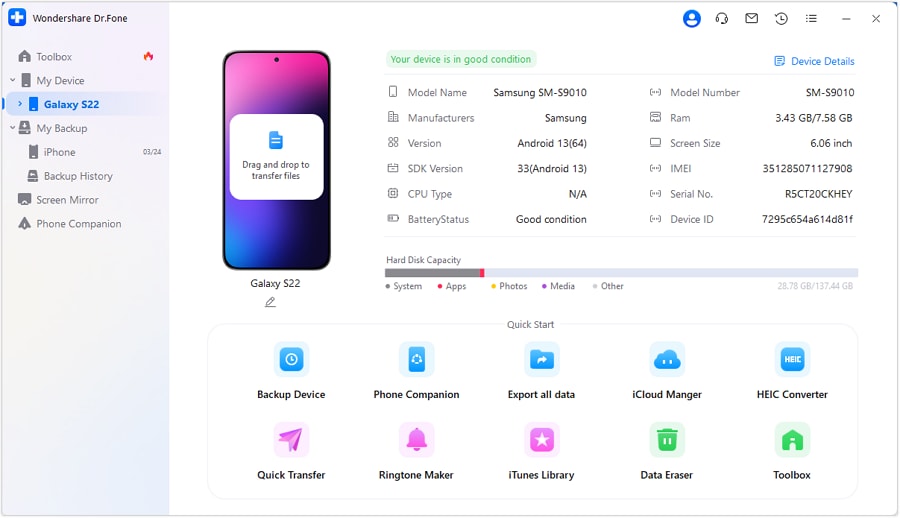
Step 1. The first step is to download the Dr.Fone software from its official website and then run the installer wizard. Once the installation is complete, launch the program.
Step 2. Now, connect both the Android phones via a good USB cable to the PC. Thereafter, go to the Dr.Fone program’s main interface and click on the “Switch” button. You will see the two devices connected with the Source device on the left and the Destination device on the right on the next screen.
If you want the Source device to be the Destination device, click on the “Flip” button at the center of the screen.

Step 3. You can now select the files to be transferred by checking the corresponding boxes. In this case, check the Music box and then click on “Start Transfer” to transfer music from Vivo V30 to Other Android Devices.

You should now see your music files being transferred with the overall progress displayed on a dialogue box.
There you go; within a few seconds, your music files will be transferred successfully.
Part 2. How to Transfer Music from Vivo V30 to Other Android Devices Selectively?
Another way to transfer music from Vivo V30 to Other Android Devices is by using the transfer feature on Dr.Fone - Phone Manager (Android) . As the name implies, this feature can be used to transfer files from one Android device to another by selecting the particular music file one by one instead of choosing an entire music file.
Dr.Fone - Phone Manager (Android)
Transfer Android Media to Android Devices Selectively
- Transfer files between Android and iOS, including contacts, photos, music, SMS, and more.
- Manage, export/import your music, photos, videos, contacts, SMS, Apps, etc.
- Transfer iTunes to Android (vice versa).
- Manage your iOS/Android device on the computer.
- Fully compatible with the latest iOS and Android version.
3981454 people have downloaded it
Here are a few easy steps to follow on how to transfer music from Vivo V30 to Other Android Devices.
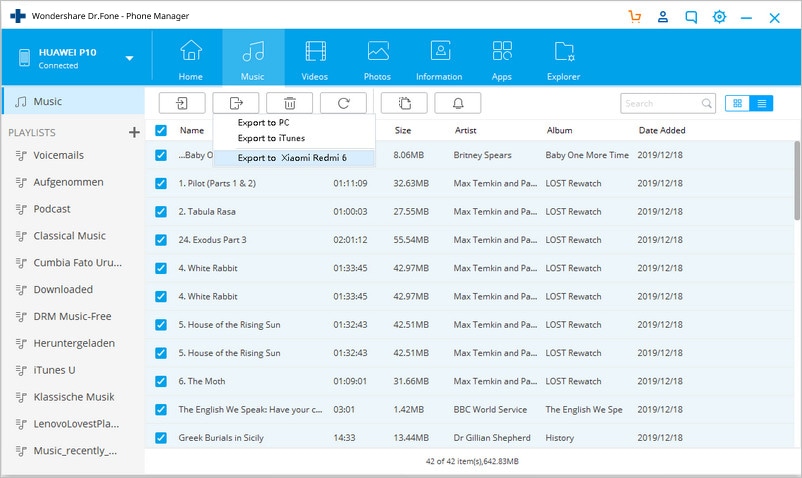
Step 1: After installing Dr.Fone software on your computer and launching it, connect the Android device via USB cable. Now click on the “Music” tab at the top of the screen amongst the other listed options. The program would immediately recognize your device.
Step 2. The moment all the audio files or music files on the connected device are displayed on the Dr.Fone software screen. You can scroll down and select each file you wish to copy or select an entire folder from the left side pane.
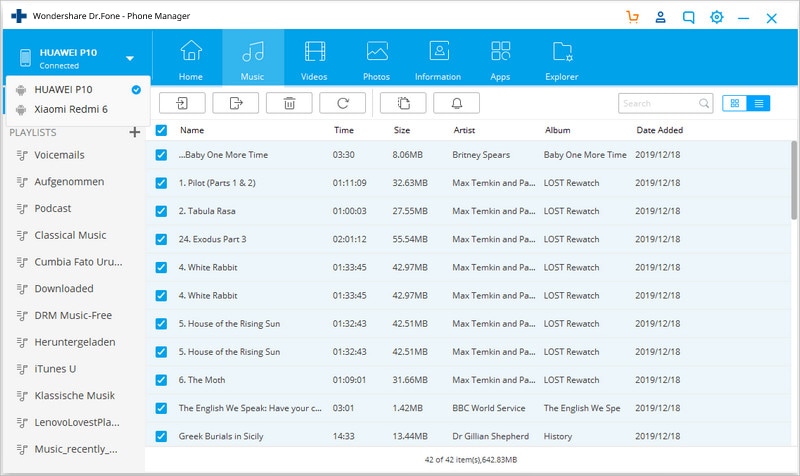
Step 3. After selecting the music files, you wish to copy, click on the “Export” button on the app and then select “Export to Device”. You will see the other device connected; there, click on the Vivo V30 device’s name to begin the transfer process.
Part 3. How to transfer music from Vivo V30 to Other Android Devices using Bluetooth?
Bluetooth transfer is one of the oldest methods that can be used to transfer music from Vivo V30 to Other Android Devices, and it is a simple way to make use of it.
Here are the steps to follow to know how to transfer music from Vivo V30 to Other Android Devices.
Step 1. There are two ways you can turn on Bluetooth on your Vivo V30
Method 1: The first method is to swipe from top to down on your Vivo V30 to view the swipe menu on some Android OS. You would be able to view and immediately turn on Bluetooth with a single click.
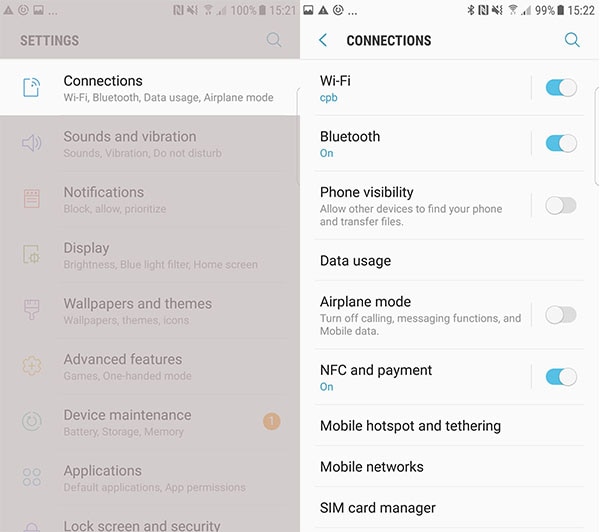
Method 2: Go to “Connection” from the Settings Menu on your Vivo V30, and then in the Connections options, you will see “Bluetooth”. Make sure it is switched on. Also, ensure that the phone’s Bluetooth visibility is enabled so that your device can be seen and easily paired with the other device.
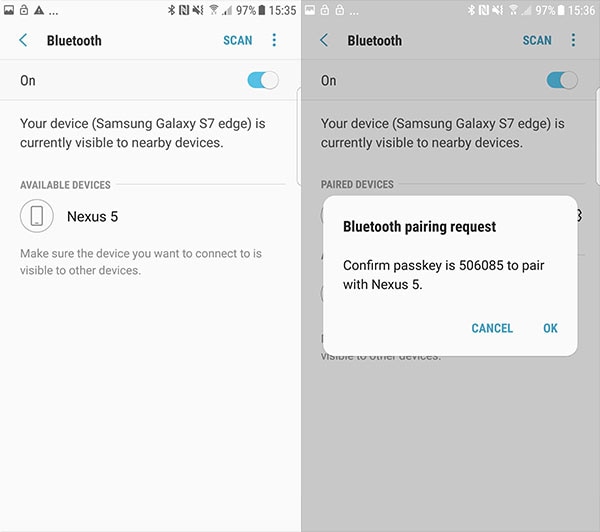
Step 2. Now, switch on the Bluetooth for the destination device as well. Once done, search for your device’s Bluetooth name on the phone and click to pair both Bluetooth devices together.
Mostly, you will be provided with a pair confirmation code that will be displayed on both devices. Click OK to pair both devices successfully.
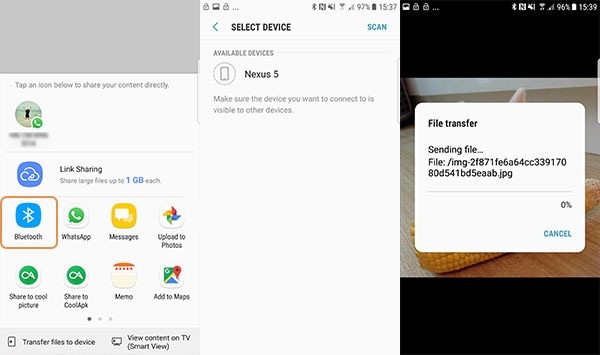
Step 3. The final step is to head to the File Manager app on your phone or go to your Music Player, select the music file you wish to transfer, and then click on your device’s Share button or logo.
Here, scroll until you see the “Bluetooth” option. You will be immediately prompted to select the Vivo V30 device to share with, click the earlier paired device name, and then click on “Accept” on the other device.
This is how you can transfer music files from Vivo V30 to Other Android Devices using Bluetooth.
Part 4. How to transfer music from Vivo V30 to Other Android Devices using NFC?
NFC or Near Field Communication is another wireless means to transfer music from Vivo V30 to Other Android Devices. Although, unlike Bluetooth, this method requires contact between the two devices making the transfer.
Below are the steps on how to transfer music from Vivo V30 to Other Android Devices using NFC.
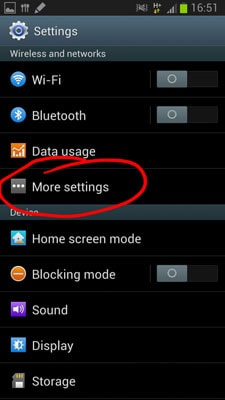
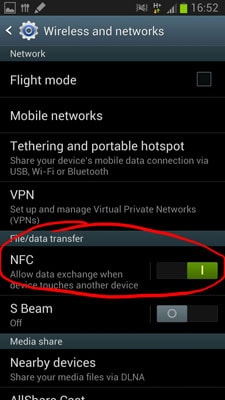
Step 1. First, enable NFC connection on both the Vivo V30 devices between which you want to transfer the music files. To switch on NFC on Android, go to Phone’s “Settings” and click on “More Settings” under “Wireless and Network” options. Now click on the NFC button to ensure that it is switched On. Do the same on the other Android device as well.
Step 2. Before you begin to transfer, you need to touch the back of both devices (whose NFC has already been turned on), you will notice that both devices vibrate upon a successful connection. This means you can now start transferring your music files.
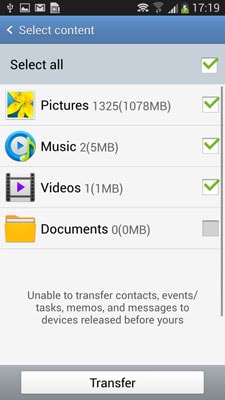
Step 3. After connecting both the Vivo V30 devices, you will be provided with media options of files that can be transferred. In this case, select the Music files and then click on “Transfer” to send the music files via NFC.
Part 5. How to transfer music from Vivo V30 to Other Android Devices using Google Play Music?
Google Play Music is a free Music streaming service provided by Google and available for all users with a Google account. Follow these steps to transfer music files to an Android phone using Google play.
Note: You need a Google account to be able to make use of this service
Step 1. Open Google Play Music on your computer and sign in with your already existing Google account details (Same as on 1st Android Device).
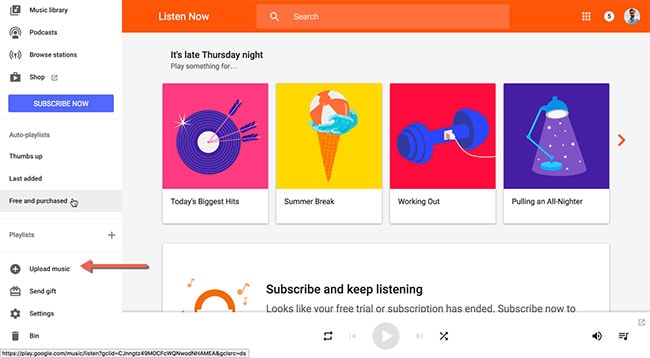
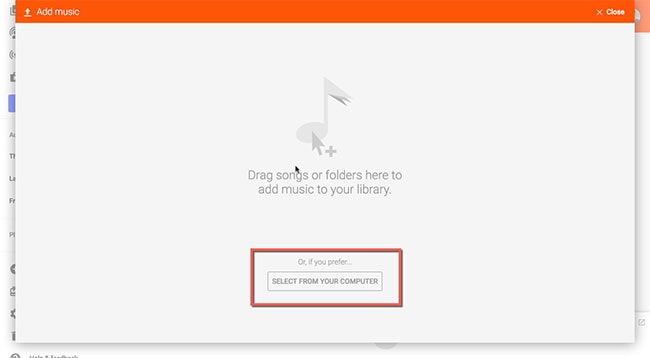
Step 2. You can now upload music files by clicking on the Upload button at the left corner of the screen to view the main Panel of the page. At the bottom of the page, click on “Select From Your Computer” to upload music files from your computer to Google Play.
Step 3. After the upload has been completed, download the “Google Play Music” app on your other Android phone and then log in to the app with the same Google credentials. You will see all the recently uploaded tracks on your Google Play account. You can now stream or download them easily.
At last, we hope that you now know how to transfer music from Vivo V30 to Other Android Devices devices safely and securely through the above article. In fact, you have got two very good options to perform the transfer in the form of Dr.Fone - Phone Transfer and Dr.Fone - Phone Manager (Android) . Well, choose the most convenient one for you and make sure that you proceed with the guided steps mentioned for each way.
Also read:
- [New] 2024 Approved Evaluating VLC for Screen Recordings
- [New] Monetization Timeline for Successful YouTubers
- [New] This Year's Unexpected Cinematic Gems for 2024
- [Updated] Effortlessly Record macOS Content & Display for 2024
- [Updated] In 2024, Navigating Game Capture in the Latest Windows 11
- Android's Latest Advancements for Immersive Video Viewing for 2024
- In 2024, 4 Ways to Transfer Music from Xiaomi Redmi A2 to iPhone | Dr.fone
- In 2024, Android to Apple How To Transfer Photos From Infinix Smart 7 HD to iPad Easily | Dr.fone
- In 2024, How to Transfer Data After Switching From Poco F5 Pro 5G to Latest Samsung | Dr.fone
- In 2024, How to Transfer Data from Honor X50i to BlackBerry | Dr.fone
- In 2024, How to Transfer Data from OnePlus Nord CE 3 Lite 5G to Any iOS Devices | Dr.fone
- In 2024, How to Transfer Music from Tecno Camon 20 Pro 5G to iPod | Dr.fone
- In 2024, The Photographic Edge Cutting-Edge Editing Strategies
- Title: In 2024, How to Transfer Data from Vivo V30 to Any iOS Devices | Dr.fone
- Author: Emma
- Created at : 2025-01-12 06:12:32
- Updated at : 2025-01-17 03:29:33
- Link: https://android-transfer.techidaily.com/in-2024-how-to-transfer-data-from-vivo-v30-to-any-ios-devices-drfone-by-drfone-transfer-from-android-transfer-from-android/
- License: This work is licensed under CC BY-NC-SA 4.0.