
In 2024, How to Transfer Data from Vivo Y56 5G to Other Android Devices? | Dr.fone
How to Transfer Data from Vivo Y56 5G to Other Android Devices?
Hi, I have recently bought a new Android phone. Is there any way to transfer my data (Contacts, Messages, Photos, Videos, Music, Apps, etc.) from my old Android phone to the new Android phone? I have used the Samsung Kies program to transfer my Contacts, Music, and Pictures, but there is no option within the program to transfer text messages. I would really appreciate any suggestions? How to transfer data to a new phone? Thanks.
Have you had your old Android device for years, and it’s time for an upgrade? Here top 4 solutions to transfer data from Vivo Y56 5G to Other Android Devices . Getting a shiny Android device, like Samsung Galaxy Note 8, S7, S8, is an exciting thing, but also frustrates you. Although Android offers easy access to the SD card, you still find it difficult to transfer data, like apps and SMS from Vivo Y56 5G to Other Android Devices in batch. Are you scratching your head about it? Don’t worry. Here is a chance for you. All you need is to give a professional transfer tool, Dr.Fone - Phone Transfer to transfer everything from one phone to another. Read this article, and you will know how to transfer data from Vivo Y56 5G to Other Android Devices easily and quickly.
Part 1. How to transfer data from Vivo Y56 5G to Other Android Devices in One Click
When you log into the accounts, like Google, Facebook, Twitter, contacts in them will also be transferred. Thus, make sure whether you want to transfer them or not. If not, do not sign in the accounts before the Android to Android transfer. Dr.Fone can transfer everything from Vivo Y56 5G to Other Android Devices, including apps, contacts, messages, videos, music, photos, calendar, even WhatsApp chats, etc. Follow the steps below to know clearly how to send data from Vivo Y56 5G to Other Android Devices.
Step 1. Run the Android to Android transfer Tool
The first thing is to install and run Dr.Fone on your computer. When its primary window appears, click Phone Transfer to start transfer data.

Step 2. Get Both Android Devices Connected
Connect your two Android devices to the computer via USB cables. After recognized, your Vivo Y56 5Gs will be listed res on both sides of the window.

Step 3. Transfer Contacts, Photos, Videos, Music, SMS, Call Logs, Calendar and Apps from Vivo Y56 5G to Other Android Devices
Between the two Android phones, display all the contents you can transfer. You can uncheck any content you dislike to transfer. Then, click Start Transfer to transfer files from Vivo Y56 5G to another Android Phone quickly.

That’s all. It isn’t easy to transfer all your data from Vivo Y56 5G to Other Android Devices. Try Dr.Fone - Phone Transfer free to transfer Android files to your new Android phone. It is the best Android to Android data transfer tool. With it, you can transfer everything from Vivo Y56 5G to Other Android Devices.
Part 2. How to Transfer Everything from Vivo Y56 5G to Other Android Devices with Google Backup
No one likes to spend a lot of time on the stuff, such as transfer data from Vivo Y56 5G to Other Android Devices every time you change the phone. If you want to transfer quickly and painlessly, then here is the best which explains how to transfer data from Vivo Y56 5G to Other Android Devices using the Google Backup method. Google still has many ways to get all your stuff off your old device and add to your new device using Google Backup.
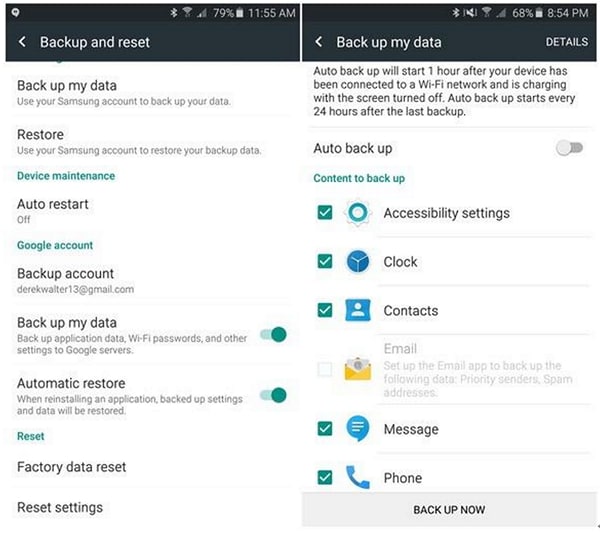
Before taking up backup the first thing you need to do is to sign-in the Android phone using your Google account. In the setting menu, you need to search for Backup and reset mode. Make sure you have backup data and automatic restore as both are flipped on your google account. Your Google server will remember your password, so you do not need to re-enter the password every time you sign in. Google sync really very well with Android devices.
Part 3. How to Transfer Data from Vivo Y56 5G to Other Android Devices with Bluetooth
Users feel good while setting up a new Android device. But we also know that your data is sensitive, so there would be one thing that would bother you is how to transfer data from Vivo Y56 5G to Other Android Devices using Bluetooth . Don’t worry. Here’s an easy way that would help you out to transfer all the data safely by simply using Bluetooth. You have to connect both the Vivo Y56 5G devices and enable the Bluetooth.

This one is the best to transfer the data such as photos, videos, songs, and other files. You have to discover the Vivo Y56 5G device and connect them through the wireless Bluetooth exchange data method. Allow your destination device to detect its presence and attempt to establish the connection between them. Once both devices are paired with Bluetooth, exchange the data, which include files, songs, ringtones, photos and videos. Note that Bluetooth can’t transfer text messages, contacts, call history or Apps.
Part 4. Tips about how to transfer from Vivo Y56 5G to Other Android Devices
When you have bought a new device, then certainly there is a need to transfer your data such as Contacts, SMS, Photos, Music, Apps, and more other documents using different methods. Your device data can also be transferred from Android smartphones to iPhone and vice versa. If you need to have a fast and easy way to transfer the data, you can try with Dr.Fone - Phone Transfer. Here we also have a list of a few different ways which can be used easily without any restrictions.
Transfer Contacts from Vivo Y56 5G to Other Android Devices
Transferring the contacts is the most important thing, the time has come when you do not need to face the painstaking process of copying each contact with the hand. Now you can transfer the contacts easier along with cloud synchronization. It’s one of the easiest ways to keep your contacts up-to-date and sync it with your Google account. Transfer the contacts and sync it on that registered account. Similarly, when you buy a new device, open your Google account on your new device and copy all the saved contacts from that account onto your new device.

Transfer SMS from Vivo Y56 5G to Other Android Devices
You can now transfer your old SMS to the Android device easily by using this free SMS backup app, which can restore and transfer all SMS stored in XML file format, and then you can send directly to your new Android devices. Here we have used a backup app that can explain how to transfer from Vivo Y56 5G to Other Android Devices easily when connected with each other and help you out to restore the SMS messages. Note that this app won’t pay attention to which SMS already exists and which one is imported twice. Instead, you can use MobileTrans one-click app, which helps you out in resolving this problem.

Transfer Photos from Vivo Y56 5G to Other Android Devices
You can use Dr.Fone - Phone Transfer, which can help you in how to transfer from Vivo Y56 5G to Other Android Devices easily. You simply have to install the tool, connect your Vivo Y56 5G, and share your data such as photos, movies, and other files directly from Vivo Y56 5G to the other Android devices. Try it free.
Transfer Music from Vivo Y56 5G to Other Android Devices
We all love music and have collected the music according to our choice. Mostly we store the MP3 files that appear on your computer after you connect your smartphone. Firstly you need to download the Android File Transfer app if you’re a mac user or else use Bluetooth File Transfer that saves these files on your computer, and then you can transfer to another device. Instead, you can use MobileTrans tool, which can easily resolve your problem of how to transfer everything from Vivo Y56 5G to Other Android Devices with few clicks only.

Transfer Apps from Vivo Y56 5G to Other Android Devices
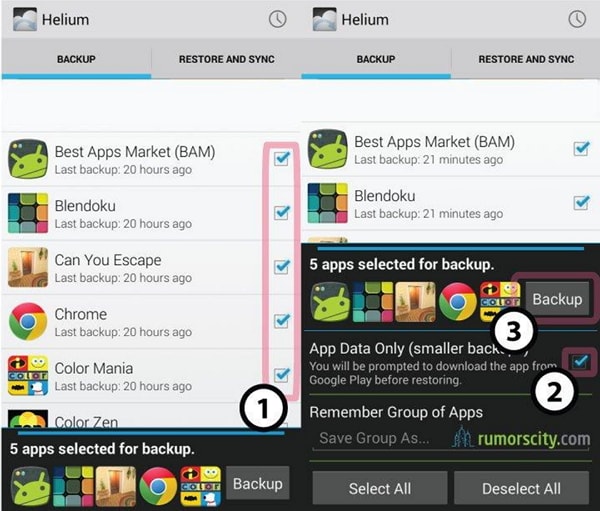
There are many apps that you require to transfer from your old phone to a new device, but here we have a Helium backup tool that can explain how to transfer from Vivo Y56 5G to Other Android Devices apps easily and do not require to be rooted. It can transfer the tool which can come in a free trial version and also support SD card and PC. You can automatically schedule the backup and can sync your Vivo Y56 5Gs.
I hope we were able to make you understand how to transfer everything from Vivo Y56 5G to Other Android Devices using third-party tools. We recommend using Dr.Fone - Phone Transfer, which works as the all-in-one tool and transfers all your data within few clicks only, including contacts, SMS, Photos, Music, Videos, Apps, etc.
Why not download it have a try? If this guide helps, don’t forget to share it with your friends.
How to Use Phone Clone to Migrate Your Vivo Y56 5G Data?
Dr.Fone - Phone Transfer
Best Tool to Migrate Huawei Phone Data
- Transfers any data between devices.
- Supports all phone models like iPhone, Samsung, Huawei, LG, Moto, etc.
- 2-3x faster transfer process compared to other transfer tools.
- Data kept absolutely secure during the transfer.

The rapid change in the mobile models has made it difficult for us to keep up with the trend. For some, while it might be a matter of owing only the best mobile, for others it’s a matter of enjoying the best of the world at each point of time. Thereby they try to keep up with the mobile trend by getting their hands on the latest mobile whenever possible whether iOS or Android. In such a scenario it becomes difficult to transfer data from one to another. But here is some mobile technology such as Phone Clone that will change it forever. So, let us see how you can use it to your advantage to transfer your valuable information.
Before we move on to see how to transfer data we will first see why someone would like to migrate the information from old phone to new phone:
- - To replace the old phone with a new phone as the primary phone
- - To back up all the info in both the phone
Moving on, in the subsequent section, we will understand how to use Phone Clone Vivo.
Part 1: How to use Phone Clone for Android?
Android has been ruling the world with its open-source technology and compatibility for a wide range of devices. As a result of which, many companies are producing the latest technology in hardware without any worry of OS support. Android phone makers such as Huawei, Samsung, HTC, and many others are at the trend of releasing flagship models at the different budget range on a regular interval. As a result, this has made people run like fans for grabbing a hand on the latest rig, to enjoy the best of the world at every point in time. In such a scenario, it becomes difficult to transfer your data from one phone to another securely. Well in this part, we will be introduced to the Huawei Phone Clone app that will help you to migrate information from one phone to another.
Here are the steps to be followed for Phone Clone Vivo to transfer your data from one phone to another:
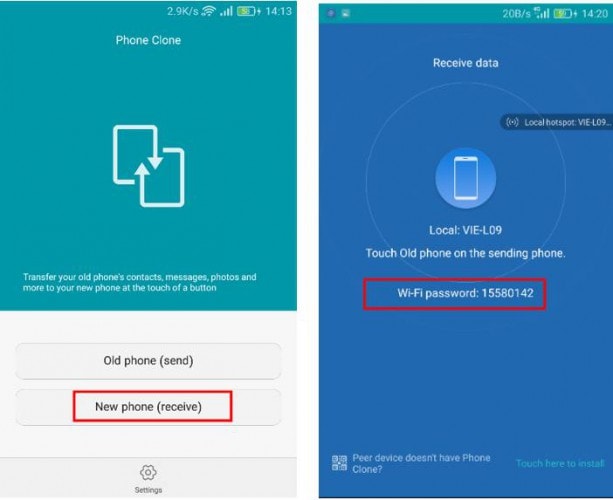
1. First, install the app on both the phones, i.e., on both old and new mobiles
2. Open the app on the new phone. Click on the new phone button. A Wi-Fi will be created whose password will be displayed at the time of creation. You will need that password in the next step.
3. Open the app on the old phone. Click on the old phone button. Select the wi-fi network created in the 2nd step and enter the password that you received in the 2nd step.
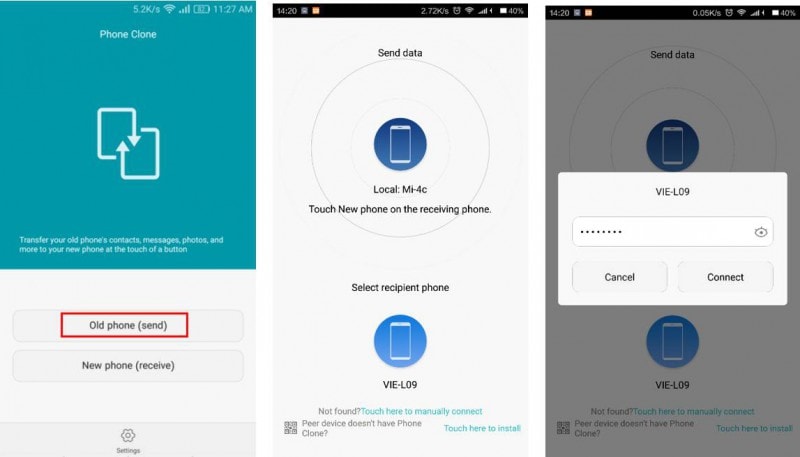
4. Once connected, click the number of tabs on the old phone that you want to send to a new phone.
Part 2: How to use Phone Clone for iPhone
The best part of the Huawei Phone Clone is that it supports not only Android but it also supports the iPhone. All the things that you can do while transferring data from one Android to another, you can achieve the same feat while transferring data from one iPhone to another iPhone. It is especially useful when you get that big update to your iPhone version, and most of the apps get useless due to the drastic hardware and software change in old and new iPhones. Thinking about changing your old iPhone to a new one could have been disastrous if not catastrophic if personal data could not have been transferable from one mobile to another. Phone Clone by Huawei lets you simply achieve the task while at the same time saving you a lot of data and time
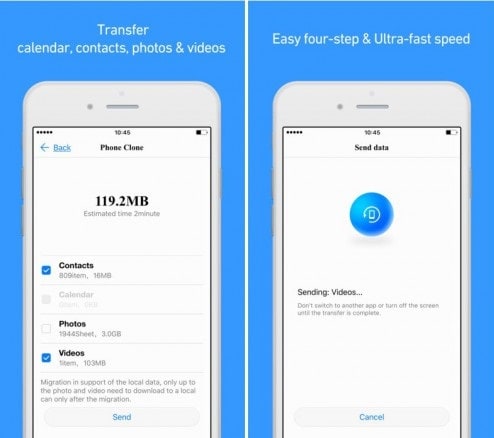
Now, let us take a look at how you can use Phone Clone Vivo app without spending a penny on expensive services and with 4 simple steps:
1. Install the Phone Clone app on old and new iPhone mobile
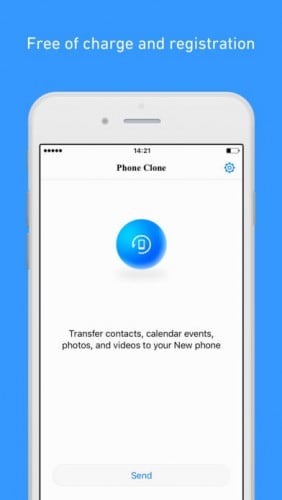
2. Open the app for the new iPhone. Click on the send button. A Wi-Fi hotspot will be created, displaying its name and password.
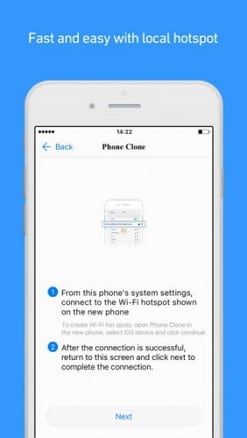
3. Go to the wi-fi setting of the old iPhone and connect to the Wifi network mentioned in step 2. Open the app on the old iPhone and click on next to complete the connection.
4. Once connected, click on the tabs presented in the old iPhone and select the tab that you want to send to the new iPhone.
Part 3: Best Phone Clone alternative: Dr.Fone - Phone Transfer to migrate iPhone/Android data
While Phone Clone is free of cost and is a great emergency there is still much lagging in the app. It does not connect properly; it sometimes fails to send files completely and many more. To overcome we have with you the best Huawei Phone Clone alternative, called Dr.Fone - Phone Transfer , the easiest way to migrate iPhone/Android data.
Dr.Fone provides one of the best options to switch personal data from one phone to another seamlessly. It supports mobile of all kinds of data and service carriers, so you are not restricted to any particular type of mobile set or carrier service. Enjoy the freedom of information transfer without any loss in security and fast process.
Some of the pros of Dr.Fone - Phone Transfer are as follows:
Dr.Fone - Phone Transfer
1-Click Phone-to-Phone Transfer
- Easy, fast, and safe.
- Move data between devices with different operating systems, i.e. iOS to Android.
- Supports iOS devices that run the latest iOS version

- Transfer photos, text messages, contacts, notes, and many other file types.
- Supports over 8000+ Android devices. Works for all models of iPhone, iPad, and iPod.

3981454 people have downloaded it
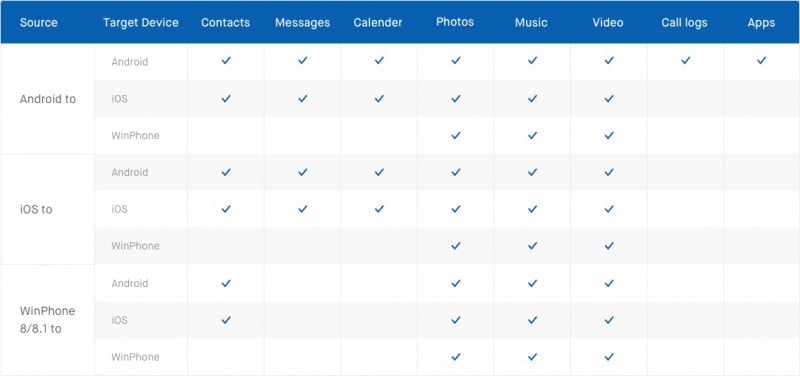
Here is a small comparison of how data transfer from one platform to another platform fares in Dr.Fone
Now let us take a look at how to use Dr. Fone to transfer data between mobiles:
1. Launch the Dr.Fone app on the computer and select Phone Transfer.
2. Connect both the mobile to the computer and select the send and receive side on the computer
3. Select the files and then click on “Start transfer” to complete the transfer process

The best part of Dr.Fone is that you can try it free of cost to check if it suits your requirements. We are sure that its jaw-dropping feature will leave an impression on your mind.
We hope that you learned some of the phone clone methods and applications that you can use to transfer your information from an old phone to a new phone. Use the methods mentioned above and be sure that you are on the safer and faster side of transferring data.
Android to Apple: How To Transfer Photos From Vivo Y56 5G to iPad Easily
If you are an Android user and have recently switched to an iPad, you might be wondering how to transfer photos from Vivo Y56 5G to iPad. It is a common question that many people ask when they switch from one device to another. Fortunately, there are several ways to transfer photos from Vivo Y56 5G to iPad easily. In this article, we will show you how to do it using different methods.
We are living in a world where capturing memories is at our fingertips, and the need to share photos across different devices is more prevalent than ever. Whether you’re looking to share your photos with friends or ensure a secure backup, transferring photos from your Android to your iPad shouldn’t be a hassle.
This article is your ultimate guide to executing photo transfer with no problems. We’ll walk you through the process of how to transfer photos from Vivo Y56 5G to iPad as well as iPhone, highlight common mistakes to avoid, and make sure your cherished moments are transferred seamlessly.
Part 1. How Can I Transfer Photos From Vivo Y56 5G to iPad Directly?
For a straightforward photo transfer from Vivo Y56 5G to iPad, Apple’s Move to iOS app can be an excellent choice. It’s important to note, though, that your iPad must be in setup mode for this method to work. If it’s not in setup mode, you’ll need to perform a reset on your iPad before proceeding with the transfer.
How can I transfer photos from Vivo Y56 5G to iPad? Follow the steps below.
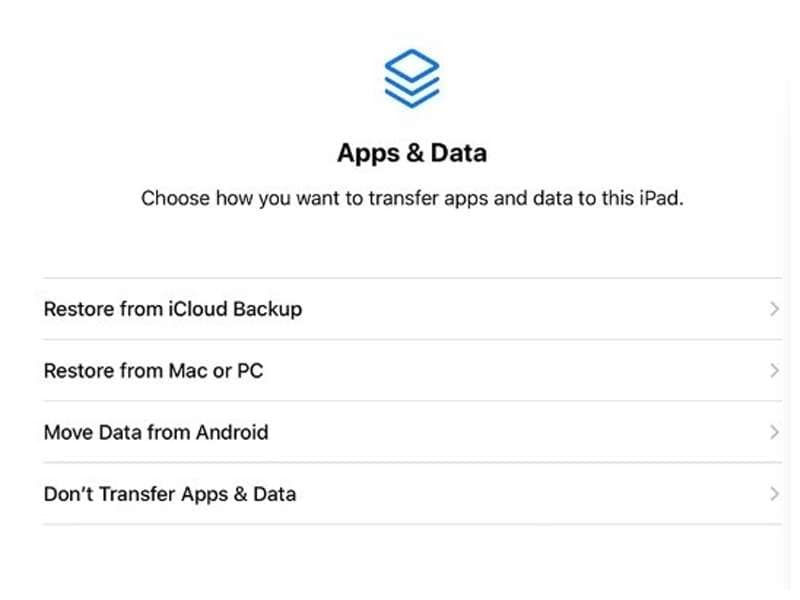
Step 1: Set Up Your iPad.
As you set up your iPad, reach the “Apps & Data” screen and select “Move Data from Android.”
Step 2: Install and launch Move to iOS on your Vivo Y56 5G.
Install Move to iOS and open the app on your Android. Review the terms and conditions and press “Agree” to proceed.
Step 3: Enter the code.
A six to ten-digit code will be displayed on your iPad screen. Enter this code when prompted on your Vivo Y56 5G.
Step 4: Select photos to transfer.
In the Move to iOS app, choose “Photos” to transfer your images. Then, tap “Continue” to initiate the transfer process. Remember to keep your devices close to each other and connected to power until the transfer process is completed for quicker transfer.
Step 5: Transfer complete.
Allow the app to complete the transfer process. Once the transfer is complete, you will be prompted to finish setting up your iPad. Follow the instructions to complete the setup process.
Part 2. How to Transfer Photos from Vivo Y56 5G to iPad Using Cloud Services (Google Drive)
In addition to dedicated apps like Move to iOS, you can also use cloud-based storage services such as Google Drive to transfer photos from Vivo Y56 5G to iPad.
Because it’s stored in the cloud, you can find your photos from any device as long as there is an internet connection. Just upload your photos to Google Drive and later download them on your iPad. It’s also suitable for backup purposes. Google provides its users a 15 GB of free storage.
How to transfer photos from Vivo Y56 5G to iPad with Google Drive:
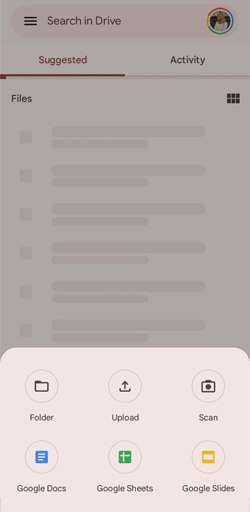
Step 1: Upload photos to Google Drive.
Open Google Drive on your Vivo Y56 5G, navigate to the “+” icon, and select “Upload.” Choose the photos you want to transfer and upload them to your Google Drive.
Step 2: Access Google Drive on iPad.
On your iPad, download and install Google Drive if you haven’t. Log in with the same Google account used on your Vivo Y56 5G.
Step 3: Download Photos to iPad.
Locate the uploaded photos in Google Drive on your iPad. Tap on each photo or select multiple photos, then click download to save them directly to your iPad.
Part 3. How to Share Pics From iPhone to Android with Dr.Fone
In addition to transferring photos from Vivo Y56 5G to iPad, you might also be interested in sharing pictures from iPhone to Android. Although both iPad and iPhone belong to the same Apple ecosystem, they function on slightly distinct operating systems— iPads utilize iPadOS, whereas iPhones operate on iOS.
For an efficient transfer of pictures from iPhone to Android, Wondershare Dr.Fone comes into play. This versatile tool features a dedicated Phone Transfer tool that enables comprehensive sharing of photos and other media content.
This method is particularly well-suited for streamlined bulk photo transfers, making it an ideal choice for individuals seeking a more encompassing solution for data transfer.
Dr.Fone Basic
Backup & Restore iOS Data Turns Flexible.
- One-click to back up the whole iOS device to your computer.
- Preview and selectively restore files to any device with simplicity.
- Export what you want from the backup to your computer.
- Your device’s data remains intact during the restore process.
- Supports iPhone, iPad, iPod touch, and the latest iOS version.
4,781,237 people have downloaded it
How to share pics from iPhone to Android with Dr.Fone Phone Transfer tool:
Step 1: Open Dr.Fone’s Phone Transfer tool
Make a connection between your iPhone and your Vivo Y56 5G on your computer. Launch Wondershare Dr.Fone on your computer and navigate to Toolbox > Phone Transfer.
Step 2: Specify the source and destination devices
After connecting them, the platform will identify the connected devices and load their data. Choose iPhone as the source and Android as the destination device to set the transfer path. Use the Flip button to alter the transfer direction.
Step 3: Choose photos for the transfer
Proceed to select the types of data you wish to transfer. Checkmark photos and click the Start Transfer button. If you want to remove existing data from the destination device, you can select “Clear data before copy.”

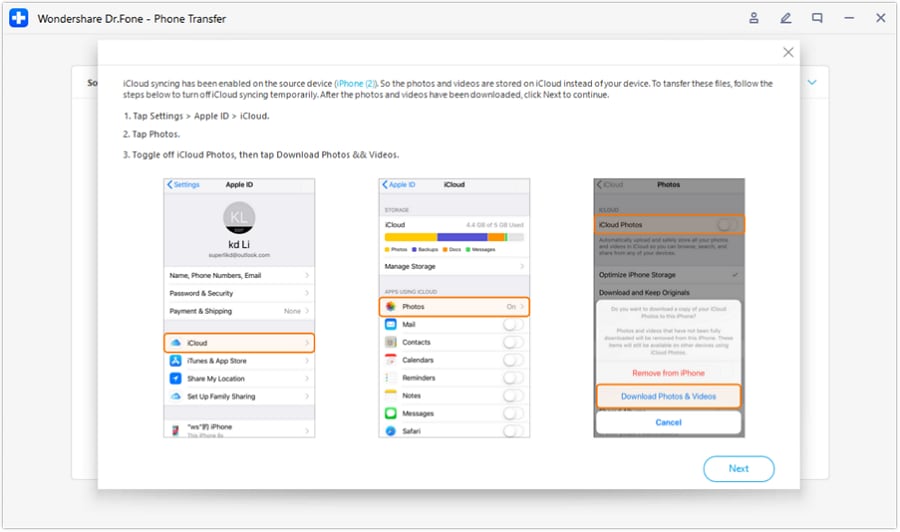
Step 4: Disable iCloud syncing
Now, Dr. Fone’s Phone Transfer tool should prompt you to disable iCloud syncing. Follow the instructions.
Step 5: Monitor data transfer progress
The progress of the data transfer will be displayed in a pop-up window. Once completed, click OK to conclude the process.
Part 4. Mistakes to Avoid When Transferring Photos from Vivo Y56 5G to iPad/iPhone
Transferring photos from your Vivo Y56 5G to an iPad or iPhone holds the promise of seamless photo sharing. However, several factors can contribute to the failure of file transfer processes. To address them, it’s essential to navigate through common mistakes that users often encounter so you won’t make the same errors.
1. Insufficient battery levels
Users often attempt photo transfers with low battery levels on either device. For a successful process, it is crucial to make sure that both your Android and iPad/iPhone have sufficient battery levels or are connected to power sources during the transfer.
2. Limited storage space
Overlooking available storage space on the iPad/iPhone is a common oversight. To avoid transfer failures, check and clear sufficient space on your iPad/iPhone to accommodate the photos you intend to transfer.
3. Interference from Third-Party Apps:
Allowing interference from other apps during the transfer. Close unnecessary apps on both devices to prevent potential conflicts and ensure a smoother transfer process.
4. Ignoring file compatibility:
Apple and Android devices often have varying file compatibilities. For example, iPhones commonly employ the HEIC format, which may pose recognition challenges on Android devices. So, verify that the photo formats are compatible with both Android and iOS devices. If necessary, convert files to ensure a trouble-free transfer.
5. Skipping App Permissions:
When you use apps to transfer files, they usually ask for permission to access your media files. While it’s common for users to overlook this step or hesitate to do it, not granting access can actually lead to transfer failures. The app needs permission to access and transfer files securely.
Conclusion
Although they work in different operating systems, transferring photos between Android and Apple devices, including iPad and iPhone, can be accomplished through various methods. Apps like Move to iOS and Dr.Fone provide straightforward solutions, while cloud services like Google Drive offer convenient alternatives.
Also read:
- [Updated] 2024 Approved Crafting Visual Stories in Minutes Using Window's 8 Movie Maker
- Hard Resetting an Honor Play 7T Device Made Easy | Dr.fone
- How Many Attempts To Unlock iPhone 13
- How To Improve Image Quality When Shooting On An iPhone With Lower MP Cameras
- How to Transfer Videos from Honor 100 Pro to iPad | Dr.fone
- In 2024, 4 Ways to Transfer Music from Vivo Y78+ to iPhone | Dr.fone
- In 2024, 5 Techniques to Transfer Data from Samsung Galaxy A05 to iPhone 15/14/13/12 | Dr.fone
- In 2024, 5 Ways to Move Contacts From Oppo A1 5G to iPhone (13/14/15) | Dr.fone
- In 2024, How to Make the Most of Your Apple iPhone 15 Pro Lock Screen with Notifications? | Dr.fone
- In 2024, How to Transfer Contacts from Vivo V29 Pro to Other Android Devices Devices? | Dr.fone
- In 2024, How to Transfer Data from Oppo A38 to Samsung Phone | Dr.fone
- In 2024, How to Transfer Data from Vivo Y27s to BlackBerry | Dr.fone
- In 2024, How to Transfer Music from Honor Magic5 Ultimate to iPod | Dr.fone
- In 2024, In-Depth Analysis of ShareX Criticism & Replacements
- Top 6 Apps/Services to Trace Any OnePlus Nord CE 3 Lite 5G Location By Mobile Number | Dr.fone
- Unveiling the Future of AR with Apple Vision Pro's Latest Update - Mastering Spatial Persona Features | TechInnovator Blog
- Unveiling the Latest in Hardware - Guided by Tom's Expertise
- Title: In 2024, How to Transfer Data from Vivo Y56 5G to Other Android Devices? | Dr.fone
- Author: Emma
- Created at : 2025-01-14 20:14:24
- Updated at : 2025-01-17 00:25:36
- Link: https://android-transfer.techidaily.com/in-2024-how-to-transfer-data-from-vivo-y56-5g-to-other-android-devices-drfone-by-drfone-transfer-from-android-transfer-from-android/
- License: This work is licensed under CC BY-NC-SA 4.0.