
In 2024, How to Transfer Music from Lava Yuva 2 to iPod | Dr.fone
How to Transfer Music from Lava Yuva 2 to iPod
If you’re among the fortunate few still holding onto a functioning iPod, consider yourself lucky, as Apple officially bid farewell to the iPod product line in 2022. While this iconic device may no longer be in production, its legacy lives on.
However, if your cherished iPod is showing signs of wear or experiencing issues, it becomes important to safeguard the music collection you’ve accumulated over the years. To address this, some of us wonder, can I transfer iPod music to Android? The answer is yes. Absolutely. We are here to show you how.
- Can I Transfer iPod Music to Android?
- Part 1. Transfer Music from iPod to Android via Bluetooth
- Part 2. How to Transfer Music from Lava Yuva 2 to iPod with Move to iOS App

- Part 3. How To Transfer Music From iPod to Android/Android to iPod With Easy Software
- Conclusion
Can I Transfer iPod Music to Android?
Can you transfer music from an iPod to an Android phone? Despite the fact that the iPod is an Apple product, transferring its music to an Android device is indeed possible. Apple’s ecosystem may be renowned for its exclusivity, but with the right methods, you can seamlessly bridge the gap between your iPod and an Android device.
One of the most straightforward ways to transfer music from your iPod to an Android device is by using Bluetooth. It’s worth noting that Bluetooth transfer capability is present in all iPod Touch models but not in older iPod models. Bluetooth support for iPod Touch was introduced with the 2nd Generation and iOS 3.0, while iPod Nano gained support from the 7th Generation onward.
Alternatively, other methods involve employing a dedicated app and third-party software as an intermediary. Rest assured; the upcoming sections will comprehensively cover these approaches, providing you with the necessary guidance for a smooth music transfer process.
Part 1. Transfer Music from iPod to Android via Bluetooth
Bluetooth technology serves as a versatile means for wirelessly connecting devices, and in this case, it provides a convenient avenue for transferring music from your iPod to an Android device. This wireless approach simplifies the process, allowing for seamless data exchange between the two devices.
But first, you still need to check Bluetooth compatibility. Ensure that both your iPod and Android devices can do Bluetooth transfer. This method is also applicable when you wonder how to download music from an iPod to an Android phone.
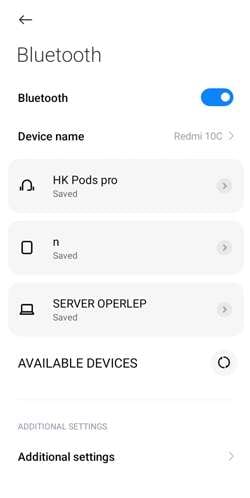
Step 1: Enable Bluetooth on both Devices.
On your iPod, navigate to the Settings menu and select Bluetooth. Enable Bluetooth on the Android device by accessing its settings as well. Make sure that you have set both devices to discoverable mode.
Step 2: Pair the Lava Yuva 2 devices.
Search for available Bluetooth devices on your Lava Yuva 2, and select your iPod from the list. Likewise, confirm the pairing request on your iPod.
Step 3: Initiate file transfer.
Once paired, locate the music files on your iPod that you wish to transfer. Use the sharing or send via Bluetooth option (this may vary depending on your iPod model) to send the selected music files to your Lava Yuva 2.
Step 4: Accept the files on Android.
Accept the incoming Bluetooth transfer request from the iPod. The music files will then be transferred wirelessly from your iPod to the Android device.
Step 5: Verify transfer success.
Confirm the successful transfer by checking the music library on your Lava Yuva 2. The transferred songs should now be available and ready to play.
Part 2. How to Transfer Music from Lava Yuva 2 to iPod with Move to iOS App
For those looking to transfer music from an Android device to an iPod, the Move to iOS app provides a user-friendly solution.
While this app is designed for iOS devices, this approach is limited to iPod touch models and may not be compatible with all iPod devices. Users with older iPod models may need to explore alternative methods for transferring music between devices, which we will introduce in the next section.
Before starting the transfer, you need to download and install the Move to iOS app on the Google Play Store. Now, how to transfer music from Lava Yuva 2 to iPod:
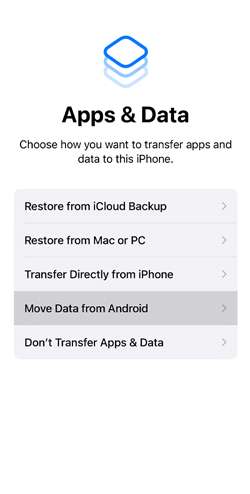
Step 1: Set Up Your iPod:
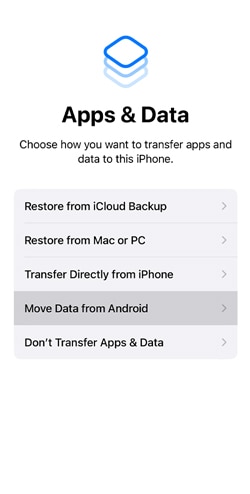
As you set up your iPod for the first time, reach the “Apps & Data” screen and choose “Move Data from Android.”
Step 2: Agree to Terms and Conditions
Open Move to iOS on your Lava Yuva 2. Review the terms and conditions and press “Agree” to proceed.
Step 3: Enter the Code
On your iPod, a six to ten-digit code will be displayed. Enter this code when prompted on your Lava Yuva 2.
Step 4: Select Content to Transfer
In the Move to iOS app, choose “Music” to transfer your music files specifically. Then, tap “Continue” to initiate the transfer process. Remember to keep your devices close to each other and connected to power until the transfer process is completed for quicker transfer.
Step 5: Transfer complete.
Allow the app to complete the transfer process. Once the transfer is complete, you will be prompted to finish setting up your iPod. Follow the instructions to complete the setup process.
Part 3. How To Transfer Music From iPod to Android/Android to iPod With Easy Software
Now, for a more comprehensive and versatile solution, using software like Wondershare Dr.Fone provides a streamlined process to transfer music not only from Lava Yuva 2 to iPod but also from iPod to Android.
Dr.Fone offers a Phone Transfer tool, a user-friendly tool that simplifies the transfer of data between different devices, offering a wide range of compatibility. It is the answer to your “**Can I transfer music from an iPod to an Android phone?**” question. It’s all possible with Dr.Fone’s Phone Transfer tool.
The software is designed with a user-friendly interface, ensuring that even those without technical expertise can even navigate and use it effectively.
Dr.Fone Basic
Backup & Restore iOS Data Turns Flexible.
- One-click to back up the whole iOS device to your computer.
- Preview and selectively restore files to any device with simplicity.
- Export what you want from the backup to your computer.
- Your device’s data remains intact during the restore process.
- Supports iPhone, iPad, iPod touch, and the latest iOS version.
4,802,453 people have downloaded it
How to transfer music from iPod to Android:
Step 1: Open Dr.Fone’s Phone Transfer tool
Make a connection between your iPod and your Lava Yuva 2 on your computer. Launch Wondershare Dr.Fone on your computer and navigate to Toolbox > Phone Transfer.

Step 2: Specify the source and destination devices
After connecting them, the platform will identify the connected devices and load their data. Choose the Source and Destination devices to set the transfer path. Use the Flip button to alter the transfer direction (for example, when you want to transfer from Lava Yuva 2 to iPod instead).

Step 3: Choose the music category for the transfer
Proceed to select the types of data you wish to transfer. Checkmark music and click the Start Transfer button. If you want to remove existing data from the destination device, you can select “Clear data before copy.”

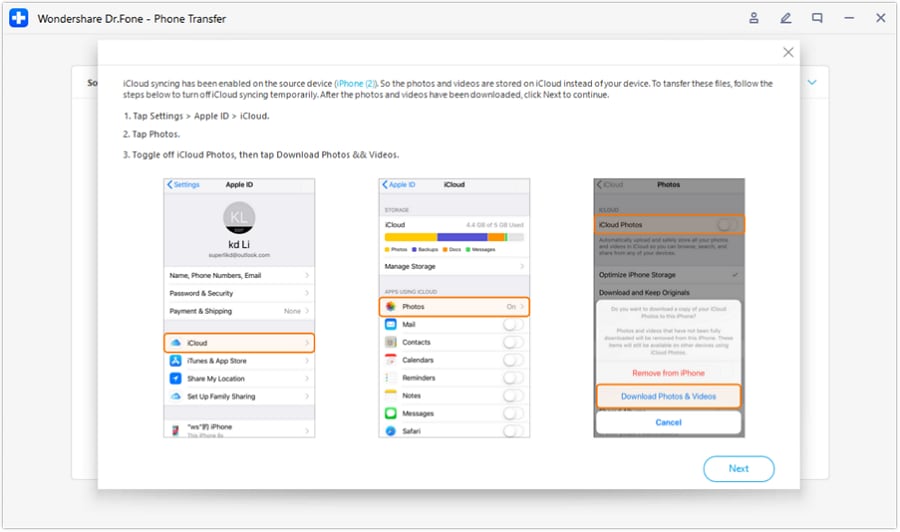
Step 4: Disable iCloud syncing
Now, Dr. Fone’s Phone Transfer tool should prompt a specific operation on the window. Follow the instructions to turn off iCloud syncing.
Step 5: Monitor data transfer progress
The progress of the data transfer will be displayed in a pop-up window. Once completed, click OK to conclude the process.

Conclusion
Transferring music seamlessly between iPod and Android devices, and vice versa, has become more accessible than ever with the right tools and methods. Bluetooth technology serves as a wireless bridge, allowing users to effortlessly move their favourite music from an iPod to an Android device.
On the other hand, there are also apps like Move to iOS and Dr.Fone Basic that facilitate the transfer of music depending on your needs. These options empower users to break through the traditional barriers of device exclusivity and seamlessly enjoy their music collections across different ecosystems.
How to Transfer Content from android to iPhone Directly
Since Lava Yuva 2 is embracing Android as its operating system, transitioning from an iPhone to a Lava Yuva 2, or vice versa, can pose challenges due to the differing operating systems. But it doesn’t mean impossible!
If you’re switching to an iPhone and need to transfer all your data, this article has you covered. We will look at ways to facilitate smooth Lava Yuva 2 to iPhone transfer while ensuring your valuable information transfers across these devices with no problem.
Part 1. How to Transfer Content from Lava Yuva 2 to iPhone Directly
You must be familiar with Lava Yuva 2 Migrate if you are a Lava Yuva 2 user. It is a solution for seamless data transfer used in Lava Yuva 2 devices. With this app, you can transfer data from your Lava Yuva 2 device to others, such as iPhones.
However, most of the latest Lava Yuva 2 models are now unable to run Lava Yuva 2 Migrate since it’s a pretty outdated app. It has been retired by the company since 2015. Users are seeking alternative methods for data transfer as a result. In this section, we explore more effective solutions to transfer content directly from Lava Yuva 2 to iPhone besides Lava Yuva 2 Migrate.
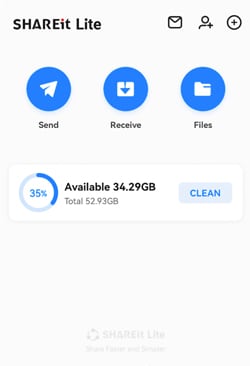
Solution 1. Using ShareIt App
When Lava Yuva 2 Migrate is not an option, ShareIt can be a versatile alternative for Lava Yuva 2 to iPhone transfer. ShareIt is a popular cross-platform file-sharing application known for its simplicity and efficiency. To use it, you’ll need to download the ShareIt app on both your Lava Yuva 2 and iPhone.
If you have downloaded and installed it, you can continue with the steps below:
- Step 1: Connect your Lava Yuva 2 and iPhone devices
Since ShareIt operates by creating a hotspot network among devices, it’s necessary to have both devices connected to the same Wi-Fi network. Make sure to keep both devices close to each other, too.
- Step 2: Select the files to transfer
On your Lava Yuva 2 device, click the “Send” button. After a new window appears displaying all the categorized files on your device, choose the specific files you want to transfer.
- Step 3: Look for the Lava Yuva 2 device to transfer
After selecting the files, press “Send” and provide the necessary permissions for GPS and Bluetooth. Once permissions are granted, the Lava Yuva 2 device will initiate a search for nearby devices.
- Step 4: Transfer the files to the iPhone.
On your iPhone, open the ShareIt app and click “Receive.” This action opens all the necessary ports to receive shared files. When your Lava Yuva 2 phone detects your iPhone, tap on the iPhone’s avatar to proceed with the transfer.
Solution 2. Move Contents from Lava Yuva 2 to iPhone via Apps & Data
Another good alternative of Lava Yuva 2 to iPhone transfer app is Move to iOS. This Move to iOS app is designed by Apple specifically for users moving from Android devices to iPhones. You can download it from the Google Play Store. Then, you can transfer the data by accessing Apps & Data on the iPhone.
However, if you have been using your iPhone for a while, you must reset your iPhone first to proceed with this method. It can be done by going to Settings > General > Reset > Erase all content and settings. After resetting, your iPhone will be going back to the initial setup.
For more details, follow the instructions below:
Step 1: Setup your iPhone
Power up your new iPhone and progress through the initial setup until you get into the “Apps & Data” screen. Select the option that reads “Move Data from Android.”
Step 2: Agree to Terms and Conditions
Open Move to iOS on your Lava Yuva 2 phone. Review the terms and conditions and press “Agree” to proceed.
Step 3: Enter the Code
On your Lava Yuva 2, a screen will appear to request a 6-10-digit code. This code will be generated on your iPhone. Enter the displayed code on your Lava Yuva 2 device to make a secure connection between the two devices.
Step 4: Select Content to Transfer
Next, choose the types of content you wish to transfer. Tap “Continue” to initiate the transfer process. Remember to keep your devices close to each other and connected to power until the transfer process is completed for quicker transfer.
Step 5: Transfer complete.
Once the transfer is complete, you will be prompted to finish setting up your iPhone. Follow the instructions to complete the setup process.
Part 2. How To Make iPhone to Lava Yuva 2 Data Transfer Using Easy Software
One significant reason why data transfer from iPhone to Lava Yuva 2 is tricky is due to privacy concerns. Apple really prioritizes their user privacy. It implements strict security measures to prevent any breaches. While this is beneficial for users, it can also complicate data transfer.
Another contributing factor is the structure of the files. Android boasts a file system that is more straightforward, unlike iOS. As a solution, third-party software like Wondershare Dr.Fone offers tools like Phone Transfer to simplify the process. With Dr. Fone’s Phone Transfer, you can transfer any data from Lava Yuva 2 to iPhone or iPhone to Lava Yuva 2.
How to make iPhone to Lava Yuva 2 data transfer with Dr.Fone:
- Step 1: Open Dr.Fone’s Phone Transfer tool
Make a connection between your iPhone and your Lava Yuva 2 phone through USB cable on your computer. Launch Wondershare Dr.Fone on your computer and navigate to Toolbox > Phone Transfer.
- Step 2: Specify the source and destination devices
After connecting them, the platform will identify the connected devices and load their data onto the platform. Choose the Source and Destination devices to set the transfer path. Use the Flip button if necessary to alter the transfer direction.
- Step 3: Choose the data type for the transfer
Proceed to select the types of data you wish to transfer. Checkmark the category and click the Start Transfer button. If you want to remove existing data from the destination device, you can select “Clear data before copy.”
- Step 4: Disable iCloud syncing
Now, Dr. Fone’s Phone Transfer tool should prompt a specific operation on the window. Follow the instructions to turn off iCloud syncing. Open your iPhone Settings and tap on your device’s name. Go to iCloud > Photos to disable the toggle for iCloud Photos.
- Step 5: Monitor data transfer progress
The progress of the data transfer will be displayed in a pop-up window. Once completed, click OK to conclude the process.
Part 3. How to Do Lava Yuva 2 to iPhone Data Transfer Using Dropbox/Google Drive
Another method for Lava Yuva 2 to iPhone transfer is using Cloud services like Dropbox or Google Drive. Both Dropbox and Google Drive serve as virtual storage spaces accessible from any device with an internet connection. Users can upload and store their files to the cloud, making them available for download on other devices.
Either Google Drive or Dropbox follows similar steps for data transfer. The difference between them is in the amount of free storage each service provides. Notably, Google Drive provides 15GB of free storage, while Dropbox offers 2GB.
Follow these steps on how to do a Lava Yuva 2 to iPhone transfer via cloud storage services.
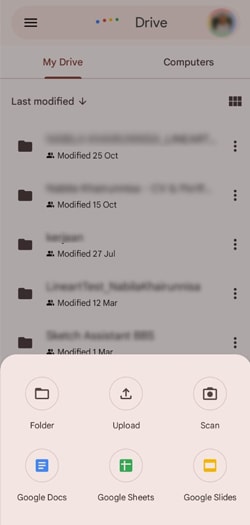
- Step 1: Install and set up Dropbox/Google Drive:
Begin by installing the Dropbox or Google Drive app on both your Lava Yuva 2 and iPhone. Create accounts if you don’t have them already.
- Step 2: Upload the files from Lava Yuva 2
Open the cloud storage app on your Lava Yuva 2 device and upload the data you want to transfer. This can include photos, videos, documents, and more. Then, wait for the upload to complete. Make sure that all files are successfully uploaded before proceeding.
- Step 3: Sign in to the cloud storage on your iPhone
On your iPhone, open Dropbox or Google Drive and sign in with the same account. Find the transferred files in the cloud storage.
- Step 4: Download to iPhone:
Select the files you want to transfer and download them to your iPhone. Once the download is complete, organize the transferred files on your iPhone as needed.
Conclusion
Transitioning from a Lava Yuva 2 device to an iPhone, or vice versa, may present challenges due to the difference in operating systems. However, with the right tools and methods, the iPhone to Lava Yuva 2 data transfer can be done seamlessly and efficiently.
Even though Lava Yuva 2 Migrate is no longer in the game, apps like ShareIt and Move to iOS can be alternatives for a direct transfer. If things get a bit trickier when transferring from iPhone to Lava Yuva 2 due to Apple’s privacy measures, third-party software like Wondershare Dr.Fone’s Phone Transfer is there to simplify it all.
And for those who prefer the cloud, Dropbox and Google Drive also offer a solution. So, no matter your preference, there’s a solution to ensure your data transfer moves smoothly.
How to Transfer Data from Lava Yuva 2 to Other Android Devices?
Hi, I have recently bought a new Android phone. Is there any way to transfer my data (Contacts, Messages, Photos, Videos, Music, Apps, etc.) from my old Android phone to the new Android phone? I have used the Samsung Kies program to transfer my Contacts, Music, and Pictures, but there is no option within the program to transfer text messages. I would really appreciate any suggestions? How to transfer data to a new phone? Thanks.
Have you had your old Android device for years, and it’s time for an upgrade? Here top 4 solutions to transfer data from Lava Yuva 2 to Other Android Devices . Getting a shiny Android device, like Samsung Galaxy Note 8, S7, S8, is an exciting thing, but also frustrates you. Although Android offers easy access to the SD card, you still find it difficult to transfer data, like apps and SMS from Lava Yuva 2 to Other Android Devices in batch. Are you scratching your head about it? Don’t worry. Here is a chance for you. All you need is to give a professional transfer tool, Dr.Fone - Phone Transfer to transfer everything from one phone to another. Read this article, and you will know how to transfer data from Lava Yuva 2 to Other Android Devices easily and quickly.
Part 1. How to transfer data from Lava Yuva 2 to Other Android Devices in One Click
When you log into the accounts, like Google, Facebook, Twitter, contacts in them will also be transferred. Thus, make sure whether you want to transfer them or not. If not, do not sign in the accounts before the Android to Android transfer. Dr.Fone can transfer everything from Lava Yuva 2 to Other Android Devices, including apps, contacts, messages, videos, music, photos, calendar, even WhatsApp chats, etc. Follow the steps below to know clearly how to send data from Lava Yuva 2 to Other Android Devices.
Step 1. Run the Android to Android transfer Tool
The first thing is to install and run Dr.Fone on your computer. When its primary window appears, click Phone Transfer to start transfer data.
Step 2. Get Both Android Devices Connected
Connect your two Android devices to the computer via USB cables. After recognized, your Lava Yuva 2s will be listed res on both sides of the window.
Step 3. Transfer Contacts, Photos, Videos, Music, SMS, Call Logs, Calendar and Apps from Lava Yuva 2 to Other Android Devices
Between the two Android phones, display all the contents you can transfer. You can uncheck any content you dislike to transfer. Then, click Start Transfer to transfer files from Lava Yuva 2 to another Android Phone quickly.

That’s all. It isn’t easy to transfer all your data from Lava Yuva 2 to Other Android Devices. Try Dr.Fone - Phone Transfer free to transfer Android files to your new Android phone. It is the best Android to Android data transfer tool. With it, you can transfer everything from Lava Yuva 2 to Other Android Devices.
Part 2. How to Transfer Everything from Lava Yuva 2 to Other Android Devices with Google Backup
No one likes to spend a lot of time on the stuff, such as transfer data from Lava Yuva 2 to Other Android Devices every time you change the phone. If you want to transfer quickly and painlessly, then here is the best which explains how to transfer data from Lava Yuva 2 to Other Android Devices using the Google Backup method. Google still has many ways to get all your stuff off your old device and add to your new device using Google Backup.
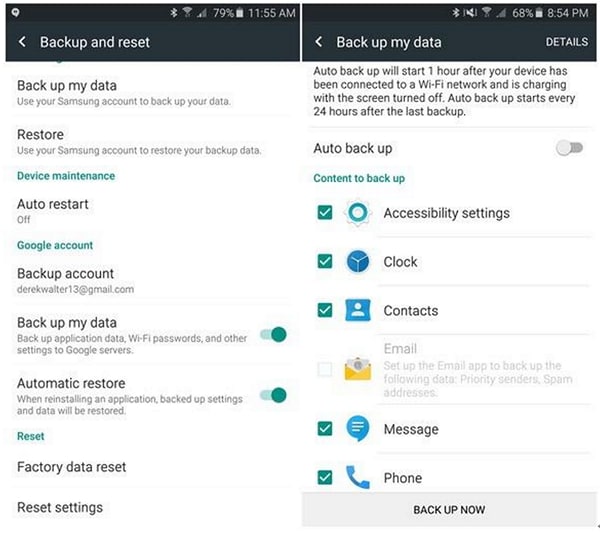
Before taking up backup the first thing you need to do is to sign-in the Android phone using your Google account. In the setting menu, you need to search for Backup and reset mode. Make sure you have backup data and automatic restore as both are flipped on your google account. Your Google server will remember your password, so you do not need to re-enter the password every time you sign in. Google sync really very well with Android devices.
Part 3. How to Transfer Data from Lava Yuva 2 to Other Android Devices with Bluetooth
Users feel good while setting up a new Android device. But we also know that your data is sensitive, so there would be one thing that would bother you is how to transfer data from Lava Yuva 2 to Other Android Devices using Bluetooth . Don’t worry. Here’s an easy way that would help you out to transfer all the data safely by simply using Bluetooth. You have to connect both the Lava Yuva 2 devices and enable the Bluetooth.

This one is the best to transfer the data such as photos, videos, songs, and other files. You have to discover the Lava Yuva 2 device and connect them through the wireless Bluetooth exchange data method. Allow your destination device to detect its presence and attempt to establish the connection between them. Once both devices are paired with Bluetooth, exchange the data, which include files, songs, ringtones, photos and videos. Note that Bluetooth can’t transfer text messages, contacts, call history or Apps.
Part 4. Tips about how to transfer from Lava Yuva 2 to Other Android Devices
When you have bought a new device, then certainly there is a need to transfer your data such as Contacts, SMS, Photos, Music, Apps, and more other documents using different methods. Your device data can also be transferred from Android smartphones to iPhone and vice versa. If you need to have a fast and easy way to transfer the data, you can try with Dr.Fone - Phone Transfer. Here we also have a list of a few different ways which can be used easily without any restrictions.
Transfer Contacts from Lava Yuva 2 to Other Android Devices
Transferring the contacts is the most important thing, the time has come when you do not need to face the painstaking process of copying each contact with the hand. Now you can transfer the contacts easier along with cloud synchronization. It’s one of the easiest ways to keep your contacts up-to-date and sync it with your Google account. Transfer the contacts and sync it on that registered account. Similarly, when you buy a new device, open your Google account on your new device and copy all the saved contacts from that account onto your new device.

Transfer SMS from Lava Yuva 2 to Other Android Devices
You can now transfer your old SMS to the Android device easily by using this free SMS backup app, which can restore and transfer all SMS stored in XML file format, and then you can send directly to your new Android devices. Here we have used a backup app that can explain how to transfer from Lava Yuva 2 to Other Android Devices easily when connected with each other and help you out to restore the SMS messages. Note that this app won’t pay attention to which SMS already exists and which one is imported twice. Instead, you can use MobileTrans one-click app, which helps you out in resolving this problem.

Transfer Photos from Lava Yuva 2 to Other Android Devices
You can use Dr.Fone - Phone Transfer, which can help you in how to transfer from Lava Yuva 2 to Other Android Devices easily. You simply have to install the tool, connect your Lava Yuva 2, and share your data such as photos, movies, and other files directly from Lava Yuva 2 to the other Android devices. Try it free.
Transfer Music from Lava Yuva 2 to Other Android Devices
We all love music and have collected the music according to our choice. Mostly we store the MP3 files that appear on your computer after you connect your smartphone. Firstly you need to download the Android File Transfer app if you’re a mac user or else use Bluetooth File Transfer that saves these files on your computer, and then you can transfer to another device. Instead, you can use MobileTrans tool, which can easily resolve your problem of how to transfer everything from Lava Yuva 2 to Other Android Devices with few clicks only.

Transfer Apps from Lava Yuva 2 to Other Android Devices
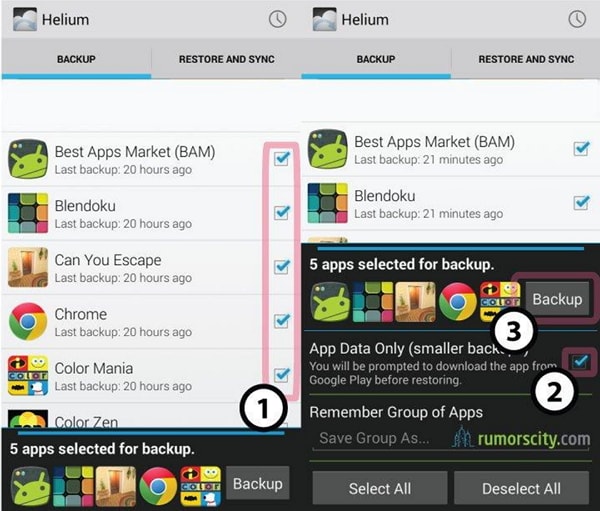
There are many apps that you require to transfer from your old phone to a new device, but here we have a Helium backup tool that can explain how to transfer from Lava Yuva 2 to Other Android Devices apps easily and do not require to be rooted. It can transfer the tool which can come in a free trial version and also support SD card and PC. You can automatically schedule the backup and can sync your Lava Yuva 2s.
I hope we were able to make you understand how to transfer everything from Lava Yuva 2 to Other Android Devices using third-party tools. We recommend using Dr.Fone - Phone Transfer, which works as the all-in-one tool and transfers all your data within few clicks only, including contacts, SMS, Photos, Music, Videos, Apps, etc.
Why not download it have a try? If this guide helps, don’t forget to share it with your friends.
Also read:
- [New] Essential GIF Tools for X/8/7/6 Owners
- [Updated] Free, Safe Steps to Extract Audio From YouTube Videos for 2024
- [Updated] Share Smiles & Photos (iPhones) for 2024
- Fixing the Problem of Invisible Desktop Icons on Your Windows 10 PC
- From Raw Footage to Final Cut YouTube Studio Edition for 2024
- How to Choose the Right Thumbnail Size for Impact
- How to Transfer Data from Vivo Y28 5G to Any iOS Devices | Dr.fone
- How to Transfer Photos from Lava Agni 2 5G to New Android? | Dr.fone
- In 2024, 2 Ways to Transfer Text Messages from Honor X50 GT to iPhone 15/14/13/12/11/X/8/ | Dr.fone
- In 2024, How to Transfer Contacts from Itel S23 to Outlook | Dr.fone
- In 2024, How to Transfer Contacts from Motorola Edge 40 Neo to Other Android Devices Using Bluetooth? | Dr.fone
- In 2024, Top 10 Fingerprint Lock Apps to Lock Your Xiaomi Redmi A2+ Phone
- Reestablishing Copy-Pasting Efficiency Across Browsers
- Titre SEO: Tutoriel Simple Et Pratique De Compression Vidéo Pour Conversion De Fichiers 1080P en Format 720P
- Title: In 2024, How to Transfer Music from Lava Yuva 2 to iPod | Dr.fone
- Author: Emma
- Created at : 2025-01-11 21:50:09
- Updated at : 2025-01-17 00:52:31
- Link: https://android-transfer.techidaily.com/in-2024-how-to-transfer-music-from-lava-yuva-2-to-ipod-drfone-by-drfone-transfer-from-android-transfer-from-android/
- License: This work is licensed under CC BY-NC-SA 4.0.