
In 2024, How to Transfer Photos From Lava Yuva 3 Pro to Samsung Galaxy S21 Ultra | Dr.fone
How to Transfer Photos From Lava Yuva 3 Pro to Samsung Galaxy S21 Ultra
Samsung is one of the leading brands in the technology market, and Samsung Galaxy S21 Ultra is the latest device released by them. Among all the gadgets and smartphones released by Samsung, S21 Ultra is really a remarkable creation that is amazingly filled with all the latest technology. If you are thinking about getting a brand new Samsung S21 Ultra, you are in the right place.
In this article, we will talk about the Samsung Galaxy S21 Ultra price and all its details with proper dissection that will help you determine whether this device is worth the value. Also, you’ll definitely get to learn how to transfer photos to Samsung Galaxy S21 Ultra with advanced software that surely does the job well. So let’s get to the details without wasting any time!
Part 1: Samsung Galaxy S21 Ultra Introduction
Samsung Galaxy S21 Ultra is the new model of the Samsung Galaxy series. This amazing device has so many features, the best quality camera, and 5G connectivity. This model of the Samsung Galaxy series has a pro-grade camera. Using its camera, you can take the best shots of anything. You can record video like a professional by using the camera. The camera has multi-lens with zoom-in features. You cannot take a perfect zoomed shot using another device because they don’t have these zoom-in features.
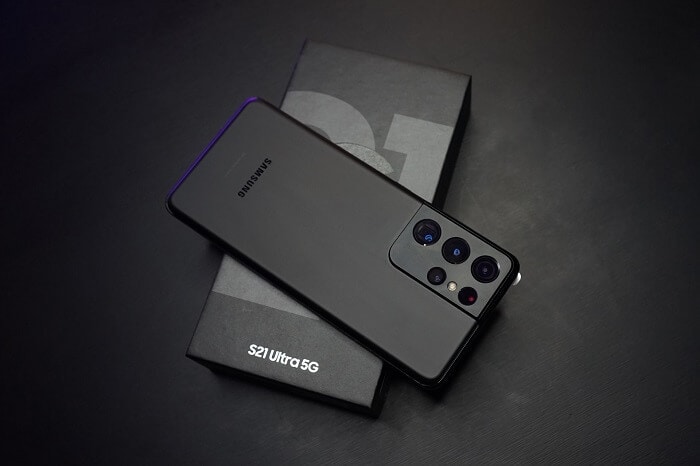
Record your life’s best moment with the Samsung Galaxy S21 Ultra 8k video feature. With this camera, you can also make GIFs, record short videos, slow-motion videos, etc. Galaxy S21 Ultra has a 108MP resolution. When it comes to the battery, you should know it has one lithium battery. Once you charge the Lava Yuva 3 Pro device, it’s ready to go for a long day. Now share your life moment on social media and enjoy your favorite game with Galaxy Ultra 5G. This device is available in multiple colors, including Phantom Black, Phantom Silver, Phantom Titanium, Phantom Navy, and Phantom Brown.
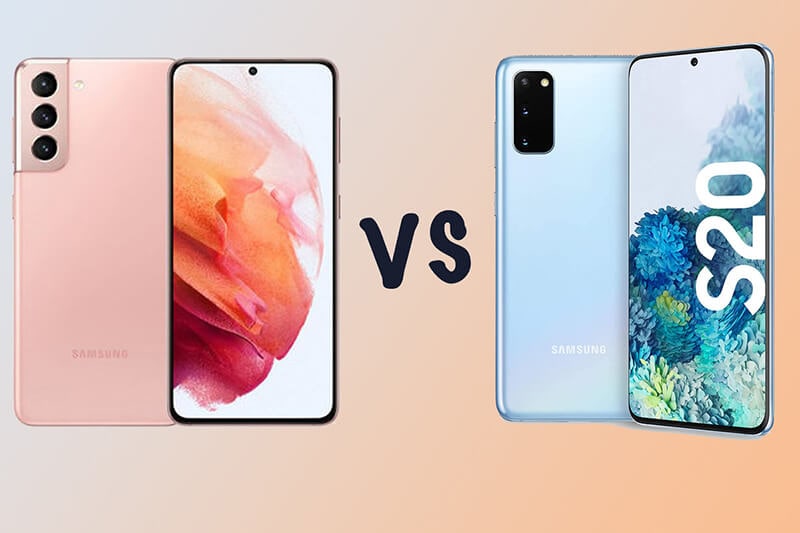
Part 2: The Differences among S21, S21+, and S21 Ultra
We all know how amazing the Samsung Galaxy S21 series is. Their features and quality make us fall in love with these devices. Though Samsung Galaxy S21, S21+, and S21 Ultra have many common features, there are still many differences among these. So, let’s find out what those are:
Price:
Among Samsung Galaxy S21, S21 Plus, and S21 Ultra, Samsung Galaxy S21 has the lowest price in town. It costs only $799. After S21, here comes S21 plus. The price of this model starts at $999. Now when it comes to Galaxy S21 Ultra, it begins at $1299. So, comparatively, Galaxy S21 Ultra is an expensive model. Among these three models, ultra has the best quality features, camera, and RAM capacity.
Design:
Though three of these have the same design of camera and position, the real difference is in size. Galaxy S21 comes in 6.2 inches screen, Galaxy S21 Plus has a 6.7-inch screen, and Galaxy S21 Ultra has a 6.8-inch screen. Galaxy S21 Ultra comes with a wide camera bump that fits the extra sensors. Galaxy S21 Ultra fits better in hands because of its curved edges.
Display:
As mentioned, the difference of screen measurements. Besides this, there are some other differences in the display. Galaxy S21 and S21 Plus come in FHD resolution displays, where Galaxy S21 Ultra has QHD resolution. That means you can see the details on the Galaxy S21 Ultra. Galaxy S21 and S21 Plus change the refresh rate between 48Hz and 120Hz, where Galaxy S21 Ultra can go 10Hz and 120Hz.
Camera:
Galaxy S21 and S21 Plus have three cameras: a 12MP main camera and a 12MP ultra-wide camera with a 64MP telephoto camera. The front camera comes in 10MP. On the other side, Galaxy S21 Ultra comes with a 108MP main camera, 12MP ultra-wide, and two 10MP telephoto cameras. Among these two telephoto cameras, one has 3x zoom capacity, and the other has 10X zoom capacity. S21 Ultra has a laser autofocus sensor that will track the subject and take the perfect shot. For video recording, three of these models have great video features. However, S21 Ultra is offering you the bright night sensor so you can record and take pictures in low light.
Battery and Charging:
Regarding the battery performance and charging system, there are many differences among Samsung Galaxy S21, Galaxy S21 Plus, and S21 Ultra. Samsun Galaxy S21 has 4000 mAh battery capacity, Galaxy S21 Plus comes in 4800 mAh, and Galaxy S21 Ultra has 5000 mAh. So, comparatively, Galaxy S21 Ultra has the best quality battery. The charging system is the same for all of these three models. It needs 25W on a wired connection. You can also charge them wireless on 15W.
Connectivity:
In these three models, you will get 5G. So, there is no argument about this. However, Galaxy S21 Plus and S21 Ultra have been manufactured with Ultra-Wide Band (UWB) chips. It is a new feature that will provide hands-free control. Using these features, you can unlock your car or find the SmartTag tracker. Among these, S21 Ultra offers you more. It has Wi-Fi 6E compatibility, which is the fastest and lowest latency for Wi-Fi connection.
Pro tips: How to Transfer Photos to S21 Ultra?
Most of the time, after purchasing a new phone, we cannot transfer photos or other data to that device easily. At that moment, if you can use amazing data recovery software to transfer all your photos to the new Samsung Galaxy S21 Ultra, that would be a great solution. Well, we have the best solution for you. We are going to introduce you to an amazing software: Dr.Fone - Phone Transfer . It is a brilliant data recovery software that you can use for both iOS and Android systems. It has many amazing features. You can recover your data, transfer your photos and files, unlock Apple’s ID and lock screen, repair the Android or iOS system, switch data from one phone to another phone, keep backup, restore data and erase data permanently from a device. Using this amazing software, you can transfer your photos to Samsung Galaxy S21 Ultra within one single click. Let’s follow the guideline to know how to do this.
Step 1: Download & Install Program
Download and install the software on your computer. Then start the Dr.Fone - Phone Transfer, and you’ll get the program’s home page. Now click on the “Switch” option to proceed forward.

Step 2: Connect Android and iOS Device
Next, you can connect your Samsung Galaxy S21 Ultra and an iOS device to the computer (you can also use an Android device here). Use a USB cable for the Android device and a lightning cable for the iOS device. You’ll get an interface like below when the program detects both devices. You can use the “Flip” button to change devices as the target device and the sender device. You can also choose the file types here to transfer.

Step 3: Start Transfer Process
After choosing the desired file types (Photos for this case), click on the “Start Transfer” button to start the transfer process. Keep patience until the process ends and make sure both Android and iOS devices stay connected properly during the process.

Step 4: Finish Transfer and Check
Within a short time, all your selected photos will be transferred to the Samsung Galaxy S21 Ultra. Then disconnect the Lava Yuva 3 Pro devices and check if everything is okay.
Here is the video tutorial for you:
Important Note: New Samsung Galaxy S21 Ultra has new software to transfer all files to another device, called Smart switch. This feature is used for keeping the backup and restoring the files. Though it is good software, it has many cons. So, before using that app, check these cons.
- Smart Switch has a low-speed transfer problem. It shows up when you transfer data with wireless connectivity.
- After transferring the data, the smart switch does not back up the data. It is quite hard to recover the data using this app.
- Using the Smart Switch app, you can only transfer the data from Samsung to Samsung. You can’t use it for other devices.
Conclusion
Samsung Galaxy S21 Ultra has amazing features for the bottom line and is more updated than other models. It has the best quality camera, better battery capacity, and other new features. The design and the display are way better than the other models. After purchasing the Samsung Galaxy S21 Ultra, if you get stuck transferring your photos to the Lava Yuva 3 Pro device, then you don’t have to worry. We have introduced you to Dr.Fone - Phone Transfer in this article. Using this software, you can recover any files and keep data backup and restore them later. To transfer your photos to Galaxy S21 Ultra, you can use Dr.Fone Switch app by following the steps we provided. It’s definitely better software than Smart Switch.
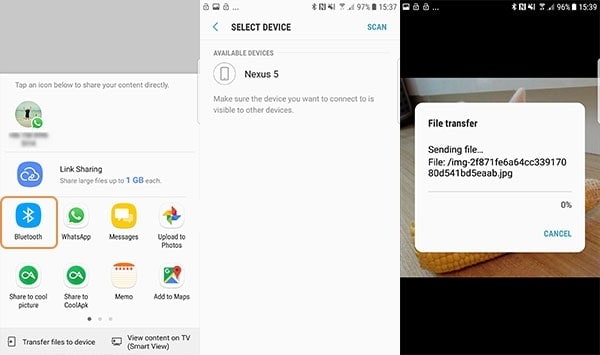
How to Transfer Contacts from Lava Yuva 3 Pro to Other Android Devices Using Bluetooth?
One of the first and the most important things people care about while upgrading their phones today is how to transfer contacts from one phone to another phone. 2022 has just begun, new devices from smartphone companies are coming in and one of the most anticipated of them is Samsung Galaxy S22 series that is rumored to launch just this February. For some, the upgrade fever is coming on! And, it pays to be prepared in advance. If you are going to be upgrading your old Android to one of the fancy new Android smartphones soon, you are in the right place. You will learn how to transfer contacts from the old device to the new one easily and smoothly.
Part I: How to Transfer Contacts from Lava Yuva 3 Pro to Other Android Devices via Bluetooth?
This method works if you are not trading in your old smartphone to offset the cost of the new, as to transfer contacts from one Android smartphone to another using Bluetooth you will require both devices present and in close proximity, a few feet away at best. There are advantages to transferring contacts using Bluetooth, such as no need for using the internet, going through any other hoops, or opening special apps! Everything you need to share contacts from one Android phone to another is built right into your phone! Now, to transfer contacts from one Android smartphone to another using Bluetooth, you must first pair the two devices together so as to allow for seamless contacts transfer.
I.I: Pairing Two Android Devices Together
Here’s how to pair your old and new phone together via Bluetooth:
Step 1: On your old and new devices, go to Settings, then Bluetooth
Step 2: Make sure Bluetooth is “On” on both of them
Step 3: If everything is done correctly, both devices will show themselves to each other
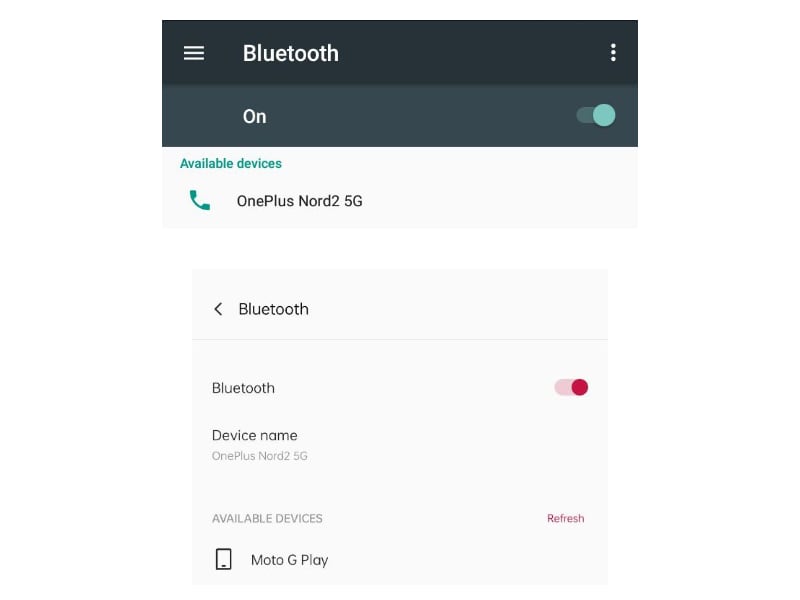
Step 4: Tap the other device on either of them. Here, the Moto G4 Play was tapped on OnePlus Nord 2:
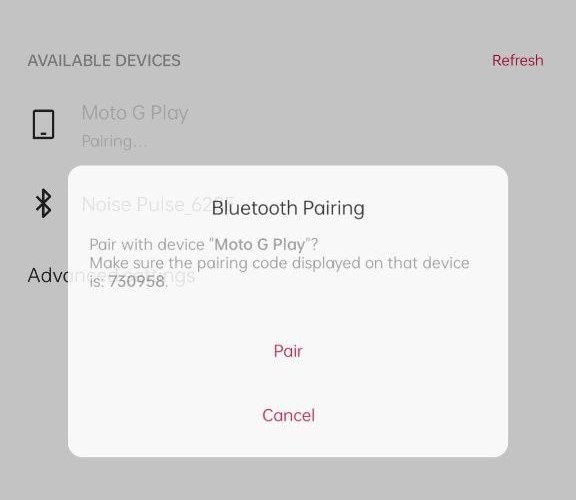
Step 5: A prompt to pair with the new phone will come on the other device as well. For your device, make sure that the PIN is the same on both devices to ensure the security of the connection. This PIN is generated afresh and is unique, so the PIN in the image is not the PIN you will see on your devices. Tap Pair on your old device to pair the two devices together using Bluetooth.
Step 6: After pairing is complete, both devices will show under paired devices on each other:
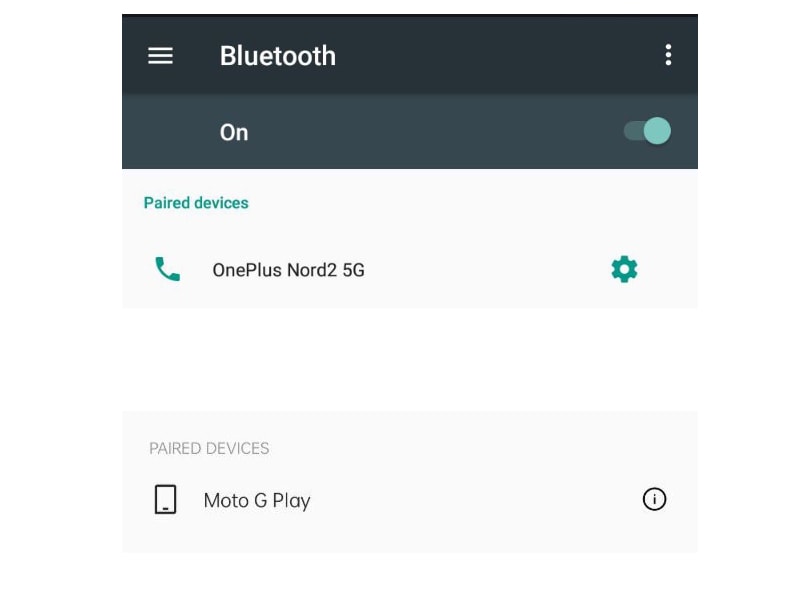
And that’s how simple it is to pair devices to each other using Bluetooth!
I.II: Transfer Contacts from One Android Smartphone to Another Using Bluetooth
Here is how to transfer contacts from one Android to another, easily, using Bluetooth:
Step 1: Go to Phone on your old phone and select the Contacts tab
Step 2: Tap the vertical ellipses and select Import/ Export.
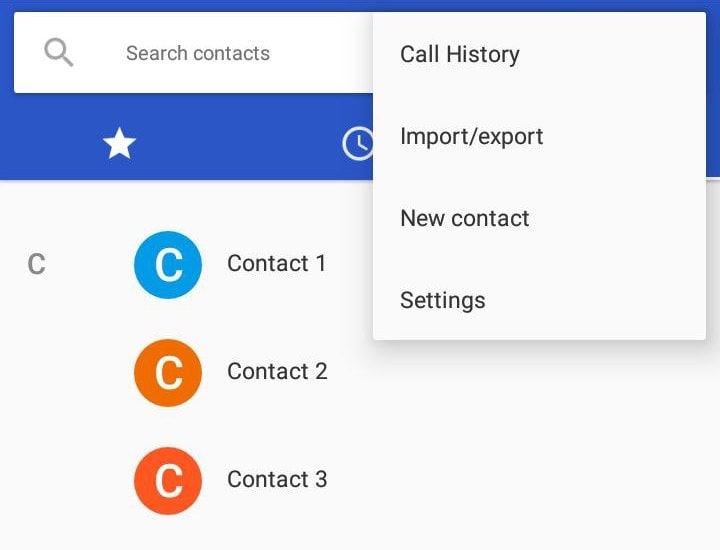
This particular option can vary by your phone model and Android flavor, this is on Android 7 running on Motorola G4 Play. If you are unable to find a way to select contacts or share contacts in the Phone app on your phone, use the Contacts app on your phone for the same effect.
Step 3: A popup will emerge:

Select Share All Contacts.
Step 4: When you do that, this will come up:
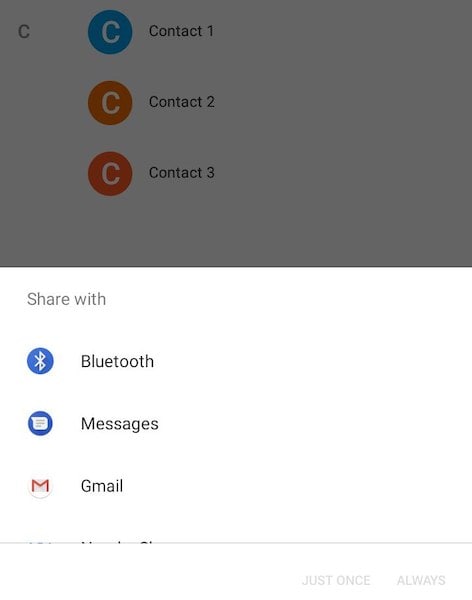
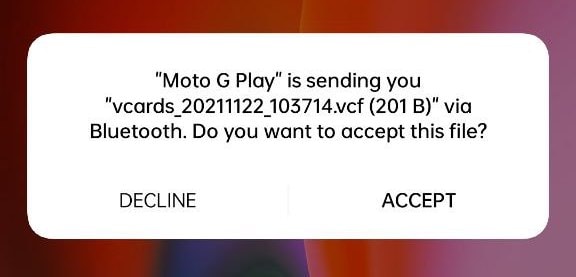
Select Bluetooth in the Share With menu. You may select Always or Just Once and proceed.
Step 5: Choose the paired handset, in this case, the OnePlus Nord 2:
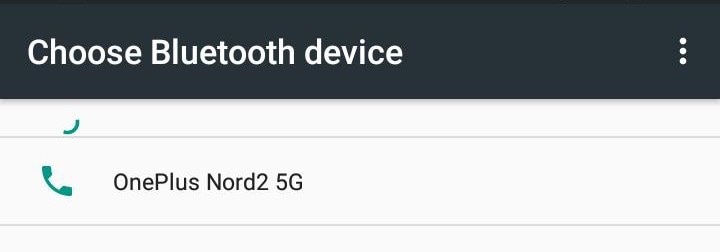
Step 6: The VCF file will be exported to Nord 2 and you can accept it on the Nord 2 (new device).
And that is how to transfer contacts from an Android smartphone to another using Bluetooth!
Part II: Other Methods to Transfer Contacts from Lava Yuva 3 Pro to Other Android Devices
What are other ways to transfer contacts from one Android smartphone to another? Glad you asked. Because there are other ways to transfer contacts from an Android smartphone to another that do not use Bluetooth and can be both seamless and more powerful than the Bluetooth method, depending on your tastes and needs.
II.I: Sync Contacts Using Google Account
This is another method to transfer your contacts on one Android device and restore them on another Android device. Here’s how to transfer contacts from one Android smartphone to another using Google Sync:
Step 1: Go to Settings on your old device
Step 2: Tap Accounts
Step 3: Tap the account you want to transfer contacts from
Step 4: Make sure that there is a checkmark next to Contacts, or, in other words, Contacts sync is enabled/ toggled.
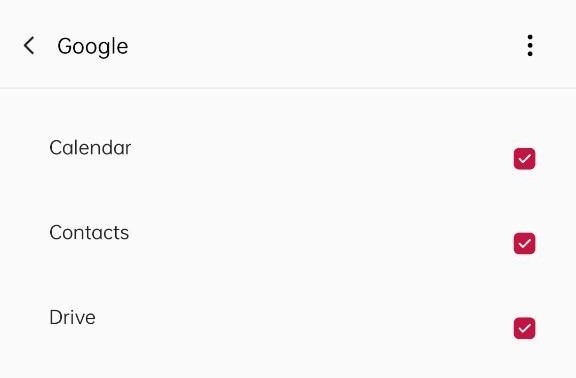
Now, Google will sync your contacts from the Lava Yuva 3 Pro device onto the cloud, and your new device signed into the same Google Account will automatically download the contacts.
II.II: Transfer Contacts from An Android Smartphone To Another Using Manufacturer Apps
Now, if you have an LG phone, you might be more willing to use LG apps than, say, Xiaomi apps. Same for Xiaomi users who would probably scoff at using Samsung apps on their beloved Xiaomi devices. Manufacturers provide apps on Google Play Store that make transferring content from another device to their devices easy because that suits them to make the processes as seamless and easy for their customers. Even Apple is no different in that regard, they have an app to make it easy for people to switch from Lava Yuva 3 Pro to iOS.
There are apps by most major manufacturers like Samsung and Xiaomi, including the older titans such as LG that have now stopped manufacturing phones recently. More or less, the steps that users would need to take to transfer contacts from their old devices to the new are fairly common, and you can use the app for your manufacturers, such as Mi Mover for Xiaomi and Samsung Smart Switch. Here is how to transfer contacts from old Android to new Samsung devices using Samsung Smart Switch.
Step 1: Download Samsung Smart Switch on both your old Android and the new Samsung device
Step 2: Keep the Lava Yuva 3 Pro devices close by, say, on the table. This will not work if the Lava Yuva 3 Pro devices are in different rooms or too far away.
Step 3: Launch Smart Switch on both the Lava Yuva 3 Pro devices
Step 4: Tap Send Data on old Android
Step 5: Tap Receive Data on the new Samsung device
Step 6: Tap Wireless method on both devices
Step 7: Tap Allow on your old device to start the transfer process. Don’t worry, this will not dump all your content just yet.
Step 8: On your new Samsung device, choose what you want to transfer - Contacts, in this case.
Step 9: Tap Transfer and when the transfer is done, tap Close.
That’s all it takes to transfer contacts from old phone to new using Samsung Smart Switch. The process is fairly similar for all other apps from manufacturers. You tap Send on the old device, tap Receive on the new device, choose what you want to receive, and that’s it.
Limitations Of App-based Transfer Methods
It must be noted that there is one binding limitation with such apps - these apps are not two-way streets. You cannot use Samsung Switch to transfer contacts from Samsung phones to another manufacturer’s phones. The same goes for all other manufacturers. All of them allow data into their devices, not out of their devices onto another manufacturer’s devices, using their apps.
In that regard, using a third-party solution such as Dr.Fone allows you complete freedom to do whatever you want and whenever you want, and even so, Dr.Fone is a great tool to have in one’s arsenal to use every day. How? Because not only does Dr.Fone allow you to transfer contacts from one Android device to another, you have complete freedom to mix the Lava Yuva 3 Pro devices in all possible ways. So, if you want to transfer from Samsung to Xiaomi, you can do that. You want to transfer from Xiaomi to Samsung, Dr.Fone does that. Transfer from Apple iPhone to Xiaomi? Yes! Xiaomi or Samsung to Apple iPhone? You bet, all supported! And with a clean, easy-to-use interface that does the job quickly and safely.
II.III: Transfer Contacts from Lava Yuva 3 Pro to Other Android Devices Using Dr.Fone - Phone Transfer
Video Tutorial: How to Transfer Data from Lava Yuva 3 Pro to Other Android Devices
Now, how about a method that frees you from all limitations and any possible hiccups you might encounter with the previous methods? Yes, that is what Dr.Fone promises.
Dr.Fone is a set of modules that specialize in particular tasks that users need to perform with their phones. Phone Transfer is one such module that helps users to easily and quickly transfer contacts and other data from any smartphone to any other smartphone. That means you only need one Dr.Fone to transfer from iPhone to Samsung, Xiaomi to Samsung, LG to Xiaomi, Samsung to Oppo, the combinations are endless since Dr.Fone does not limit you in any way!
Here’s how to transfer contacts from, say, an iPhone to an Android device using Dr.Fone:
Step 1: Download Dr.Fone
Step 2: Launch Dr.Fone
Step 3: Select the Phone Transfer module and connect your Lava Yuva 3 Pros to the computer
Step 4: When the Lava Yuva 3 Pro devices are connected, select the Contacts category to transfer and click Start Transfer. Within seconds, your contacts will be transferred to the new device.

That’s it! It is that easy. Connect your devices, select what to transfer, click Start Transfer, and boom! You’re good to go. If you are thinking about WhatsApp chats, that is handled easily, too, using the WhatsApp Transfer module. You’re going to have a wide smile plastered all over your face when you try this and experience how seamless and easy this is, everything integrated into one easy-to-use app called Dr.Fone.
Transferring contacts from one Android to another Android can be done in two broad ways. One is to transfer contacts from an Android smartphone to another using Bluetooth, which means you can transfer between any smartphone easily and whenever you wish to, without limitations such as which manufacturer the smartphone belongs to. But, how about some more control over what you transfer? If you do not want to use Bluetooth, there is the other way to simply enable Sync in your Google Account, post which your contacts will be uploaded to your Google Account and downloaded to your other device. Or, when you want to do more than transfer, or when you want to have the convenience of doing things from your computer, you have a third way, where you can use Dr.Fone with the Phone Transfer module that lets you select what to transfer, and importantly, lets you transfer between manufacturers easily. So you want to transfer from Lava Yuva 3 Pro to iPhone, you can do that. You want to transfer from an Android smartphone to another, you can do that. You want to transfer contacts and other data from one manufacturer to another, you can do that. All in just three steps - connect, select, click.
[Easiest Guide] How to Clone Lava Yuva 3 Pro Phone? 6 Ways In 2024
Changing Android phones is no longer a tedious job. By using an Android clone app, you can simply transfer your data from one device to another. In this way, you can clone Android phone without the need to maintain multiple accounts Android. In this post, we will teach you how to clone Android phone using five different solutions. So what are you waiting for? Read this guide and clone Android phone without much trouble.
You can watch the video below to clone Android phone and copy its data
Part 1: How to clone Android phone using Dr.Fone - Phone Transfer?
To clone an Android phone in a fast and secure manner, simply take the assistance of Dr.Fone - Phone Transfer . It is a part of the Dr.Fone toolkit and can be used to transfer all sorts of data directly from one device to another. For instance, you can transfer your photos, videos, music, messages, contacts, notes, and multiple accounts to Android detail as well. It is compatible with all the leading Android devices manufactured by brands like Samsung, HTC, Lenovo, Huawei, LG, Motorola, and more. Having an intuitive process, it will let you Android clone in no time. To learn how to clone Android phone using Dr.Fone Switch, follow these steps:
Dr.Fone - Phone Transfer
Transfer Photo from Lava Yuva 3 Pro to iPhone in 1 Click Directly!
- Cross-platform data shift between any device of your choice from Android and iPhone.
- Support massive data, including images, videos, music, messages, contacts, apps, and more.
- Works perfectly with almost mobile phones and tablets, such as iPhones, iPad, Samsung, Huawei, etc.
- Fully work with mobile system iOS 17 and Android 13 and computer system Windows 11 and Mac 12.
- 100% safe and risk-free, backup & restore data as the original.
3981454 people have downloaded it
1. Download Dr.Fone - Phone Transfer on your Windows or Mac before changing Android phones. Afterward, you can connect both devices to the computer and launch the Dr.Fone toolbox.
2. Click on the “Phone Transfer” button to view its dedicated interface.
3. As you can see, Dr.Fone will automatically detect your connected devices. One of them would be marked as the source, while the other one would be the target device.
4. If you wish to change their positions before you do Android clone, click the “Flip” button.

5. Now, you can select the kind of data that you wish to transfer from one device to another.
6. Click on the “Start Transfer” button to clone Android phone.
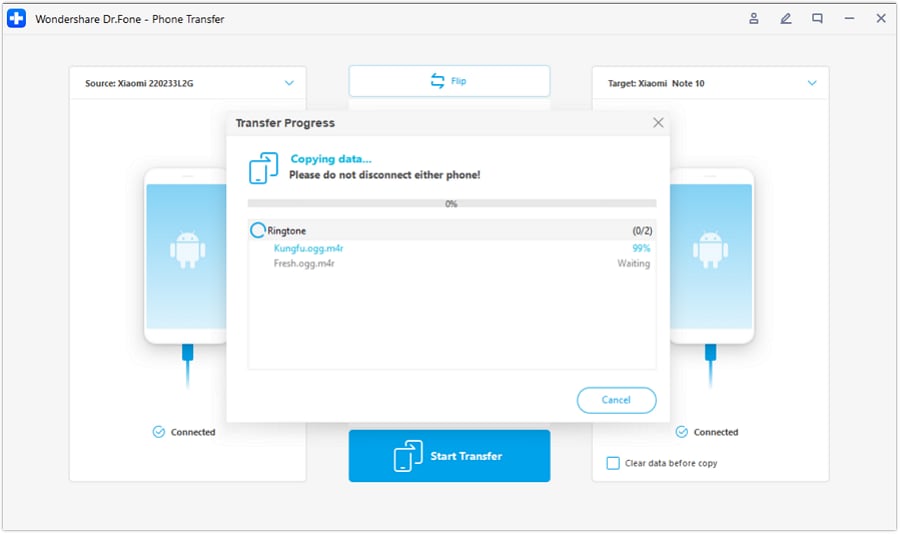
7. Sit back and wait for a while as the application will transfer the selected content from one device to another. Make sure that both devices stay connected to the computer.
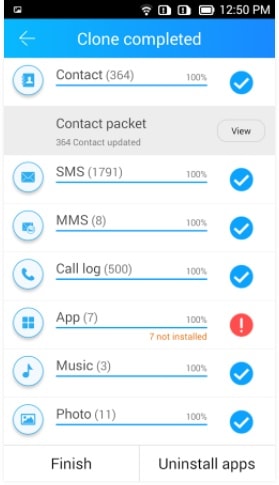
8. Once the cloning process is completed, you will be notified.
In this way, you can easily learn how to clone Android phone in a few seconds. Later, you can disconnect the Lava Yuva 3 Pro devices and use them readily. Besides Android, you can also use Dr.Fone - Phone Transfer to transfer data between different platforms as well.
Part 2: Clone Android phone using SHAREit
SHAREit is a popular cross-platform device-sharing app that over 600 million users use. The app can be used to perform a wireless transfer of data at a fast speed. This is done without utilizing your data usage or via Bluetooth. The app uses Wifi directly to clone Android phone. While changing Android phones, use SHAREit the following way:
Download SHAREit: https://play.google.com/store/apps/details?id=com.lenovo.anyshare.gps
1. First, install the SHAREit app on both Android devices. You can get it for free from the Google Play Store.
2. Now, launch the app on the source device and tap on the “Send” option.

3. This will further let you select the data files that you wish to transfer. Click on the “Next” option after selecting your content.
4. Bring the target device in close proximity to the sender and launch the app. Mark it as a receiving device.

5. This will make the phone automatically detect the sending device. Select the Wi-Fi hotspot that is associated with the sending device to form a secure connection.
6. As the connection is made, you can select the receiving device on the source phone. This will initiate the cloning of your data.

Part 3: Clone Android phone using CLONEit
While changing Android phones, users often look for alternatives. Therefore, you can also take the assistance of CLONEit to transfer your files in a batch. The app can also be used to migrate multiple accounts Android without much trouble. To learn how to clone Android phone using CLONEit, follow these steps:
1. Download the CLONEit app on both devices. After installing, launch the app on the Lava Yuva 3 Pro devices and turn on their Wifi.
Download CLONEit: https://play.google.com/store/apps/details?id=com.lenovo.anyshare.cloneit
2. Mark the source device as a “Sender” and the target devices as a “Receiver”.

3. In this way, the target device will automatically start looking for the sender. You can view the Wifi hotspot the sender has created to verify the connection.
4. You need to confirm the connection request by tapping on the “Ok” button of the prompt.

5. Once the connection has been established, you can clone Android phone easily. Just go to the source device (sender) and select the data that you wish to transfer.
6. After making your selection, click on the “Start” button to make your target device the Android clone of your old device.
7. Wait for a while as the transfer of data would take place. You will be notified as soon as it is completed successfully.
Part 4: Clone Android phone using Phone Clone
Huawei has also developed a dedicated app – Phone Clone to transfer the data from one Android device to another wirelessly. In this way, you don’t have to set up multiple accounts Android for every phone you buy. The app supports a fast and extensive cloning option with a user-friendly interface. To make your new device an Android clone, follow these steps:
1. Launch the Phone Clone app on both devices. If you don’t have the app, you can download it from Google Play.
Download Phone Clone: https://play.google.com/store/apps/details?id=com.hicloud.android.clone&hl=en
2. After launching the app on the new phone, mark it as a receiver. This will turn your phone into a Wi-Fi hotspot.
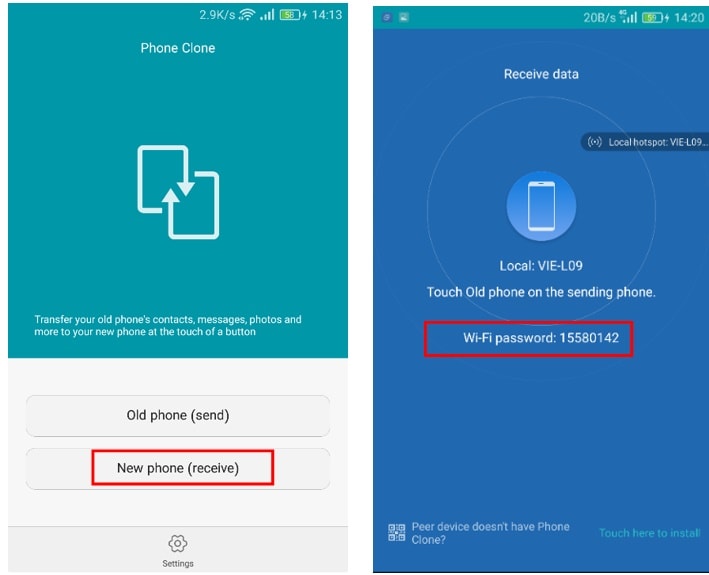
3. Go to the app on the source device and mark it as a sender. It will start looking for the available Wifi networks.
4. Connect it to the hotspot you have recently created and verified the password.

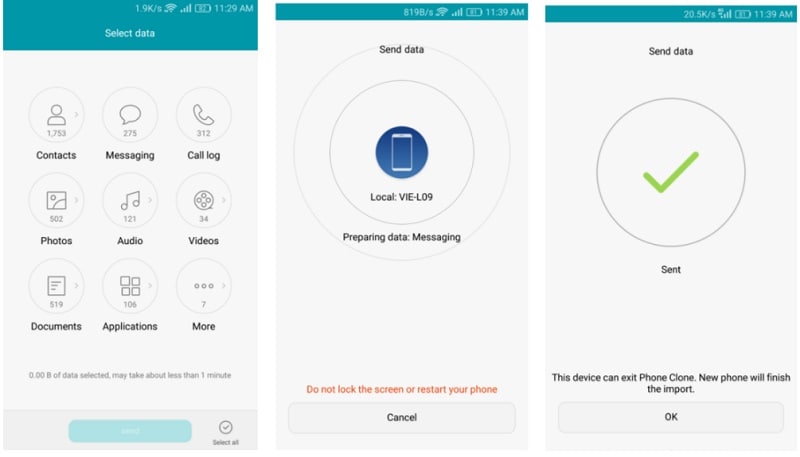
5. Once a secure connection is established, you can clone Android phone by selecting the data from the source device.
6. Tap on the “Send” button and transfer the selected content to the target device wirelessly.
Part 5: Clone Android phone using Google Drive
Google Drive is ideally used to store data on the cloud. However, it can also be used to back up and restore your data. Even though Google Drive transfers the data wirelessly, it consumes a substantial amount of data usage. Also, the process is not as fast or smooth as other options. Nevertheless, you can learn how to clone Android phone using Google Drive by following these steps:
1. Unlock your source Android device and go to Settings > Backup & Reset. From here, you can turn on the option to backup your data.
2. Furthermore, you can verify the account on which you are taking the backup of your data and turn on the option of “Automatic Restore”. This will be of great help if you are managing multiple accounts Android.

3. After taking a complete backup of your data, turn on your brand-new Android to perform its setup.
4. Log in using the credentials of your Google Account. Make sure that the account should be linked to your previous device.

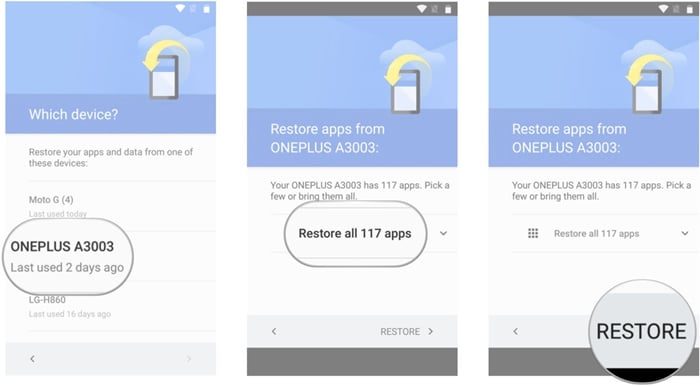
5. After signing in, the Lava Yuva 3 Pro device will automatically sync to the account and identify the backup files. Simply select the most recent backup file.
6. Also, you can select the apps and app data that you wish to transfer. Click on the “Restore” button at the end to make your target device an Android clone of your previous phone.
Part 6: Clone Lava Yuva 3 Pro Phone Using Bluetooth
Using Bluetooth for cloning an Android phone is not the most efficient method. It is more suitable for transferring specific files than creating a comprehensive clone. Moreover, it’s a slow and manual process that requires you to select and transfer files one by one. Here’s how you can use Bluetooth for this purpose:
1. On both Android devices, turn on Bluetooth and pair the Lava Yuva 3 Pro devices. Navigate to the file you want to send on the source device, tap “Share,” and select “Bluetooth.”
2. Now, choose the targeted device to send the file. Move to the other device and “Accept” the incoming file transfer.
FAQs
1. Is Android phone clone safe?
Cloning an Android phone using reputable and trusted methods, apps, or tools is generally safe. Nonetheless, it is of utmost importance to exercise prudence and employ trustworthy software to safeguard your personal data. Be sure to obtain apps and tools exclusively from reputable sources, such as the Google Play Store, and adhere to the best data security practices.
2. Can I clone between different Android phone models or brands?
The ability to clone between different Android phone models or brands depends on the specific method or tool you are using. Dedicated phone transfer apps like Wondershare Dr.Fone - Phone Transfer or Phone Clone are often designed to work across various Android models and brands.
3. What should I do before cloning my Android phone to ensure a smooth process?
Before commencing the cloning procedure for your Lava Yuva 3 Pro, creating a backup of your device’s data is crucial. It can be accomplished by using either the integrated backup feature or a trustworthy third-party app.
This precautionary step guarantees the safety of your data should any issues arise during the cloning procedure. Moreover, it’s imperative to verify that both devices are running the most up-to-date software updates and application versions.
Conclusion
Now, when you know six different ways to clone Android phone, you can easily move from one device to another without experiencing any data loss. This guide will certainly help every individual who is changing Android phones. Feel free to share it with your friends and family and let us know about your feedback regarding these solutions as well.
Also read:
- [New] In 2024, Unpacking the Performance A Complete Guide to LG BP350 Monitors
- [New] Step-by-Step Guide to Producing Quality Mobile Videos
- [Updated] 2024 Approved Instagram's Abandoned Followers Map
- [Updated] Chronicle Conversations on Google
- 2024 Approved Thrill Seekers' Guide Games Like Grand Theft Auto V
- Ensure Optimal Performance with Newest NETGEAR Wi-Fi Adapter Drivers Downloaded Here!
- Harnessing the Power of Gratuitous Text Animations for 2024
- How to Transfer Text Messages from Honor 100 to New Phone | Dr.fone
- How to Use Phone Clone to Migrate Your Lava Blaze Curve 5G Data? | Dr.fone
- In 2024, 2 Ways to Transfer Text Messages from Lenovo ThinkPhone to iPhone 15/14/13/12/11/X/8/ | Dr.fone
- In 2024, 3 Smart and Simple Ways to Change Home Address on Apple iPhone 15 Pro Max | Dr.fone
- In 2024, 4 Ways to Transfer Music from Oppo Find X6 to iPhone | Dr.fone
- In 2024, 6 Ways To Transfer Contacts From Honor Play 40C to iPhone | Dr.fone
- In 2024, Android to Apple How To Transfer Photos From Itel P40 to iPad Easily | Dr.fone
- In 2024, How to Transfer Contacts from OnePlus Nord CE 3 Lite 5G to Other Android Devices Using Bluetooth? | Dr.fone
- In 2024, How to Transfer Contacts from Poco F5 Pro 5G to Outlook | Dr.fone
- In 2024, How to Transfer Data from Poco C51 to Other Android Devices? | Dr.fone
- Professional Insights Into Android's Recording Features for 2024
- Top 5 High-Quality Android Screen Recording Solutions for 2024
- Title: In 2024, How to Transfer Photos From Lava Yuva 3 Pro to Samsung Galaxy S21 Ultra | Dr.fone
- Author: Emma
- Created at : 2025-01-02 20:47:02
- Updated at : 2025-01-04 21:36:50
- Link: https://android-transfer.techidaily.com/in-2024-how-to-transfer-photos-from-lava-yuva-3-pro-to-samsung-galaxy-s21-ultra-drfone-by-drfone-transfer-from-android-transfer-from-android/
- License: This work is licensed under CC BY-NC-SA 4.0.