
In 2024, How to Transfer Photos From Samsung Galaxy S24+ to Samsung Galaxy S21 Ultra | Dr.fone
How to Transfer Photos From Samsung Galaxy S24+ to Samsung Galaxy S21 Ultra
Samsung is one of the leading brands in the technology market, and Samsung Galaxy S21 Ultra is the latest device released by them. Among all the gadgets and smartphones released by Samsung, S21 Ultra is really a remarkable creation that is amazingly filled with all the latest technology. If you are thinking about getting a brand new Samsung S21 Ultra, you are in the right place.
In this article, we will talk about the Samsung Galaxy S21 Ultra price and all its details with proper dissection that will help you determine whether this device is worth the value. Also, you’ll definitely get to learn how to transfer photos to Samsung Galaxy S21 Ultra with advanced software that surely does the job well. So let’s get to the details without wasting any time!
Part 1: Samsung Galaxy S21 Ultra Introduction
Samsung Galaxy S21 Ultra is the new model of the Samsung Galaxy series. This amazing device has so many features, the best quality camera, and 5G connectivity. This model of the Samsung Galaxy series has a pro-grade camera. Using its camera, you can take the best shots of anything. You can record video like a professional by using the camera. The camera has multi-lens with zoom-in features. You cannot take a perfect zoomed shot using another device because they don’t have these zoom-in features.
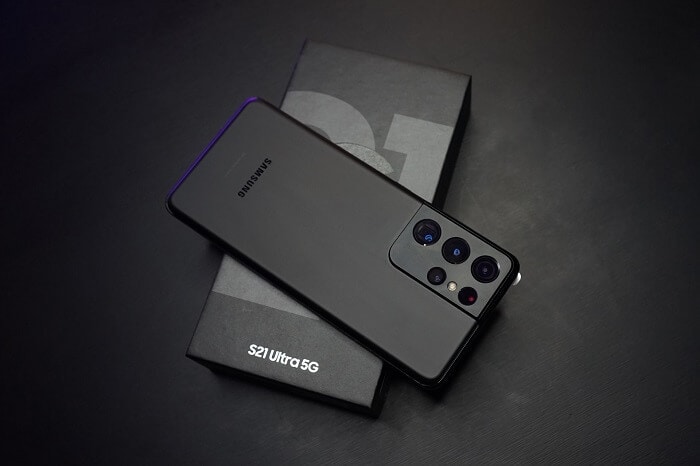
Record your life’s best moment with the Samsung Galaxy S21 Ultra 8k video feature. With this camera, you can also make GIFs, record short videos, slow-motion videos, etc. Galaxy S21 Ultra has a 108MP resolution. When it comes to the battery, you should know it has one lithium battery. Once you charge the Samsung Galaxy S24+ device, it’s ready to go for a long day. Now share your life moment on social media and enjoy your favorite game with Galaxy Ultra 5G. This device is available in multiple colors, including Phantom Black, Phantom Silver, Phantom Titanium, Phantom Navy, and Phantom Brown.
Part 2: The Differences among S21, S21+, and S21 Ultra
We all know how amazing the Samsung Galaxy S21 series is. Their features and quality make us fall in love with these devices. Though Samsung Galaxy S21, S21+, and S21 Ultra have many common features, there are still many differences among these. So, let’s find out what those are:
Price:
Among Samsung Galaxy S21, S21 Plus, and S21 Ultra, Samsung Galaxy S21 has the lowest price in town. It costs only $799. After S21, here comes S21 plus. The price of this model starts at $999. Now when it comes to Galaxy S21 Ultra, it begins at $1299. So, comparatively, Galaxy S21 Ultra is an expensive model. Among these three models, ultra has the best quality features, camera, and RAM capacity.
Design:
Though three of these have the same design of camera and position, the real difference is in size. Galaxy S21 comes in 6.2 inches screen, Galaxy S21 Plus has a 6.7-inch screen, and Galaxy S21 Ultra has a 6.8-inch screen. Galaxy S21 Ultra comes with a wide camera bump that fits the extra sensors. Galaxy S21 Ultra fits better in hands because of its curved edges.
Display:
As mentioned, the difference of screen measurements. Besides this, there are some other differences in the display. Galaxy S21 and S21 Plus come in FHD resolution displays, where Galaxy S21 Ultra has QHD resolution. That means you can see the details on the Galaxy S21 Ultra. Galaxy S21 and S21 Plus change the refresh rate between 48Hz and 120Hz, where Galaxy S21 Ultra can go 10Hz and 120Hz.
Camera:
Galaxy S21 and S21 Plus have three cameras: a 12MP main camera and a 12MP ultra-wide camera with a 64MP telephoto camera. The front camera comes in 10MP. On the other side, Galaxy S21 Ultra comes with a 108MP main camera, 12MP ultra-wide, and two 10MP telephoto cameras. Among these two telephoto cameras, one has 3x zoom capacity, and the other has 10X zoom capacity. S21 Ultra has a laser autofocus sensor that will track the subject and take the perfect shot. For video recording, three of these models have great video features. However, S21 Ultra is offering you the bright night sensor so you can record and take pictures in low light.
Battery and Charging:
Regarding the battery performance and charging system, there are many differences among Samsung Galaxy S21, Galaxy S21 Plus, and S21 Ultra. Samsun Galaxy S21 has 4000 mAh battery capacity, Galaxy S21 Plus comes in 4800 mAh, and Galaxy S21 Ultra has 5000 mAh. So, comparatively, Galaxy S21 Ultra has the best quality battery. The charging system is the same for all of these three models. It needs 25W on a wired connection. You can also charge them wireless on 15W.
Connectivity:
In these three models, you will get 5G. So, there is no argument about this. However, Galaxy S21 Plus and S21 Ultra have been manufactured with Ultra-Wide Band (UWB) chips. It is a new feature that will provide hands-free control. Using these features, you can unlock your car or find the SmartTag tracker. Among these, S21 Ultra offers you more. It has Wi-Fi 6E compatibility, which is the fastest and lowest latency for Wi-Fi connection.
Pro tips: How to Transfer Photos to S21 Ultra?
Most of the time, after purchasing a new phone, we cannot transfer photos or other data to that device easily. At that moment, if you can use amazing data recovery software to transfer all your photos to the new Samsung Galaxy S21 Ultra, that would be a great solution. Well, we have the best solution for you. We are going to introduce you to an amazing software: Dr.Fone - Phone Transfer . It is a brilliant data recovery software that you can use for both iOS and Android systems. It has many amazing features. You can recover your data, transfer your photos and files, unlock Apple’s ID and lock screen, repair the Android or iOS system, switch data from one phone to another phone, keep backup, restore data and erase data permanently from a device. Using this amazing software, you can transfer your photos to Samsung Galaxy S21 Ultra within one single click. Let’s follow the guideline to know how to do this.
Step 1: Download & Install Program
Download and install the software on your computer. Then start the Dr.Fone - Phone Transfer, and you’ll get the program’s home page. Now click on the “Switch” option to proceed forward.

Step 2: Connect Android and iOS Device
Next, you can connect your Samsung Galaxy S21 Ultra and an iOS device to the computer (you can also use an Android device here). Use a USB cable for the Android device and a lightning cable for the iOS device. You’ll get an interface like below when the program detects both devices. You can use the “Flip” button to change devices as the target device and the sender device. You can also choose the file types here to transfer.

Step 3: Start Transfer Process
After choosing the desired file types (Photos for this case), click on the “Start Transfer” button to start the transfer process. Keep patience until the process ends and make sure both Android and iOS devices stay connected properly during the process.

Step 4: Finish Transfer and Check
Within a short time, all your selected photos will be transferred to the Samsung Galaxy S21 Ultra. Then disconnect the Samsung Galaxy S24+ devices and check if everything is okay.
Here is the video tutorial for you:
Important Note: New Samsung Galaxy S21 Ultra has new software to transfer all files to another device, called Smart switch. This feature is used for keeping the backup and restoring the files. Though it is good software, it has many cons. So, before using that app, check these cons.
- Smart Switch has a low-speed transfer problem. It shows up when you transfer data with wireless connectivity.
- After transferring the data, the smart switch does not back up the data. It is quite hard to recover the data using this app.
- Using the Smart Switch app, you can only transfer the data from Samsung to Samsung. You can’t use it for other devices.
Conclusion
Samsung Galaxy S21 Ultra has amazing features for the bottom line and is more updated than other models. It has the best quality camera, better battery capacity, and other new features. The design and the display are way better than the other models. After purchasing the Samsung Galaxy S21 Ultra, if you get stuck transferring your photos to the Samsung Galaxy S24+ device, then you don’t have to worry. We have introduced you to Dr.Fone - Phone Transfer in this article. Using this software, you can recover any files and keep data backup and restore them later. To transfer your photos to Galaxy S21 Ultra, you can use Dr.Fone Switch app by following the steps we provided. It’s definitely better software than Smart Switch.
5 Ways To Teach You To Transfer Files from Samsung Galaxy S24+ to Other Android Devices Easily
Transferring data from one phone to another when switching devices is a complex and tough task. The data stored in their old phone is one of the major reasons why people are hesitant to switch devices. However, it is only the case when you don’t know the right method. If you plan to switch to a new Android device, this article will help you transfer files from Samsung Galaxy S24+ to Other Android Devices.
There are multiple ways to transfer files from one Android to another, but we have chosen the easiest 5 methods in this article. Stick with the article to find different methods for Android-to-Android file transfer, along with their pro, cons, and best-case scenarios.
Part 1: Transfer Files Between Android via Bluetooth
When trying to transfer files between Android phones, Bluetooth is available as the in-built option. It is part of all Android devices, and you don’t need any internet, computer, or cable to use it. Although newer and faster transfer methods have overshadowed Bluetooth as a data transfer option, it is still among the reliable options.
Steps To Transfer Files via Bluetooth
Step 1: Start by enabling Bluetooth on both Android devices and ensuring their visibility is set to all. Afterward, select the targeted files on the old Android phone.
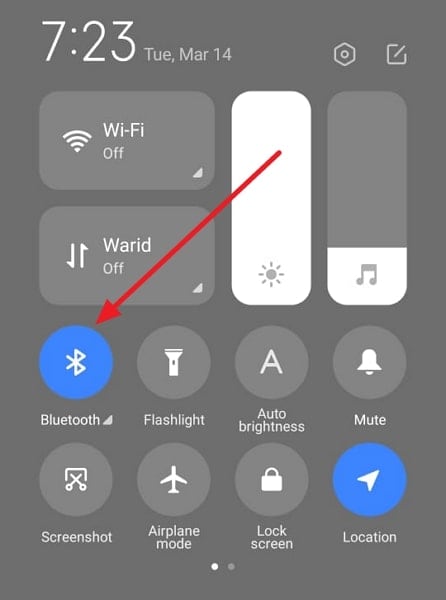
Step 2: Now, press the “Share” icon and select “Bluetooth.” Choose your new Android device from the available devices on the next screen.
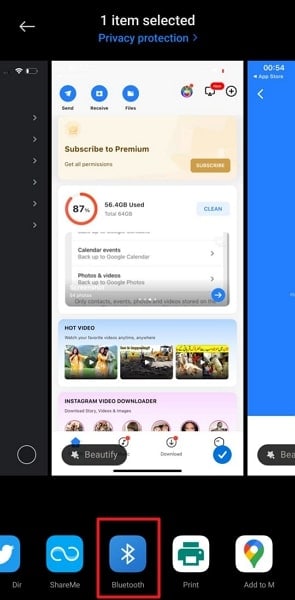
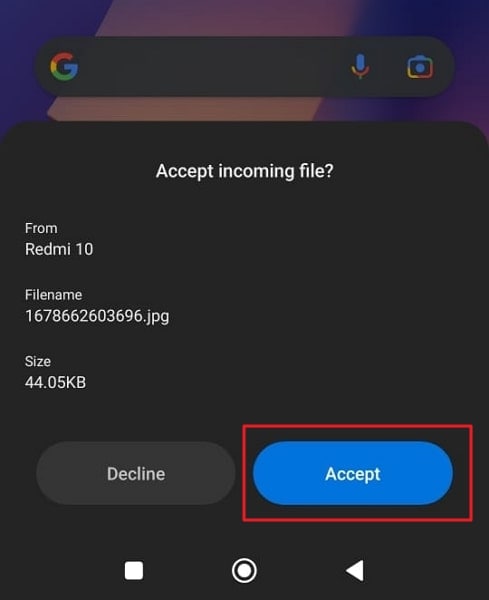
Step 3: Move to your new Android phone and hit “Accept” to start the transfer process. The transfer time will be depended on the size of the files.
Pros and Cons
| Pros | Cons |
|---|---|
| · It is an in-built option for all Android devices. | · It is an extremely slow method for transferring files |
| · You don’t need internet, cable, or Wi-Fi to send files via Bluetooth. | · If you send large files using this method, the process frequently fails, which can corrupt the files. |
| · Using Bluetooth doesn’t require any special knowledge or skills |
Best For
Using Bluetooth is best for transferring small to medium, size files. It is also convenient when you can’t access the internet.
Part 2: Transfer Files from Samsung Galaxy S24+ to Other Android Devices by Nearby Share
Nearby Share is a method developed by Google to share files between Android phones. It can be considered Google’s answer to Apple’s AirDrop, though, unlike AirDrop, it doesn’t require Wi-Fi. This method is available for all Android devices though you should use the latest Android OS for smoother working. Moreover, Bluetooth needs to be enabled to use this method.
Step-by-Step Guide To Transfer Files via Nearby Share
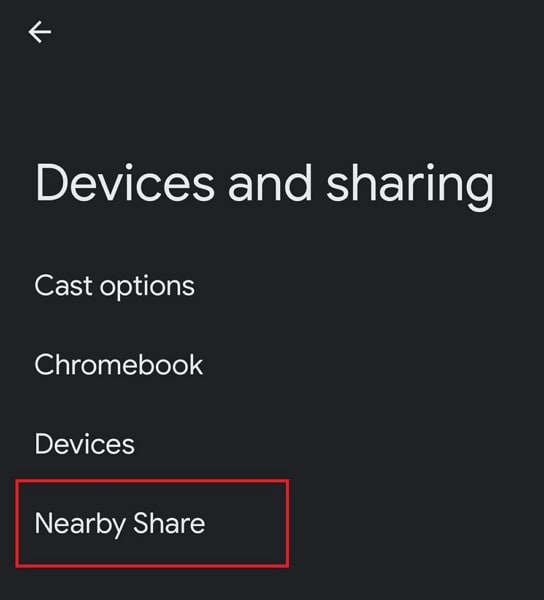
Step 1: You will need to activate “Nearby Share” on both devices first. To do that, go to the phone’s “Settings” and access the “Google” settings. Here, tap “Devices and Sharing,” and from the next appearing screen, choose “Nearby Share.”
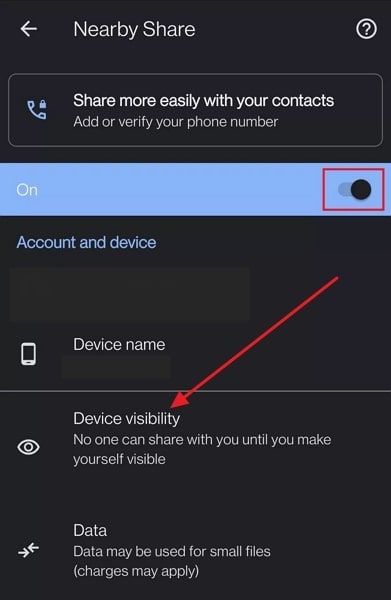
Step 2: In the “Nearby Share” screen, toggle it on and set device visibility to “Everyone.” Once you activate it on both Android devices, find and select the files you want to transfer on the old Android phone.
Step 3: After selecting the required files, press the “Share” button and select “Nearby Share” from the options. It will detect nearby devices and select your new Android device once it appears. A prompt will appear on both phones with a matching PIN. Accept the files on the new phone to start the transfer process.

Pros and Cons
| Pros | Cons |
|---|---|
| · It is a fast and secure way of transferring files between Android devices. | · You can only send limited types of files through this method. |
| · You do not need Wi-Fi to use this feature. | · This feature consumes a lot of battery if you use it for a long time or transfer large-size files. |
| · Nearby Share is available on a wide range of Android devices. |
Best For
Using Nearby Share is recommended when you don’t have access to a computer or the internet, and you need to share large files.
Part 3: Transfer Files Between Android by USB Cable
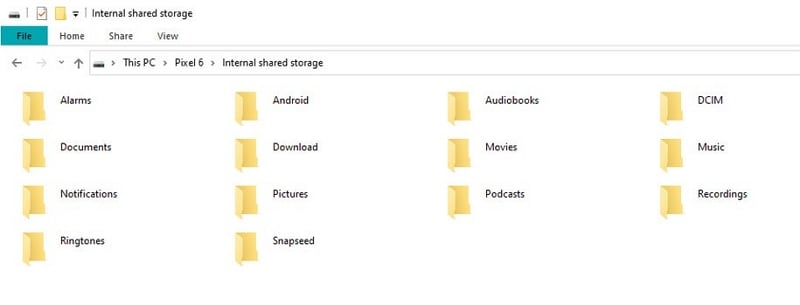
If you have access to a computer, you can use it to transfer files from Samsung Galaxy S24+ to Other Android Devices. All you need is a USB cable, and you are set. In this method, you will first copy data from the old phone to the computer and then copy it to the new phone from the computer. It works by default on Windows, but for Mac, you need Android File Transfer.
Instructions To Transfer Files by USB Cable
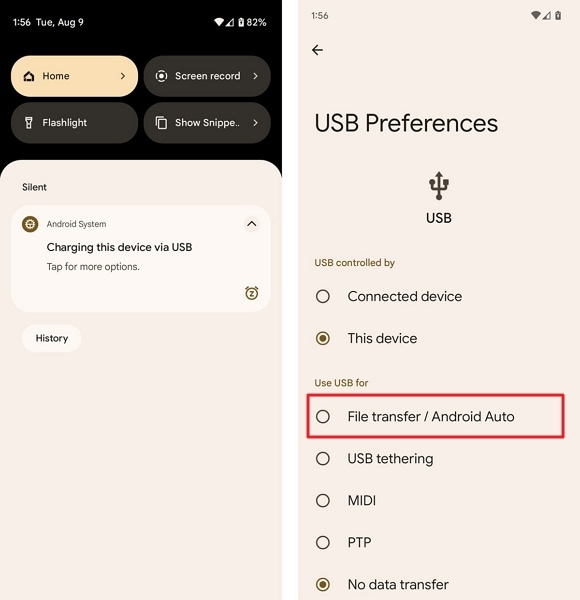
Step 1: First, connect your old Android phone to your computer using a USB cable. A prompt will appear on your asking for the USB purpose. Here, select “File Transfer/Android Auto.” It will give your computer access to the phone data.
Step 2: Now copy all the data you want to transfer to your computer and disconnect the old device. Afterward, connect the new Android device to the computer, give access permission, and copy the data you took from the old phone to the new phone.
Pros and Cons
| Pros | Cons |
|---|---|
| · You do not need to use any third-party app for this method | · This method can be time-consuming as you need to transfer the same data two times. |
| · It is a reliable and secure method. | · It only works well on Windows; on Mac, it becomes a hassle. |
| · Only a USB cable is needed to transfer the data. |
Best For
Using a USB cable is best for transferring data when you have large files and don’t have any better options.
Part 4: Sync Files from Samsung Galaxy S24+ to Other Android Devices With Google Account
Google Account is another great way for Android-to-Android file transfer if you haven’t set up the new phone yet. It allows you to back up all your data on the old device and restore it to the new Android device. With this method, you can transfer most of the data from the old phone, including settings, contacts, notes, etc.
Step-by-Step Guide To Transfer Files With Google Account
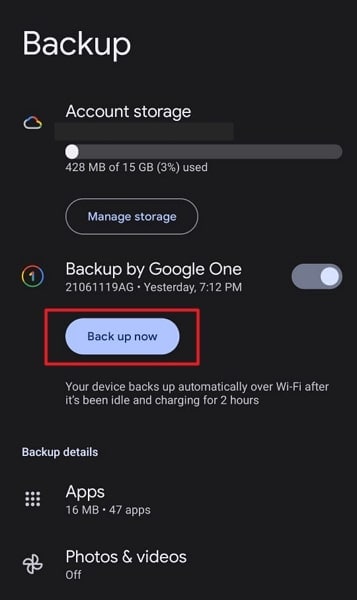
Step 1: On your old Android device, go to “Settings” and tap “Google.” In the Google settings, select “Backup” and tap “Backup Now” to back up your phone. Once the backup is complete, move to the new device.
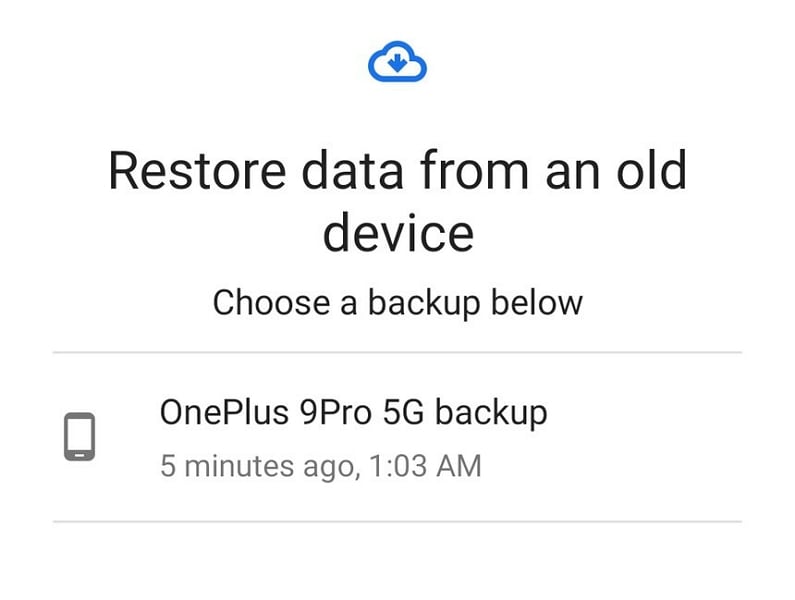
Step 2: When setting up the new Android device, sign in using the same Google Account. Afterward, select “Restore from Google Backup” when the option appears to restore the backup from the old phone.
Pros and Cons
| Pros | Cons |
|---|---|
| · It can transfer most of the phone data to the new Android phone. | · If your old device data is larger than 15GB, then you have to buy the storage because Google only provides 15GB free storage. |
| · Using Google Account is also secure, as your backup is encrypted. | · It requires you to use the same Google Account on both devices. |
| · The devices don’t need to be near each other. |
Best For
Using Google Account to transfer files from Samsung Galaxy S24+ to Other Android Devices is best when you still haven’t set up the new Android device.
Part 5: Best choice: The Fastest Way to Transfer Files from Samsung Galaxy S24+ to Other Android Devices with Dr.Fone
Want to find the best and fast way to transfer files from Samsung Galaxy S24+ to Other Android Devices? If you don’t want to go through any time-consuming or complex transfer process, we recommend you use Wondershare Dr.Fone. It is a complete toolbox for smartphones and includes all the necessary solutions. Regarding Android data transfer, it can quickly transfer data between 8000+ Android devices, including the latest ones.
Key Features of Dr.Fone
- Using the Dr.Fone app, you can transfer data to Android devices with the latest Android 13 OS.
- This tool allows you to transfer, back up, and restore your entire WhatsApp data from chats to emojis to locations.
- If you have lost your phone data, you can recover it back using the Dr.Fone app safely and quickly.
- With this tool, you can also repair system issues in your device in a secure environment.
Steps To Transfer Files from Samsung Galaxy S24+ to Other Android Devices With Dr.Fone
Aside from being the fastest way to transfer files between Android phones, it also has the simplest transfer process. You only need Dr.Fone installed on your system and a couple of USB cables to use this method. Here is how you can transfer files from phone to phone via Dr.Fone:
Step 1: Establish the Connection Between Android Devices
Use USB cables to connect both Android devices to the computer and launch Dr.Fone app. From the “Home” screen, click “Phone Transfer” and wait for the program to assign devices to the correct positions.
Step 2: Assign Android Devices to their Correct Positions
For transferring data from the old Android device to the new one, the old device should be at the “Source” position and the new device at the “Destination” position. If the positions assigned by the program are incorrect, use the “Flip” button to correct them.
Step 3: Select the Desired Data and Complete the Transfer Process
Now select the data you want to transfer and click “Start Transfer” to begin the transfer process. In case you want to delete data on the new device, select “Clear Data before Copy” before pressing “Start Transfer.”

Pros and Cons
| Pros | Cons |
|---|---|
| · It can transfer over 15 types of data from one phone to another. | · You will need a computer to transfer data through Dr.Fone |
| · The transfer process of this method is extremely fast and gets completed within minutes. | · It also needs USB cables to connect your Samsung Galaxy S24+s. |
| · You do not need the internet to use this method. |
Best For
It is best for all sorts of data transfer situations. Whether you are transferring a few files or moving all the data, it is a perfect tool.
Conclusion
To summarize, while it may seem troublesome to transfer files from Samsung Galaxy S24+ to Other Android Devices, in reality, it isn’t. This has been well demonstrated through the article using 5 of the easiest transfer methods. It includes methods suited for a few files, like Bluetooth, to the best method of using Dr.Fone. With Dr.Fone, you can transfer all types of data from Samsung Galaxy S24+ to Other Android Devices in the shortest time possible.
How to Transfer Content from android to iPhone Directly
Since Samsung Galaxy S24+ is embracing Android as its operating system, transitioning from an iPhone to a Samsung Galaxy S24+, or vice versa, can pose challenges due to the differing operating systems. But it doesn’t mean impossible!
If you’re switching to an iPhone and need to transfer all your data, this article has you covered. We will look at ways to facilitate smooth Samsung Galaxy S24+ to iPhone transfer while ensuring your valuable information transfers across these devices with no problem.
Part 1. How to Transfer Content from Samsung Galaxy S24+ to iPhone Directly
You must be familiar with Samsung Galaxy S24+ Migrate if you are a Samsung Galaxy S24+ user. It is a solution for seamless data transfer used in Samsung Galaxy S24+ devices. With this app, you can transfer data from your Samsung Galaxy S24+ device to others, such as iPhones.
However, most of the latest Samsung Galaxy S24+ models are now unable to run Samsung Galaxy S24+ Migrate since it’s a pretty outdated app. It has been retired by the company since 2015. Users are seeking alternative methods for data transfer as a result. In this section, we explore more effective solutions to transfer content directly from Samsung Galaxy S24+ to iPhone besides Samsung Galaxy S24+ Migrate.
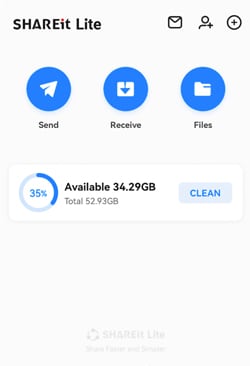
Solution 1. Using ShareIt App
When Samsung Galaxy S24+ Migrate is not an option, ShareIt can be a versatile alternative for Samsung Galaxy S24+ to iPhone transfer. ShareIt is a popular cross-platform file-sharing application known for its simplicity and efficiency. To use it, you’ll need to download the ShareIt app on both your Samsung Galaxy S24+ and iPhone.
If you have downloaded and installed it, you can continue with the steps below:
- Step 1: Connect your Samsung Galaxy S24+ and iPhone devices
Since ShareIt operates by creating a hotspot network among devices, it’s necessary to have both devices connected to the same Wi-Fi network. Make sure to keep both devices close to each other, too.
- Step 2: Select the files to transfer
On your Samsung Galaxy S24+ device, click the “Send” button. After a new window appears displaying all the categorized files on your device, choose the specific files you want to transfer.
- Step 3: Look for the Samsung Galaxy S24+ device to transfer
After selecting the files, press “Send” and provide the necessary permissions for GPS and Bluetooth. Once permissions are granted, the Samsung Galaxy S24+ device will initiate a search for nearby devices.
- Step 4: Transfer the files to the iPhone.
On your iPhone, open the ShareIt app and click “Receive.” This action opens all the necessary ports to receive shared files. When your Samsung Galaxy S24+ phone detects your iPhone, tap on the iPhone’s avatar to proceed with the transfer.
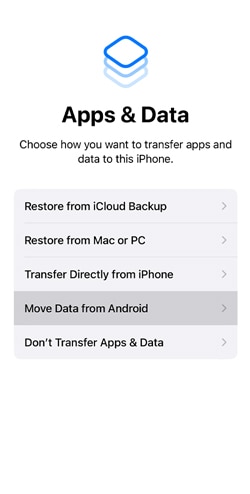
Solution 2. Move Contents from Samsung Galaxy S24+ to iPhone via Apps & Data
Another good alternative of Samsung Galaxy S24+ to iPhone transfer app is Move to iOS. This Move to iOS app is designed by Apple specifically for users moving from Android devices to iPhones. You can download it from the Google Play Store. Then, you can transfer the data by accessing Apps & Data on the iPhone.
However, if you have been using your iPhone for a while, you must reset your iPhone first to proceed with this method. It can be done by going to Settings > General > Reset > Erase all content and settings. After resetting, your iPhone will be going back to the initial setup.
For more details, follow the instructions below:
Step 1: Setup your iPhone
Power up your new iPhone and progress through the initial setup until you get into the “Apps & Data” screen. Select the option that reads “Move Data from Android.”
Step 2: Agree to Terms and Conditions
Open Move to iOS on your Samsung Galaxy S24+ phone. Review the terms and conditions and press “Agree” to proceed.
Step 3: Enter the Code
On your Samsung Galaxy S24+, a screen will appear to request a 6-10-digit code. This code will be generated on your iPhone. Enter the displayed code on your Samsung Galaxy S24+ device to make a secure connection between the two devices.
Step 4: Select Content to Transfer
Next, choose the types of content you wish to transfer. Tap “Continue” to initiate the transfer process. Remember to keep your devices close to each other and connected to power until the transfer process is completed for quicker transfer.
Step 5: Transfer complete.
Once the transfer is complete, you will be prompted to finish setting up your iPhone. Follow the instructions to complete the setup process.

Part 2. How To Make iPhone to Samsung Galaxy S24+ Data Transfer Using Easy Software
One significant reason why data transfer from iPhone to Samsung Galaxy S24+ is tricky is due to privacy concerns. Apple really prioritizes their user privacy. It implements strict security measures to prevent any breaches. While this is beneficial for users, it can also complicate data transfer.
Another contributing factor is the structure of the files. Android boasts a file system that is more straightforward, unlike iOS. As a solution, third-party software like Wondershare Dr.Fone offers tools like Phone Transfer to simplify the process. With Dr. Fone’s Phone Transfer, you can transfer any data from Samsung Galaxy S24+ to iPhone or iPhone to Samsung Galaxy S24+.
How to make iPhone to Samsung Galaxy S24+ data transfer with Dr.Fone:
- Step 1: Open Dr.Fone’s Phone Transfer tool
Make a connection between your iPhone and your Samsung Galaxy S24+ phone through USB cable on your computer. Launch Wondershare Dr.Fone on your computer and navigate to Toolbox > Phone Transfer.
- Step 2: Specify the source and destination devices
After connecting them, the platform will identify the connected devices and load their data onto the platform. Choose the Source and Destination devices to set the transfer path. Use the Flip button if necessary to alter the transfer direction.
- Step 3: Choose the data type for the transfer
Proceed to select the types of data you wish to transfer. Checkmark the category and click the Start Transfer button. If you want to remove existing data from the destination device, you can select “Clear data before copy.”

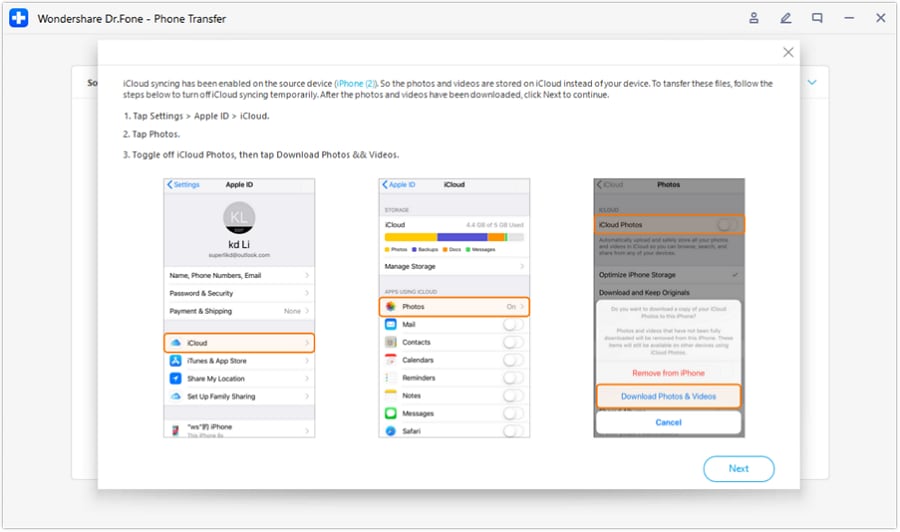
- Step 4: Disable iCloud syncing
Now, Dr. Fone’s Phone Transfer tool should prompt a specific operation on the window. Follow the instructions to turn off iCloud syncing. Open your iPhone Settings and tap on your device’s name. Go to iCloud > Photos to disable the toggle for iCloud Photos.
- Step 5: Monitor data transfer progress
The progress of the data transfer will be displayed in a pop-up window. Once completed, click OK to conclude the process.
Part 3. How to Do Samsung Galaxy S24+ to iPhone Data Transfer Using Dropbox/Google Drive
Another method for Samsung Galaxy S24+ to iPhone transfer is using Cloud services like Dropbox or Google Drive. Both Dropbox and Google Drive serve as virtual storage spaces accessible from any device with an internet connection. Users can upload and store their files to the cloud, making them available for download on other devices.
Either Google Drive or Dropbox follows similar steps for data transfer. The difference between them is in the amount of free storage each service provides. Notably, Google Drive provides 15GB of free storage, while Dropbox offers 2GB.
Follow these steps on how to do a Samsung Galaxy S24+ to iPhone transfer via cloud storage services.
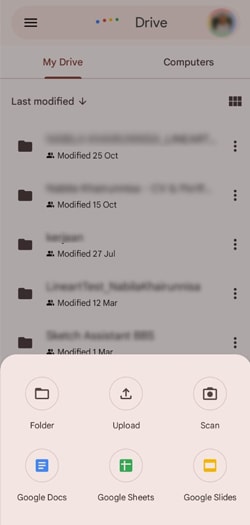
- Step 1: Install and set up Dropbox/Google Drive:
Begin by installing the Dropbox or Google Drive app on both your Samsung Galaxy S24+ and iPhone. Create accounts if you don’t have them already.
- Step 2: Upload the files from Samsung Galaxy S24+
Open the cloud storage app on your Samsung Galaxy S24+ device and upload the data you want to transfer. This can include photos, videos, documents, and more. Then, wait for the upload to complete. Make sure that all files are successfully uploaded before proceeding.
- Step 3: Sign in to the cloud storage on your iPhone
On your iPhone, open Dropbox or Google Drive and sign in with the same account. Find the transferred files in the cloud storage.
- Step 4: Download to iPhone:
Select the files you want to transfer and download them to your iPhone. Once the download is complete, organize the transferred files on your iPhone as needed.
Conclusion
Transitioning from a Samsung Galaxy S24+ device to an iPhone, or vice versa, may present challenges due to the difference in operating systems. However, with the right tools and methods, the iPhone to Samsung Galaxy S24+ data transfer can be done seamlessly and efficiently.
Even though Samsung Galaxy S24+ Migrate is no longer in the game, apps like ShareIt and Move to iOS can be alternatives for a direct transfer. If things get a bit trickier when transferring from iPhone to Samsung Galaxy S24+ due to Apple’s privacy measures, third-party software like Wondershare Dr.Fone’s Phone Transfer is there to simplify it all.
And for those who prefer the cloud, Dropbox and Google Drive also offer a solution. So, no matter your preference, there’s a solution to ensure your data transfer moves smoothly.
Also read:
- [New] Seamless SRT to SUB A Comprehensive Guide
- 2024 Approved FB Video Direction What's the Right Angle?
- Alle Foto's Op Mijn Computer Vinden in Windows 10
- How to Transfer Data After Switching From Tecno Pova 6 Pro 5G to Latest Samsung | Dr.fone
- How to Transfer Music from Motorola Moto G24 to iPod | Dr.fone
- How to Use ChatGPT for Cognitive Behavioral Therapy
- In 2024, 5 Ways to Transfer Music from OnePlus Ace 2V to Other Android Devices Easily | Dr.fone
- In 2024, How to Transfer Apps from Oppo A56s 5G to Another | Dr.fone
- In 2024, How to Transfer Contacts from Realme C33 2023 to iPhone XS/11 | Dr.fone
- In 2024, Network Locked SIM Card Inserted On Your Nokia 130 Music Phone? Unlock It Now
- Possible solutions to restore deleted photos from Oppo Reno 9A.
- Secure Uniqueness: 5 Ways to Avoid Local Name Clashes on Windows
- Title: In 2024, How to Transfer Photos From Samsung Galaxy S24+ to Samsung Galaxy S21 Ultra | Dr.fone
- Author: Emma
- Created at : 2024-10-23 19:12:09
- Updated at : 2024-10-30 18:18:26
- Link: https://android-transfer.techidaily.com/in-2024-how-to-transfer-photos-from-samsung-galaxy-s24plus-to-samsung-galaxy-s21-ultra-drfone-by-drfone-transfer-from-android-transfer-from-android/
- License: This work is licensed under CC BY-NC-SA 4.0.