
In 2024, How to Transfer Photos from Vivo Y200e 5G to New Android? | Dr.fone
How to Transfer Photos from Vivo Y200e 5G to New Android?

The phone industry, for years, has constantly improved on the design and development of mobile phones being released into the market. One of the major developments is the introduction of the camera to mobile phones. The ease of carriage and portability has made mobile phone cameras a preference over digital cameras. As a result we are witnessing more pictures taken with the aid of a phone. This also means most of these photos are stored on the phone memory.
Most of these photos would need to be shared with other people who are either a part of the photo or you would want to transfer them to your new android device. Most users are at a loss about how to transfer their photos from one android device to another. There are several ways to do that successfully without the risk of losing your priced photos. And in this article we have outlined several ways through which you can transfer your photos from your Vivo Y200e 5G to your new android device.
Part 1. Transfer Photos from Vivo Y200e 5G to New Android with a File Transfer Software
One way of moving your photos between android devices is through the use of file transfer software. This software enables you to connect both android devices together.
Using file transfer software to move your photos from one android device to another android device provides a secure and sure transfer window, ensuring your files won’t be lost. Reliable software you can use for this purpose is the Dr.Fone - Phone Transfer software. Dr.Fone - Phone Transfer file transfer software is topnotch and user friendly. This article will carefully lead you through the process of using this software.
Dr.Fone - Phone Transfer
Transfer Everything from Android/iPhone to New iPhone in 1 Click.
- It supports all the leading iOS devices, including devices running on iOS 11.
- The tool can transfer your photos, videos, contacts, messages, music, call logs, notes, bookmarks, and so much more.
- You can transfer all your data or select the type of content you wish to move.
- It is compatible with Android devices as well. This means you can easily perform a cross-platform transfer (e.g. iOS to Android).
- Extremely user-friendly and fast, it provides a one-click solution
3981454 people have downloaded it
Ensure you have a good PC where you would download and install the Dr.Fone software. When the software has installed, go to desktop home screen and double click on the icon. You can follow the steps below to start a file transfer.
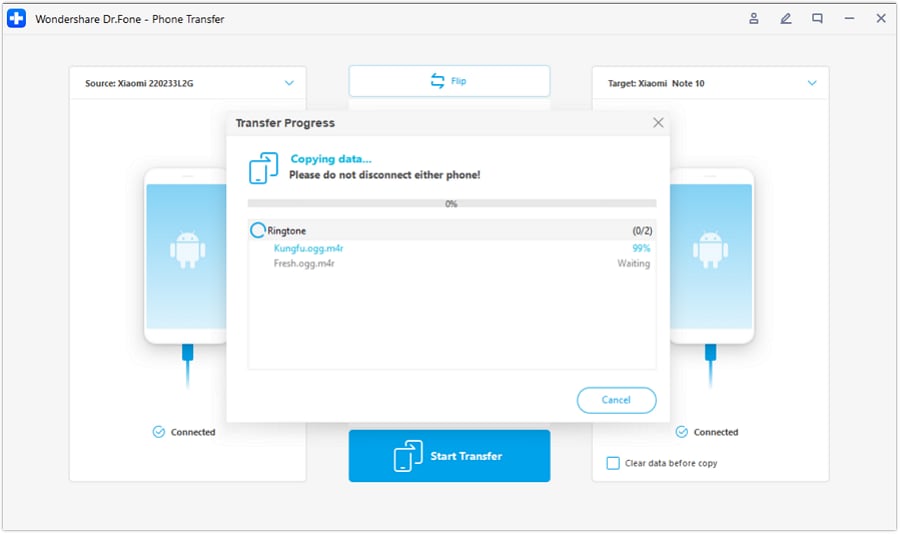
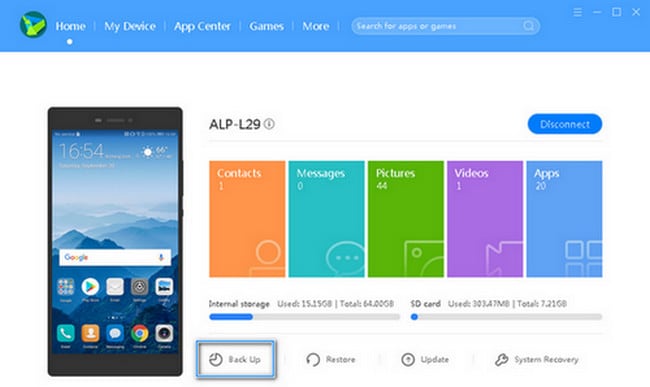
Step 1. Click on “Switch” module after you open Dr.Fone toolkit

Step 2. Connect both phones to PC and select “Photos”
Using a good USB cable, connect both old and new devices to your PC. When that is done, a list of data that can be transferred will appear. Choose “Photos” and this will move your photos from the source device to the destination device. You can also change both device between “source” and “Destination” by using the “Flip” button.

Step 3. Click “Start Transfer”
Click on the button “Start Transfer”. Keep phones connected. Dr.Fone starts to transfer photos. Go to view trabsferred photos on the destination phone until it completes.
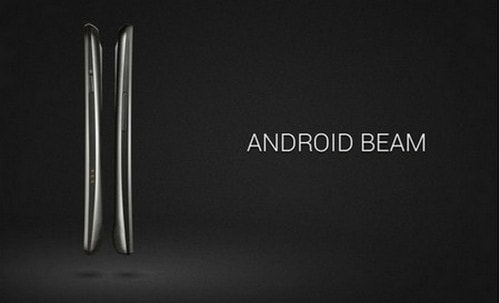
Part 2. How to Transfer Photos from Vivo Y200e 5G to New Android Using NFC
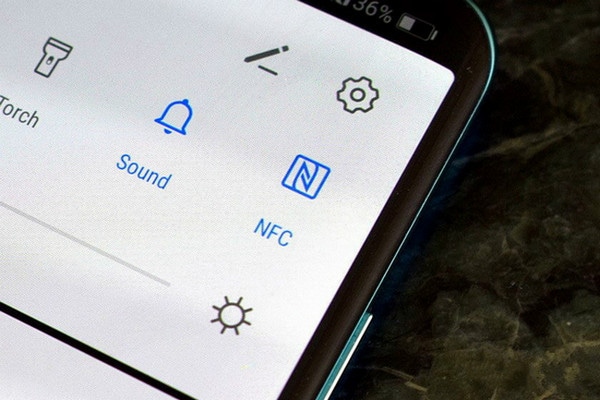
Near Field Communication(NFC) is a technology that supports Android Beam and is ideal for transferring data between android devices by just pressing their backs together. It is a fast and simple program that requires both devices to NFC-capable. This means they are able to communicate with each other when their fields are near. This communication is made possible through radio frequencies. Most devices have NFC hardware integrated underneath their panel.
NFC can be found in almost every android device. In the past, it was easy to identify devices with NFC as such devices usually had NFC printed somewhere in the back of the Vivo Y200e 5G devices, most tines on the battery pack. But since most android devices don’t have a removable back, there is an alternative to checking if your device is NFC enabled.
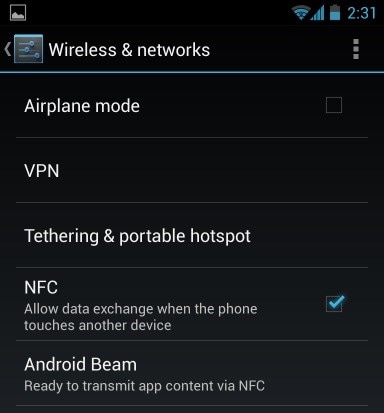
1. On your Vivo Y200e 5G, tap on “Settings” and click on “More” located under “Wireless and Networks” .
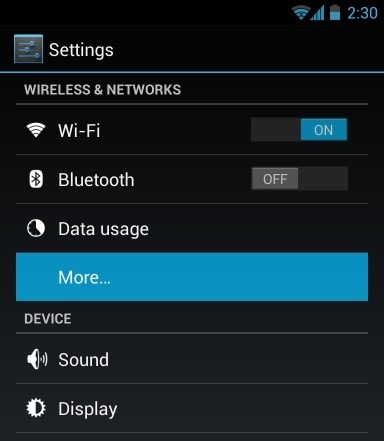
This would take you to a screen where you should find the NFC and android beam options as depicted in the image below. At this stage enable both options if any or both have been disabled. If the NFC option doesn’t appear, it then means your device does not have Near Field Communication (NFC) functionality.
2. Another method of checking is by opening settings menu and tapping on the search icon. Type in “NFC”. If your phone is capable, it will show up. The NFC function works hand-in-hand with the android beam. NFC may not work at optimal levels if android beam is “off”.
To Transfer Photos from your Vivo Y200e 5G to a new android device, ensure both devices support NFC using the method explained above. Once this is confirmed, use Android beam to access the photos you want to transfer to your new android device.
1. To select multiple photos, long press on a photo. Then choose the photos you want to transfer to new android device. When you are done selecting, you can begin the beaming process.
2. Next, place both devices against each other, back to back.
3. At this stage, both an audio sound and visual message will appear, acting as confirmation that both devices have found each other’s radio waves.
4. Now, on your Vivo Y200e 5G, the screen will reduce to a thumbnail and a “Touch to beam” message will pop up at the top.
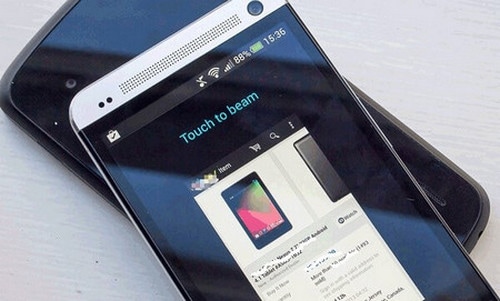
To begin beaming, you must touch the screen on your Vivo Y200e 5G from where the photos are been sent. A sound will alert you that beaming has started.
To ensure a successful transfer, make sure devices are not locked neither should the screen be turned off. Also both devices should be kept back-to-back throughout the duration of the transfer.
5. Finally, when the beaming is complete, you will hear an audio sound. This is to confirm completion of the process. Alternatively, instead of an audio confirmation, the application on your new android device to which the photos were sent will automatically launch and display the beamed content.
Part 3. Transfer Photos between Android Phones by Bluetooth
The Presence of Bluetooth technology in phones is as old as android itself. The use of this technology offers another method that you can employ in transferring your photos from your Vivo Y200e 5G to your new android device. It is a short and simple method that is known to most android users.
The purpose of this article is to guide you through the process of successfully transferring your photos from your Vivo Y200e 5G to your new android device. This process involves navigating to the Bluetooth option on your device, connecting to your new device and initiating transfer. The steps are outlined below
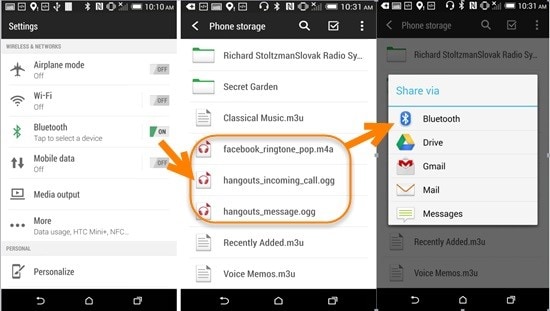
1. Locate the Bluetooth on both devices. Go to your Settings and click on the “Connected device “Option. Under that option, you will find Bluetooth, click on it and toggle it on. Do the same for the receiving device.
2. Your device will start searching for nearby visible devices to pair with. Make Sure your new android device is visible to other devices. When your android device appears on the list of available devices on your old Android, select it to pair.
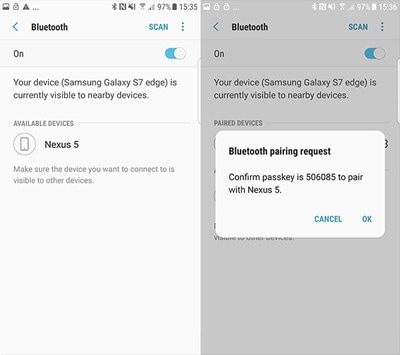
A message will pop up on your new android device, requesting permission to pair with your Vivo Y200e 5G. Click “Accept “to establish connection.
3. After both devices have successfully been paired to each other, go to the folder containing the Photos your want to send to your new Android device. Select the photo or if they are more than one, long press on a photo. This will create a thumbnail. Select the photos you want to transfer and choose the share button normally depicted by this icon
4. A list of option will appear. Choose Bluetooth. This will take you back to The Bluetooth application. Click on your new android device that you have previously paired with. A Message will appear on your new device asking for permission to receive the photos from your Vivo Y200e 5G. Click “Accept”. This will initiate the transfer process. A progress bar at the top of your screen will show you the Progress of each transfer.
Part 4. Transfer Photos from Old to New Android Phones via Device-Specific App
Samsung Smart Switch
The Samsung smart switch software helps to Transfer Photos either by cable or wireless transfer If your Samsung device does not come with the software, you can download it here .
1. Open the switch app on both Samsung devices. On the sending device, tap “Send data” and on the receiving device, tap “Receive data”.
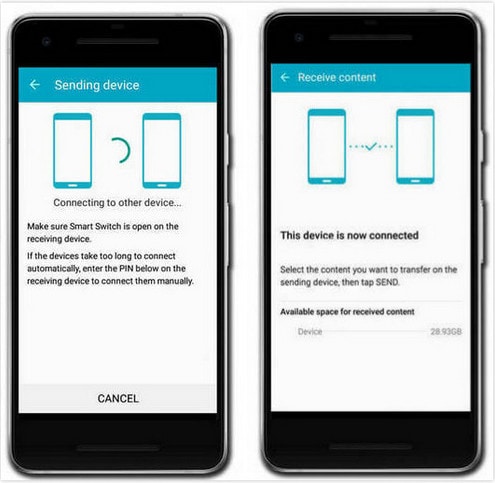
2. Now, choose either the Cable option using an OTG adapter or wireless transfer option.
3. On the old Samsung device, select the data to be transferred to the new Samsung device. When you are done with this, your phone will notify the size and time length of the transfer.

4. Thereafter, click on “Send” to begin the transfer of data from on device to the other.
LG Mobile Switch
LG’s mobile switch software is device specific software that allows for data transfer. Follow the steps below.
1. Switch on your LG device. On the home screen, swipe left. Click on Management and tap “LG Mobile Switch”. Select the data to be transferred and tap on “agree”. A list of options will appear on how to transfer the data; select “Wireless” and tap receive. On the screen that comes up next, tap on “Start”.
2. Now go to your old LG device and open the software. Click on “Send Data” and choose “send data wirelessly”. Next, tap “tap start” and choose the name of your new phone. Then click on “accept” and on the new device, tap on “receive”. Select the data to be sent and tap “Next”. This will start the transfer. When it is completed, the data would have been transferred from your old android to the new android.
Huawei Backup
Huawei devices have HiSuite, an inbuilt manager tool. This app helps users to manage the data on their Huawei devices and also to back up and restore data. To backup and restore on Huawei devices using Hisuite, follow the steps below
1. Download the tool here and install. This tool is supported by windows only. Then, open the tool and connect your Huawei device to you PC by means of a USB cable.
2. Go to settings app on your android device and click on “advanced settings”. Click on “security” and choose “Allow Hisuite to use HDB”. You will see the “Back Up” and “Restore” options. Click on “Back Up” and select the data you want to back up. You can encrypt your backup with a password. Then click on “Back Up”.
3. Click on “Restore” to retrieve data from previous backups after selecting the backup file you want.
[Solved] Move from Vivo Y200e 5G to iOS not Working Problems
You might be wondering, what is the Move to iOS? If you are an android user and have decided to shift to the iPhone, you will need the Move to iOS tool. The app is developed to help transfer data from an android device to iOS devices. Google play store has the app, and it’s free.
To use the app, install it on your android device first. The transfer process requires following several simple steps to move to iOS. The app seems easy to use the tool, but newbies must learn about the Move to iOS guidelines to complete the process. With this tool, you will transfer various android data such as camera photos, contacts, message history, mail accounts, calendars, and videos.
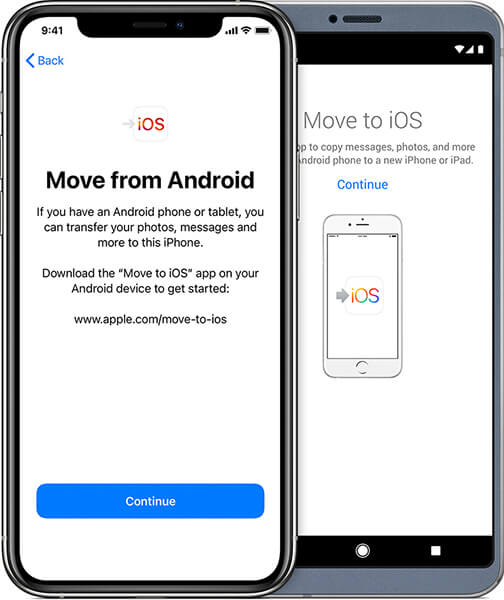
Move to iOS app works on android version 4.0 or higher. You can transfer data to any iPhone in a relatively straightforward process. Also, beware that the Move to iOS will work only when setting up a new iPhone or iPad.
Besides knowing what the content that Moves to iOS tool can transfer, you might be wondering how long the process can take. Depending on the content you want to transfer, the process generally takes around 10 – 30 minutes. However, other factors can determine the time the app will take to move content to iOS. They include the speed of the network, patency of the transmission process, and Wi-Fi stability.
Part 1: Move to iOS not working problem lists
Users can learn to use the Move to iOS app quickly. However, they will occasionally experience problems while using this tool. If the app runs into errors, you will encounter some problems.
- Move to iOS no code.
These steps will help you get the Move to iOS code;
When setting up your iPhone, tap on the move data from the android option. Then, launch the Move to ios app on your android device and tap continue. You will see the find you code screen; tap on the .next’ button to continue.
Tap on the continue button on your iOS device and wait for a ten-digit code to appear.
Once you receive the code on your iPhone, enter it on the android device and wait for the Vivo Y200e 5G devices to connect. Select all the content you want to move and click Next.
Once the loading bar on the iOS device is done, tap on the ‘Done’ button on your android device. Proceed to set up your iOS device using the onscreen steps.
If you are not receiving any code on your iOS device, you can fix it by ensuring the Wi-Fi is always on throughout the process. You can also reboot your devices if the error is temporary.
- Move to iOS could not communicate correctly with the Vivo Y200e 5G devices.
To avoid this Move to iOS error, ensure both devices run on updated operating systems, i.e., android 4.0 or later and iOS 9 or later. The phones must have enough power, and lastly, ensure that you turn off background apps to avoid notifications during the transfer process.
- Move to iOS stuck on preparing/transferring.
You are transferring your android data to iOS, but the process is stuck on the transferring page. The problem is related to Wi-Fi connections. Should the Wi-Fi disconnect for a few seconds, the transfer process stops. Other distractions on android such as calls, switching to sleep mode, or other background operations might also cause the Move to iOS error.
- Move to iOS takes forever/slow.
The length of time taken to transfer data from android to iOS depends on the size of the data and Wi-Fi connection. To speed up the transfer, check your Wi-Fi connection, delete unnecessary data from the android device, or restart the transfer if it takes too long.
- Move to iOS Wi-Fi disconnect.
Wi-Fi drops will obviously interfere with the transfer process. To avoid this error, you can reset your router and the network and turn off smart switching and airplane mode.
- Move to iOS interrupted
If the Move to iOS process is interrupted, you can fix it by restarting the phone, check your network connections on both devices, turn off the smart network swath on android and turn on the airplane mode.
- Move to iOS, not connecting devices.
The circumstances can be frustrating as the transfer process will not be completed successfully. But what is the solution to all these problems? We will discuss the solutions to move to iOS not working in the later sections of this article.
While the Move to iOS app can be easy to use, you need to know a couple of things before transferring.
- Ensure the android and iOS device can connect to Wi-Fi
- Ensure the Vivo Y200e 5G devices have enough power to complete the process/ plug the Vivo Y200e 5G devices into power
- The iOS device should run on iOS 9.0 or higher
- The android device should run on android 4.0 or higher
- Check the capacity of the transferred content, whether it will fit the new iOS device.
- Update chrome on android to the latest version to transfer bookmarks
Part 2: 9 Tips about moving to iOS not working problems
Even though Move to iOS is a useful tool for android users willing to transfer content to the iOS device, there are several instances where it fails to work correctly. The app will show a message indicating the type of error you are experiencing during the transfer process.
Most of the ‘move to iOS’ problems are related to Wi-Fi connection issues, android and iOS versions, space requirements, connection optimizers, and application issues. Nevertheless, you will need to find a solution to these problems to transfer your data successfully from android to iOS devices. This section will discuss possible solutions to the errors that occasionally appear when moving android data to iOS devices.
Tip 1: Restart both your devices
Restarting your devices is the essential thing to do when troubleshooting the Move to iOS problems. It is a great way o eliminate minor issues during data transfer from android to iOS devices. The process can resolve the Move to iOS stuck on connecting to iPhone issues. A simple restart will eliminate the bugs and any cached error in the Vivo Y200e 5G devices.
Tip 2: Clear all running apps
It is recommended to avoid using the android device o run applications when using the Move to iOS app. Since the app runs in the foreground, you should ensure all other apps in the android are disabled before starting the data transfer process. Notifications and incoming calls are likely to interfere with the process; therefore, users must ensure such distraction is not happening by disabling such apps.
Tip 3: Make sure the Wi-Fi connection is turned on
Wi-Fi connectivity is a significant factor in ensuring data transfer is successful. Since Move to iOS relies on Wi-Fi, you should ensure it Is turned on and is stable. The iPhone usually creates a private network for the android device to connect. Please turn on the Wi-Fi connection on your android to make it ready to connect to the iPhone’s private network. This will make it possible to send the Move to iOS code to initiate the data transfer process.
Tip 4: Plug both devices to power
You should ensure that both the android and iOS devices have sufficient power to run through the entire data transfer process. If you doubt the power consumption, keep the Vivo Y200e 5G devices connected to power before you start moving your content from android to iOS device.
Tip 5: Set your phone into airplane mode
When you transfer android data to iOS using the Move to iOS tool, apple recommends that you turn off your mobile data. Some android devices can switch from Wi-Fi to mobile data when the connection tends to drop on either side using the smart switch feature. This can interfere with the transfer process. Similarly, it could be useful if incoming calls were prevented to avoid interfering with the data transfer process. All mediums of connectivity are disabled except for the connection between the android and iOS devices through the iPhones Wi-Fi network.
The best way to ensure these distractions are not happening is to turn on airplane mode on the android device.
Tip 6: Check the storage requirement
Before you begin transferring android data to iOS devices, check the size of all content including the external micro SD card, to determine whether it fits into the new iOS device. If the content is larger than the destination storage, you will obviously encounter an error during the transfer process. You need to delete the content you don’t need to transfer from your android device before getting started.
Tip 7: Disable the connection optimizer
Android devices with connection optimizers will switch between different connections for better connectivity. Since the Move to iOS app utilizes the iPhones private network, the connection optimizer might start using mobile data or switch to another Wi-Fi connection when the current connection drops. The circumstance can break the connection between the android ad iOS device hence interfering with the data transfer process. Be sure to turn off the feature from settings before running the Move to iOS app.
Tip 8: Check the compatibility of your devices
You need to check whether your android device meets the minimum requirements to be compatible with the Move to iOS app, much like other apps found on the App Store and Google play store. Generally, the app runs on Android 4.0 and above while transferring data to iOS 9.0 or later devices.
Tip 9: Turn off battery optimization
Turning off the battery optimization on both your Android and iOS device is a requirement when using the Move to iOS tool. The app is designed to run in the foreground, and the android user should not have other applications running. However, the phone might automatically minimize the Move to iOS app when it switches to battery optimization mode. Therefore you should ensure the feature is closed from the settings of your android device.
Part 3: [Alternative] Move to iOS not working solved without a PC
An alternative solution to Move to iOS not working problem is to use Dr. Fone – Phone Manager (iOS) . The software can transfer all types of data from android to iOS devices quickly. Here, you will select the type of data you need and begin moving in a single click.
Most importantly, the programs transfer data at a very high speed compared to other alternatives. You can also use the software to transfer social apps and retain the important history of apps like WhatsApp, Wechat, Viber, Line, or Kik.
Dr.Fone - Phone Manager (iOS)
Move/Transfer Android data from Computer to iPod/iPhone/iPad without iTunes
- Transfer, manage, export/import your music, photos, videos, contacts, SMS, Apps, etc.
- Back up your music, photos, videos, contacts, SMS, Apps, etc., to the computer and restore them easily.
- Transfer music, photos, videos, contacts, messages, etc., from one smartphone to another.
- Transfer media files between iOS devices and iTunes.
- Fully compatible with iOS 7 to iOS 15 and iPod.
3981454 people have downloaded it
Here is how to transfer data from iOS to android device without a PC
You need to login to your iCloud account on android to download data, or you can use the iOS-to-android adapter to connect your iPhone to android to transfer data directly.
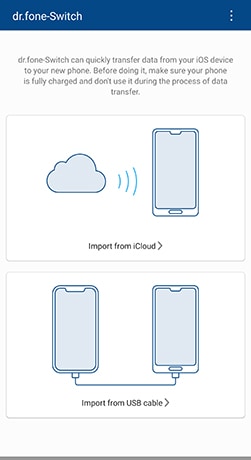
Use the following simple steps.
Install Dr. Fone- Phone Transfer app on your android device and click on the ‘Import From iCloud’ option.
Use your apple passcode to log in to the iCloud account. You will be required to enter a verification code if prompted to two-factor authentication.
Select from the list of data detected from iCloud and tap on start importing.

Wait for the data transfer process to complete.
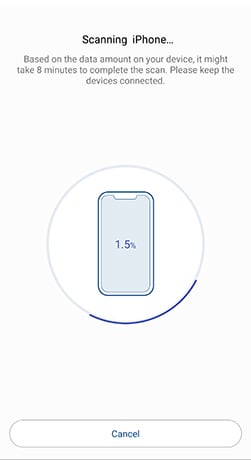
To transfer content from your iPhone to Android device directly, open Dr. Fone – Phone Transfer on android and tap ‘import from a USB cable.’ Use the iOS-to-android cable to connect your iOS and Android devices.
Dr. Fone – Phone Transfer will begin to scan data on your iPhone. The time will depend on the content on the iPhone.
Tap on ‘start importing’ once all data has been detected.
Part 4: [Alternative] Move to iOS not working solved with a PC
The following steps will help you transfer data from android to an iOS device using a PC.
- Open the Dr. Fone program on your computer and click ‘phone transfer’ from the modules displayed.
- Connect your iOS and Android devices to the computer. You can always use the ‘flip’ option to change the source and destination devices.

- Select the types of data you want to transfer, then click on the ‘start transfer’ option to continue. Be careful not to disconnect the Vivo Y200e 5G devices until the process is complete.

- If you want to clear the destination phone’s data before transferring data, ensure you check the ‘clear data before copy’ box.
- All the data you selected will be transferred successfully in a few minutes.
Conclusion
Transferring data from android to iOS device has been made easier with the Move to iOS app. However, you need to consider the requirements for the data transfer process to complete successfully. You can also apply Dr. Fone – Phone Transfer as your recommended alternatives to transfer android data to the iOS device in the simplest way.
How to Transfer Music from Vivo Y200e 5G to iPod
If you’re among the fortunate few still holding onto a functioning iPod, consider yourself lucky, as Apple officially bid farewell to the iPod product line in 2022. While this iconic device may no longer be in production, its legacy lives on.
However, if your cherished iPod is showing signs of wear or experiencing issues, it becomes important to safeguard the music collection you’ve accumulated over the years. To address this, some of us wonder, can I transfer iPod music to Android? The answer is yes. Absolutely. We are here to show you how.
- Can I Transfer iPod Music to Android?
- Part 1. Transfer Music from iPod to Android via Bluetooth
- Part 2. How to Transfer Music from Vivo Y200e 5G to iPod with Move to iOS App
- Part 3. How To Transfer Music From iPod to Android/Android to iPod With Easy Software
- Conclusion
Can I Transfer iPod Music to Android?
Can you transfer music from an iPod to an Android phone? Despite the fact that the iPod is an Apple product, transferring its music to an Android device is indeed possible. Apple’s ecosystem may be renowned for its exclusivity, but with the right methods, you can seamlessly bridge the gap between your iPod and an Android device.
One of the most straightforward ways to transfer music from your iPod to an Android device is by using Bluetooth. It’s worth noting that Bluetooth transfer capability is present in all iPod Touch models but not in older iPod models. Bluetooth support for iPod Touch was introduced with the 2nd Generation and iOS 3.0, while iPod Nano gained support from the 7th Generation onward.
Alternatively, other methods involve employing a dedicated app and third-party software as an intermediary. Rest assured; the upcoming sections will comprehensively cover these approaches, providing you with the necessary guidance for a smooth music transfer process.
Part 1. Transfer Music from iPod to Android via Bluetooth
Bluetooth technology serves as a versatile means for wirelessly connecting devices, and in this case, it provides a convenient avenue for transferring music from your iPod to an Android device. This wireless approach simplifies the process, allowing for seamless data exchange between the two devices.
But first, you still need to check Bluetooth compatibility. Ensure that both your iPod and Android devices can do Bluetooth transfer. This method is also applicable when you wonder how to download music from an iPod to an Android phone.
Step 1: Enable Bluetooth on both Devices.
On your iPod, navigate to the Settings menu and select Bluetooth. Enable Bluetooth on the Android device by accessing its settings as well. Make sure that you have set both devices to discoverable mode.
Step 2: Pair the Vivo Y200e 5G devices.
Search for available Bluetooth devices on your Vivo Y200e 5G, and select your iPod from the list. Likewise, confirm the pairing request on your iPod.
Step 3: Initiate file transfer.
Once paired, locate the music files on your iPod that you wish to transfer. Use the sharing or send via Bluetooth option (this may vary depending on your iPod model) to send the selected music files to your Vivo Y200e 5G.
Step 4: Accept the files on Android.
Accept the incoming Bluetooth transfer request from the iPod. The music files will then be transferred wirelessly from your iPod to the Android device.
Step 5: Verify transfer success.
Confirm the successful transfer by checking the music library on your Vivo Y200e 5G. The transferred songs should now be available and ready to play.
Part 2. How to Transfer Music from Vivo Y200e 5G to iPod with Move to iOS App
For those looking to transfer music from an Android device to an iPod, the Move to iOS app provides a user-friendly solution.
While this app is designed for iOS devices, this approach is limited to iPod touch models and may not be compatible with all iPod devices. Users with older iPod models may need to explore alternative methods for transferring music between devices, which we will introduce in the next section.
Before starting the transfer, you need to download and install the Move to iOS app on the Google Play Store. Now, how to transfer music from Vivo Y200e 5G to iPod:
Step 1: Set Up Your iPod:
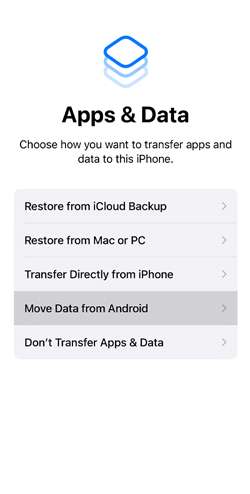
As you set up your iPod for the first time, reach the “Apps & Data” screen and choose “Move Data from Android.”
Step 2: Agree to Terms and Conditions
Open Move to iOS on your Vivo Y200e 5G. Review the terms and conditions and press “Agree” to proceed.
Step 3: Enter the Code
On your iPod, a six to ten-digit code will be displayed. Enter this code when prompted on your Vivo Y200e 5G.
Step 4: Select Content to Transfer
In the Move to iOS app, choose “Music” to transfer your music files specifically. Then, tap “Continue” to initiate the transfer process. Remember to keep your devices close to each other and connected to power until the transfer process is completed for quicker transfer.
Step 5: Transfer complete.
Allow the app to complete the transfer process. Once the transfer is complete, you will be prompted to finish setting up your iPod. Follow the instructions to complete the setup process.
Part 3. How To Transfer Music From iPod to Android/Android to iPod With Easy Software
Now, for a more comprehensive and versatile solution, using software like Wondershare Dr.Fone provides a streamlined process to transfer music not only from Vivo Y200e 5G to iPod but also from iPod to Android.
Dr.Fone offers a Phone Transfer tool, a user-friendly tool that simplifies the transfer of data between different devices, offering a wide range of compatibility. It is the answer to your “**Can I transfer music from an iPod to an Android phone?**” question. It’s all possible with Dr.Fone’s Phone Transfer tool.
The software is designed with a user-friendly interface, ensuring that even those without technical expertise can even navigate and use it effectively.
Dr.Fone Basic
Backup & Restore iOS Data Turns Flexible.
- One-click to back up the whole iOS device to your computer.
- Preview and selectively restore files to any device with simplicity.
- Export what you want from the backup to your computer.
- Your device’s data remains intact during the restore process.
- Supports iPhone, iPad, iPod touch, and the latest iOS version.
4,802,453 people have downloaded it
How to transfer music from iPod to Android:
Step 1: Open Dr.Fone’s Phone Transfer tool
Make a connection between your iPod and your Vivo Y200e 5G on your computer. Launch Wondershare Dr.Fone on your computer and navigate to Toolbox > Phone Transfer.
Step 2: Specify the source and destination devices
After connecting them, the platform will identify the connected devices and load their data. Choose the Source and Destination devices to set the transfer path. Use the Flip button to alter the transfer direction (for example, when you want to transfer from Vivo Y200e 5G to iPod instead).
Step 3: Choose the music category for the transfer
Proceed to select the types of data you wish to transfer. Checkmark music and click the Start Transfer button. If you want to remove existing data from the destination device, you can select “Clear data before copy.”

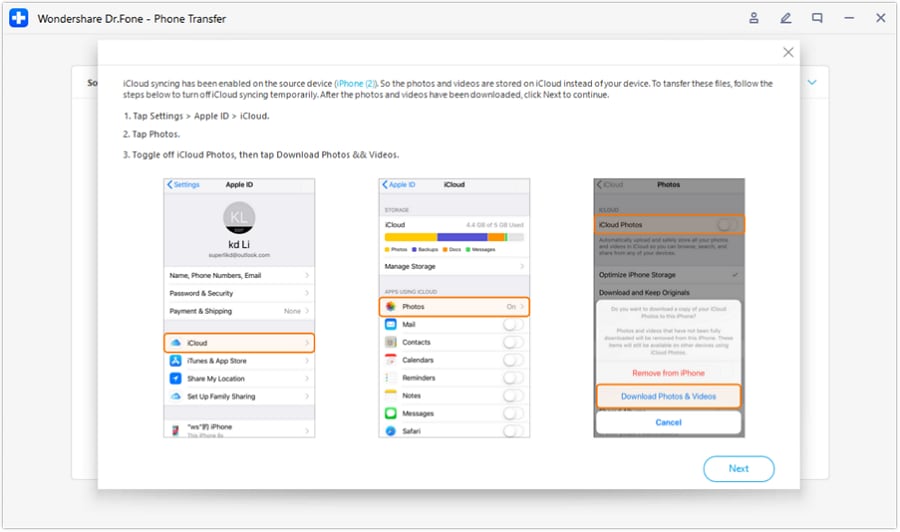
Step 4: Disable iCloud syncing
Now, Dr. Fone’s Phone Transfer tool should prompt a specific operation on the window. Follow the instructions to turn off iCloud syncing.
Step 5: Monitor data transfer progress
The progress of the data transfer will be displayed in a pop-up window. Once completed, click OK to conclude the process.
Conclusion
Transferring music seamlessly between iPod and Android devices, and vice versa, has become more accessible than ever with the right tools and methods. Bluetooth technology serves as a wireless bridge, allowing users to effortlessly move their favourite music from an iPod to an Android device.
On the other hand, there are also apps like Move to iOS and Dr.Fone Basic that facilitate the transfer of music depending on your needs. These options empower users to break through the traditional barriers of device exclusivity and seamlessly enjoy their music collections across different ecosystems.
Also read:
- [New] 2024 Approved Charting a Course Essential Equipment for YouTube Enthusiasts
- [New] In 2024, Pinpointing Your Own Signature TikTok Tag
- [Updated] Innovative Artists' Guide to Best Free 3D PSDs
- [Updated] The Pathway to Perfect Images Step-By-Step Backdrop Erasure
- [Updated] Top 30 Budget-Friendly After Effects Templates
- 2024 Approved How To Record Internet Radio - A Simple Guide
- 5 Proven Fixes If Your Mouse Won't Stay Connected – A Comprehensive Tutorial
- Chrome ブックマークの保存先を知る: 詳細なガイド
- How to Transfer Data After Switching From Lava Yuva 2 Pro to Latest Samsung | Dr.fone
- How to Transfer Music from Tecno Pop 7 Pro to iPod | Dr.fone
- How to Transfer Text Messages from Poco M6 5G to New Phone | Dr.fone
- In 2024, Android to Apple How To Transfer Photos From Samsung Galaxy A15 5G to iPad Easily | Dr.fone
- In 2024, How Can You Transfer Files From Xiaomi Redmi K70 Pro To iPhone 15/14/13? | Dr.fone
- In 2024, How to Transfer Contacts from Infinix Smart 8 Pro to Outlook | Dr.fone
- In 2024, How to Transfer Contacts from Nokia 105 Classic to Outlook | Dr.fone
- In 2024, How to Transfer Contacts from Vivo Y100i to iPhone XS/11 | Dr.fone
- In 2024, How to Transfer Contacts from Xiaomi Redmi Note 13 Pro+ 5G To Phone | Dr.fone
- In 2024, Top 10 AirPlay Apps in Samsung Galaxy A25 5G for Streaming | Dr.fone
- In 2024, Unleash the Power of Slow Motion Best Video Editing Tools
- Title: In 2024, How to Transfer Photos from Vivo Y200e 5G to New Android? | Dr.fone
- Author: Emma
- Created at : 2024-10-13 18:58:05
- Updated at : 2024-10-19 20:20:49
- Link: https://android-transfer.techidaily.com/in-2024-how-to-transfer-photos-from-vivo-y200e-5g-to-new-android-drfone-by-drfone-transfer-from-android-transfer-from-android/
- License: This work is licensed under CC BY-NC-SA 4.0.