
In 2024, How to Use Phone Clone to Migrate Your Nokia C12 Plus Data? | Dr.fone
How to Use Phone Clone to Migrate Your Nokia C12 Plus Data?
Dr.Fone - Phone Transfer
Best Tool to Migrate Huawei Phone Data
- Transfers any data between devices.
- Supports all phone models like iPhone, Samsung, Huawei, LG, Moto, etc.
- 2-3x faster transfer process compared to other transfer tools.
- Data kept absolutely secure during the transfer.

The rapid change in the mobile models has made it difficult for us to keep up with the trend. For some, while it might be a matter of owing only the best mobile, for others it’s a matter of enjoying the best of the world at each point of time. Thereby they try to keep up with the mobile trend by getting their hands on the latest mobile whenever possible whether iOS or Android. In such a scenario it becomes difficult to transfer data from one to another. But here is some mobile technology such as Phone Clone that will change it forever. So, let us see how you can use it to your advantage to transfer your valuable information.
Before we move on to see how to transfer data we will first see why someone would like to migrate the information from old phone to new phone:
- - To replace the old phone with a new phone as the primary phone
- - To back up all the info in both the phone
Moving on, in the subsequent section, we will understand how to use Phone Clone Nokia.
Part 1: How to use Phone Clone for Android?
Android has been ruling the world with its open-source technology and compatibility for a wide range of devices. As a result of which, many companies are producing the latest technology in hardware without any worry of OS support. Android phone makers such as Huawei, Samsung, HTC, and many others are at the trend of releasing flagship models at the different budget range on a regular interval. As a result, this has made people run like fans for grabbing a hand on the latest rig, to enjoy the best of the world at every point in time. In such a scenario, it becomes difficult to transfer your data from one phone to another securely. Well in this part, we will be introduced to the Huawei Phone Clone app that will help you to migrate information from one phone to another.
Here are the steps to be followed for Phone Clone Nokia to transfer your data from one phone to another:
1. First, install the app on both the phones, i.e., on both old and new mobiles
2. Open the app on the new phone. Click on the new phone button. A Wi-Fi will be created whose password will be displayed at the time of creation. You will need that password in the next step.
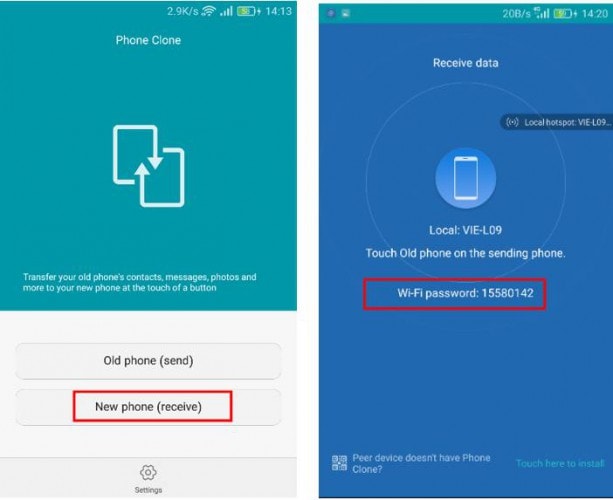
3. Open the app on the old phone. Click on the old phone button. Select the wi-fi network created in the 2nd step and enter the password that you received in the 2nd step.
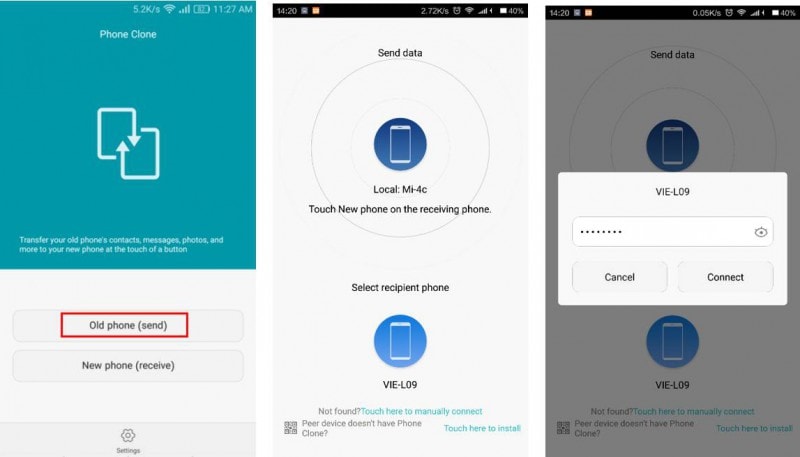
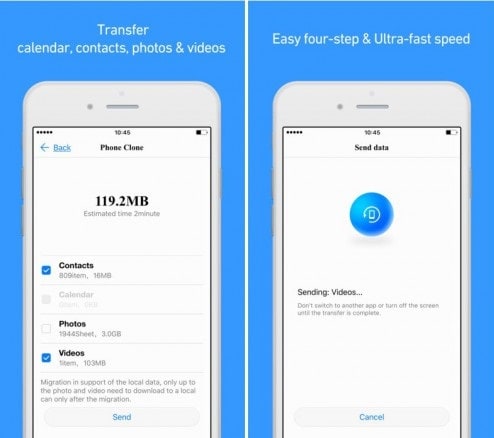
4. Once connected, click the number of tabs on the old phone that you want to send to a new phone.
Part 2: How to use Phone Clone for iPhone
The best part of the Huawei Phone Clone is that it supports not only Android but it also supports the iPhone. All the things that you can do while transferring data from one Android to another, you can achieve the same feat while transferring data from one iPhone to another iPhone. It is especially useful when you get that big update to your iPhone version, and most of the apps get useless due to the drastic hardware and software change in old and new iPhones. Thinking about changing your old iPhone to a new one could have been disastrous if not catastrophic if personal data could not have been transferable from one mobile to another. Phone Clone by Huawei lets you simply achieve the task while at the same time saving you a lot of data and time
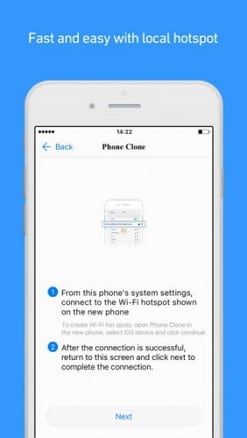
Now, let us take a look at how you can use Phone Clone Nokia app without spending a penny on expensive services and with 4 simple steps:
1. Install the Phone Clone app on old and new iPhone mobile
2. Open the app for the new iPhone. Click on the send button. A Wi-Fi hotspot will be created, displaying its name and password.
3. Go to the wi-fi setting of the old iPhone and connect to the Wifi network mentioned in step 2. Open the app on the old iPhone and click on next to complete the connection.
4. Once connected, click on the tabs presented in the old iPhone and select the tab that you want to send to the new iPhone.
Part 3: Best Phone Clone alternative: Dr.Fone - Phone Transfer to migrate iPhone/Android data
While Phone Clone is free of cost and is a great emergency there is still much lagging in the app. It does not connect properly; it sometimes fails to send files completely and many more. To overcome we have with you the best Huawei Phone Clone alternative, called Dr.Fone - Phone Transfer , the easiest way to migrate iPhone/Android data.
Dr.Fone provides one of the best options to switch personal data from one phone to another seamlessly. It supports mobile of all kinds of data and service carriers, so you are not restricted to any particular type of mobile set or carrier service. Enjoy the freedom of information transfer without any loss in security and fast process.
Some of the pros of Dr.Fone - Phone Transfer are as follows:
Dr.Fone - Phone Transfer
1-Click Phone-to-Phone Transfer
- Easy, fast, and safe.
- Move data between devices with different operating systems, i.e. iOS to Android.
- Supports iOS devices that run the latest iOS version

- Transfer photos, text messages, contacts, notes, and many other file types.
- Supports over 8000+ Android devices. Works for all models of iPhone, iPad, and iPod.

3981454 people have downloaded it
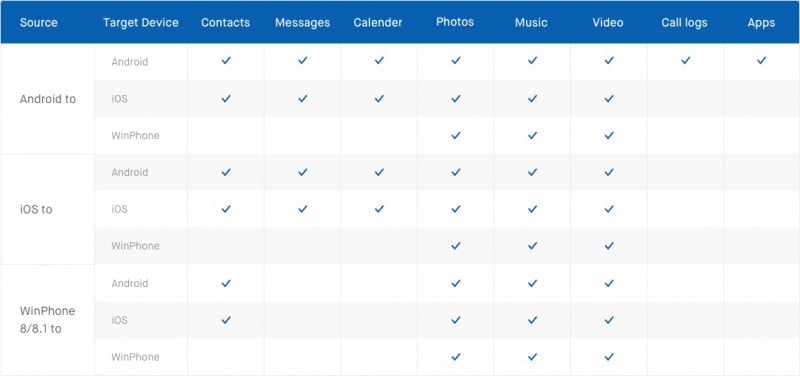
Here is a small comparison of how data transfer from one platform to another platform fares in Dr.Fone
Now let us take a look at how to use Dr. Fone to transfer data between mobiles:
1. Launch the Dr.Fone app on the computer and select Phone Transfer.

2. Connect both the mobile to the computer and select the send and receive side on the computer

3. Select the files and then click on “Start transfer” to complete the transfer process

The best part of Dr.Fone is that you can try it free of cost to check if it suits your requirements. We are sure that its jaw-dropping feature will leave an impression on your mind.
We hope that you learned some of the phone clone methods and applications that you can use to transfer your information from an old phone to a new phone. Use the methods mentioned above and be sure that you are on the safer and faster side of transferring data.
[Solved] Move from Nokia C12 Plus to iOS not Working Problems
You might be wondering, what is the Move to iOS? If you are an android user and have decided to shift to the iPhone, you will need the Move to iOS tool. The app is developed to help transfer data from an android device to iOS devices. Google play store has the app, and it’s free.
To use the app, install it on your android device first. The transfer process requires following several simple steps to move to iOS. The app seems easy to use the tool, but newbies must learn about the Move to iOS guidelines to complete the process. With this tool, you will transfer various android data such as camera photos, contacts, message history, mail accounts, calendars, and videos.
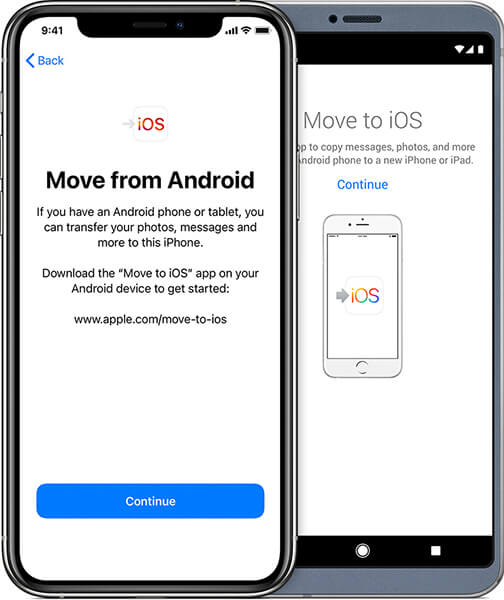
Move to iOS app works on android version 4.0 or higher. You can transfer data to any iPhone in a relatively straightforward process. Also, beware that the Move to iOS will work only when setting up a new iPhone or iPad.
Besides knowing what the content that Moves to iOS tool can transfer, you might be wondering how long the process can take. Depending on the content you want to transfer, the process generally takes around 10 – 30 minutes. However, other factors can determine the time the app will take to move content to iOS. They include the speed of the network, patency of the transmission process, and Wi-Fi stability.
Part 1: Move to iOS not working problem lists
Users can learn to use the Move to iOS app quickly. However, they will occasionally experience problems while using this tool. If the app runs into errors, you will encounter some problems.
- Move to iOS no code.
These steps will help you get the Move to iOS code;
When setting up your iPhone, tap on the move data from the android option. Then, launch the Move to ios app on your android device and tap continue. You will see the find you code screen; tap on the .next’ button to continue.
Tap on the continue button on your iOS device and wait for a ten-digit code to appear.
Once you receive the code on your iPhone, enter it on the android device and wait for the Nokia C12 Plus devices to connect. Select all the content you want to move and click Next.
Once the loading bar on the iOS device is done, tap on the ‘Done’ button on your android device. Proceed to set up your iOS device using the onscreen steps.
If you are not receiving any code on your iOS device, you can fix it by ensuring the Wi-Fi is always on throughout the process. You can also reboot your devices if the error is temporary.
- Move to iOS could not communicate correctly with the Nokia C12 Plus devices.
To avoid this Move to iOS error, ensure both devices run on updated operating systems, i.e., android 4.0 or later and iOS 9 or later. The phones must have enough power, and lastly, ensure that you turn off background apps to avoid notifications during the transfer process.
- Move to iOS stuck on preparing/transferring.
You are transferring your android data to iOS, but the process is stuck on the transferring page. The problem is related to Wi-Fi connections. Should the Wi-Fi disconnect for a few seconds, the transfer process stops. Other distractions on android such as calls, switching to sleep mode, or other background operations might also cause the Move to iOS error.
- Move to iOS takes forever/slow.
The length of time taken to transfer data from android to iOS depends on the size of the data and Wi-Fi connection. To speed up the transfer, check your Wi-Fi connection, delete unnecessary data from the android device, or restart the transfer if it takes too long.
- Move to iOS Wi-Fi disconnect.
Wi-Fi drops will obviously interfere with the transfer process. To avoid this error, you can reset your router and the network and turn off smart switching and airplane mode.
- Move to iOS interrupted
If the Move to iOS process is interrupted, you can fix it by restarting the phone, check your network connections on both devices, turn off the smart network swath on android and turn on the airplane mode.
- Move to iOS, not connecting devices.
The circumstances can be frustrating as the transfer process will not be completed successfully. But what is the solution to all these problems? We will discuss the solutions to move to iOS not working in the later sections of this article.
While the Move to iOS app can be easy to use, you need to know a couple of things before transferring.
- Ensure the android and iOS device can connect to Wi-Fi
- Ensure the Nokia C12 Plus devices have enough power to complete the process/ plug the Nokia C12 Plus devices into power
- The iOS device should run on iOS 9.0 or higher
- The android device should run on android 4.0 or higher
- Check the capacity of the transferred content, whether it will fit the new iOS device.
- Update chrome on android to the latest version to transfer bookmarks
Part 2: 9 Tips about moving to iOS not working problems
Even though Move to iOS is a useful tool for android users willing to transfer content to the iOS device, there are several instances where it fails to work correctly. The app will show a message indicating the type of error you are experiencing during the transfer process.
Most of the ‘move to iOS’ problems are related to Wi-Fi connection issues, android and iOS versions, space requirements, connection optimizers, and application issues. Nevertheless, you will need to find a solution to these problems to transfer your data successfully from android to iOS devices. This section will discuss possible solutions to the errors that occasionally appear when moving android data to iOS devices.
Tip 1: Restart both your devices
Restarting your devices is the essential thing to do when troubleshooting the Move to iOS problems. It is a great way o eliminate minor issues during data transfer from android to iOS devices. The process can resolve the Move to iOS stuck on connecting to iPhone issues. A simple restart will eliminate the bugs and any cached error in the Nokia C12 Plus devices.
Tip 2: Clear all running apps
It is recommended to avoid using the android device o run applications when using the Move to iOS app. Since the app runs in the foreground, you should ensure all other apps in the android are disabled before starting the data transfer process. Notifications and incoming calls are likely to interfere with the process; therefore, users must ensure such distraction is not happening by disabling such apps.
Tip 3: Make sure the Wi-Fi connection is turned on
Wi-Fi connectivity is a significant factor in ensuring data transfer is successful. Since Move to iOS relies on Wi-Fi, you should ensure it Is turned on and is stable. The iPhone usually creates a private network for the android device to connect. Please turn on the Wi-Fi connection on your android to make it ready to connect to the iPhone’s private network. This will make it possible to send the Move to iOS code to initiate the data transfer process.
Tip 4: Plug both devices to power
You should ensure that both the android and iOS devices have sufficient power to run through the entire data transfer process. If you doubt the power consumption, keep the Nokia C12 Plus devices connected to power before you start moving your content from android to iOS device.
Tip 5: Set your phone into airplane mode
When you transfer android data to iOS using the Move to iOS tool, apple recommends that you turn off your mobile data. Some android devices can switch from Wi-Fi to mobile data when the connection tends to drop on either side using the smart switch feature. This can interfere with the transfer process. Similarly, it could be useful if incoming calls were prevented to avoid interfering with the data transfer process. All mediums of connectivity are disabled except for the connection between the android and iOS devices through the iPhones Wi-Fi network.
The best way to ensure these distractions are not happening is to turn on airplane mode on the android device.
Tip 6: Check the storage requirement
Before you begin transferring android data to iOS devices, check the size of all content including the external micro SD card, to determine whether it fits into the new iOS device. If the content is larger than the destination storage, you will obviously encounter an error during the transfer process. You need to delete the content you don’t need to transfer from your android device before getting started.
Tip 7: Disable the connection optimizer
Android devices with connection optimizers will switch between different connections for better connectivity. Since the Move to iOS app utilizes the iPhones private network, the connection optimizer might start using mobile data or switch to another Wi-Fi connection when the current connection drops. The circumstance can break the connection between the android ad iOS device hence interfering with the data transfer process. Be sure to turn off the feature from settings before running the Move to iOS app.
Tip 8: Check the compatibility of your devices
You need to check whether your android device meets the minimum requirements to be compatible with the Move to iOS app, much like other apps found on the App Store and Google play store. Generally, the app runs on Android 4.0 and above while transferring data to iOS 9.0 or later devices.
Tip 9: Turn off battery optimization
Turning off the battery optimization on both your Android and iOS device is a requirement when using the Move to iOS tool. The app is designed to run in the foreground, and the android user should not have other applications running. However, the phone might automatically minimize the Move to iOS app when it switches to battery optimization mode. Therefore you should ensure the feature is closed from the settings of your android device.
Part 3: [Alternative] Move to iOS not working solved without a PC
An alternative solution to Move to iOS not working problem is to use Dr. Fone – Phone Manager (iOS) . The software can transfer all types of data from android to iOS devices quickly. Here, you will select the type of data you need and begin moving in a single click.
Most importantly, the programs transfer data at a very high speed compared to other alternatives. You can also use the software to transfer social apps and retain the important history of apps like WhatsApp, Wechat, Viber, Line, or Kik.
Dr.Fone - Phone Manager (iOS)
Move/Transfer Android data from Computer to iPod/iPhone/iPad without iTunes
- Transfer, manage, export/import your music, photos, videos, contacts, SMS, Apps, etc.
- Back up your music, photos, videos, contacts, SMS, Apps, etc., to the computer and restore them easily.
- Transfer music, photos, videos, contacts, messages, etc., from one smartphone to another.
- Transfer media files between iOS devices and iTunes.
- Fully compatible with iOS 7 to iOS 15 and iPod.
3981454 people have downloaded it
Here is how to transfer data from iOS to android device without a PC
You need to login to your iCloud account on android to download data, or you can use the iOS-to-android adapter to connect your iPhone to android to transfer data directly.
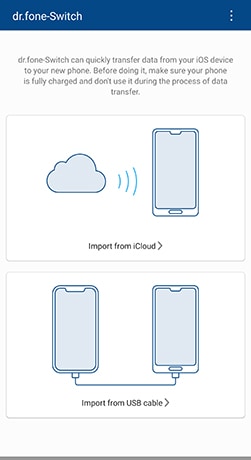
Use the following simple steps.
Install Dr. Fone- Phone Transfer app on your android device and click on the ‘Import From iCloud’ option.
Use your apple passcode to log in to the iCloud account. You will be required to enter a verification code if prompted to two-factor authentication.
Select from the list of data detected from iCloud and tap on start importing.
Wait for the data transfer process to complete.
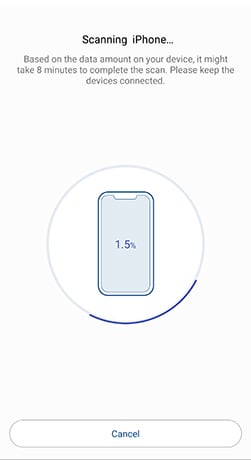
To transfer content from your iPhone to Android device directly, open Dr. Fone – Phone Transfer on android and tap ‘import from a USB cable.’ Use the iOS-to-android cable to connect your iOS and Android devices.
Dr. Fone – Phone Transfer will begin to scan data on your iPhone. The time will depend on the content on the iPhone.
Tap on ‘start importing’ once all data has been detected.
Part 4: [Alternative] Move to iOS not working solved with a PC
The following steps will help you transfer data from android to an iOS device using a PC.
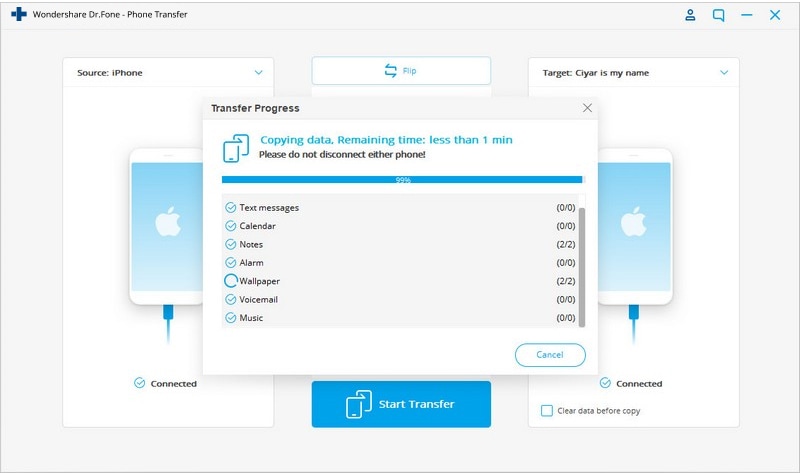
- Open the Dr. Fone program on your computer and click ‘phone transfer’ from the modules displayed.
- Connect your iOS and Android devices to the computer. You can always use the ‘flip’ option to change the source and destination devices.
- Select the types of data you want to transfer, then click on the ‘start transfer’ option to continue. Be careful not to disconnect the Nokia C12 Plus devices until the process is complete.
- If you want to clear the destination phone’s data before transferring data, ensure you check the ‘clear data before copy’ box.
- All the data you selected will be transferred successfully in a few minutes.
Conclusion
Transferring data from android to iOS device has been made easier with the Move to iOS app. However, you need to consider the requirements for the data transfer process to complete successfully. You can also apply Dr. Fone – Phone Transfer as your recommended alternatives to transfer android data to the iOS device in the simplest way.
How I Transferred Messages from Nokia C12 Plus to iPhone 12/XS (Max) in Seconds
Recently, I got a new iPhone 12/XS (Max) with so much excitement. But, the one thing that was driving me crazy was how to transfer messages from my old Android device to this iPhone 12/XS (Max), as I have always been an Android phone user till then. So, I was scared to transfer anything to the new iPhone and ruin it. You can have numerous solutions to transfer text messages from Nokia C12 Plus to iPhone 12/XS (Max) after setup.
Well! If you are in a similar situation as me, then I would recommend you go through this article. I have finally opted to import SMS to iPhone 12/XS (Max) from Android.
2 Apps to Transfer Messages from Nokia C12 Plus to iPhone 12/XS (Max) without Computer
How to transfer Android messages to iPhone 12/XS (Max) using Move to iOS app
The first method to transfer text messages from Nokia C12 Plus to iPhone 12/XS (Max) is using the official Move to iOS app from Apple. Message history, call logs, contacts, web bookmarks, apps, etc. can be transferred from your Android to any iOS device. Though, I have noticed the app was acting strangely during data transfer. My Wi-Fi got some issues, and Move to iOS couldn’t properly complete the transfer.
Guide for Move to iOS to transfer messages from Nokia C12 Plus to iPhone 12/XS (Max)
Download, install, and launch Move to iOS on your Nokia C12 Plus.
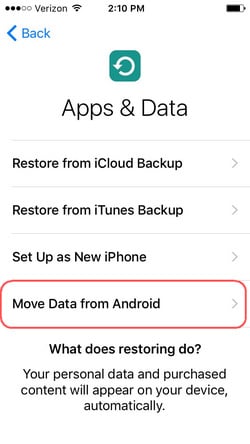
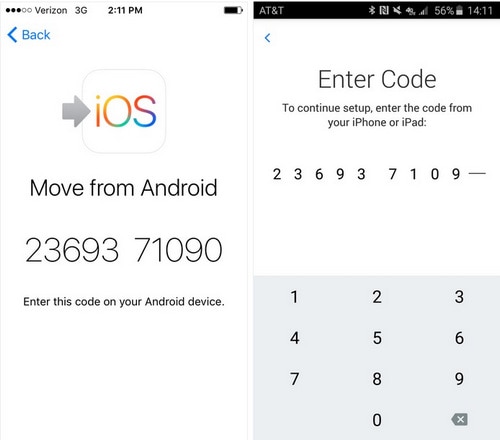
Get the iPhone 12/XS (Max) and configure the setup and then connect to Wi-Fi. Browse to the ‘Apps & Data’ option, click ‘Move Data from Android’ thereafter. Click the ‘Continue’ button and note the passcode.
On your Nokia C12 Plus, click ‘Continue’ and then press ‘Agree’. When prompted for a passcode, enter the one you got from iPhone 12/XS (Max).
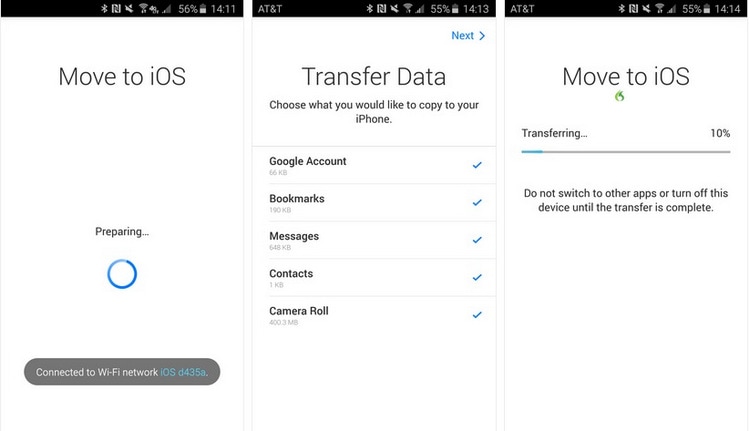
Ensure that the Android phone is also connected to Wi-Fi. Now, click on ‘Messages’ from the ‘Data Transfer’ option. Click ‘Next’ and wait a while to finish the data transfer. Hit the ‘Done’ button afterward once the iPhone 12/XS (Max) gets synched with these messages, set up your iCloud account, and view the messages.
How to transfer Android messages to iPhone 12/XS (Max) using SMS Backup+
You can learn how to transfer messages from Nokia C12 Plus to iPhone 12/XS (Max) without a computer using the SMS Backup+ app. It can automatically backup the SMS, call logs, MMS using a different label in Google Calendar and Gmail. Remember that MMS can’t be restored later.
Here is how to transfer messages from Nokia C12 Plus to iPhone 12/XS (Max) with SMS Backup+:
Get the Android phone and sign in to your ‘Gmail account’ and press ‘Settings’. Go to ‘Forwarding and POP/IMAP’. Now, tap ‘Enable IMAP’ and click ‘Save Changes’.
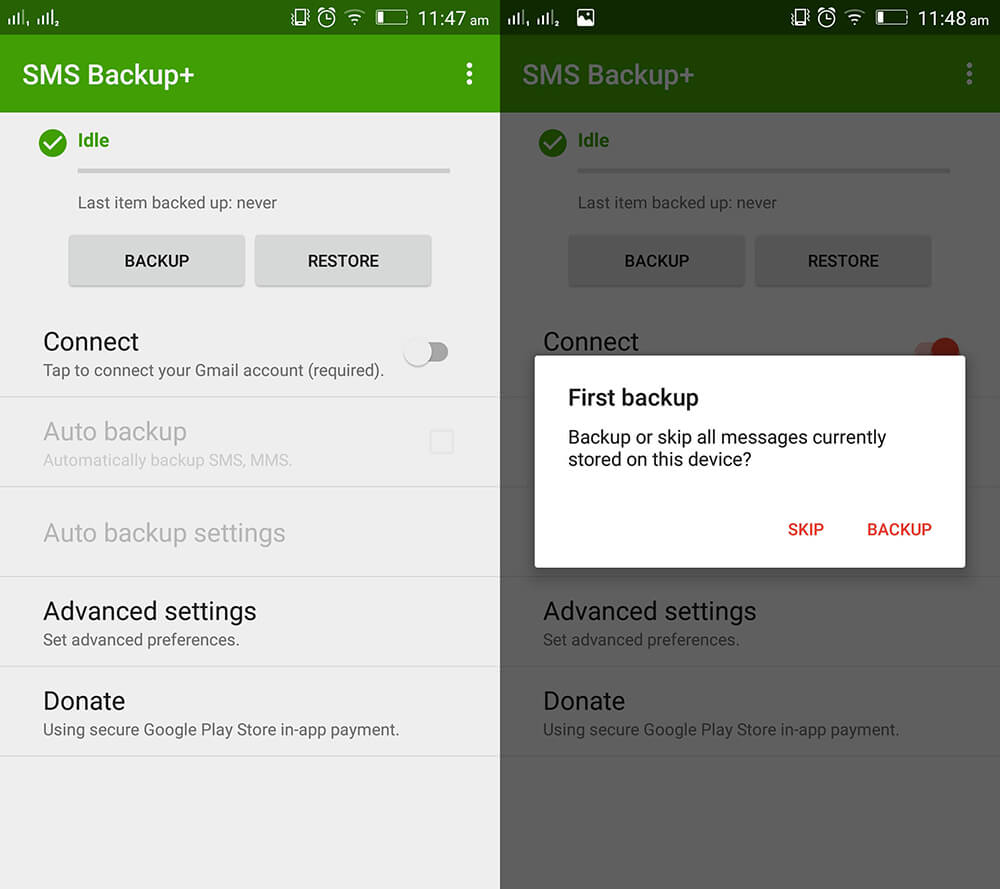
Download SMS Backup+ on your Nokia C12 Plus from Google Play Store and launch it. Tap ‘Connect’ choose the recently used Gmail account. Now, allow the app to backup the SMS to your Gmail account and hit ‘Backup’.
Now, since you’ve backed up your messages to Gmail, you can simply access and view them from any device. Simply launch Gmail with the same account, and you’ll be able to get hold of all your messages right on your iPhone 12/XS (Max).
Note: The messages will be enclosed in an Email attachment. That implies you won’t be able to import your messages to your iMessage app. If you want to transfer SMS to the default messages app, try Dr.Fone - Phone Transfer. It’s a one-click and reliable desktop software.
2 Methods to Transfer Messages from Nokia C12 Plus to iPhone 12/XS (Max) with a PC
How to transfer all messages to iPhone 12/XS (Max) at a time
For transferring messages from your Nokia C12 Plus to iPhone 12/XS (Max), opting for Dr.Fone - Phone Transfer is a great idea. Speak of transferring contacts, photos, music, text messages, etc. from Nokia C12 Plus to iOS devices or vice versa, it has a proven record of credibility.
This is how to import SMS to iPhone 12/XS (Max) from Android –
Step 1: Download Dr.Fone - Phone Transfer on your PC and then install and launch it. Connect your Android and iPhone 12/XS (Max) using respective USB cables.
Step 2: Hit the ‘Switch’ tab from the Dr.Fone window. Select the Android phone as the source and iPhone 12/XS (Max) as the destination over here. Use the ‘Flip’ button in case you have altered the selection.
Note: Selecting the ‘Clear Data before Copy’ option completely deletes everything from the target.

Step 3: In this section, tap on ‘Messages’ and select the ones you want to selectively transfer. Hit the ‘Start Transfer’ button and then wait a while. Click ‘OK’ once the transfer process is over.
How to transfer only selected messages iPhone 12/XS (Max)
Alternatively, you can opt for Dr.Fone - Phone Manager for selectively transferring messages from your Nokia C12 Plus to your iPhone. Managing your iPhone is easy with such an effective desktop tool.
Dr.Fone - Phone Manager (iOS)
Quickly and Selectively Transfer Messages from Nokia C12 Plus to iPhone 12/XS (Max)
- Managing your iPhone data got easier by exporting, delete, and add data with this software.
- It is compatible with the most recent iOS firmware. It requires no internet connectivity to carry out the data transfer.
- When you are looking for a quick transfer of SMS, videos, music, contacts, etc. to your iPhone 12/XS (Max), this tool is a gem.
- The best-known alternative to iTunes to connect your PC and iPhone.
3981454 people have downloaded it
Here comes the guide to import SMS to iPhone 12/XS (Max) from Android selectively:
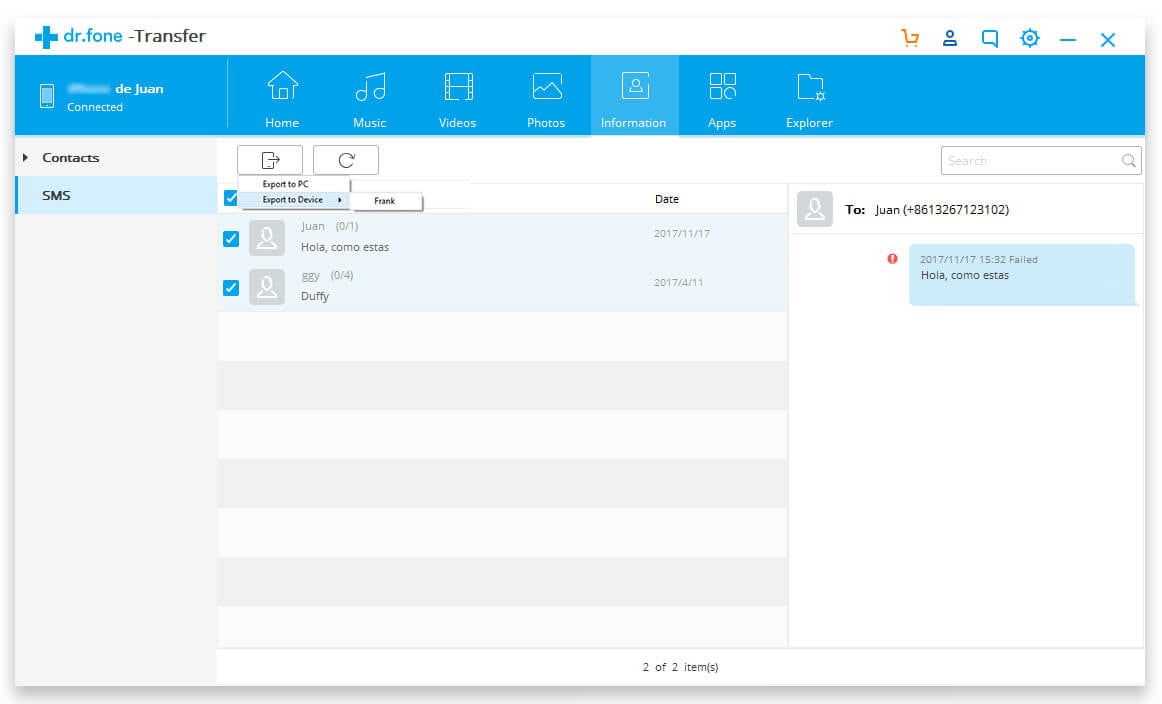
Step 1: Get Dr.Fone - Phone Manager installed and launched on your PC. Now, press the ‘Phone Manager’ tab.
Step 2: Use respective USB cables to connect your Android and iPhone 12/XS (Max) with the computer and then pick Android as the source device. Then, select the ‘Information’ tab displayed on the top.
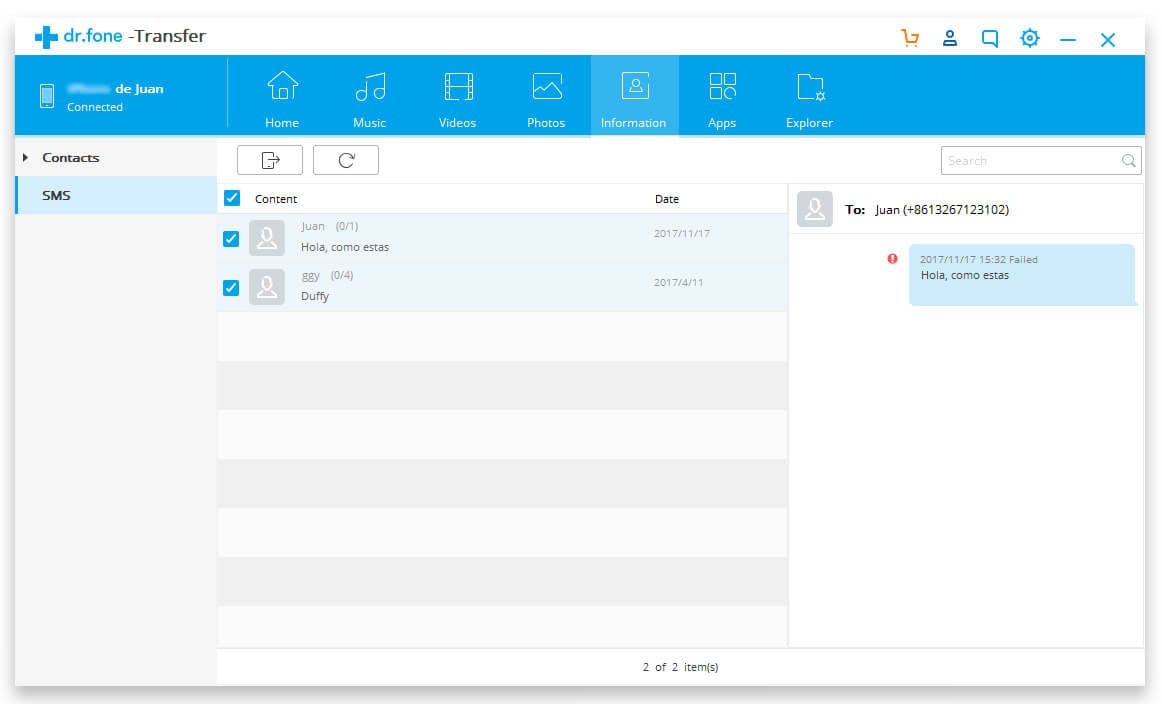
Step 3: From the list of messages, choose the desired text messages and hit the ‘Export’ button. Click the ‘Export to device’ button consecutively and complete the process with the onscreen guide.
Conclusion
I hope, this article brought you answers to your messages and data transfer queries. From my own experience, I found Dr.Fone Toolkit as the most viable option. If you are looking for a solution that leads to no data loss, then you can go for either Dr.Fone - Phone Transfer or Dr.Fone - Phone Manager .
Also read:
- [New] 2024 Approved Rank the Best 7 Android-Friendly AdBlockers Reviewed
- [New] Unlocking the Power of Closed Captions on Vimeo
- [Updated] 2024 Approved Adjusting Low-Bit Rate Settings (OBS)
- [Updated] Techniques for Captivating Visual FB Ads
- From Your Insights to Ingenious AI: Build a GPT of Your Design
- Guide to Saving Real-Time Screen Chats
- How To Recover Data from iPhone 11? | Dr.fone
- How to Transfer Data from Itel P55 5G to Any iOS Devices | Dr.fone
- How to Transfer Data from Nubia Red Magic 9 Pro+ to BlackBerry | Dr.fone
- How to Transfer Text Messages from Infinix Hot 30i to New Phone | Dr.fone
- How To Transfer WhatsApp From Apple iPhone 15 Pro Max to other iPhone 12 devices? | Dr.fone
- In 2024, 6 Ways To Transfer Contacts From Poco C51 to iPhone | Dr.fone
- In 2024, 8 Ways to Transfer Photos from Motorola Moto G04 to iPhone Easily | Dr.fone
- In 2024, 8 Ways to Transfer Photos from Tecno Spark 20 Pro to iPhone Easily | Dr.fone
- In 2024, Best 3 Software to Transfer Files to/from Your Oppo A2 via a USB Cable | Dr.fone
- In 2024, How to Transfer Photos from Itel P40+ to Laptop Without USB | Dr.fone
- Ultimate Guide to Catch the Regional-Located Pokemon For Realme Note 50 | Dr.fone
- Title: In 2024, How to Use Phone Clone to Migrate Your Nokia C12 Plus Data? | Dr.fone
- Author: Emma
- Created at : 2024-10-23 18:49:59
- Updated at : 2024-10-30 22:38:34
- Link: https://android-transfer.techidaily.com/in-2024-how-to-use-phone-clone-to-migrate-your-nokia-c12-plus-data-drfone-by-drfone-transfer-from-android-transfer-from-android/
- License: This work is licensed under CC BY-NC-SA 4.0.