
In 2024, Top 6 Ways to Transfer Text Messages from Motorola Edge 40 Pro to Other Android Devices | Dr.fone
Top 6 Ways to Transfer Text Messages from Motorola Edge 40 Pro to Other Android Devices
With the advancement in technology, your expectations have also increased. You have made technology as your magic stick. It makes your life easy and smooth. Isn’t it? However, at the same moment, it is very painful when you don’t get know the ways to transfer text messages from Motorola Edge 40 Pro to another Android. We understand that it might be little tricky on how to get the task done. For this reason, we have collated top 6 ways to transfer messages from Motorola Edge 40 Pro to Other Android Devices. And made sure to get you the step by step details of all the entire procedure you need to go through to transfer text messages from Motorola Edge 40 Pro to Other Android Devices.
Part 1: Best free apps to transfer text messages from Motorola Edge 40 Pro to Other Android Devices
When you are planning to upgrade your phone from one Android version to another, and you want to transfer all your existing SMS’s from one phone to another, then there are several free applications that are available on the Play Store that can make your life easy.

1. SMS Backup and Restore App
One of the best and easiest ways to transfer text messages from your old Android device to new Android device is by using the SMS Backup and Restore App available on the Play Store. You don’t have to worry about any data cable connections. It just needs data connection and your attention. In order to transfer text messages from Motorola Edge 40 Pro to Other Android Devices, follow the below-mentioned steps.
Step 1 - Open the Backup app on the Motorola Edge 40 Pro device from which you want to transfer the text messages.
Step 2 - Click on “Set Up A Backup” once you check-in the app.
Step 3 - Select Messages from the options you receive on the next tab and click on “Next”.
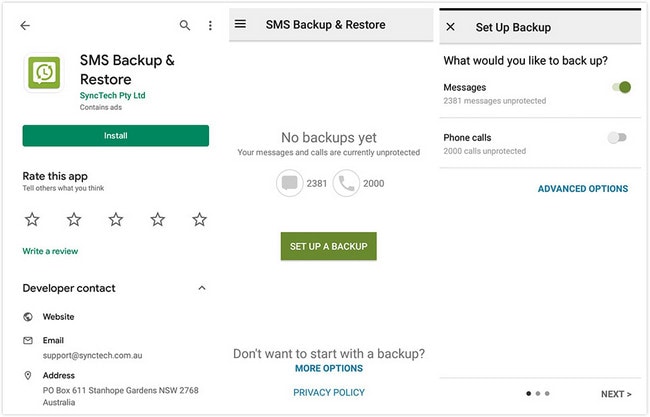
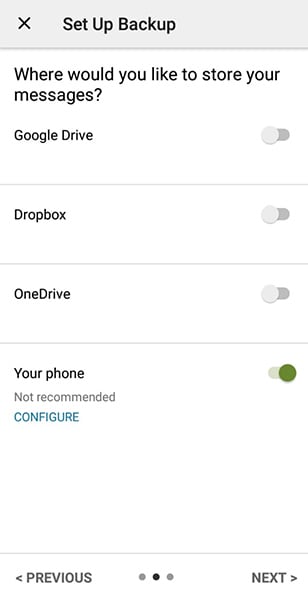
Step 4 - Select where you want to create your backup. And click on “Next”.
Step 5 - Once you click on next, you will be prompted to select one option from Hourly, Weekly or Daily which will set the frequency of the backup. Click on “Back Up Now” to start taking the backup of SMS.
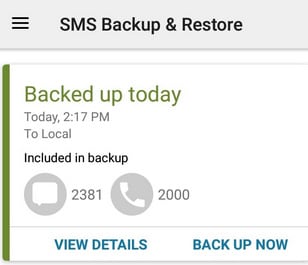
Note: All this you need to do when you feel that your backups should be taken at regular intervals.
Step 6 - Once the backup file is ready, share it on the Motorola Edge 40 Pro device where you need to copy the backup. Once that is done, download the same app on the Motorola Edge 40 Pro device.
Step 7 - Click on the “Restore” button from the side menu.
Step 8 - Click on the “storage location” where you have saved your file.
Step 9 - Select the message option from the two options displayed and click on “Restore”.
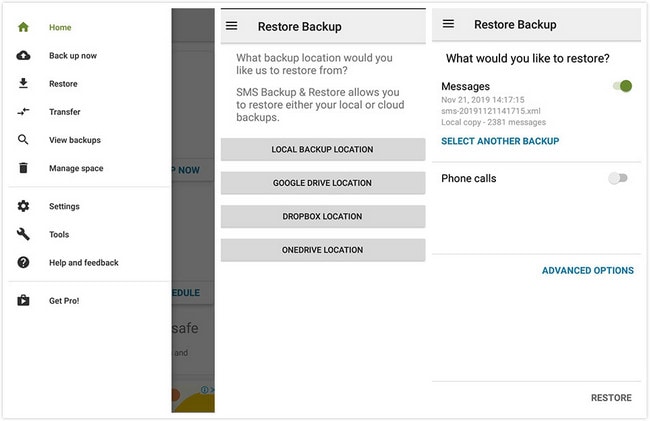
Upon completion of the process, transfer of messages from one Android to another Android phone is carried out successfully.
2. Super Backup & Restore
Another and a simpler way to transfer text messages from one Android to another Android is by using the Super Backup & Restore app. It will not take much time of yours and will create backup in seconds. You just need to follow the steps as directed below.
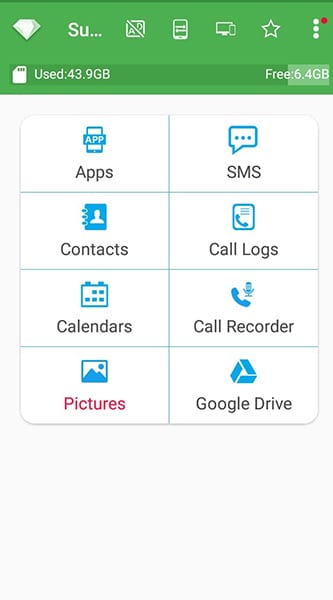
Step 1 - Open the app and click on “SMS”.
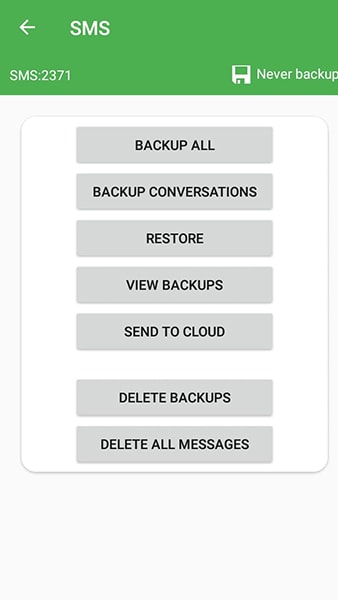
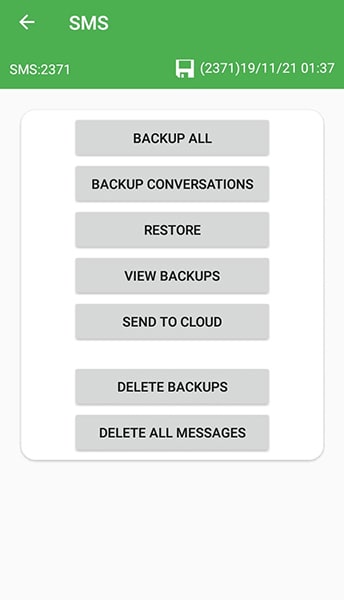
Step 2 - Click on “Backup All”. Once done, now click on the “Ok” button when you receive a pop-up. It will then start taking a backup of all your text messages.
Step 3 - Share the generated .xml file generated on the Android device where you want to restore the backup.
Step 4 - Now download the same app on another device where you have shared the .xml file.
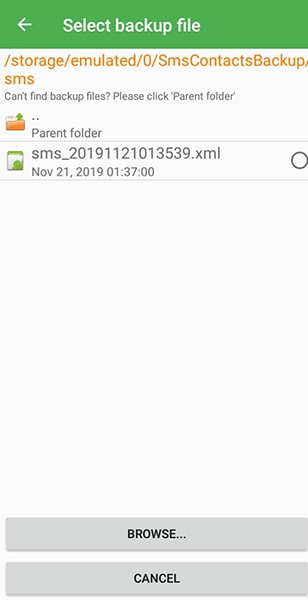
Step 5 - Click on “SMS”, then click on the “Restore” button. It will ask you to select the .xml file which you had saved in step #3.
Step 6 - It will start restoring all your SMS’s.
3. Smart Switch (Samsung)
Whether you are switching from iPhone or from any Android phone to Samsung Galaxy phone, the transfer of data like image, text messages, videos, etc. is done easily and smoothly using Samsung smart switch. In order to do so, please follow the steps discussed below on how to transfer text messages from Motorola Edge 40 Pro to Other Android Devices using Smart Switch.
Step 1 – Install and Open Smart Switch app on both the Motorola Edge 40 Pro devices.
Step 2 - Click on “Send” data on your old smartphone and click on “Receive” data on your new Galaxy phone.

Step 3 - Connect with the “Wireless” connection on both the Motorola Edge 40 Pro devices.
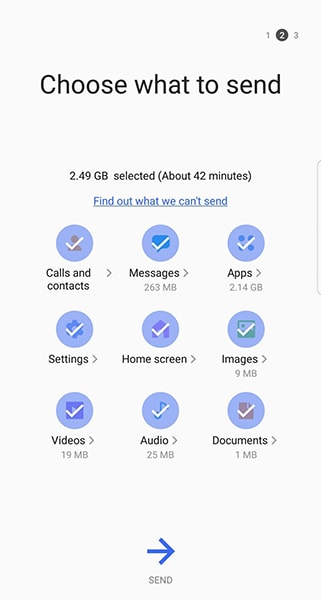
Step 4 - Select the content you want to transfer to the Galaxy device and click on “Send” button to start transferring the content from one device to another.
Part 2: Great software Dr.Fone - Phone Transfer to transfer text messages from Motorola Edge 40 Pro to Other Android Devices (Recommended)
Every user in this world is looking out for the easiest way to tackle the task. Let’s say that you want to transfer text messages from Motorola Edge 40 Pro to Other Android Devices. And in order to do so, you are searching for an app which is secured, powerful, and user-friendly. Then Dr.Fone - Phone Transfer (iOS&Android) will be the best option. It is compatible across platforms like iOS and Android. Moreover, it can effectively transfer data between cross platform devices in just matter of one click.
Step by Step Tutorial
Here are the steps on how you can transfer text messages from Motorola Edge 40 Pro to Other Android Devices using Dr.Fone - Phone Transfer.
Dr.Fone - Phone Transfer
Transfer Everything from Android/iPhone to New iPhone in 1 Click.
- It supports all the leading iOS devices, including devices running on iOS 11.
- The tool can transfer your photos, videos, contacts, messages, music, call logs, notes, bookmarks, and so much more.
- You can transfer all your data or select the type of content you wish to move.
- It is compatible with Android devices as well. This means you can easily perform a cross-platform transfer (e.g. iOS to Android).
- Extremely user-friendly and fast, it provides a one-click solution
3,285,946 people have downloaded it
Step 1 - First of all, download the tool going on the official site. Once it is done, you just need to launch your application. Now click on the “Switch” option from the main screen.

Step 2 - Now, you need to connect your Motorola Edge 40 Pros with your PC using the USB cable to transfer the text messages from the old Android to new Android device. If the source and destination positions are not correct, do it using the Flip button available at the bottom center.

Step 3 – Simply select the files you want to transfer.

Step 4 - Once you have selected the files, click on start. This will quickly and easily transfer the files from the source device to the destination device.

Part 3: Manage Text Messages from Motorola Edge 40 Pro to Other Android Devices using Dr.Fone - Phone Manager
The app named Dr.Fone - Phone Manager (Android) is a smart way to transfer text messages from Motorola Edge 40 Pro to Other Android Devices. If you are trying to transfer your files from a mobile device to a computer, from a computer to a mobile device, etc. Dr.Fone - Phone Manager is yet another powerful option available at present. You can also transfer data from iTunes backup to Android. It is fully compatible with all Android and iOS devices.
Step by Step Tutorial
Whether you want to transfer data, i.e. images or videos or text messages, the steps that are mentioned below remains the same.
Step 1: Grab your copy of the Dr.Fone - Phone Manager (Android) from its official website and then install it over your PC. Now, launch the tool and then opt for the “Transfer” tab from the main screen. Meanwhile, get your “Source” device connected with your PC using the genuine USB cable only.
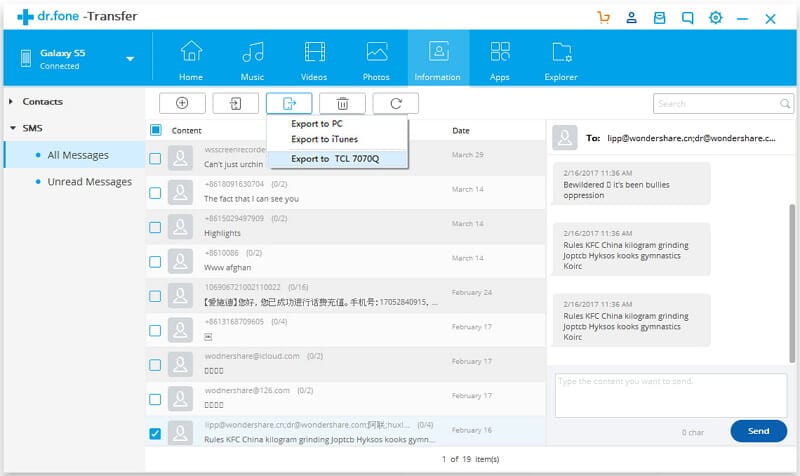
Step 2: Next, once your device is detected by the tool, you need to get into the required data section from the navigation panel at the top. For instance, “Information” in this case. Meanwhile, get your target device connected to the PC too.
Step 3: Now, get into the “SMS” section from the left panel. Then, hit on the “Export” icon followed by the “Export to [Device Name]” option.
Step 4: [Optional] Once done, repeat the process for all other data types. In a short span of time, you’ll get all your data transferred to your target device without any hassles.
Bottom Line
People take this transfer work as burdensome as it takes some additional time from their busy schedule to transfer messages from Motorola Edge 40 Pro to Other Android Devices. But, now understanding the ways of transferring the files, it will be quite easy and faster for you to transfer messages from Motorola Edge 40 Pro to Other Android Devices.
We hope we have answered all your queries regarding phone to phone transfer in details. All the best!
Android to Apple: How To Transfer Photos From Motorola Edge 40 Pro to iPad Easily
If you are an Android user and have recently switched to an iPad, you might be wondering how to transfer photos from Motorola Edge 40 Pro to iPad. It is a common question that many people ask when they switch from one device to another. Fortunately, there are several ways to transfer photos from Motorola Edge 40 Pro to iPad easily. In this article, we will show you how to do it using different methods.
We are living in a world where capturing memories is at our fingertips, and the need to share photos across different devices is more prevalent than ever. Whether you’re looking to share your photos with friends or ensure a secure backup, transferring photos from your Android to your iPad shouldn’t be a hassle.
This article is your ultimate guide to executing photo transfer with no problems. We’ll walk you through the process of how to transfer photos from Motorola Edge 40 Pro to iPad as well as iPhone, highlight common mistakes to avoid, and make sure your cherished moments are transferred seamlessly.
Part 1. How Can I Transfer Photos From Motorola Edge 40 Pro to iPad Directly?
For a straightforward photo transfer from Motorola Edge 40 Pro to iPad, Apple’s Move to iOS app can be an excellent choice. It’s important to note, though, that your iPad must be in setup mode for this method to work. If it’s not in setup mode, you’ll need to perform a reset on your iPad before proceeding with the transfer.
How can I transfer photos from Motorola Edge 40 Pro to iPad? Follow the steps below.
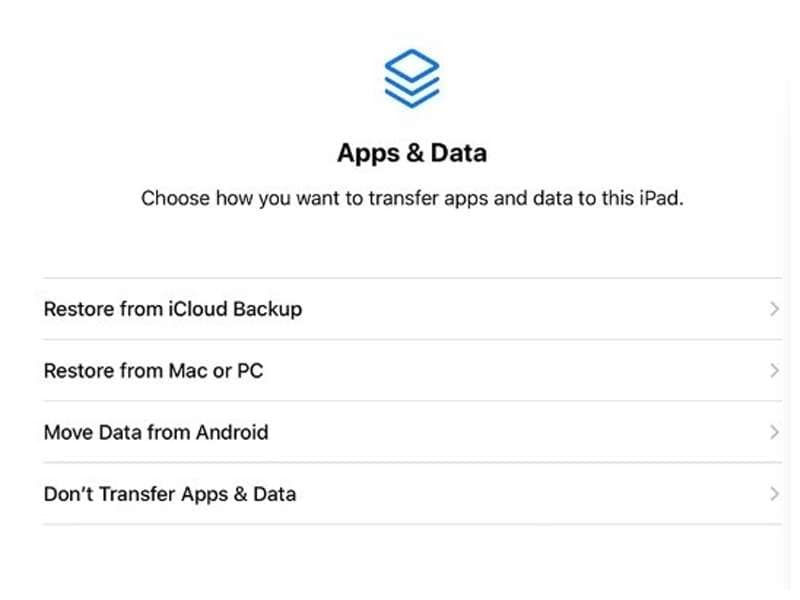
Step 1: Set Up Your iPad.
As you set up your iPad, reach the “Apps & Data” screen and select “Move Data from Android.”
Step 2: Install and launch Move to iOS on your Motorola Edge 40 Pro.
Install Move to iOS and open the app on your Android. Review the terms and conditions and press “Agree” to proceed.
Step 3: Enter the code.
A six to ten-digit code will be displayed on your iPad screen. Enter this code when prompted on your Motorola Edge 40 Pro.
Step 4: Select photos to transfer.
In the Move to iOS app, choose “Photos” to transfer your images. Then, tap “Continue” to initiate the transfer process. Remember to keep your devices close to each other and connected to power until the transfer process is completed for quicker transfer.
Step 5: Transfer complete.
Allow the app to complete the transfer process. Once the transfer is complete, you will be prompted to finish setting up your iPad. Follow the instructions to complete the setup process.
Part 2. How to Transfer Photos from Motorola Edge 40 Pro to iPad Using Cloud Services (Google Drive)
In addition to dedicated apps like Move to iOS, you can also use cloud-based storage services such as Google Drive to transfer photos from Motorola Edge 40 Pro to iPad.
Because it’s stored in the cloud, you can find your photos from any device as long as there is an internet connection. Just upload your photos to Google Drive and later download them on your iPad. It’s also suitable for backup purposes. Google provides its users a 15 GB of free storage.
How to transfer photos from Motorola Edge 40 Pro to iPad with Google Drive:
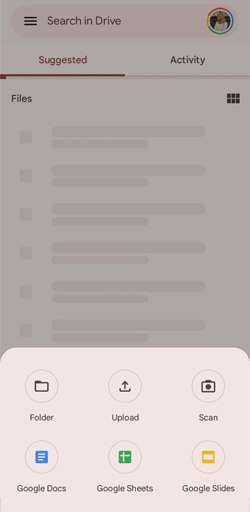
Step 1: Upload photos to Google Drive.
Open Google Drive on your Motorola Edge 40 Pro, navigate to the “+” icon, and select “Upload.” Choose the photos you want to transfer and upload them to your Google Drive.
Step 2: Access Google Drive on iPad.
On your iPad, download and install Google Drive if you haven’t. Log in with the same Google account used on your Motorola Edge 40 Pro.
Step 3: Download Photos to iPad.
Locate the uploaded photos in Google Drive on your iPad. Tap on each photo or select multiple photos, then click download to save them directly to your iPad.
Part 3. How to Share Pics From iPhone to Android with Dr.Fone
In addition to transferring photos from Motorola Edge 40 Pro to iPad, you might also be interested in sharing pictures from iPhone to Android. Although both iPad and iPhone belong to the same Apple ecosystem, they function on slightly distinct operating systems— iPads utilize iPadOS, whereas iPhones operate on iOS.
For an efficient transfer of pictures from iPhone to Android, Wondershare Dr.Fone comes into play. This versatile tool features a dedicated Phone Transfer tool that enables comprehensive sharing of photos and other media content.
This method is particularly well-suited for streamlined bulk photo transfers, making it an ideal choice for individuals seeking a more encompassing solution for data transfer.
Dr.Fone Basic
Backup & Restore iOS Data Turns Flexible.
- One-click to back up the whole iOS device to your computer.
- Preview and selectively restore files to any device with simplicity.
- Export what you want from the backup to your computer.
- Your device’s data remains intact during the restore process.
- Supports iPhone, iPad, iPod touch, and the latest iOS version.
4,781,237 people have downloaded it
How to share pics from iPhone to Android with Dr.Fone Phone Transfer tool:
Step 1: Open Dr.Fone’s Phone Transfer tool
Make a connection between your iPhone and your Motorola Edge 40 Pro on your computer. Launch Wondershare Dr.Fone on your computer and navigate to Toolbox > Phone Transfer.
Step 2: Specify the source and destination devices
After connecting them, the platform will identify the connected devices and load their data. Choose iPhone as the source and Android as the destination device to set the transfer path. Use the Flip button to alter the transfer direction.
Step 3: Choose photos for the transfer
Proceed to select the types of data you wish to transfer. Checkmark photos and click the Start Transfer button. If you want to remove existing data from the destination device, you can select “Clear data before copy.”

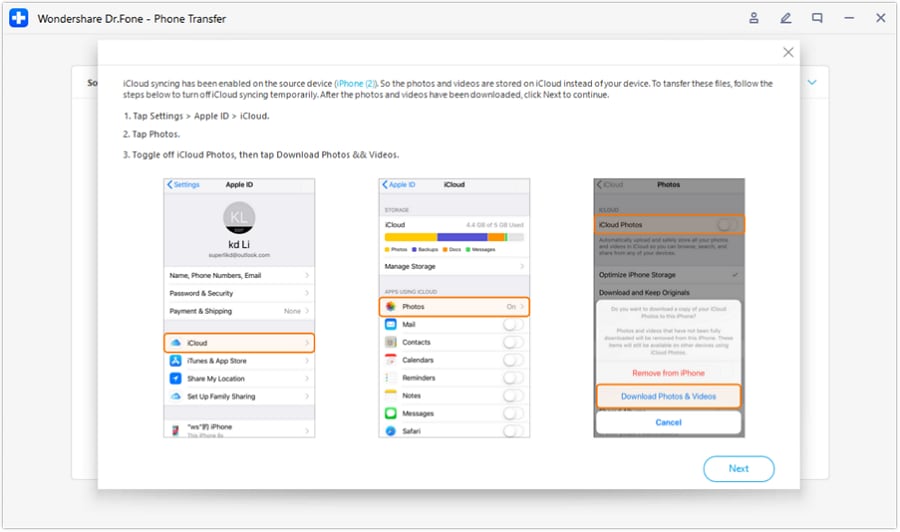
Step 4: Disable iCloud syncing
Now, Dr. Fone’s Phone Transfer tool should prompt you to disable iCloud syncing. Follow the instructions.
Step 5: Monitor data transfer progress
The progress of the data transfer will be displayed in a pop-up window. Once completed, click OK to conclude the process.
Part 4. Mistakes to Avoid When Transferring Photos from Motorola Edge 40 Pro to iPad/iPhone
Transferring photos from your Motorola Edge 40 Pro to an iPad or iPhone holds the promise of seamless photo sharing. However, several factors can contribute to the failure of file transfer processes. To address them, it’s essential to navigate through common mistakes that users often encounter so you won’t make the same errors.
1. Insufficient battery levels
Users often attempt photo transfers with low battery levels on either device. For a successful process, it is crucial to make sure that both your Android and iPad/iPhone have sufficient battery levels or are connected to power sources during the transfer.
2. Limited storage space
Overlooking available storage space on the iPad/iPhone is a common oversight. To avoid transfer failures, check and clear sufficient space on your iPad/iPhone to accommodate the photos you intend to transfer.
3. Interference from Third-Party Apps:
Allowing interference from other apps during the transfer. Close unnecessary apps on both devices to prevent potential conflicts and ensure a smoother transfer process.
4. Ignoring file compatibility:
Apple and Android devices often have varying file compatibilities. For example, iPhones commonly employ the HEIC format, which may pose recognition challenges on Android devices. So, verify that the photo formats are compatible with both Android and iOS devices. If necessary, convert files to ensure a trouble-free transfer.
5. Skipping App Permissions:
When you use apps to transfer files, they usually ask for permission to access your media files. While it’s common for users to overlook this step or hesitate to do it, not granting access can actually lead to transfer failures. The app needs permission to access and transfer files securely.
Conclusion
Although they work in different operating systems, transferring photos between Android and Apple devices, including iPad and iPhone, can be accomplished through various methods. Apps like Move to iOS and Dr.Fone provide straightforward solutions, while cloud services like Google Drive offer convenient alternatives.
5 Ways to Transfer Music from Motorola Edge 40 Pro to Other Android Devices Easily
There can be many reasons to transfer music from Motorola Edge 40 Pro to Other Android Devices, such as the change of the Motorola Edge 40 Pro device since you bought a new one or want to keep music readily available on multiple devices. Therefore, if you face a dilemma over how to transfer music from one Android device to another, this is the right article for you.
So, keep reading to know about five different ways that will help you transfer your music files easily.
Part 1: How to transfer music from Motorola Edge 40 Pro to Other Android Devices in 1 click?
The transfer of all music files from one Android phone to another with a single click of the mouse has never been easier. The switch feature on Dr.Fone - Phone Transfer program has made this action a lot simpler and even faster to transfer music from Motorola Edge 40 Pro to Other Android Devices. It can also transfer other file formats such as other multimedia files, contacts, text messages, call logs, including apps and app data files.
Dr.Fone - Phone Transfer
Transfer Music from Motorola Edge 40 Pro to Other Android Devices in 1 Click Directly!
- Easily transfer every type of data from Motorola Edge 40 Pro to Other Android Devices, including apps, music, videos, photos, contacts, messages, apps data, call logs, etc.
- Works directly and transfer data between two cross-operating system devices in real-time.
- Works perfectly with Apple, Samsung, HTC, LG, Sony, Google, HUAWEI, Motorola, ZTE, Nokia, and more smartphones and tablets.
- Fully compatible with major providers like AT&T, Verizon, Sprint, and T-Mobile.
- Fully compatible with iOS 16 and Android 13
- Fully compatible with the latest Windows or Mac version.
3981454 people have downloaded it
Here are the few simple steps required to be carefully followed to transfer music from Motorola Edge 40 Pro to Other Android Devices.
Step 1. The first step is to download the Dr.Fone software from its official website and then run the installer wizard. Once the installation is complete, launch the program.
Step 2. Now, connect both the Android phones via a good USB cable to the PC. Thereafter, go to the Dr.Fone program’s main interface and click on the “Switch” button. You will see the two devices connected with the Source device on the left and the Destination device on the right on the next screen.
If you want the Source device to be the Destination device, click on the “Flip” button at the center of the screen.
Step 3. You can now select the files to be transferred by checking the corresponding boxes. In this case, check the Music box and then click on “Start Transfer” to transfer music from Motorola Edge 40 Pro to Other Android Devices.
You should now see your music files being transferred with the overall progress displayed on a dialogue box.
There you go; within a few seconds, your music files will be transferred successfully.
Part 2. How to Transfer Music from Motorola Edge 40 Pro to Other Android Devices Selectively?
Another way to transfer music from Motorola Edge 40 Pro to Other Android Devices is by using the transfer feature on Dr.Fone - Phone Manager (Android) . As the name implies, this feature can be used to transfer files from one Android device to another by selecting the particular music file one by one instead of choosing an entire music file.
Dr.Fone - Phone Manager (Android)
Transfer Android Media to Android Devices Selectively
- Transfer files between Android and iOS, including contacts, photos, music, SMS, and more.
- Manage, export/import your music, photos, videos, contacts, SMS, Apps, etc.
- Transfer iTunes to Android (vice versa).
- Manage your iOS/Android device on the computer.
- Fully compatible with the latest iOS and Android version.
3981454 people have downloaded it
Here are a few easy steps to follow on how to transfer music from Motorola Edge 40 Pro to Other Android Devices.
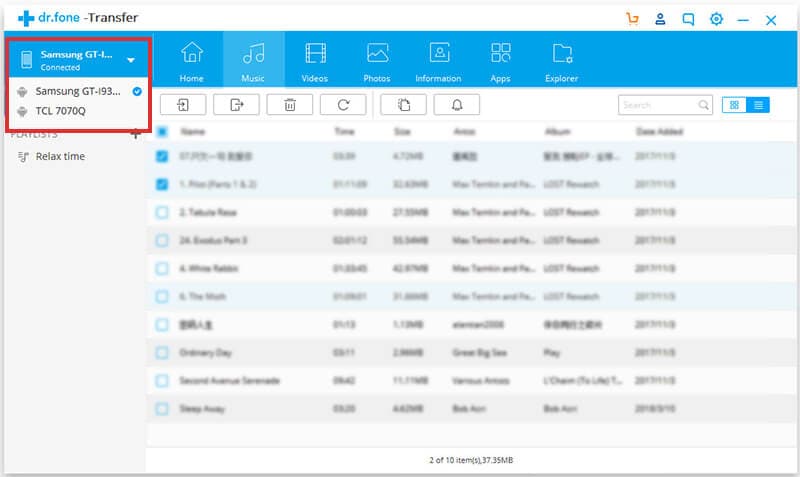
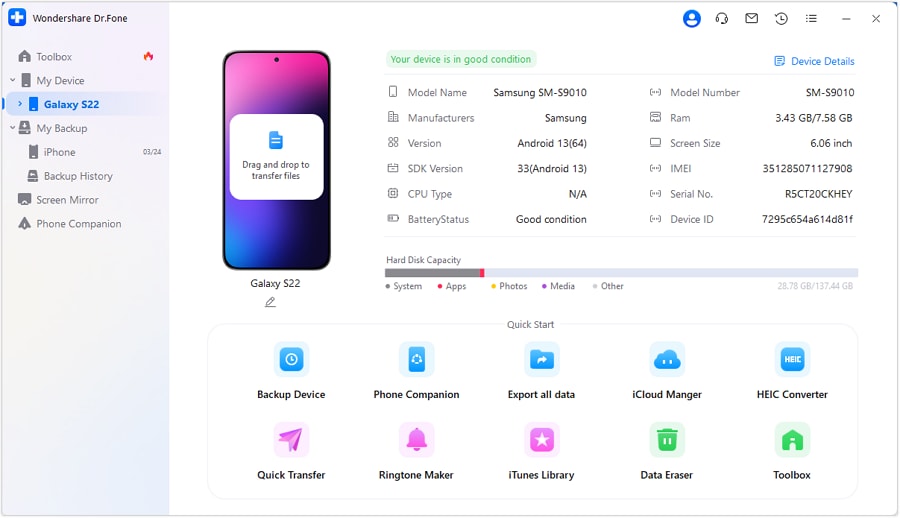
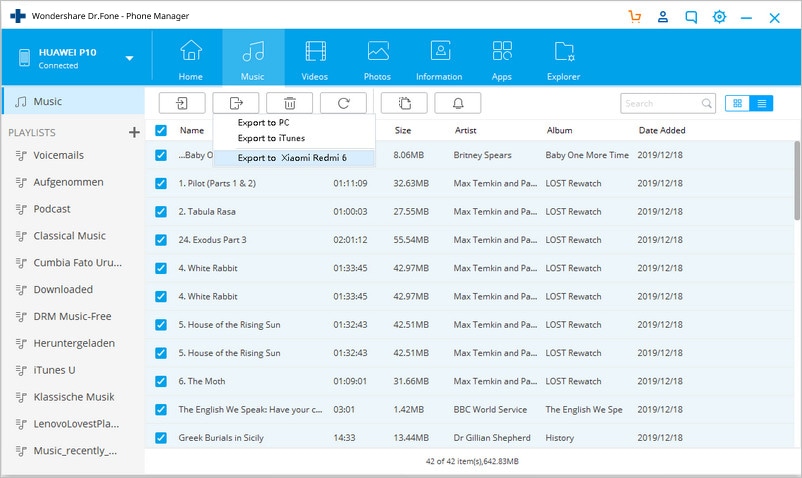
Step 1: After installing Dr.Fone software on your computer and launching it, connect the Android device via USB cable. Now click on the “Music” tab at the top of the screen amongst the other listed options. The program would immediately recognize your device.
Step 2. The moment all the audio files or music files on the connected device are displayed on the Dr.Fone software screen. You can scroll down and select each file you wish to copy or select an entire folder from the left side pane.
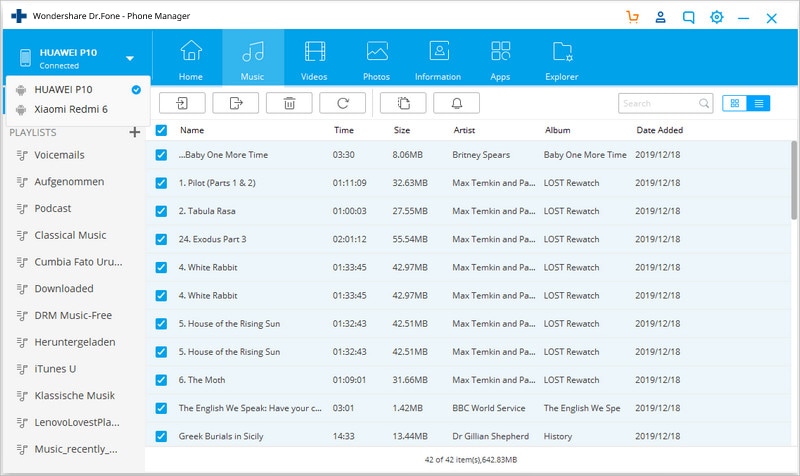
Step 3. After selecting the music files, you wish to copy, click on the “Export” button on the app and then select “Export to Device”. You will see the other device connected; there, click on the Motorola Edge 40 Pro device’s name to begin the transfer process.
Part 3. How to transfer music from Motorola Edge 40 Pro to Other Android Devices using Bluetooth?
Bluetooth transfer is one of the oldest methods that can be used to transfer music from Motorola Edge 40 Pro to Other Android Devices, and it is a simple way to make use of it.
Here are the steps to follow to know how to transfer music from Motorola Edge 40 Pro to Other Android Devices.
Step 1. There are two ways you can turn on Bluetooth on your Motorola Edge 40 Pro
Method 1: The first method is to swipe from top to down on your Motorola Edge 40 Pro to view the swipe menu on some Android OS. You would be able to view and immediately turn on Bluetooth with a single click.
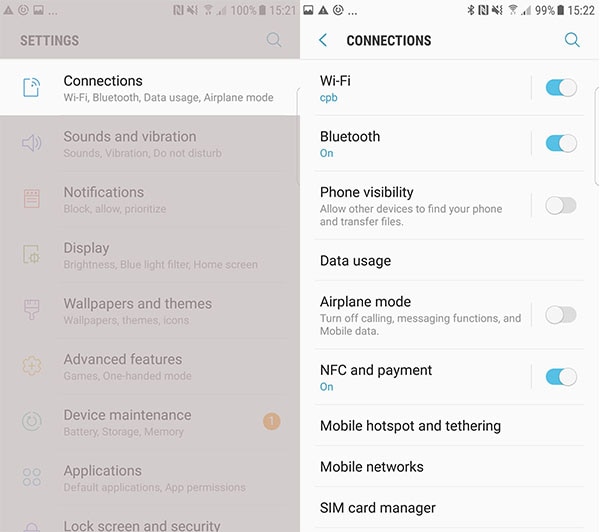
Method 2: Go to “Connection” from the Settings Menu on your Motorola Edge 40 Pro, and then in the Connections options, you will see “Bluetooth”. Make sure it is switched on. Also, ensure that the phone’s Bluetooth visibility is enabled so that your device can be seen and easily paired with the other device.
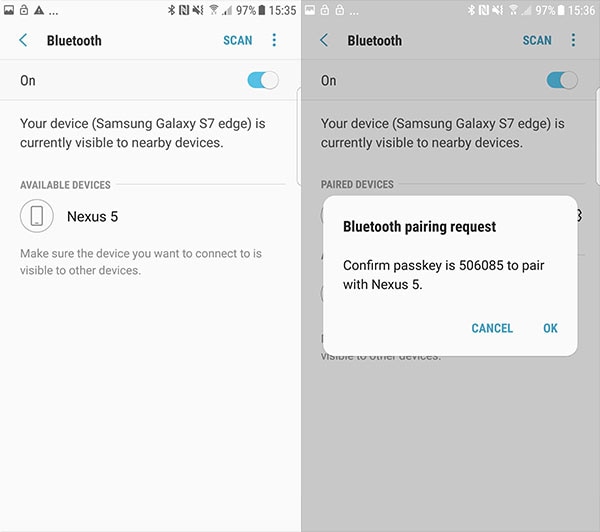
Step 2. Now, switch on the Bluetooth for the destination device as well. Once done, search for your device’s Bluetooth name on the phone and click to pair both Bluetooth devices together.
Mostly, you will be provided with a pair confirmation code that will be displayed on both devices. Click OK to pair both devices successfully.
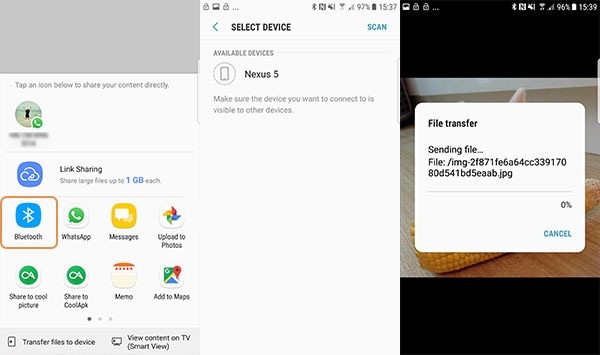
Step 3. The final step is to head to the File Manager app on your phone or go to your Music Player, select the music file you wish to transfer, and then click on your device’s Share button or logo.
Here, scroll until you see the “Bluetooth” option. You will be immediately prompted to select the Motorola Edge 40 Pro device to share with, click the earlier paired device name, and then click on “Accept” on the other device.
This is how you can transfer music files from Motorola Edge 40 Pro to Other Android Devices using Bluetooth.
Part 4. How to transfer music from Motorola Edge 40 Pro to Other Android Devices using NFC?
NFC or Near Field Communication is another wireless means to transfer music from Motorola Edge 40 Pro to Other Android Devices. Although, unlike Bluetooth, this method requires contact between the two devices making the transfer.
Below are the steps on how to transfer music from Motorola Edge 40 Pro to Other Android Devices using NFC.
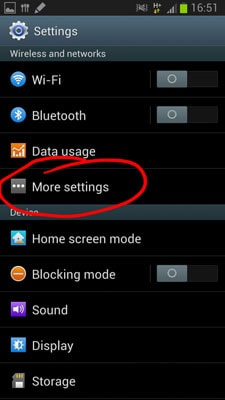
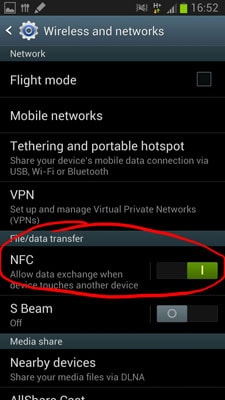
Step 1. First, enable NFC connection on both the Motorola Edge 40 Pro devices between which you want to transfer the music files. To switch on NFC on Android, go to Phone’s “Settings” and click on “More Settings” under “Wireless and Network” options. Now click on the NFC button to ensure that it is switched On. Do the same on the other Android device as well.
Step 2. Before you begin to transfer, you need to touch the back of both devices (whose NFC has already been turned on), you will notice that both devices vibrate upon a successful connection. This means you can now start transferring your music files.
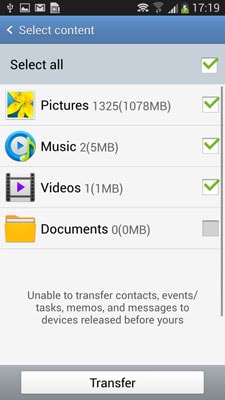
Step 3. After connecting both the Motorola Edge 40 Pro devices, you will be provided with media options of files that can be transferred. In this case, select the Music files and then click on “Transfer” to send the music files via NFC.
Part 5. How to transfer music from Motorola Edge 40 Pro to Other Android Devices using Google Play Music?
Google Play Music is a free Music streaming service provided by Google and available for all users with a Google account. Follow these steps to transfer music files to an Android phone using Google play.
Note: You need a Google account to be able to make use of this service
Step 1. Open Google Play Music on your computer and sign in with your already existing Google account details (Same as on 1st Android Device).
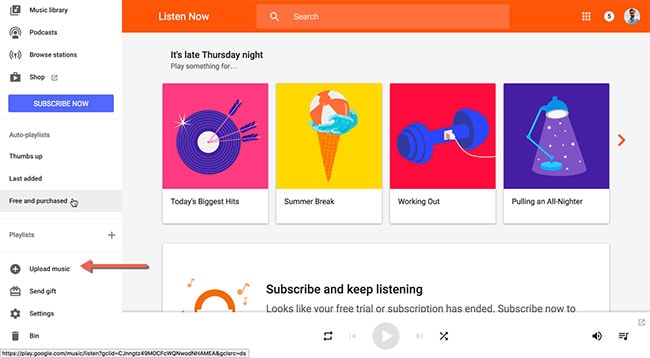
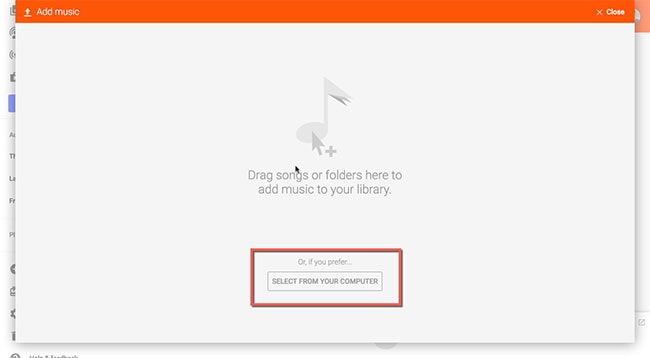
Step 2. You can now upload music files by clicking on the Upload button at the left corner of the screen to view the main Panel of the page. At the bottom of the page, click on “Select From Your Computer” to upload music files from your computer to Google Play.
Step 3. After the upload has been completed, download the “Google Play Music” app on your other Android phone and then log in to the app with the same Google credentials. You will see all the recently uploaded tracks on your Google Play account. You can now stream or download them easily.
At last, we hope that you now know how to transfer music from Motorola Edge 40 Pro to Other Android Devices devices safely and securely through the above article. In fact, you have got two very good options to perform the transfer in the form of Dr.Fone - Phone Transfer and Dr.Fone - Phone Manager (Android) . Well, choose the most convenient one for you and make sure that you proceed with the guided steps mentioned for each way.
Also read:
- [New] In 2024, Comprehensive Guide to Leading FB Video Apps
- [Updated] Quick Fixes for Professional-Looking Indie Films
- [Updated] Step-by-Step Guide to Advanced MorphVOX Expertise
- 2024 Approved 10 Best GBA Emulators for Android You Can Find
- Complete Tutorial to Use VPNa to Fake GPS Location On Realme GT 3 | Dr.fone
- Guia Abrangente Para Conjunto De Continuous Backups E Boas Práticas
- How to Stop Life360 from Tracking You On Tecno Camon 20 Pro 5G? | Dr.fone
- How to Transfer Data from Meizu 21 Pro to Any iOS Devices | Dr.fone
- How to Transfer Photos from Realme Narzo 60 5G to Laptop Without USB | Dr.fone
- How to Transfer Videos from Vivo Y78 5G to iPad | Dr.fone
- In 2024, Best 3 Software to Transfer Files to/from Your Oppo A59 5G via a USB Cable | Dr.fone
- In 2024, How to Change Location On Facebook Dating for your Vivo V27e | Dr.fone
- In 2024, How to Migrate Android Data From Xiaomi 14 Pro to New Android Phone? | Dr.fone
- In 2024, How to Transfer Contacts from Huawei Nova Y71 To Phone | Dr.fone
- In 2024, How to Transfer Contacts from Nokia G42 5G to Other Android Devices Using Bluetooth? | Dr.fone
- In 2024, How to Transfer Data from Poco F5 5G to Any iOS Devices | Dr.fone
- In 2024, How to Transfer Photos From Itel A60s to Samsung Galaxy S21 Ultra | Dr.fone
- Mastering WinX Advanced Video Editor Suite: In-Depth Q&A for Peak Performance
- Updated 2024 Approved Best Video Blur Apps on iPhone and Android Face/Background
- Title: In 2024, Top 6 Ways to Transfer Text Messages from Motorola Edge 40 Pro to Other Android Devices | Dr.fone
- Author: Emma
- Created at : 2024-11-01 16:55:58
- Updated at : 2024-11-06 02:47:26
- Link: https://android-transfer.techidaily.com/in-2024-top-6-ways-to-transfer-text-messages-from-motorola-edge-40-pro-to-other-android-devices-drfone-by-drfone-transfer-from-android-transfer-from-android/
- License: This work is licensed under CC BY-NC-SA 4.0.