
Solved Move from Samsung Galaxy XCover 7 to iOS not Working Problems | Dr.fone
[Solved] Move from Samsung Galaxy XCover 7 to iOS not Working Problems
You might be wondering, what is the Move to iOS? If you are an android user and have decided to shift to the iPhone, you will need the Move to iOS tool. The app is developed to help transfer data from an android device to iOS devices. Google play store has the app, and it’s free.
To use the app, install it on your android device first. The transfer process requires following several simple steps to move to iOS. The app seems easy to use the tool, but newbies must learn about the Move to iOS guidelines to complete the process. With this tool, you will transfer various android data such as camera photos, contacts, message history, mail accounts, calendars, and videos.
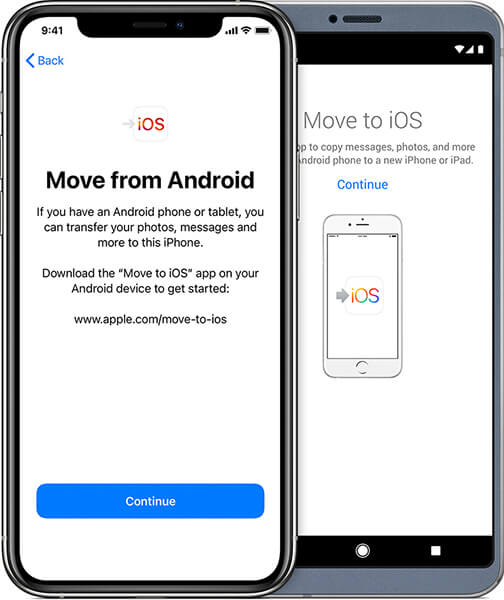
Move to iOS app works on android version 4.0 or higher. You can transfer data to any iPhone in a relatively straightforward process. Also, beware that the Move to iOS will work only when setting up a new iPhone or iPad.
Besides knowing what the content that Moves to iOS tool can transfer, you might be wondering how long the process can take. Depending on the content you want to transfer, the process generally takes around 10 – 30 minutes. However, other factors can determine the time the app will take to move content to iOS. They include the speed of the network, patency of the transmission process, and Wi-Fi stability.
Part 1: Move to iOS not working problem lists
Users can learn to use the Move to iOS app quickly. However, they will occasionally experience problems while using this tool. If the app runs into errors, you will encounter some problems.
- Move to iOS no code.
These steps will help you get the Move to iOS code;
When setting up your iPhone, tap on the move data from the android option. Then, launch the Move to ios app on your android device and tap continue. You will see the find you code screen; tap on the .next’ button to continue.
Tap on the continue button on your iOS device and wait for a ten-digit code to appear.
Once you receive the code on your iPhone, enter it on the android device and wait for the Samsung Galaxy XCover 7 devices to connect. Select all the content you want to move and click Next.
Once the loading bar on the iOS device is done, tap on the ‘Done’ button on your android device. Proceed to set up your iOS device using the onscreen steps.
If you are not receiving any code on your iOS device, you can fix it by ensuring the Wi-Fi is always on throughout the process. You can also reboot your devices if the error is temporary.
- Move to iOS could not communicate correctly with the Samsung Galaxy XCover 7 devices.
To avoid this Move to iOS error, ensure both devices run on updated operating systems, i.e., android 4.0 or later and iOS 9 or later. The phones must have enough power, and lastly, ensure that you turn off background apps to avoid notifications during the transfer process.
- Move to iOS stuck on preparing/transferring.
You are transferring your android data to iOS, but the process is stuck on the transferring page. The problem is related to Wi-Fi connections. Should the Wi-Fi disconnect for a few seconds, the transfer process stops. Other distractions on android such as calls, switching to sleep mode, or other background operations might also cause the Move to iOS error.
- Move to iOS takes forever/slow.
The length of time taken to transfer data from android to iOS depends on the size of the data and Wi-Fi connection. To speed up the transfer, check your Wi-Fi connection, delete unnecessary data from the android device, or restart the transfer if it takes too long.
- Move to iOS Wi-Fi disconnect.
Wi-Fi drops will obviously interfere with the transfer process. To avoid this error, you can reset your router and the network and turn off smart switching and airplane mode.
- Move to iOS interrupted
If the Move to iOS process is interrupted, you can fix it by restarting the phone, check your network connections on both devices, turn off the smart network swath on android and turn on the airplane mode.
- Move to iOS, not connecting devices.
The circumstances can be frustrating as the transfer process will not be completed successfully. But what is the solution to all these problems? We will discuss the solutions to move to iOS not working in the later sections of this article.
While the Move to iOS app can be easy to use, you need to know a couple of things before transferring.
- Ensure the android and iOS device can connect to Wi-Fi
- Ensure the Samsung Galaxy XCover 7 devices have enough power to complete the process/ plug the Samsung Galaxy XCover 7 devices into power
- The iOS device should run on iOS 9.0 or higher
- The android device should run on android 4.0 or higher
- Check the capacity of the transferred content, whether it will fit the new iOS device.
- Update chrome on android to the latest version to transfer bookmarks
Part 2: 9 Tips about moving to iOS not working problems
Even though Move to iOS is a useful tool for android users willing to transfer content to the iOS device, there are several instances where it fails to work correctly. The app will show a message indicating the type of error you are experiencing during the transfer process.
Most of the ‘move to iOS’ problems are related to Wi-Fi connection issues, android and iOS versions, space requirements, connection optimizers, and application issues. Nevertheless, you will need to find a solution to these problems to transfer your data successfully from android to iOS devices. This section will discuss possible solutions to the errors that occasionally appear when moving android data to iOS devices.
Tip 1: Restart both your devices
Restarting your devices is the essential thing to do when troubleshooting the Move to iOS problems. It is a great way o eliminate minor issues during data transfer from android to iOS devices. The process can resolve the Move to iOS stuck on connecting to iPhone issues. A simple restart will eliminate the bugs and any cached error in the Samsung Galaxy XCover 7 devices.
Tip 2: Clear all running apps
It is recommended to avoid using the android device o run applications when using the Move to iOS app. Since the app runs in the foreground, you should ensure all other apps in the android are disabled before starting the data transfer process. Notifications and incoming calls are likely to interfere with the process; therefore, users must ensure such distraction is not happening by disabling such apps.
Tip 3: Make sure the Wi-Fi connection is turned on
Wi-Fi connectivity is a significant factor in ensuring data transfer is successful. Since Move to iOS relies on Wi-Fi, you should ensure it Is turned on and is stable. The iPhone usually creates a private network for the android device to connect. Please turn on the Wi-Fi connection on your android to make it ready to connect to the iPhone’s private network. This will make it possible to send the Move to iOS code to initiate the data transfer process.
Tip 4: Plug both devices to power
You should ensure that both the android and iOS devices have sufficient power to run through the entire data transfer process. If you doubt the power consumption, keep the Samsung Galaxy XCover 7 devices connected to power before you start moving your content from android to iOS device.
Tip 5: Set your phone into airplane mode
When you transfer android data to iOS using the Move to iOS tool, apple recommends that you turn off your mobile data. Some android devices can switch from Wi-Fi to mobile data when the connection tends to drop on either side using the smart switch feature. This can interfere with the transfer process. Similarly, it could be useful if incoming calls were prevented to avoid interfering with the data transfer process. All mediums of connectivity are disabled except for the connection between the android and iOS devices through the iPhones Wi-Fi network.
The best way to ensure these distractions are not happening is to turn on airplane mode on the android device.
Tip 6: Check the storage requirement
Before you begin transferring android data to iOS devices, check the size of all content including the external micro SD card, to determine whether it fits into the new iOS device. If the content is larger than the destination storage, you will obviously encounter an error during the transfer process. You need to delete the content you don’t need to transfer from your android device before getting started.
Tip 7: Disable the connection optimizer
Android devices with connection optimizers will switch between different connections for better connectivity. Since the Move to iOS app utilizes the iPhones private network, the connection optimizer might start using mobile data or switch to another Wi-Fi connection when the current connection drops. The circumstance can break the connection between the android ad iOS device hence interfering with the data transfer process. Be sure to turn off the feature from settings before running the Move to iOS app.
Tip 8: Check the compatibility of your devices
You need to check whether your android device meets the minimum requirements to be compatible with the Move to iOS app, much like other apps found on the App Store and Google play store. Generally, the app runs on Android 4.0 and above while transferring data to iOS 9.0 or later devices.
Tip 9: Turn off battery optimization
Turning off the battery optimization on both your Android and iOS device is a requirement when using the Move to iOS tool. The app is designed to run in the foreground, and the android user should not have other applications running. However, the phone might automatically minimize the Move to iOS app when it switches to battery optimization mode. Therefore you should ensure the feature is closed from the settings of your android device.
Part 3: [Alternative] Move to iOS not working solved without a PC
An alternative solution to Move to iOS not working problem is to use Dr. Fone – Phone Manager (iOS) . The software can transfer all types of data from android to iOS devices quickly. Here, you will select the type of data you need and begin moving in a single click.
Most importantly, the programs transfer data at a very high speed compared to other alternatives. You can also use the software to transfer social apps and retain the important history of apps like WhatsApp, Wechat, Viber, Line, or Kik.
Dr.Fone - Phone Manager (iOS)
Move/Transfer Android data from Computer to iPod/iPhone/iPad without iTunes
- Transfer, manage, export/import your music, photos, videos, contacts, SMS, Apps, etc.
- Back up your music, photos, videos, contacts, SMS, Apps, etc., to the computer and restore them easily.
- Transfer music, photos, videos, contacts, messages, etc., from one smartphone to another.
- Transfer media files between iOS devices and iTunes.
- Fully compatible with iOS 7 to iOS 15 and iPod.
3981454 people have downloaded it
Here is how to transfer data from iOS to android device without a PC
You need to login to your iCloud account on android to download data, or you can use the iOS-to-android adapter to connect your iPhone to android to transfer data directly.
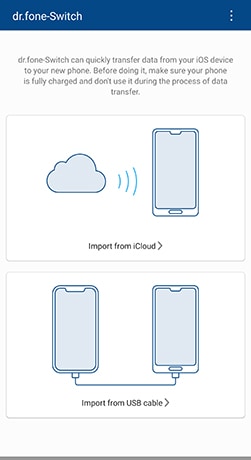
Use the following simple steps.
Install Dr. Fone- Phone Transfer app on your android device and click on the ‘Import From iCloud’ option.
Use your apple passcode to log in to the iCloud account. You will be required to enter a verification code if prompted to two-factor authentication.
Select from the list of data detected from iCloud and tap on start importing.

Wait for the data transfer process to complete.
To transfer content from your iPhone to Android device directly, open Dr. Fone – Phone Transfer on android and tap ‘import from a USB cable.’ Use the iOS-to-android cable to connect your iOS and Android devices.
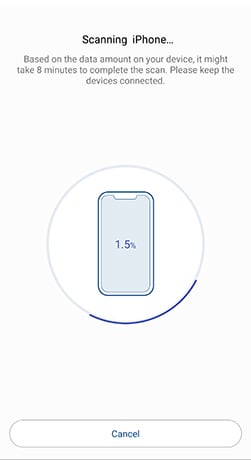
Dr. Fone – Phone Transfer will begin to scan data on your iPhone. The time will depend on the content on the iPhone.
Tap on ‘start importing’ once all data has been detected.
Part 4: [Alternative] Move to iOS not working solved with a PC
The following steps will help you transfer data from android to an iOS device using a PC.
- Open the Dr. Fone program on your computer and click ‘phone transfer’ from the modules displayed.
- Connect your iOS and Android devices to the computer. You can always use the ‘flip’ option to change the source and destination devices.

- Select the types of data you want to transfer, then click on the ‘start transfer’ option to continue. Be careful not to disconnect the Samsung Galaxy XCover 7 devices until the process is complete.

- If you want to clear the destination phone’s data before transferring data, ensure you check the ‘clear data before copy’ box.
- All the data you selected will be transferred successfully in a few minutes.
Conclusion
Transferring data from android to iOS device has been made easier with the Move to iOS app. However, you need to consider the requirements for the data transfer process to complete successfully. You can also apply Dr. Fone – Phone Transfer as your recommended alternatives to transfer android data to the iOS device in the simplest way.
Android to Apple: How To Transfer Photos From Samsung Galaxy XCover 7 to iPad Easily
If you are an Android user and have recently switched to an iPad, you might be wondering how to transfer photos from Samsung Galaxy XCover 7 to iPad. It is a common question that many people ask when they switch from one device to another. Fortunately, there are several ways to transfer photos from Samsung Galaxy XCover 7 to iPad easily. In this article, we will show you how to do it using different methods.
We are living in a world where capturing memories is at our fingertips, and the need to share photos across different devices is more prevalent than ever. Whether you’re looking to share your photos with friends or ensure a secure backup, transferring photos from your Android to your iPad shouldn’t be a hassle.
This article is your ultimate guide to executing photo transfer with no problems. We’ll walk you through the process of how to transfer photos from Samsung Galaxy XCover 7 to iPad as well as iPhone, highlight common mistakes to avoid, and make sure your cherished moments are transferred seamlessly.
Part 1. How Can I Transfer Photos From Samsung Galaxy XCover 7 to iPad Directly?
For a straightforward photo transfer from Samsung Galaxy XCover 7 to iPad, Apple’s Move to iOS app can be an excellent choice. It’s important to note, though, that your iPad must be in setup mode for this method to work. If it’s not in setup mode, you’ll need to perform a reset on your iPad before proceeding with the transfer.
How can I transfer photos from Samsung Galaxy XCover 7 to iPad? Follow the steps below.
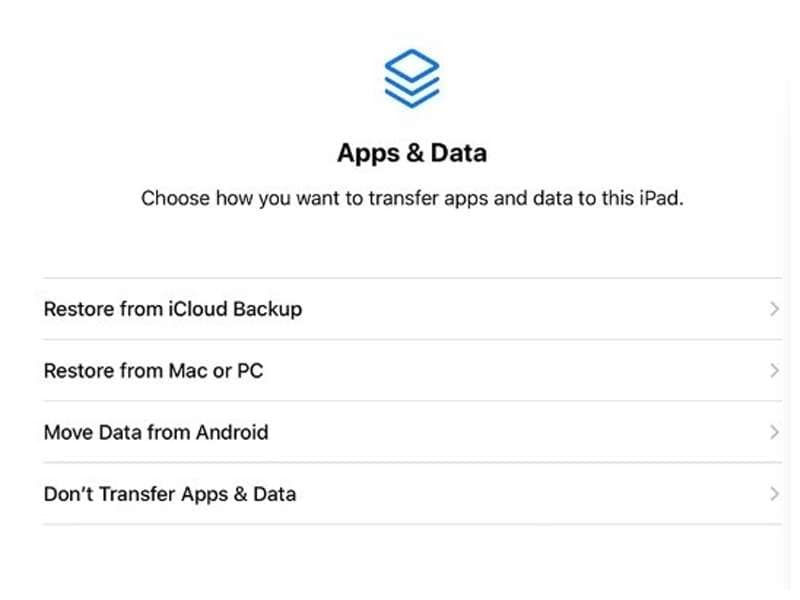
Step 1: Set Up Your iPad.
As you set up your iPad, reach the “Apps & Data” screen and select “Move Data from Android.”
Step 2: Install and launch Move to iOS on your Samsung Galaxy XCover 7.
Install Move to iOS and open the app on your Android. Review the terms and conditions and press “Agree” to proceed.
Step 3: Enter the code.
A six to ten-digit code will be displayed on your iPad screen. Enter this code when prompted on your Samsung Galaxy XCover 7.
Step 4: Select photos to transfer.
In the Move to iOS app, choose “Photos” to transfer your images. Then, tap “Continue” to initiate the transfer process. Remember to keep your devices close to each other and connected to power until the transfer process is completed for quicker transfer.
Step 5: Transfer complete.
Allow the app to complete the transfer process. Once the transfer is complete, you will be prompted to finish setting up your iPad. Follow the instructions to complete the setup process.
Part 2. How to Transfer Photos from Samsung Galaxy XCover 7 to iPad Using Cloud Services (Google Drive)
In addition to dedicated apps like Move to iOS, you can also use cloud-based storage services such as Google Drive to transfer photos from Samsung Galaxy XCover 7 to iPad.
Because it’s stored in the cloud, you can find your photos from any device as long as there is an internet connection. Just upload your photos to Google Drive and later download them on your iPad. It’s also suitable for backup purposes. Google provides its users a 15 GB of free storage.
How to transfer photos from Samsung Galaxy XCover 7 to iPad with Google Drive:
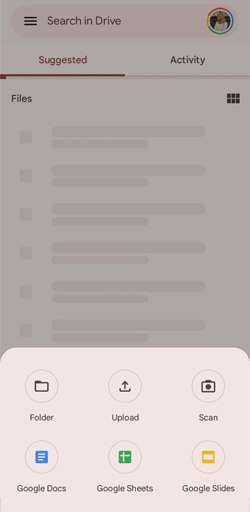
Step 1: Upload photos to Google Drive.
Open Google Drive on your Samsung Galaxy XCover 7, navigate to the “+” icon, and select “Upload.” Choose the photos you want to transfer and upload them to your Google Drive.
Step 2: Access Google Drive on iPad.
On your iPad, download and install Google Drive if you haven’t. Log in with the same Google account used on your Samsung Galaxy XCover 7.
Step 3: Download Photos to iPad.
Locate the uploaded photos in Google Drive on your iPad. Tap on each photo or select multiple photos, then click download to save them directly to your iPad.
Part 3. How to Share Pics From iPhone to Android with Dr.Fone
In addition to transferring photos from Samsung Galaxy XCover 7 to iPad, you might also be interested in sharing pictures from iPhone to Android. Although both iPad and iPhone belong to the same Apple ecosystem, they function on slightly distinct operating systems— iPads utilize iPadOS, whereas iPhones operate on iOS.
For an efficient transfer of pictures from iPhone to Android, Wondershare Dr.Fone comes into play. This versatile tool features a dedicated Phone Transfer tool that enables comprehensive sharing of photos and other media content.
This method is particularly well-suited for streamlined bulk photo transfers, making it an ideal choice for individuals seeking a more encompassing solution for data transfer.
Dr.Fone Basic
Backup & Restore iOS Data Turns Flexible.
- One-click to back up the whole iOS device to your computer.
- Preview and selectively restore files to any device with simplicity.
- Export what you want from the backup to your computer.
- Your device’s data remains intact during the restore process.
- Supports iPhone, iPad, iPod touch, and the latest iOS version.
4,781,237 people have downloaded it
How to share pics from iPhone to Android with Dr.Fone Phone Transfer tool:
Step 1: Open Dr.Fone’s Phone Transfer tool
Make a connection between your iPhone and your Samsung Galaxy XCover 7 on your computer. Launch Wondershare Dr.Fone on your computer and navigate to Toolbox > Phone Transfer.

Step 2: Specify the source and destination devices
After connecting them, the platform will identify the connected devices and load their data. Choose iPhone as the source and Android as the destination device to set the transfer path. Use the Flip button to alter the transfer direction.
Step 3: Choose photos for the transfer
Proceed to select the types of data you wish to transfer. Checkmark photos and click the Start Transfer button. If you want to remove existing data from the destination device, you can select “Clear data before copy.”

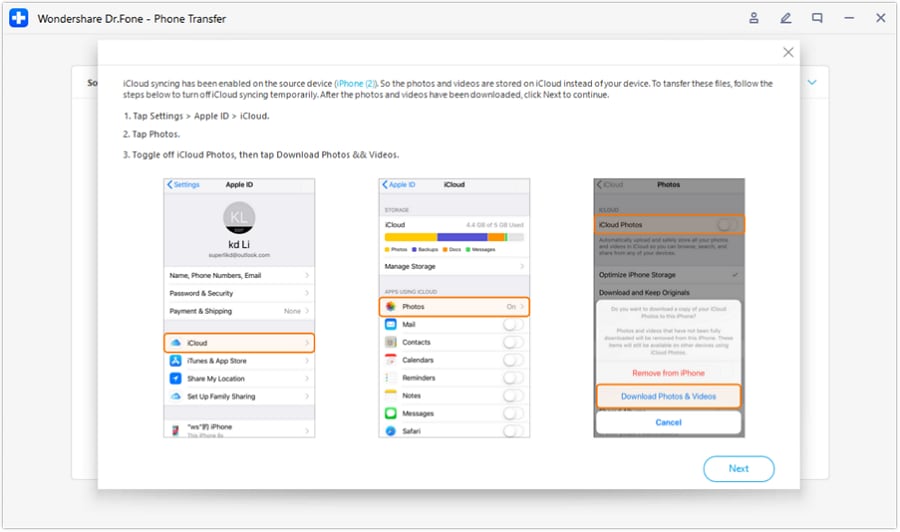
Step 4: Disable iCloud syncing
Now, Dr. Fone’s Phone Transfer tool should prompt you to disable iCloud syncing. Follow the instructions.
Step 5: Monitor data transfer progress
The progress of the data transfer will be displayed in a pop-up window. Once completed, click OK to conclude the process.
Part 4. Mistakes to Avoid When Transferring Photos from Samsung Galaxy XCover 7 to iPad/iPhone
Transferring photos from your Samsung Galaxy XCover 7 to an iPad or iPhone holds the promise of seamless photo sharing. However, several factors can contribute to the failure of file transfer processes. To address them, it’s essential to navigate through common mistakes that users often encounter so you won’t make the same errors.
1. Insufficient battery levels
Users often attempt photo transfers with low battery levels on either device. For a successful process, it is crucial to make sure that both your Android and iPad/iPhone have sufficient battery levels or are connected to power sources during the transfer.
2. Limited storage space
Overlooking available storage space on the iPad/iPhone is a common oversight. To avoid transfer failures, check and clear sufficient space on your iPad/iPhone to accommodate the photos you intend to transfer.
3. Interference from Third-Party Apps:
Allowing interference from other apps during the transfer. Close unnecessary apps on both devices to prevent potential conflicts and ensure a smoother transfer process.
4. Ignoring file compatibility:
Apple and Android devices often have varying file compatibilities. For example, iPhones commonly employ the HEIC format, which may pose recognition challenges on Android devices. So, verify that the photo formats are compatible with both Android and iOS devices. If necessary, convert files to ensure a trouble-free transfer.
5. Skipping App Permissions:
When you use apps to transfer files, they usually ask for permission to access your media files. While it’s common for users to overlook this step or hesitate to do it, not granting access can actually lead to transfer failures. The app needs permission to access and transfer files securely.
Conclusion
Although they work in different operating systems, transferring photos between Android and Apple devices, including iPad and iPhone, can be accomplished through various methods. Apps like Move to iOS and Dr.Fone provide straightforward solutions, while cloud services like Google Drive offer convenient alternatives.
How to Transfer Data from Samsung Galaxy XCover 7 to Samsung Phone
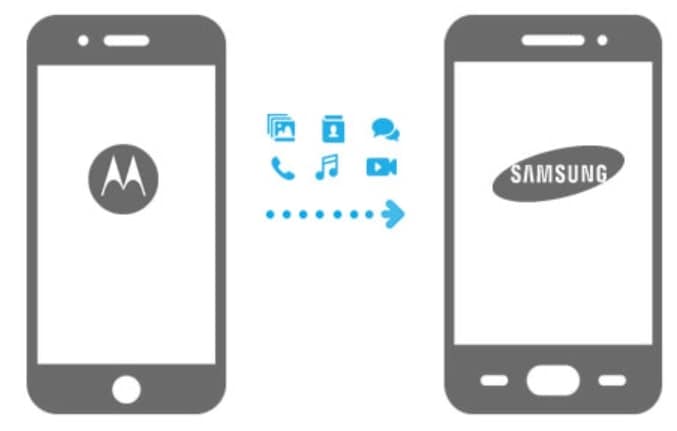
Samsung is undoubtedly the most widely used smartphone manufacturer today. Cutting edge functionalities in prices that are affordable makes Samsung a favorite. Therefore, more and more users will need to transfer data to Samsung’s devices. In this article, we are going to share how to transfer data from Motorola to Samsung, especially for how to transfer contacts from Motorola to Samsung. Check them out.
If you’re going to buy a new Samsung S23, these solutions work as well.
Part 1: Transfer Data from Motorola to Samsung using Dr.Fone
Dr.Fone - Phone Transfer can be used for transferring data from to phone to another phone like messages, contacts, call logs, calendars, photos, music, video, and apps. Also, you can back up your iPhone and save the data on your PC, for example, and restore it later when you wish. Basically, all your necessary data can be transferred fast from a phone to another phone, including transfer from Motorola to Samsung.
Dr.Fone - Phone Transfer
Migrate all data from Motorola to Samsung quickly
- Easily move 11 types of data like photos, videos, calendars, contacts, messages, music, apps, etc. from Motorola to Samsung.
- You can also transfer between iOS and Android, and iOS and iOS.
- Simple clicks to operate.
- The all-in-one process to read from the source device, transfer, and write to the target device.
4,919,791 people have downloaded it
Steps to Transfer Data from Motorola to Samsung
To transfer data from your Motorola to your Samsung phone, you will require:
- USB Cables x2
- A laptop or a computer
To start transferring data from your Motorola to your Samsung phone you will need to
Step 1. Download Dr.Fone and install it on your laptop or computer.
Step 2. Using the USB cables, attach both of your phones to the computer or laptop that you just installed Dr.Fone. When you run Dr.Fone, you’ll see a screen similar to the one shown below:
Step 3. There will be several modes listed on the screen. Select the “Phone Transfer” mode. Dr.Fone - Phone Transfer will display both of your devices after detecting them.
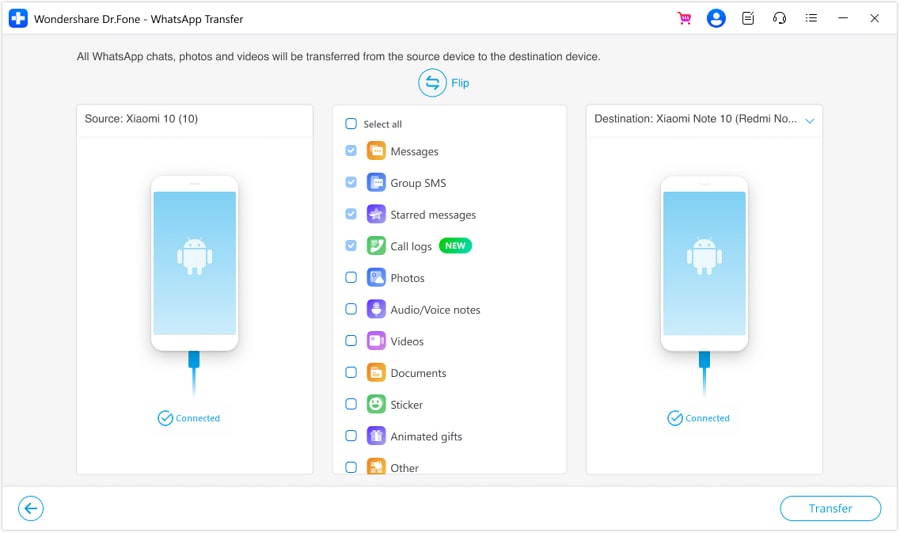
Step 4. Notice that the menu in the center shows the items to be transferred to the destination device. If you want to transfer the contacts, check the contacts item to transfer contacts from Motorola to Samsung. Check or uncheck the boxes as per your requirement. Click “Start Transfer” when you are done. Dr.Fone - Phone Transfer will begin the transferring process. A menu will appear showing the progress of the transfer.
Step 5. You can cancel the transferring process at any time by hitting the “Cancel” button however, make sure that neither of the Samsung Galaxy XCover 7 devices gets detached while the transferring process is still underway.
Part 2: Transfer WhatsApp from Motorola to Samsung via WhatsApp Transfer Tool
Looking for a hassle-free way to transfer your WhatsApp data from Motorola to Samsung? If yes, your best bet to complete the transfer without a hitch is Dr.Fone - WhatsApp Transfer . This solution facilitates the smooth transfer of WhatsApp chats, ensuring all attachments are included. Not only can you transfer chats, but you can also effortlessly backup and restore your WhatsApp data,
![]()
Dr.Fone - WhatsApp Transfer
One-click to transfer WhatsApp messages from Samsung Galaxy XCover 7 to iPhone
- Transfer WhatsApp messages from Samsung Galaxy XCover 7 to iOS, Android to Android, iOS to iOS, and iOS to Android.
- Backup WhatsApp messages from iPhone or Android on your PC.
- Allow restoring any item from the backup to iOS or Android.
- Completely or selectively preview and export WhatsApp messages from iOS backup to your computer.
- Support all iPhone and Android models.
3,480,561 people have downloaded it
This versatile tool enables effortless transfer of WhatsApp and WhatsApp Business chats between smartphones. Dr. Fone stands as your ultimate answer if you seek a smooth merging of WhatsApp chats between two devices. Here is how you can transfer your WhatsApp data with ease using Wondershare Dr.Fone:
Step 1: Access Transfer WhatsApp Messages in Wondershare Dr.Fone
Begin by opening Wondershare Dr.Fone on your computer and proceed to link your Motorola and Samsung devices using a USB cable. Once the Samsung Galaxy XCover 7 devices are connected, navigate to “Toolbox” and there, tap “WhatsApp Transfer” to proceed. On the following screen, move to the “WhatsApp” tab and click “Transfer WhatsApp Messages.”
Step 2: Assign Correct Positions to Motorola and Samsung Devices
Now, you need to assign the Motorola and Samsung devices to their respective positions. Here, the Motorola phone should be in the “Source” position. In the same way, the Samsung device needs to be in the “Destination” position. Use the “Flip” button in case the assigned positions are incorrect.
Step 3: Complete the WhatsApp Transfer Process
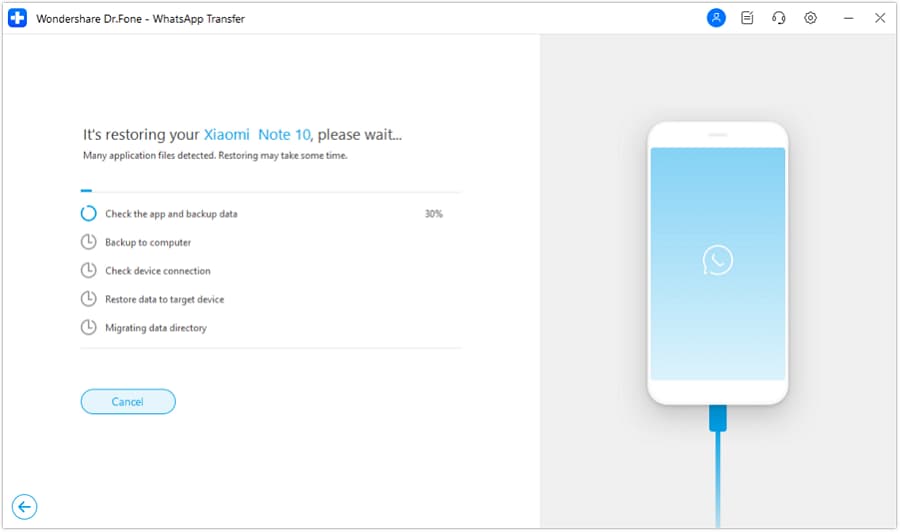
Afterward, click “Transfer” to commence the WhatsApp transfer process. A prompt will appear asking whether you want to back up WhatsApp data on the destination device. After making your choice, wait for the transfer process to finish, which will take only a few moments.
Part 3. Using Official Tools to Transfer Data from Motorola to Samsung
Samsung Smart Switch is an official tool developed by Samsung. This tool is designed to simplify transferring data from an old device, including non-Samsung devices like Motorola, to a new Samsung smartphone or tablet. This tool supports various data types, such as contacts, photos, messages, videos, calendars, and music. You can use the steps given below to transfer your data from Motorola to Samsung using Smart Switch:
Step 1. Begin with ensuring the Smart Switch app is installed on both devices. It comes pre-installed on Samsung devices, and you can download it from the Google Play Store for Motorola. Now, launch the app on both devices and keep both devices near each other.
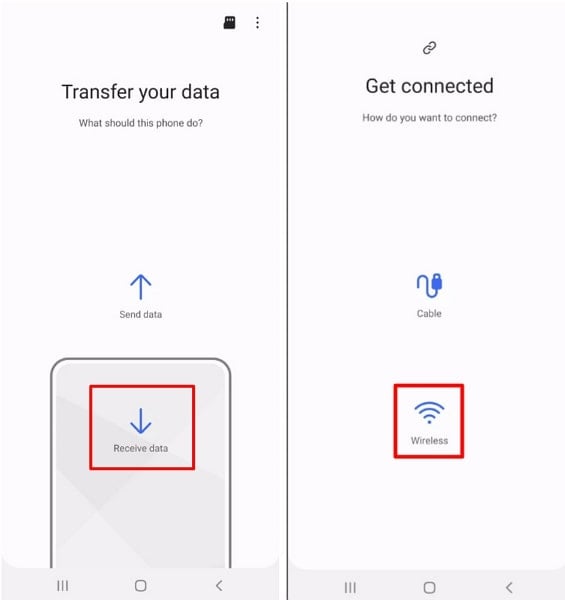
Step 2. On the Motorola device, tap “Send Data” and follow it by pressing “Wireless.” Now move to Samsung and tap “Receive Data,” then press “Galaxy/Android,” and finally tap “Wireless.”
Step 3. Afterward, finalize the connection by selecting “Allow” on the old phone. Then, on your new phone, select the content you wish to transfer and proceed by tapping “Transfer.” Once the transfer finishes, tap “Go to Home Screen” on the new phone, and you’re all set to proceed.

Bonus Tip: Want to Manage Your Samsung Galaxy XCover 7 Data before Transferring Data?
Before initiating data transfer from your Motorola phone to your new Samsung device, it’s a great idea to declutter and organize your data. Wondershare Dr.Fone is your go-to smart solution for managing and transferring Android data. With its intuitive features, you can preview, delete, export, and manage your data. This software facilitates smooth file transfers between your Samsung Galaxy XCover 7 and computer.
Moreover, it enables easy transfer of media files between iTunes and Android. Dr.Fone also offers the capability to import contacts from iCloud to either your Samsung Galaxy XCover 7 or computer. Additionally, it allows you to view and manage mobile notifications directly on your PC. It checks how much storage is left and generates a report showing the Samsung Galaxy XCover 7 device’s history with basic details automatically.
To cater for the above mentioned problems and many other, Dr.Fone - Phone Transfer was developed. Dr.Fone - Phone Transfer is an easy to use tool. It has been designed to assist you to in transferring data from your old phone to your new phone, including transferring contacts from Motorola to Samsung.
Also read:
- [New] In 2024, From Basic to Breathtaking Elevating Your Instagram Edits
- Buy WonderFox's Professional Mac App: Superior Apple Video Converter - Factory Pro Edition
- How to Avoid and Eliminate Fog on GoPro Lens/Housing
- How to Transfer Data from Asus ROG Phone 7 to Any iOS Devices | Dr.fone
- How To Transfer Data From iPhone 8 Plus To Other iPhone 12 devices? | Dr.fone
- How to Transfer Data from Vivo Y200 to BlackBerry | Dr.fone
- How to Use Phone Clone to Migrate Your Infinix Smart 7 Data? | Dr.fone
- In 2024, 2 Ways to Transfer Text Messages from Vivo X100 Pro to iPhone 15/14/13/12/11/X/8/ | Dr.fone
- In 2024, How to Transfer Data After Switching From Meizu 21 Pro to Latest Samsung | Dr.fone
- In 2024, How to Transfer Data from Asus ROG Phone 7 to Samsung Phone | Dr.fone
- In 2024, How to Transfer Music from Nubia Red Magic 8S Pro to iPod | Dr.fone
- In 2024, Transforming Virtual Worlds Enhancing Spark AR with Custom LUTs
- In 2024, Wondering the Best Alternative to Hola On Vivo V30 Lite 5G? Here Is the Answer | Dr.fone
- Limiting Friends' Access to Online Presence
- Unlock Mastery The Beginner's Guide to Editing Excellence for 2024
- Title: Solved Move from Samsung Galaxy XCover 7 to iOS not Working Problems | Dr.fone
- Author: Emma
- Created at : 2024-10-15 16:13:15
- Updated at : 2024-10-19 20:37:26
- Link: https://android-transfer.techidaily.com/solved-move-from-samsung-galaxy-xcover-7-to-ios-not-working-problems-drfone-by-drfone-transfer-from-android-transfer-from-android/
- License: This work is licensed under CC BY-NC-SA 4.0.