
Two Ways to Sync Contacts from Poco F5 5G to Gmail | Dr.fone
Two Ways to Sync Contacts from Poco F5 5G to Gmail
If you have ever lost your phone, you will agree that getting all the information that used to be on your misplaced device back can be a very trouble-laden venture, which can sometimes end in heartbreak.
One of the most important stuff you can keep on your phone is your contacts, the information about the people in your life, as well as their phone numbers. This can prove to be the most difficult data to get back after a phone is lost. Therefore, this article will tell you ways to keep your contacts updated by synchronizing contacts from Poco F5 5G to Google mail account. As with almost everything in the tech world, there is more than one way to skin a cat, and this is especially true about synchronizing contacts on Android phones.
There are two major ways to transfer contacts from Android phone to Gmail. So, shall we begin to discuss this?
Part 1: How to Sync Contacts from Poco F5 5G to Gmail? (Easier way)
One of the best ways to synchronize contacts from the phone to Gmail is to use a handy tool known as Dr.Fone - Phone Manager (Android) . It is one of the widely used and accepted tools for managing and transferring your Poco F5 5G contact details to another platform.
Dr.Fone - Phone Manager (Android)
One-Stop Solution to Sync Contacts from Poco F5 5G to Gmail
- Transfer, manage, export/import your music, photos, videos, contacts, SMS, Apps, etc.
- Backup your music, photos, videos, contacts, SMS, Apps, etc. to computer and restore them easily.
- Highlighted features such as 1-click root, gif maker, ringtone maker.
- Fully compatible with 3000+ Android devices (Android 2.2 - Android 8.0) from Samsung, LG, HTC, Huawei, Motorola, Sony, etc.
3981454 people have downloaded it
To use this safe and reliable way to synchronize contacts with Gmail on Android, follow these steps:
- 1. First of all, download the Dr.Fone software on your Windows PC and follow the installation instructions, then launch the software after the application has successfully installed.
- 2. Click on the “Phone Manager” option to continue to the next screen of the software.
- 3. Connect your phone to your PC via a USB cable. Ensure that USB debugging is enabled on your phone
- 4. Now click on the “Information” tab at the top of the interface of the software.

- 5. On the left side pane, click on the “Contacts” option to view the contacts available on your device.
- 6. You can select the contacts you wish to transfer to your PC or just simply select all and uncheck unwanted contacts.
- 7. Click on the “Export” button and choose “to vCard file” as your export format.

- 8. You will be taken to a page to select where you want the file to be saved on your PC, select the location, and click on OK to start exporting your contacts.
Once your contacts have been successfully saved to your PC as a vCard or in.VCF format can be easily imported into your Gmail account right from your computer by following these steps.
- 1. Open browser on your PC and Login to your Gmail account.
- 2. On the left side pane, click on the Gmail drop-down arrow to see and click on the “Contacts” option.
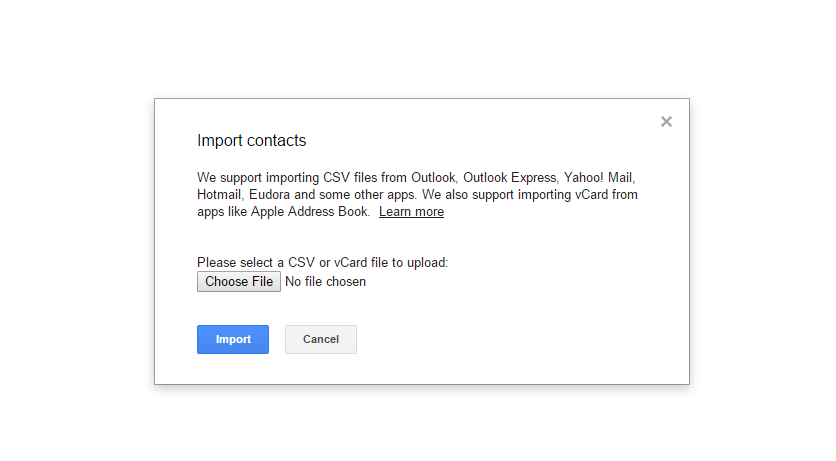
- 3.Tap on the “More” button and select “Import” from the list. Gmail will open a pop-up for you to select the location of the previously saved.VCF or vCard file.
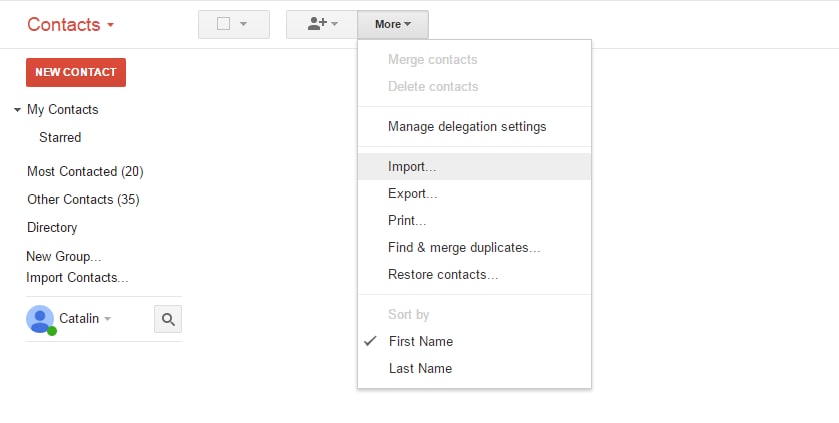
- 4. Select the vCard and then hit the “Import” button. Your contacts will be imported into your Gmail account in no time.
If you followed these steps, you would not only have synced your contacts with your computer, and you would also have synchronized them with your Gmail account.
Thus, by using Dr.Fone - Phone Manager (Android), you can not only easily transfer contacts from the phone to the Gmail account but also keep them safe from any data loss.
Part 2. How to Sync Contacts from Poco F5 5G to Gmail? (Official Way)
There is also a way whereby you can sync your contacts to your Gmail account on Android using just Your Poco F5 5G. You can do this simply by following these steps:
- 1. The first thing would be to ensure that Gmail is installed on your phone. If it is not, go to Play Store and install the Gmail App on your phone.
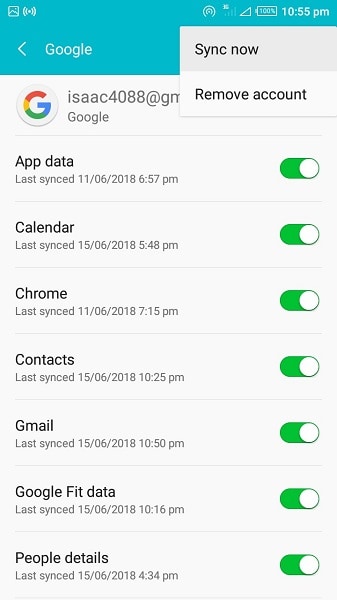
- 2. Now, go to your phone Settings, then tap on the “Accounts and Sync” option.
- 3. Tap on the Accounts and Sync service on the next screen.
- 4. Choose your Gmail account from the email accounts setup page.

- 5. Enable the “Sync Contacts” option.
- 6. Tap on the Options tab and then on the “Sync Now” button and wait until your Contacts have been successfully synchronized with your Google mail account. You will know that the Contacts have successfully completed synchronization when the “Sync” icon disappears.
And that’s it! You have successfully transferred your contact from the phone to your Gmail account. Also, when you initially add and set up a Gmail account on your mobile device, the “Automatically Sync” option should be switched on by default. If this does not occur for some reason, there are ways by which the error can be dealt with. These methods of fixing the error shall be addressed in the latter portion of this article.
Part 3. Other Ways to Backup Android Contacts
Smartphone users as a whole never want to lose their contacts; however, sometimes, due to human error or a program glitch or sheer mistake, it does happen. So it is pertinent for you to desire to have a backup of your contacts before entrusting the rest into the hands of an online backup program, in this case, your Gmail accounts. It is not about being paranoid; it is just a case of taking precautions to avoid the loss of contacts while you sync Android to Gmail account.
Although there has been no record of such occurrence in the past from users who export contacts from Poco F5 5G to Gmail, it is still advisable to perform a backup.
Another way to back up your contacts before you sync contacts from Poco F5 5G to Gmail can be found in this article: Four Ways to Backup Android Contacts Easily .
Part 4. Basic Solutions to Fix Google Contacts Syncing Issues on Android
In the above parts, you have learned how to transfer contacts from Poco F5 5G to Gmail. So what if your contacts have, for some reason, refused to sync? Well, don’t panic; here are some of the possible fixes for the problem.
Ensure that the Sync option is turned on for your device. To do this, simply:
- Tap on Settings for your device
- Go to Data Usage, then go to Menu.
- Ensure that the “Auto-Sync data” option is active on your device, if not, activate it.
- If it is already turned on, try toggling it on and off a few times, then proceed to Sync your Contacts.
Ensure that Google Contacts sync is turned on. To do this, simply:
- Once again, go to Android Settings.
- Go to the “Accounts” option.
- Go to the Google Account that you have used as your backup preference.
- Make sure that the “Contacts” option for the sync data is turned on.
- If it is already on and is still not working, try toggling the option on and off a few times.
Make sure that you have an active Internet connection, and that background data is switched off. The importance of checking your Internet connection before proceeding to more extreme measures for all issues cannot be ignored. The issues that may be disturbing you might be due to an issue with your device’s connection to the Internet
- Switch Off and Switch On your Data Connection.
- Go to Settings, then go to “Data Usage” and ensure that Restricting Background Data is disabled on your device.
Clear the App Cache for Google Contacts.
- Go to Settings
- Then tap on “Apps” or “Apps Manager,” depending on your device and Android version.
- Go to all Apps and find Contact Sync.
- Select Clear Cache and also Clear Data.
- This should knock the Contacts sync back to normal and ensure that your sync goes on without a hitch from there on out.
Remove your Google Account and set up again. The issue you are facing might be due to a malfunctioning Google Account setup. To fix this:
- Go to Settings.
- Go to Accounts, then proceed to your Google Account.
- Select the Remove Account option
- Then proceed to set up your email account again.
As a last-ditch fix, some users have reported that an account merging for the contacts fixed the problems of the contacts not syncing. To do this, do the following steps:
- Go to Contacts
- Tap on the menu, then tap on “Contacts to Display” option
- Select “Only Device”. Note that this will make only the contacts saved on the Poco F5 5G device to display.
- Tap on “Menu” and then on “Merge Accounts”
- Select Google Merge. This will merge all your Contacts with Google.
- Go back and select Menu again, this time selecting “Contacts to Display”, then “All Contacts”
- This should make all the contacts on your device to appear, and your sync problem should also be solved.
These fixes should ensure that your sync of contacts with the Google Account is now fixed, and you are now able to backup and sync your contacts to your Gmail Account. It is also worthy of note that if you want new contacts to be saved automatically to your Google account, you have to select the Google Account option when prompted on where to save the new contact, or else, the contact will not be automatically synced to your Gmail account, and you will have to create an export to add it to your Google Contacts.
Also, keep in mind that it might take a longer period of time for the contacts to synchronize to Google on a slower network connection, in deviance to a fast network connection, so you might need to exercise some patience if you’re on a slower Internet connection.
It can sometimes be bewildering and baffling when people probably lose their phones, and then they complain of loss of contacts. However, you need not worry about such loss of information again in this technological age since there are several ways to backup contacts. All the methods mentioned above are easy to execute and will help you transfer contacts from the phone to Gmail in a snap.
Lastly, you can also use Dr.Fone - Phone Manager (Android) for smoothly exporting contacts from Poco F5 5G to Gmail.
[Easiest Guide] How to Clone Poco F5 5G Phone? 6 Ways In 2024
Changing Android phones is no longer a tedious job. By using an Android clone app, you can simply transfer your data from one device to another. In this way, you can clone Android phone without the need to maintain multiple accounts Android. In this post, we will teach you how to clone Android phone using five different solutions. So what are you waiting for? Read this guide and clone Android phone without much trouble.
You can watch the video below to clone Android phone and copy its data
Part 1: How to clone Android phone using Dr.Fone - Phone Transfer?
To clone an Android phone in a fast and secure manner, simply take the assistance of Dr.Fone - Phone Transfer . It is a part of the Dr.Fone toolkit and can be used to transfer all sorts of data directly from one device to another. For instance, you can transfer your photos, videos, music, messages, contacts, notes, and multiple accounts to Android detail as well. It is compatible with all the leading Android devices manufactured by brands like Samsung, HTC, Lenovo, Huawei, LG, Motorola, and more. Having an intuitive process, it will let you Android clone in no time. To learn how to clone Android phone using Dr.Fone Switch, follow these steps:
Dr.Fone - Phone Transfer
Transfer Photo from Poco F5 5G to iPhone in 1 Click Directly!
- Cross-platform data shift between any device of your choice from Android and iPhone.
- Support massive data, including images, videos, music, messages, contacts, apps, and more.
- Works perfectly with almost mobile phones and tablets, such as iPhones, iPad, Samsung, Huawei, etc.
- Fully work with mobile system iOS 17 and Android 13 and computer system Windows 11 and Mac 12.
- 100% safe and risk-free, backup & restore data as the original.
3981454 people have downloaded it
1. Download Dr.Fone - Phone Transfer on your Windows or Mac before changing Android phones. Afterward, you can connect both devices to the computer and launch the Dr.Fone toolbox.
2. Click on the “Phone Transfer” button to view its dedicated interface.
3. As you can see, Dr.Fone will automatically detect your connected devices. One of them would be marked as the source, while the other one would be the target device.
4. If you wish to change their positions before you do Android clone, click the “Flip” button.

5. Now, you can select the kind of data that you wish to transfer from one device to another.
6. Click on the “Start Transfer” button to clone Android phone.
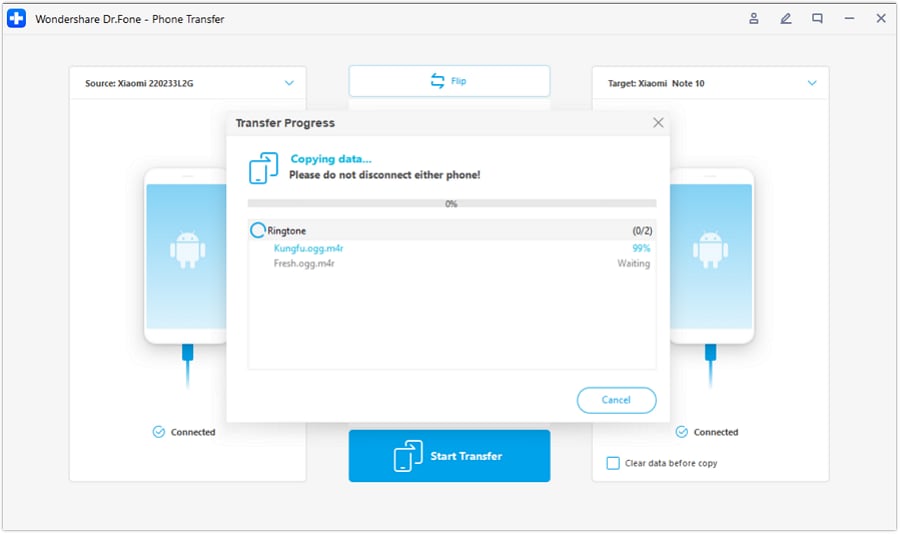
7. Sit back and wait for a while as the application will transfer the selected content from one device to another. Make sure that both devices stay connected to the computer.
8. Once the cloning process is completed, you will be notified.
In this way, you can easily learn how to clone Android phone in a few seconds. Later, you can disconnect the Poco F5 5G devices and use them readily. Besides Android, you can also use Dr.Fone - Phone Transfer to transfer data between different platforms as well.
Part 2: Clone Android phone using SHAREit
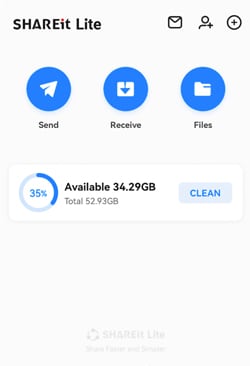
SHAREit is a popular cross-platform device-sharing app that over 600 million users use. The app can be used to perform a wireless transfer of data at a fast speed. This is done without utilizing your data usage or via Bluetooth. The app uses Wifi directly to clone Android phone. While changing Android phones, use SHAREit the following way:
Download SHAREit: https://play.google.com/store/apps/details?id=com.lenovo.anyshare.gps
1. First, install the SHAREit app on both Android devices. You can get it for free from the Google Play Store.
2. Now, launch the app on the source device and tap on the “Send” option.

3. This will further let you select the data files that you wish to transfer. Click on the “Next” option after selecting your content.
4. Bring the target device in close proximity to the sender and launch the app. Mark it as a receiving device.

5. This will make the phone automatically detect the sending device. Select the Wi-Fi hotspot that is associated with the sending device to form a secure connection.
6. As the connection is made, you can select the receiving device on the source phone. This will initiate the cloning of your data.

Part 3: Clone Android phone using CLONEit
While changing Android phones, users often look for alternatives. Therefore, you can also take the assistance of CLONEit to transfer your files in a batch. The app can also be used to migrate multiple accounts Android without much trouble. To learn how to clone Android phone using CLONEit, follow these steps:
1. Download the CLONEit app on both devices. After installing, launch the app on the Poco F5 5G devices and turn on their Wifi.
Download CLONEit: https://play.google.com/store/apps/details?id=com.lenovo.anyshare.cloneit
2. Mark the source device as a “Sender” and the target devices as a “Receiver”.

3. In this way, the target device will automatically start looking for the sender. You can view the Wifi hotspot the sender has created to verify the connection.
4. You need to confirm the connection request by tapping on the “Ok” button of the prompt.

5. Once the connection has been established, you can clone Android phone easily. Just go to the source device (sender) and select the data that you wish to transfer.
6. After making your selection, click on the “Start” button to make your target device the Android clone of your old device.
7. Wait for a while as the transfer of data would take place. You will be notified as soon as it is completed successfully.
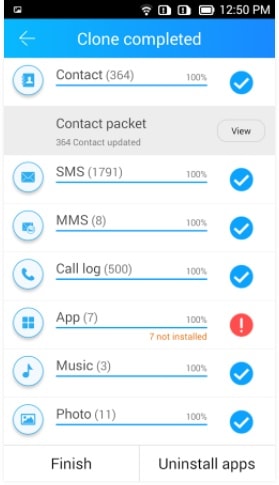
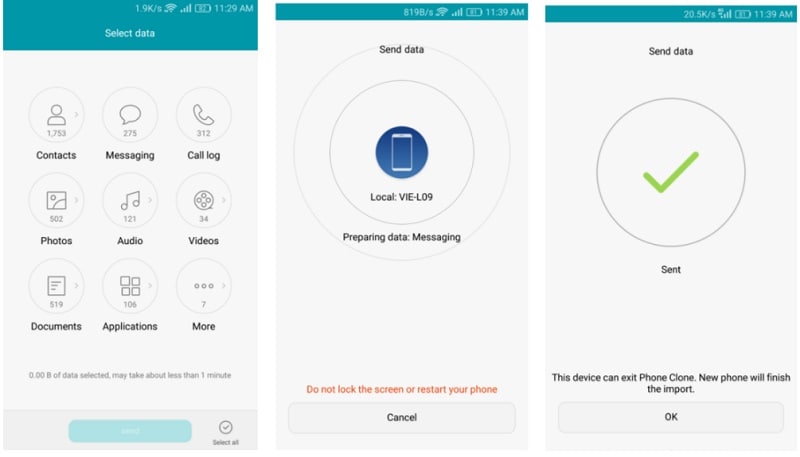
Part 4: Clone Android phone using Phone Clone
Huawei has also developed a dedicated app – Phone Clone to transfer the data from one Android device to another wirelessly. In this way, you don’t have to set up multiple accounts Android for every phone you buy. The app supports a fast and extensive cloning option with a user-friendly interface. To make your new device an Android clone, follow these steps:
1. Launch the Phone Clone app on both devices. If you don’t have the app, you can download it from Google Play.
Download Phone Clone: https://play.google.com/store/apps/details?id=com.hicloud.android.clone&hl=en
2. After launching the app on the new phone, mark it as a receiver. This will turn your phone into a Wi-Fi hotspot.
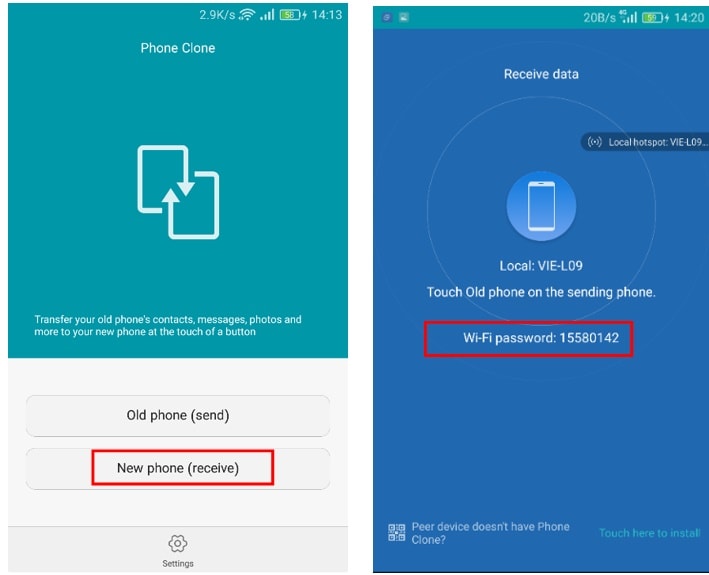
3. Go to the app on the source device and mark it as a sender. It will start looking for the available Wifi networks.
4. Connect it to the hotspot you have recently created and verified the password.

5. Once a secure connection is established, you can clone Android phone by selecting the data from the source device.
6. Tap on the “Send” button and transfer the selected content to the target device wirelessly.
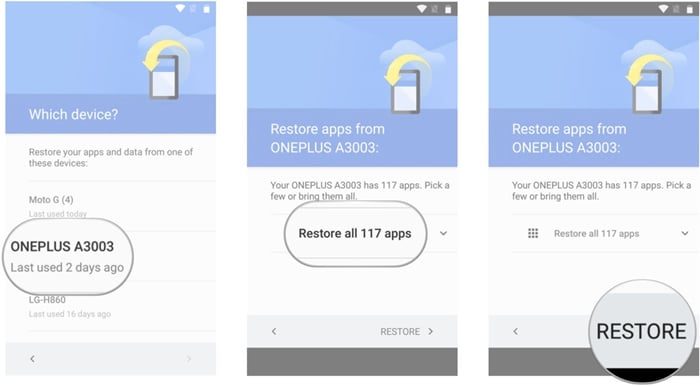
Part 5: Clone Android phone using Google Drive
Google Drive is ideally used to store data on the cloud. However, it can also be used to back up and restore your data. Even though Google Drive transfers the data wirelessly, it consumes a substantial amount of data usage. Also, the process is not as fast or smooth as other options. Nevertheless, you can learn how to clone Android phone using Google Drive by following these steps:
1. Unlock your source Android device and go to Settings > Backup & Reset. From here, you can turn on the option to backup your data.
2. Furthermore, you can verify the account on which you are taking the backup of your data and turn on the option of “Automatic Restore”. This will be of great help if you are managing multiple accounts Android.

3. After taking a complete backup of your data, turn on your brand-new Android to perform its setup.
4. Log in using the credentials of your Google Account. Make sure that the account should be linked to your previous device.

5. After signing in, the Poco F5 5G device will automatically sync to the account and identify the backup files. Simply select the most recent backup file.
6. Also, you can select the apps and app data that you wish to transfer. Click on the “Restore” button at the end to make your target device an Android clone of your previous phone.
Part 6: Clone Poco F5 5G Phone Using Bluetooth
Using Bluetooth for cloning an Android phone is not the most efficient method. It is more suitable for transferring specific files than creating a comprehensive clone. Moreover, it’s a slow and manual process that requires you to select and transfer files one by one. Here’s how you can use Bluetooth for this purpose:
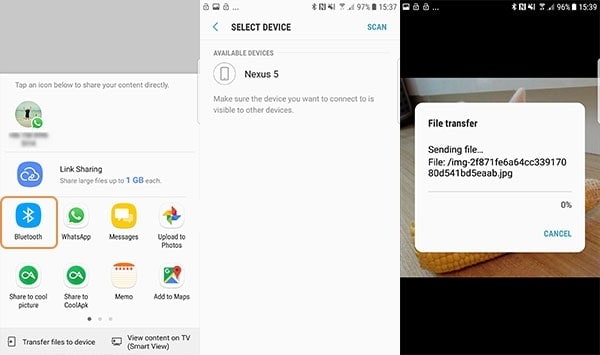
1. On both Android devices, turn on Bluetooth and pair the Poco F5 5G devices. Navigate to the file you want to send on the source device, tap “Share,” and select “Bluetooth.”
2. Now, choose the targeted device to send the file. Move to the other device and “Accept” the incoming file transfer.
FAQs
1. Is Android phone clone safe?
Cloning an Android phone using reputable and trusted methods, apps, or tools is generally safe. Nonetheless, it is of utmost importance to exercise prudence and employ trustworthy software to safeguard your personal data. Be sure to obtain apps and tools exclusively from reputable sources, such as the Google Play Store, and adhere to the best data security practices.
2. Can I clone between different Android phone models or brands?
The ability to clone between different Android phone models or brands depends on the specific method or tool you are using. Dedicated phone transfer apps like Wondershare Dr.Fone - Phone Transfer or Phone Clone are often designed to work across various Android models and brands.
3. What should I do before cloning my Android phone to ensure a smooth process?
Before commencing the cloning procedure for your Poco F5 5G, creating a backup of your device’s data is crucial. It can be accomplished by using either the integrated backup feature or a trustworthy third-party app.
This precautionary step guarantees the safety of your data should any issues arise during the cloning procedure. Moreover, it’s imperative to verify that both devices are running the most up-to-date software updates and application versions.
Conclusion
Now, when you know six different ways to clone Android phone, you can easily move from one device to another without experiencing any data loss. This guide will certainly help every individual who is changing Android phones. Feel free to share it with your friends and family and let us know about your feedback regarding these solutions as well.
How to Transfer Content from android to iPhone Directly
Since Poco F5 5G is embracing Android as its operating system, transitioning from an iPhone to a Poco F5 5G, or vice versa, can pose challenges due to the differing operating systems. But it doesn’t mean impossible!
If you’re switching to an iPhone and need to transfer all your data, this article has you covered. We will look at ways to facilitate smooth Poco F5 5G to iPhone transfer while ensuring your valuable information transfers across these devices with no problem.
Part 1. How to Transfer Content from Poco F5 5G to iPhone Directly
You must be familiar with Poco F5 5G Migrate if you are a Poco F5 5G user. It is a solution for seamless data transfer used in Poco F5 5G devices. With this app, you can transfer data from your Poco F5 5G device to others, such as iPhones.
However, most of the latest Poco F5 5G models are now unable to run Poco F5 5G Migrate since it’s a pretty outdated app. It has been retired by the company since 2015. Users are seeking alternative methods for data transfer as a result. In this section, we explore more effective solutions to transfer content directly from Poco F5 5G to iPhone besides Poco F5 5G Migrate.
Solution 1. Using ShareIt App
When Poco F5 5G Migrate is not an option, ShareIt can be a versatile alternative for Poco F5 5G to iPhone transfer. ShareIt is a popular cross-platform file-sharing application known for its simplicity and efficiency. To use it, you’ll need to download the ShareIt app on both your Poco F5 5G and iPhone.
If you have downloaded and installed it, you can continue with the steps below:
- Step 1: Connect your Poco F5 5G and iPhone devices
Since ShareIt operates by creating a hotspot network among devices, it’s necessary to have both devices connected to the same Wi-Fi network. Make sure to keep both devices close to each other, too.
- Step 2: Select the files to transfer
On your Poco F5 5G device, click the “Send” button. After a new window appears displaying all the categorized files on your device, choose the specific files you want to transfer.
- Step 3: Look for the Poco F5 5G device to transfer
After selecting the files, press “Send” and provide the necessary permissions for GPS and Bluetooth. Once permissions are granted, the Poco F5 5G device will initiate a search for nearby devices.
- Step 4: Transfer the files to the iPhone.
On your iPhone, open the ShareIt app and click “Receive.” This action opens all the necessary ports to receive shared files. When your Poco F5 5G phone detects your iPhone, tap on the iPhone’s avatar to proceed with the transfer.
Solution 2. Move Contents from Poco F5 5G to iPhone via Apps & Data
Another good alternative of Poco F5 5G to iPhone transfer app is Move to iOS. This Move to iOS app is designed by Apple specifically for users moving from Android devices to iPhones. You can download it from the Google Play Store. Then, you can transfer the data by accessing Apps & Data on the iPhone.
However, if you have been using your iPhone for a while, you must reset your iPhone first to proceed with this method. It can be done by going to Settings > General > Reset > Erase all content and settings. After resetting, your iPhone will be going back to the initial setup.
For more details, follow the instructions below:
Step 1: Setup your iPhone
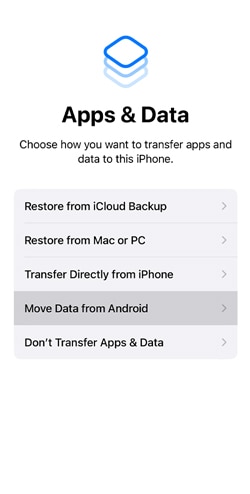
Power up your new iPhone and progress through the initial setup until you get into the “Apps & Data” screen. Select the option that reads “Move Data from Android.”
Step 2: Agree to Terms and Conditions
Open Move to iOS on your Poco F5 5G phone. Review the terms and conditions and press “Agree” to proceed.
Step 3: Enter the Code
On your Poco F5 5G, a screen will appear to request a 6-10-digit code. This code will be generated on your iPhone. Enter the displayed code on your Poco F5 5G device to make a secure connection between the two devices.
Step 4: Select Content to Transfer
Next, choose the types of content you wish to transfer. Tap “Continue” to initiate the transfer process. Remember to keep your devices close to each other and connected to power until the transfer process is completed for quicker transfer.
Step 5: Transfer complete.
Once the transfer is complete, you will be prompted to finish setting up your iPhone. Follow the instructions to complete the setup process.

Part 2. How To Make iPhone to Poco F5 5G Data Transfer Using Easy Software
One significant reason why data transfer from iPhone to Poco F5 5G is tricky is due to privacy concerns. Apple really prioritizes their user privacy. It implements strict security measures to prevent any breaches. While this is beneficial for users, it can also complicate data transfer.
Another contributing factor is the structure of the files. Android boasts a file system that is more straightforward, unlike iOS. As a solution, third-party software like Wondershare Dr.Fone offers tools like Phone Transfer to simplify the process. With Dr. Fone’s Phone Transfer, you can transfer any data from Poco F5 5G to iPhone or iPhone to Poco F5 5G.
How to make iPhone to Poco F5 5G data transfer with Dr.Fone:
- Step 1: Open Dr.Fone’s Phone Transfer tool
Make a connection between your iPhone and your Poco F5 5G phone through USB cable on your computer. Launch Wondershare Dr.Fone on your computer and navigate to Toolbox > Phone Transfer.
- Step 2: Specify the source and destination devices
After connecting them, the platform will identify the connected devices and load their data onto the platform. Choose the Source and Destination devices to set the transfer path. Use the Flip button if necessary to alter the transfer direction.

- Step 3: Choose the data type for the transfer
Proceed to select the types of data you wish to transfer. Checkmark the category and click the Start Transfer button. If you want to remove existing data from the destination device, you can select “Clear data before copy.”

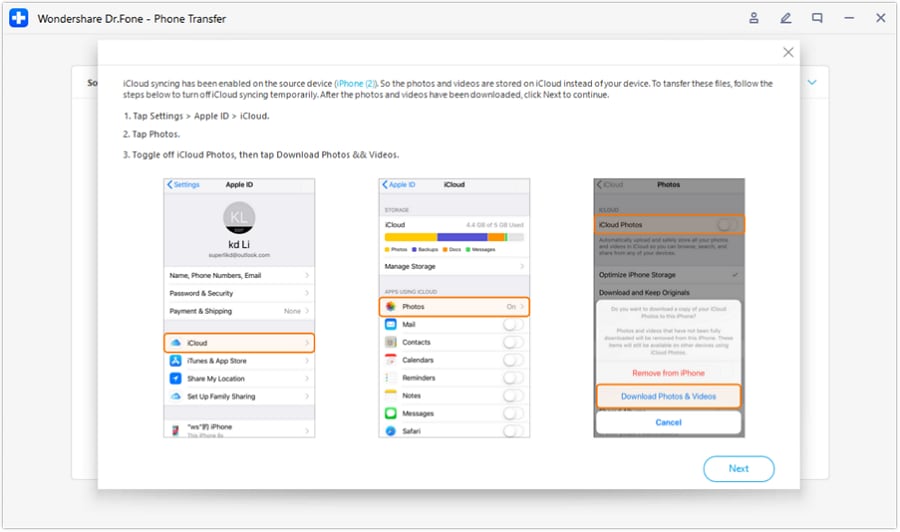
- Step 4: Disable iCloud syncing
Now, Dr. Fone’s Phone Transfer tool should prompt a specific operation on the window. Follow the instructions to turn off iCloud syncing. Open your iPhone Settings and tap on your device’s name. Go to iCloud > Photos to disable the toggle for iCloud Photos.
- Step 5: Monitor data transfer progress
The progress of the data transfer will be displayed in a pop-up window. Once completed, click OK to conclude the process.

Part 3. How to Do Poco F5 5G to iPhone Data Transfer Using Dropbox/Google Drive
Another method for Poco F5 5G to iPhone transfer is using Cloud services like Dropbox or Google Drive. Both Dropbox and Google Drive serve as virtual storage spaces accessible from any device with an internet connection. Users can upload and store their files to the cloud, making them available for download on other devices.
Either Google Drive or Dropbox follows similar steps for data transfer. The difference between them is in the amount of free storage each service provides. Notably, Google Drive provides 15GB of free storage, while Dropbox offers 2GB.
Follow these steps on how to do a Poco F5 5G to iPhone transfer via cloud storage services.
- Step 1: Install and set up Dropbox/Google Drive:
Begin by installing the Dropbox or Google Drive app on both your Poco F5 5G and iPhone. Create accounts if you don’t have them already.
- Step 2: Upload the files from Poco F5 5G
Open the cloud storage app on your Poco F5 5G device and upload the data you want to transfer. This can include photos, videos, documents, and more. Then, wait for the upload to complete. Make sure that all files are successfully uploaded before proceeding.
- Step 3: Sign in to the cloud storage on your iPhone
On your iPhone, open Dropbox or Google Drive and sign in with the same account. Find the transferred files in the cloud storage.
- Step 4: Download to iPhone:
Select the files you want to transfer and download them to your iPhone. Once the download is complete, organize the transferred files on your iPhone as needed.
Conclusion
Transitioning from a Poco F5 5G device to an iPhone, or vice versa, may present challenges due to the difference in operating systems. However, with the right tools and methods, the iPhone to Poco F5 5G data transfer can be done seamlessly and efficiently.
Even though Poco F5 5G Migrate is no longer in the game, apps like ShareIt and Move to iOS can be alternatives for a direct transfer. If things get a bit trickier when transferring from iPhone to Poco F5 5G due to Apple’s privacy measures, third-party software like Wondershare Dr.Fone’s Phone Transfer is there to simplify it all.
And for those who prefer the cloud, Dropbox and Google Drive also offer a solution. So, no matter your preference, there’s a solution to ensure your data transfer moves smoothly.
Also read:
- [New] A Deep Dive Into DJI Phantom 3 Professional Drone
- [New] In 2024, Going Viral Nine Techniques to Cement Your Status on Instagram
- [New] The Complete Manual for Using Speech Recognition in Google Documents
- [Updated] The Ultimate Guide to Top 8 Laptop Skins & Backdrops
- [Updated] Top 10 Affordable, Accessible Tools to Transform Videos
- 2024 Approved Sound Senses Try Our FREE Online Rhythm Analyzers
- Comparable Digital Painting & Sketching for PC Users
- Dive Into Advanced Computing at a Bargain – The AceMagix X1, An Intel Powerhouse with Twin Full HD Screens, Priced From Just $899.
- How to Transfer Data from Itel P55+ to BlackBerry | Dr.fone
- In 2024, 5 Ways to Move Contacts From Vivo Y100t to iPhone (13/14/15) | Dr.fone
- In 2024, Best 3 Software to Transfer Files to/from Your Vivo Y100 5G via a USB Cable | Dr.fone
- In 2024, Easiest Guide How to Clone HTC U23 Phone? | Dr.fone
- In 2024, Easiest Guide How to Clone Poco M6 Pro 5G Phone? | Dr.fone
- In 2024, How to Migrate Android Data From Nokia G22 to New Android Phone? | Dr.fone
- In 2024, How to Transfer Contacts from Xiaomi Redmi Note 12 Pro+ 5G to iPhone XS/11 | Dr.fone
- In 2024, How to Transfer Data from Nokia C12 Plus to BlackBerry | Dr.fone
- Resolving Batman ARKH Issues: Fixes for Crashing Errors and System Failures
- Title: Two Ways to Sync Contacts from Poco F5 5G to Gmail | Dr.fone
- Author: Emma
- Created at : 2024-10-19 16:06:24
- Updated at : 2024-10-25 16:43:41
- Link: https://android-transfer.techidaily.com/two-ways-to-sync-contacts-from-poco-f5-5g-to-gmail-drfone-by-drfone-transfer-from-android-transfer-from-android/
- License: This work is licensed under CC BY-NC-SA 4.0.