
Two Ways to Sync Contacts from Realme 12 5G to Gmail | Dr.fone
Two Ways to Sync Contacts from Realme 12 5G to Gmail
If you have ever lost your phone, you will agree that getting all the information that used to be on your misplaced device back can be a very trouble-laden venture, which can sometimes end in heartbreak.
One of the most important stuff you can keep on your phone is your contacts, the information about the people in your life, as well as their phone numbers. This can prove to be the most difficult data to get back after a phone is lost. Therefore, this article will tell you ways to keep your contacts updated by synchronizing contacts from Realme 12 5G to Google mail account. As with almost everything in the tech world, there is more than one way to skin a cat, and this is especially true about synchronizing contacts on Android phones.
There are two major ways to transfer contacts from Android phone to Gmail. So, shall we begin to discuss this?
Part 1: How to Sync Contacts from Realme 12 5G to Gmail? (Easier way)
One of the best ways to synchronize contacts from the phone to Gmail is to use a handy tool known as Dr.Fone - Phone Manager (Android) . It is one of the widely used and accepted tools for managing and transferring your Realme 12 5G contact details to another platform.
Dr.Fone - Phone Manager (Android)
One-Stop Solution to Sync Contacts from Realme 12 5G to Gmail
- Transfer, manage, export/import your music, photos, videos, contacts, SMS, Apps, etc.
- Backup your music, photos, videos, contacts, SMS, Apps, etc. to computer and restore them easily.
- Highlighted features such as 1-click root, gif maker, ringtone maker.
- Fully compatible with 3000+ Android devices (Android 2.2 - Android 8.0) from Samsung, LG, HTC, Huawei, Motorola, Sony, etc.
3981454 people have downloaded it
To use this safe and reliable way to synchronize contacts with Gmail on Android, follow these steps:
- 1. First of all, download the Dr.Fone software on your Windows PC and follow the installation instructions, then launch the software after the application has successfully installed.
- 2. Click on the “Phone Manager” option to continue to the next screen of the software.
- 3. Connect your phone to your PC via a USB cable. Ensure that USB debugging is enabled on your phone
- 4. Now click on the “Information” tab at the top of the interface of the software.

- 5. On the left side pane, click on the “Contacts” option to view the contacts available on your device.
- 6. You can select the contacts you wish to transfer to your PC or just simply select all and uncheck unwanted contacts.
- 7. Click on the “Export” button and choose “to vCard file” as your export format.


- 8. You will be taken to a page to select where you want the file to be saved on your PC, select the location, and click on OK to start exporting your contacts.
Once your contacts have been successfully saved to your PC as a vCard or in.VCF format can be easily imported into your Gmail account right from your computer by following these steps.
- 1. Open browser on your PC and Login to your Gmail account.
- 2. On the left side pane, click on the Gmail drop-down arrow to see and click on the “Contacts” option.
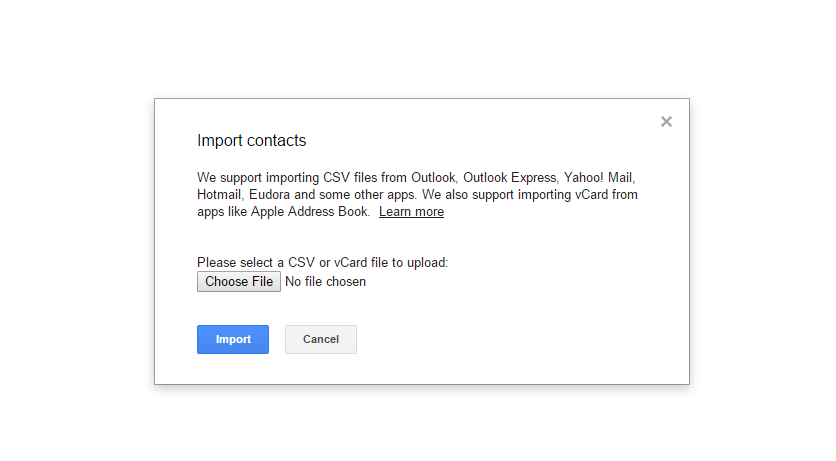
- 3.Tap on the “More” button and select “Import” from the list. Gmail will open a pop-up for you to select the location of the previously saved.VCF or vCard file.
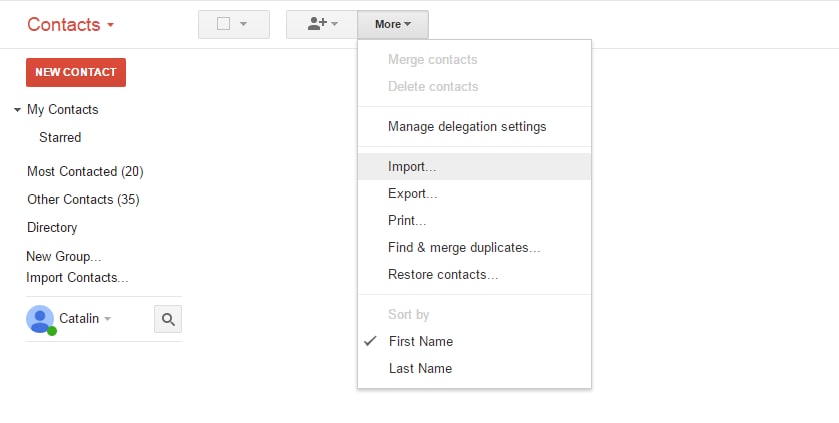
- 4. Select the vCard and then hit the “Import” button. Your contacts will be imported into your Gmail account in no time.
If you followed these steps, you would not only have synced your contacts with your computer, and you would also have synchronized them with your Gmail account.
Thus, by using Dr.Fone - Phone Manager (Android), you can not only easily transfer contacts from the phone to the Gmail account but also keep them safe from any data loss.
Part 2. How to Sync Contacts from Realme 12 5G to Gmail? (Official Way)
There is also a way whereby you can sync your contacts to your Gmail account on Android using just Your Realme 12 5G. You can do this simply by following these steps:
- 1. The first thing would be to ensure that Gmail is installed on your phone. If it is not, go to Play Store and install the Gmail App on your phone.
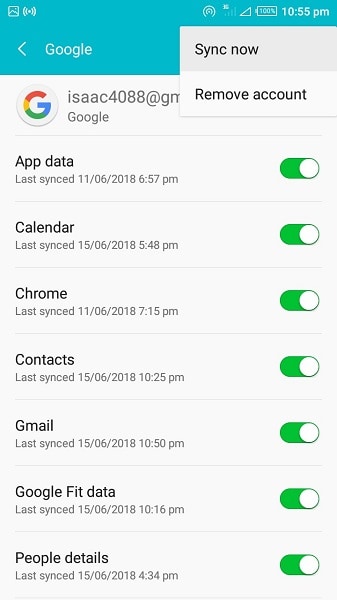
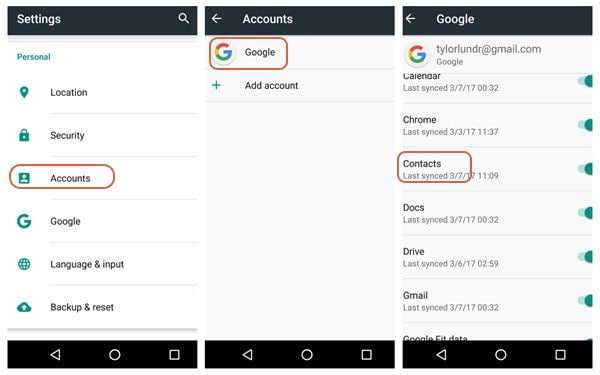
- 2. Now, go to your phone Settings, then tap on the “Accounts and Sync” option.
- 3. Tap on the Accounts and Sync service on the next screen.
- 4. Choose your Gmail account from the email accounts setup page.

- 5. Enable the “Sync Contacts” option.
- 6. Tap on the Options tab and then on the “Sync Now” button and wait until your Contacts have been successfully synchronized with your Google mail account. You will know that the Contacts have successfully completed synchronization when the “Sync” icon disappears.
And that’s it! You have successfully transferred your contact from the phone to your Gmail account. Also, when you initially add and set up a Gmail account on your mobile device, the “Automatically Sync” option should be switched on by default. If this does not occur for some reason, there are ways by which the error can be dealt with. These methods of fixing the error shall be addressed in the latter portion of this article.
Part 3. Other Ways to Backup Android Contacts
Smartphone users as a whole never want to lose their contacts; however, sometimes, due to human error or a program glitch or sheer mistake, it does happen. So it is pertinent for you to desire to have a backup of your contacts before entrusting the rest into the hands of an online backup program, in this case, your Gmail accounts. It is not about being paranoid; it is just a case of taking precautions to avoid the loss of contacts while you sync Android to Gmail account.
Although there has been no record of such occurrence in the past from users who export contacts from Realme 12 5G to Gmail, it is still advisable to perform a backup.
Another way to back up your contacts before you sync contacts from Realme 12 5G to Gmail can be found in this article: Four Ways to Backup Android Contacts Easily .
Part 4. Basic Solutions to Fix Google Contacts Syncing Issues on Android
In the above parts, you have learned how to transfer contacts from Realme 12 5G to Gmail. So what if your contacts have, for some reason, refused to sync? Well, don’t panic; here are some of the possible fixes for the problem.
Ensure that the Sync option is turned on for your device. To do this, simply:
- Tap on Settings for your device
- Go to Data Usage, then go to Menu.
- Ensure that the “Auto-Sync data” option is active on your device, if not, activate it.
- If it is already turned on, try toggling it on and off a few times, then proceed to Sync your Contacts.
Ensure that Google Contacts sync is turned on. To do this, simply:
- Once again, go to Android Settings.
- Go to the “Accounts” option.
- Go to the Google Account that you have used as your backup preference.
- Make sure that the “Contacts” option for the sync data is turned on.
- If it is already on and is still not working, try toggling the option on and off a few times.
Make sure that you have an active Internet connection, and that background data is switched off. The importance of checking your Internet connection before proceeding to more extreme measures for all issues cannot be ignored. The issues that may be disturbing you might be due to an issue with your device’s connection to the Internet
- Switch Off and Switch On your Data Connection.
- Go to Settings, then go to “Data Usage” and ensure that Restricting Background Data is disabled on your device.
Clear the App Cache for Google Contacts.
- Go to Settings
- Then tap on “Apps” or “Apps Manager,” depending on your device and Android version.
- Go to all Apps and find Contact Sync.
- Select Clear Cache and also Clear Data.
- This should knock the Contacts sync back to normal and ensure that your sync goes on without a hitch from there on out.
Remove your Google Account and set up again. The issue you are facing might be due to a malfunctioning Google Account setup. To fix this:
- Go to Settings.
- Go to Accounts, then proceed to your Google Account.
- Select the Remove Account option
- Then proceed to set up your email account again.
As a last-ditch fix, some users have reported that an account merging for the contacts fixed the problems of the contacts not syncing. To do this, do the following steps:
- Go to Contacts
- Tap on the menu, then tap on “Contacts to Display” option
- Select “Only Device”. Note that this will make only the contacts saved on the Realme 12 5G device to display.
- Tap on “Menu” and then on “Merge Accounts”
- Select Google Merge. This will merge all your Contacts with Google.
- Go back and select Menu again, this time selecting “Contacts to Display”, then “All Contacts”
- This should make all the contacts on your device to appear, and your sync problem should also be solved.
These fixes should ensure that your sync of contacts with the Google Account is now fixed, and you are now able to backup and sync your contacts to your Gmail Account. It is also worthy of note that if you want new contacts to be saved automatically to your Google account, you have to select the Google Account option when prompted on where to save the new contact, or else, the contact will not be automatically synced to your Gmail account, and you will have to create an export to add it to your Google Contacts.
Also, keep in mind that it might take a longer period of time for the contacts to synchronize to Google on a slower network connection, in deviance to a fast network connection, so you might need to exercise some patience if you’re on a slower Internet connection.
It can sometimes be bewildering and baffling when people probably lose their phones, and then they complain of loss of contacts. However, you need not worry about such loss of information again in this technological age since there are several ways to backup contacts. All the methods mentioned above are easy to execute and will help you transfer contacts from the phone to Gmail in a snap.
Lastly, you can also use Dr.Fone - Phone Manager (Android) for smoothly exporting contacts from Realme 12 5G to Gmail.
5 Ways to Move Contacts From Realme 12 5G to iPhone (13/14/15)
Android smartphones certainly have a lot to offer when it comes to communication. Each device features functional messaging and phone call applications that keep you in touch with other people. The same thing goes for Apple devices, particularly the iPhone 13, 14, and 15. These models are equipped with almost everything you need to send text messages through traditional channels or the internet. It’s fair to say that both Android and iOS smartphones are great in this regard. But if you’re looking for a change, switching to the latter is definitely an excellent choice.
Data migration nowadays is very advanced. Hence, copying your contacts between two mobile devices with different operating systems is indeed a piece of cake. All you need to do is find the right method that works pretty well in your current situation. Initiate each step and complete the entire procedure. For sure, it will only take a few minutes to get everything done.
In this article, we will provide some methods on how to transfer contacts from Realme 12 5G to iPhone (13/14/15). Continue reading below to learn more.
You can watch the video below to transfer contacts from Realme 12 5G to iPhone with ease
Part 1: Can You Move Contacts From Realme 12 5G to iPhone (13/14/15)?
There’s no denying that the phonebook is one of the most important files on our mobile phones. Without this, it will be much harder to communicate with others who don’t use the internet for messaging and calls. That’s why it’s highly recommended to prioritize the contact list when initiating sensitive procedures like phone transfers. You must do your best to keep the files safe while the process is ongoing.
Is it really possible to move contacts from Realme 12 5G to iPhone (13/14/15)? The short answer is absolutely yes. There are many tutorials out there that can definitely teach you how to transfer contacts from Realme 12 5G to iPhone. Don’t worry. All of them are very simple to conduct. Neither advanced skills nor high-end equipment is required to complete the procedures successfully. Just settle on a specific technique that perfectly suits your needs.
Another thing, you can certainly move contacts from Realme 12 5G to iPhone (13/14/15) without worrying about security. The data transfer methods today are mostly private and confidential. If there are phone transfer tools involved, you can be sure they implement the highest form of security protocols. That’s why don’t be afraid to move your contacts from one device to another. Just choose the right guide on how to transfer contacts from Realme 12 5G to iPhone. You’ll be just fine.
Part 2: 5 Tips on How to Transfer Contacts From Realme 12 5G to iPhone (13/14/15)?
As previously mentioned, it’s very simple to move your contacts from Realme 12 5G to iPhone (13/14/15). There are numerous ways to do that in easy steps. Five of them are enumerated below. Check each tutorial on how to share contacts from Realme 12 5G to iPhone and find the best one for you.
Method 1: Move contacts from Realme 12 5G to iPhone (13/14/15) via SIM card
Do you store your contact list on your SIM card? If so, moving them to your new mobile device is indeed a walk in the park. Just insert the SIM card from your Realme 12 5G into your iPhone. After that, copy the contact information to the local storage of your new smartphone. Don’t sweat it. You can do it in easy steps. Here’s how to transfer contacts from Realme 12 5G to iPhone via SIM card.
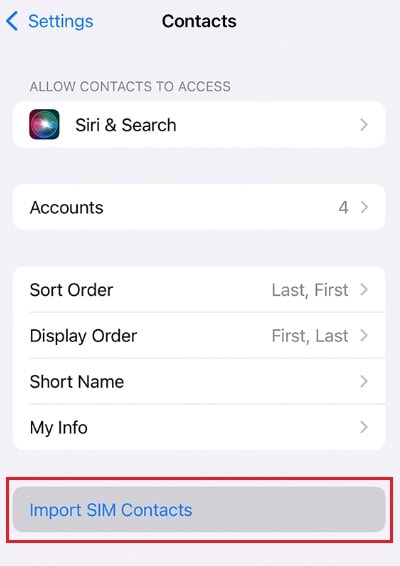
- Step 1: After inserting the SIM card into your iPhone, go to Settings.
- Step 2: Click Contacts.
- Step 3: From there, click Import SIM Contacts.
Method 2: Move contacts from Realme 12 5G to iPhone (13/14/15) using Move to iOS
Move to iOS is an Android mobile application that aids in the data transfer between an Android and iOS device. It can absolutely help you migrate your contacts from your Realme 12 5G to your iPhone with little to no effort. Here’s a short guide on how to transfer contacts from Realme 12 5G to iPhone (13/14/15) using Move to iOS.
- Step 1: Install the Move to iOS application on Google Playstore. Launch it afterward on your Realme 12 5G.
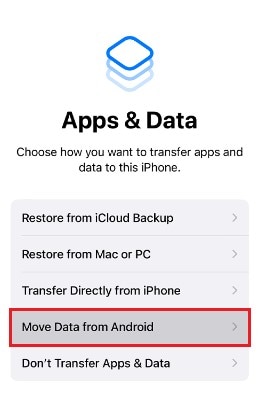
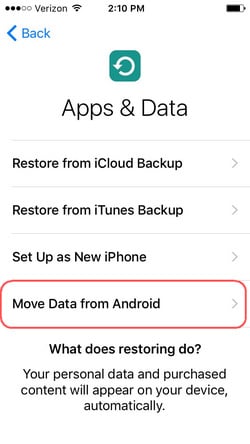
- Step 2: Start configuring your new iPhone. On the App & Data screen, click Move Data From Android.
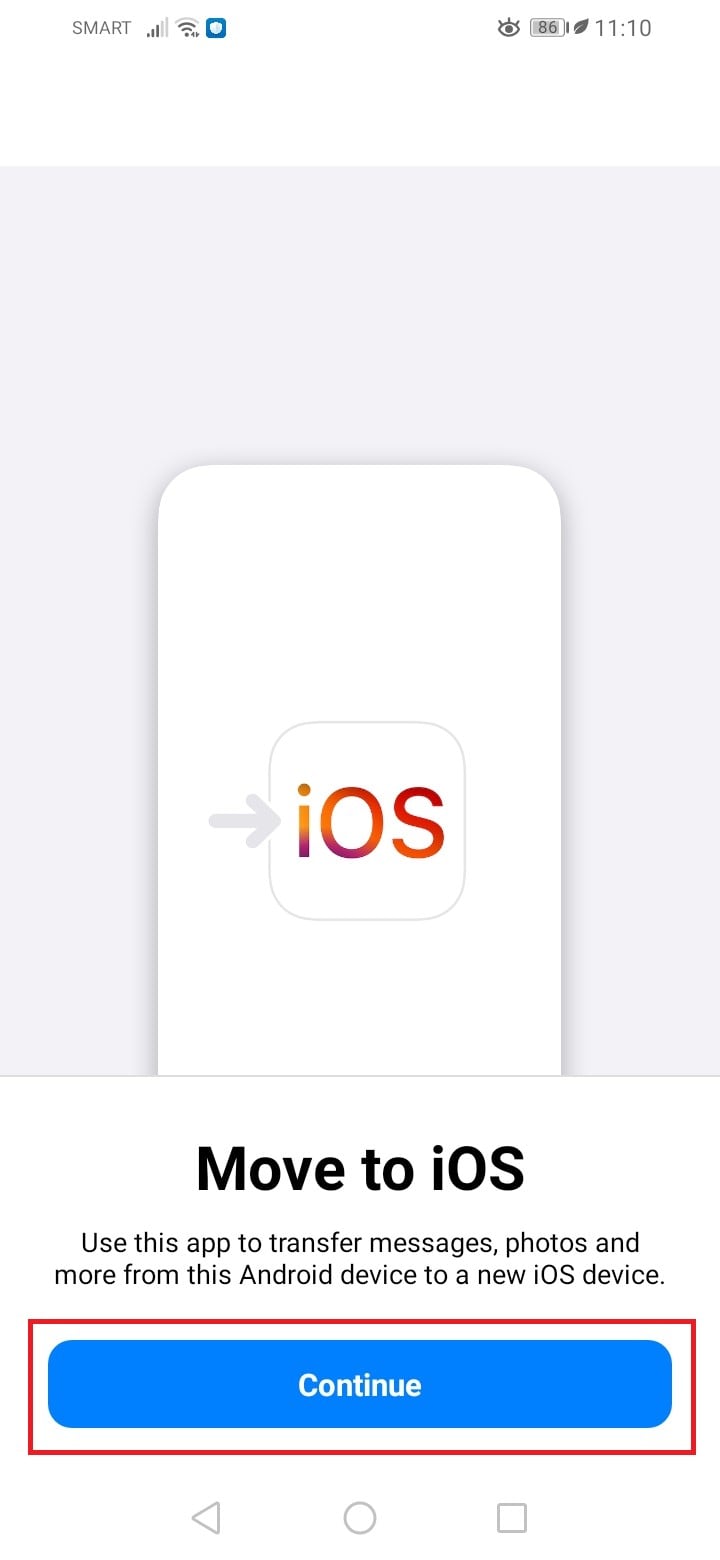
- Step 3: Going back to your Android smartphone, click Continue.
- Step 4: Read the Terms and Conditions. After that, click Agree to proceed.
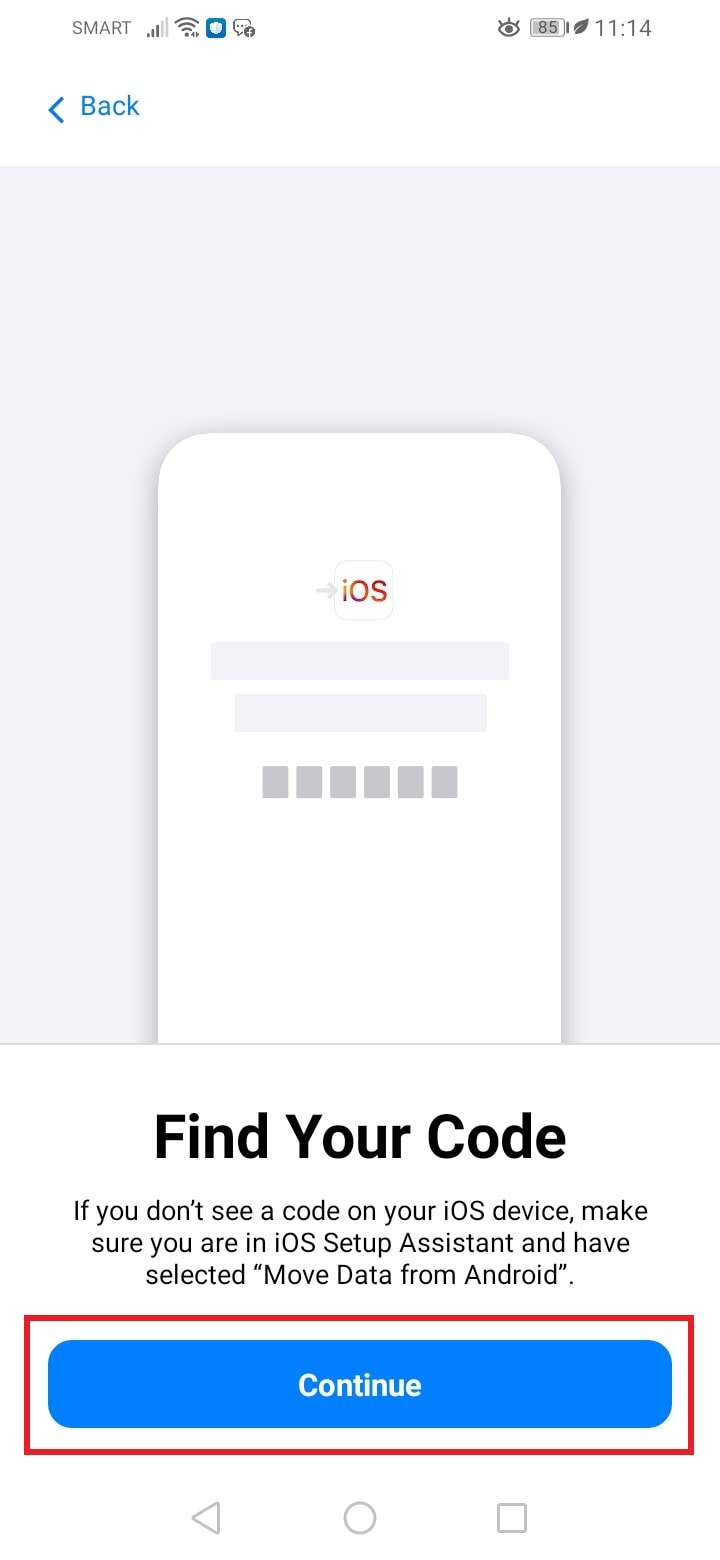
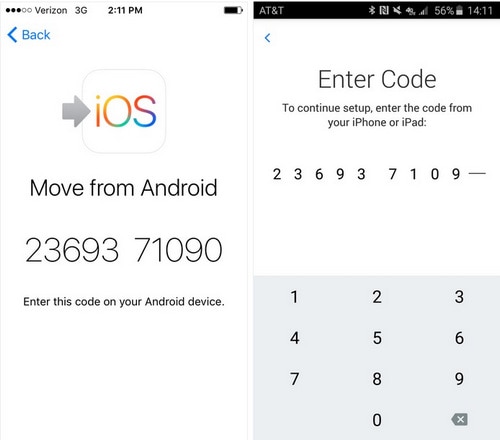
- Step 5: On the Find Your Code page, click Continue.
- Step 6: Check the code on your iPhone and then enter it on your Realme 12 5G. Right after, choose the data you want to transfer. Then, click Next to start the process.
Method 3: Move contacts from Realme 12 5G to iPhone (13/14/15) via Google
Do you have a Gmail account? If so, you can use it to sync your Android contacts with your iPhone. Don’t worry. It’s a very easy procedure. In fact, you can do it even with one eye closed. Here’s how to transfer contacts from Realme 12 5G to iPhone (13/14/15) using your Gmail account.
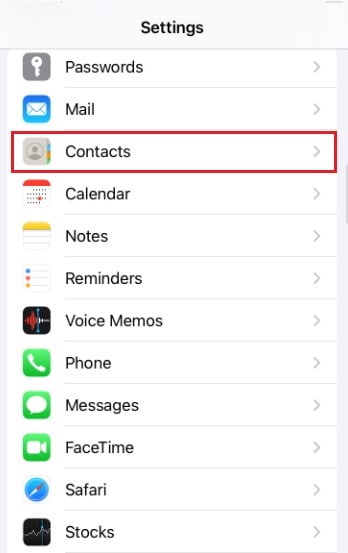
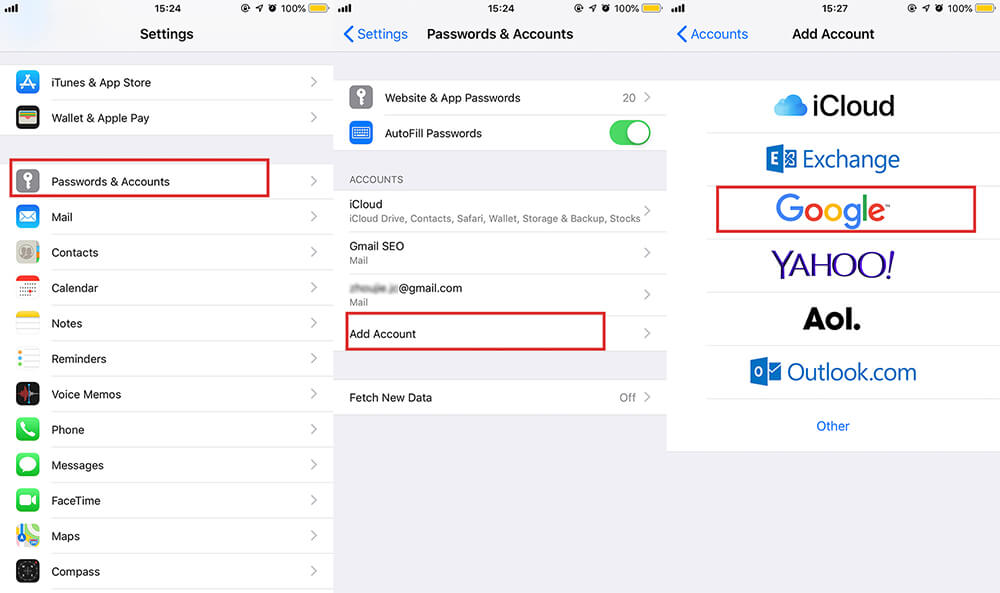
- Step 1: First and foremost, make sure your contacts are backed up to your Google account. After that, launch the Settings app on your iPhone.
- Step 2: Click Mail.

- Step 3: Click Accounts.
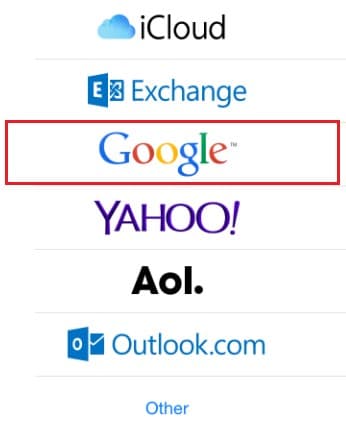
- Step 4: Click Add Account. Then, choose Google.
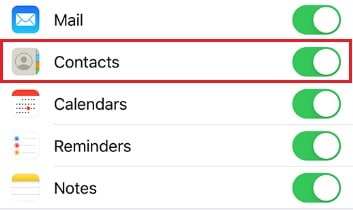
- Step 5: Log in to the Gmail account that contains your contact backup. After that, toggle on the radio radio next to Contacts.
Method 4: Move contacts from Realme 12 5G to iPhone (13/14/15) via iCloud
You can use iCloud to move your contacts from Realme 12 5G to iPhone (13/14/15). All you need to do is export the vCard from your Realme 12 5G and then import it to iCloud. From there, you may sync your iPhone with iCloud to access and store the contacts in your local storage. Here’s how to transfer contacts from Realme 12 5G to iPhone via iCloud.
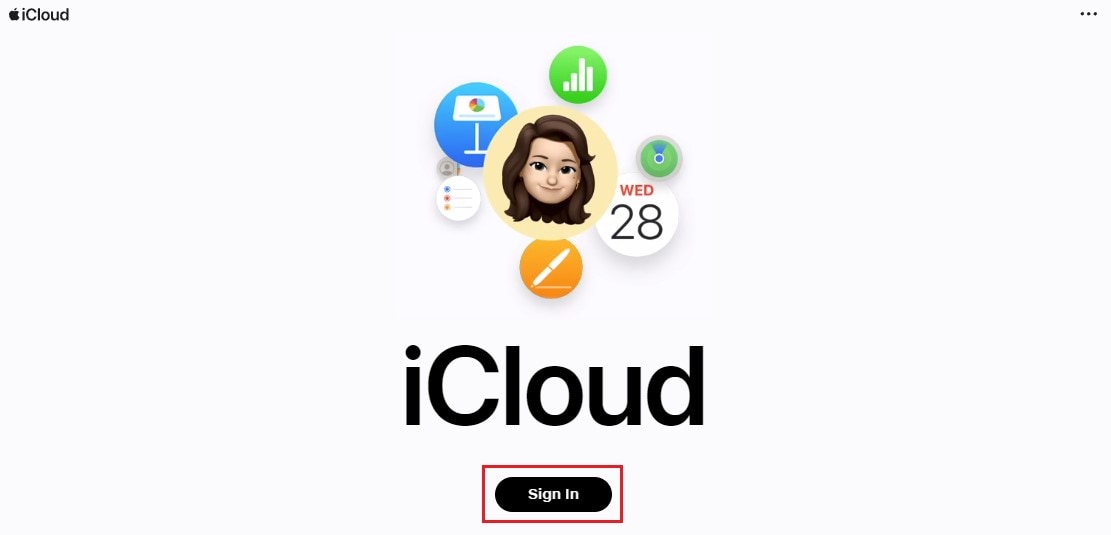
- Step 1: Assuming you have already exported the vCard and downloaded it from your Android smartphone. Now, it’s time to import the file to iCloud. Using a computer, launch the Browser application and then go to icloud.com.
- Step 2: Sign in using the Apple ID that is currently logged in to your iPhone.
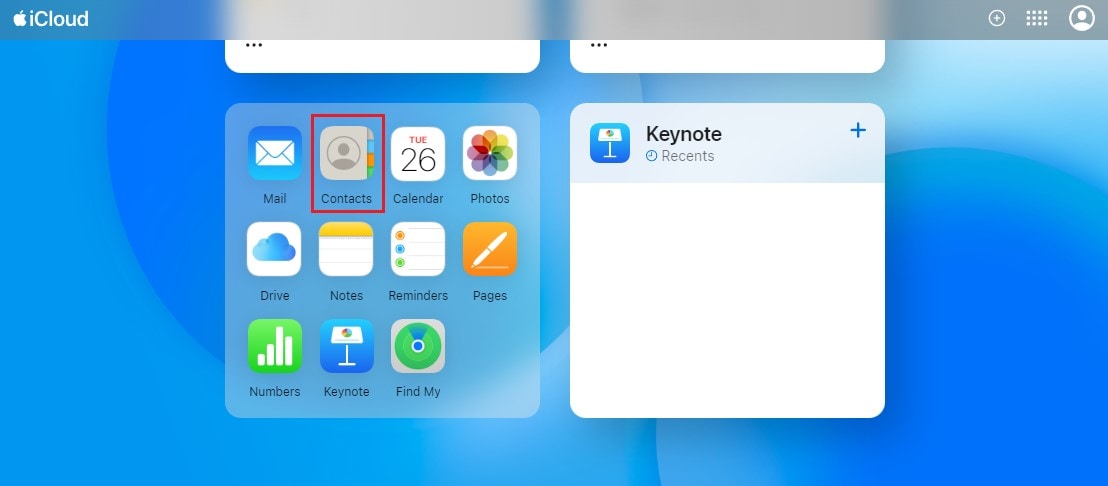
- Step 3: Click the Contacts icon.
- Step 4: Click the + icon below the Profile button.
- Step 5: Choose Import Contact. Then, select the vCard.
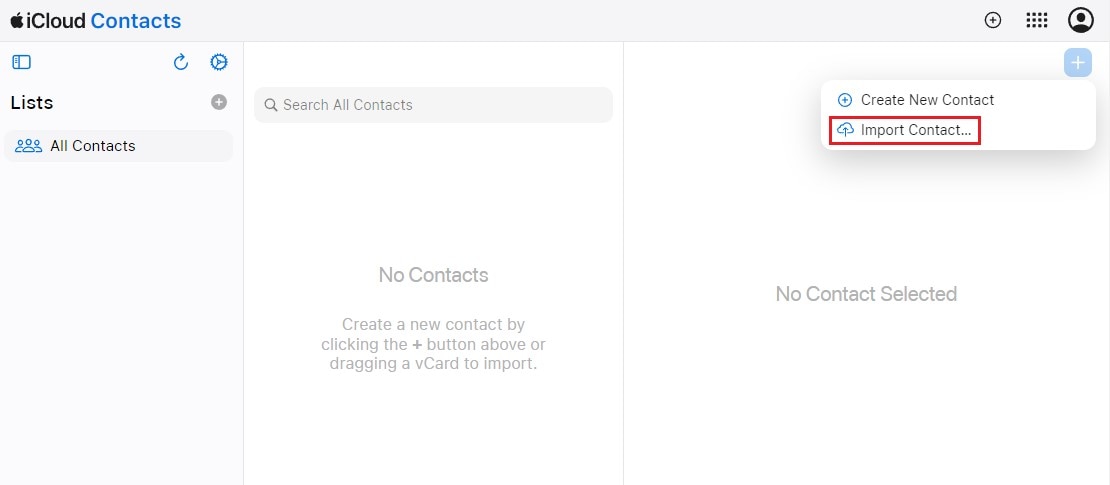
- Step 6: Make sure your iPhone is syncing the contacts with iCloud. If so, check the newly imported files on the Contacts app.
Method 5: Move contacts from Realme 12 5G to iPhone (13/14/15) using Wondershare Dr.Fone
The first four data migration methods are very helpful. It provides an effective solution to move contacts from Realme 12 5G to iPhone (13/14/15). But if you wish to explore a more convenient alternative, Wondershare Dr.Fone has something to offer. Its phone transfer feature is equipped enough to facilitate contact migration within a few minutes. Here’s how to transfer contacts from Realme 12 5G to iPhone using Wondershare Dr.Fone.
- Step 1: Download Wondershare Dr.Fone from its official website and then install it on your computer.
- Step 2: Launch the newly installed Wondershare Dr.Fone on your desktop. After it fully loads up, connect your two smartphones using their supplied data cables.
- Step 3: Access the left-side panel and then click Toolbox. Head over to the main dashboard and then click Phone Transfer.
- Step 4: Nominate your Android smartphone as the Source and your iPhone as Target. Alternatively, click Flip to modify the direction of the transfer according to your preference.

- Step 5: Select Contacts as the category. Right after, click Start Transfer to proceed.

- Step 6: Wait while Wondershare Dr.Fone is facilitating the transfer. Should you wish to terminate the progress midway, simply click Cancel.

- Step 7: After completing the process, click OK to wrap it up.

EXTRA TIP: How to Back Up Your Contacts?
As a safety measure, it’s best to back up your contacts first before the transfer. Don’t worry. Wondershare Dr.Fone has made it simpler for everyone. Here’s a short guide on how to use it in easy steps.
- Step 1: Launch Wondershare Dr.Fone on your computer. Right after, connect your Android smartphone using a data cable.
- Step 2: Click My Backup on the left-side panel. Then, click Back Up Now on the main dashboard.

- Step 3: Follow the on-screen instructions for SMS backup. After that, click OK to continue.

- Step 4: Wait while Wondershare Dr.Fone is backing up your contacts.

- Step 5: After completing the process, click Open in Folder or View Backups to review the files.

Conclusion
Truly, it’s now very easy to move contacts from Realme 12 5G to iPhone (13/14/15). The five data migration tactics provided above are proof that you can do such procedures with little to no effort. Choose one from the given list and initiate the steps in case you need to copy your phonebook from one device to another. If you prefer the most convenient option, opt for Wondershare Dr.Fone. It has a powerful phone transfer feature that can absolutely help you move contacts from Realme 12 5G to iPhone in no time. Download the application for free and take advantage of its amazing functions.
How to Transfer Contacts from Realme 12 5G to iPhone XS/11
When it comes to transferring contacts from Realme 12 5G to iPhone XS/11, we play enough care to not mess with the process.
Though, there are numerous ways to switch to a new iPhone from an Android device, some of them are really outdated. Consider, transferring contacts from Realme 12 5G to iPhone XS/11 via Bluetooth for that matter. If you have a huge phone book, then it will take ages to finish moving the contacts. You don’t need to worry at all. We have amazing alternative solutions for you.
In this article, we are going to introduce 4 vital solutions to make your transition from Realme 12 5G to iPhone a smooth sail.
How to transfer contacts from Realme 12 5G to iPhone XS/11 in one click
If you want to import contacts to iPhone XS/11 from Android in a single click, there is no better solution than Dr.Fone - Phone Transfer . Not only contacts but a wide range of device data can be transferred from your Android to an iPhone with this tool. Photos, music, text messages, videos, etc. are a few of them.
Dr.Fone - Phone Transfer
Easily transfer contacts from Realme 12 5G to iPhone XS/11
- Enables you to transfer data between Android, iOS, and WinPhone with a single click.
- Secure and there is no data loss while you transfer data between devices.
- Supports more than 6000 mobile device models from various brands like Apple, Sony, Samsung, HUAWEI, Google, etc.
- Supports all Android and iOS versions.
4,683,556 people have downloaded it
Well! After going through the amazing features of with Dr.Fone - Phone Transfer. How about learning the step-by-step procedure to transfer contacts from Realme 12 5G to iPhone XS/11 with Dr.Fone - Phone Transfer?
Here is how to transfer contacts from Realme 12 5G to iPhone XS/11 in 1 click:
Step 1: Download Dr.Fone - Phone Transfer on your computer and then install it. Launch it after installation and hit on the ‘Phone Transfer’ tab on the Dr.Fone software interface.
Step 2: Now, connect both your Realme 12 5G and iPhone XS/11 to the computer using genuine USB cables.
Step 3: Once the Realme 12 5G devices get detected, you need to select Android as the source device on the next screen. As you wish to import contacts to iPhone XS/11 from Android, the iPhone XS/11 needs to be selected in place of the target device.

Note: In case of a wrong selection, you can tap the ‘Flip’ button and change the selection.
Step 4: In this step, you have to select the data type you want to move from your Realme 12 5G to the iPhone XS/11, i.e. ‘Contacts’. Now, push the ‘Start Transfer’ button consecutively to initiate the transfer.

Note: If it’s a used iPhone XS/11, then you can select the ‘Clear Data before Copy’ checkbox for erasing any existing data on it prior to transferring the data.
Step 5: Allow some time to get the process completed. Your contacts are successfully transferred from the Android device to iPhone XS/11.
How to transfer contacts from Realme 12 5G to iPhone XS/11 using Move to iOS
Move to the iOS app from Apple allows you to make a smooth transition from an Android device to an iOS device. Be it an iPhone, iPad, or iPod Touch, this tool makes transferring content a cakewalk.
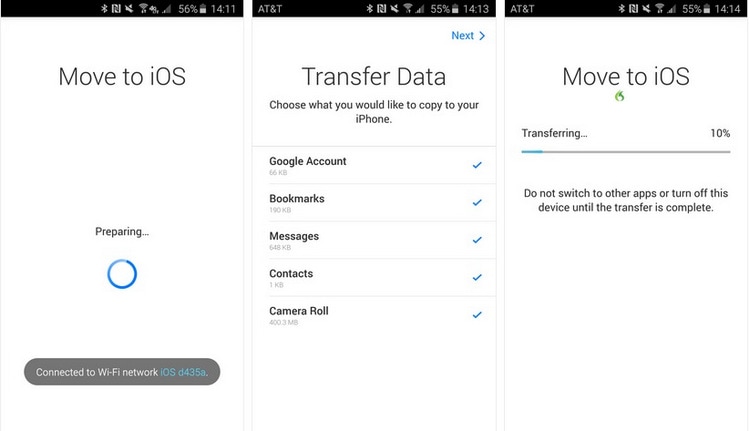
It involves quick steps to automatically moving data. Apart from contacts, it supports message history, web bookmarks, camera photos and videos, free apps, etc. It will transfer data to a factory reset or brand new iPhone only.
Step by step guide of Move to iOS app for importing contacts to iPhone XS/11 from Android
- Download the ‘Move to iOS’ app on your Realme 12 5G. Install and launch it soon after.
- Get your iPhone XS/11 and then set up the language, passcode, touchID. After that connect it to a Wi-Fi network. Browse for the ‘Apps & Data’ and select ‘Move Data from Android’.
- On your Realme 12 5G, click ‘Continue’ and then ‘Agree’. A prompt asking for a code will appear on your Android mobile.
- Get the iPhone and hit ‘Continue’ and note the displayed code. Enter this on your Realme 12 5G. When both the Android and iPhone are connected to the Wi-Fi, select ‘Contacts’ from the data types and tap ‘Next’.
- On your Realme 12 5G, click ‘Done’ as soon as the data transfer is complete. Let the iPhone XS/11 sync the contacts. You need to set up your iCloud account now. Once it is done, you can view the transferred contacts on the iOS device.
How to transfer contacts from Realme 12 5G to iPhone XS/11 using Google account
Alternatively, you can import contacts to iPhone XS/11 from Gmail from your Android mobile, as well. to do that, you need to get your Gmail and Android device contacts to get synced first.
Here is the detailed guide to transferring contacts from an Android to an iOS device.
- Go to your Realme 12 5G and go to the ‘Accounts’ tab and enable syncing of contacts. ‘Settings’ > ‘Accounts’ > ‘Google’ > Turn on ‘Contacts’ switch > tap on ‘3 vertical dots’ > ‘Sync Now’.
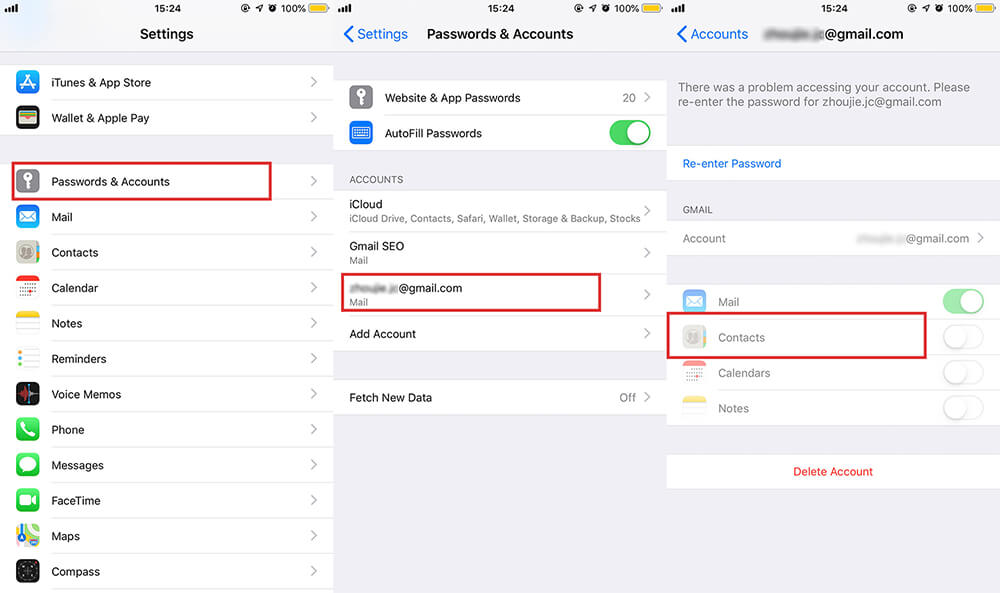
- Now, you need to add the same Gmail account to your iPhone X, in order to sync back contacts from it. For this, head to ‘Settings’ > ‘Passwords & Accounts’ > ‘Add Account’ > ‘Google’. Then, you’re required to punch in the details of the same Gmail account used over Android to sync contacts.
- Lastly, get into ‘Settings’, then ‘Passwords & Accounts’, tap on your Gmail account and ensure that the ‘Contacts’ switch is turned on. Turn it on if it is not already. Within a short span of time, you can find the Android contacts appearing on your iPhone XS/11 after that.
How to transfer contacts from Realme 12 5G to iPhone XS/11 using SIM card
As you know the SIM card itself can hold a certain number of contacts, depending on the carrier and phone make and model.
- Open the ‘Contacts’ app and click on ‘More’. Go to the ‘Import/Export’ or simply ‘Export Contacts’ option there.
- Click on ‘Export to SIM’ or ‘SIM card’ and then select the source of contacts i.e. ‘Phone’/’WhatsApp’/’Google’/’Messenger’.
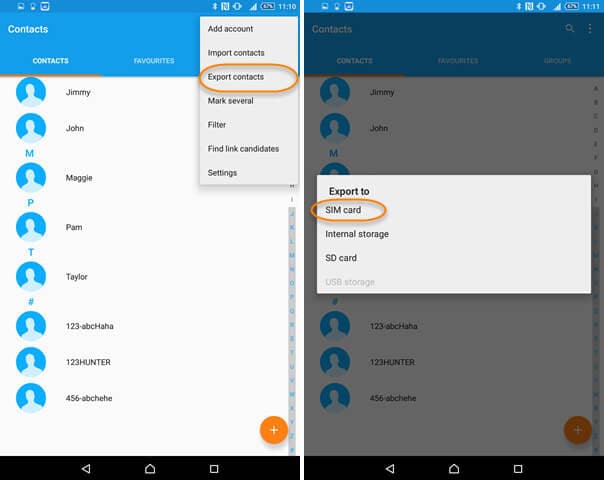
- Then hit ‘Export’ and ‘Continue’ afterward.
- Now, open the SIM card slot of your Realme 12 5G and unmount the SIM. Insert it on your iPhone XS/11 and turn it on. You can find the contacts on your iPhone.
Note: Though, it’s rare nowadays. In case you happen to own a very old SIM card and your Realme 12 5G supported the size. You might need to cut it to fit the iPhone XS/11’s micro-SIM slot.
Also read:
- [New] Elevate Your Content Strategies to Climb YouTube Ranks for 2024
- [New] Mastering the Art of Instagram Filter Use for 2024
- 2024 Approved Creating Impressive Slideshows with Video Delays in Snapchat
- 2024 Approved The Ultimate List of DJI Phantom 4 Supplements
- 2024 Approved Tweeting Fun IOS/Android Tips for Downloading GIFs
- A Deep Dive Into Instagram's Copyrighted Song Permissions for 2024
- A Quick Guide to Oppo Find X6 FRP Bypass Instantly
- Complete Tutorial on Zoom Podcasts Recording for 2024
- In 2024, How to Transfer Videos from Oppo A1x 5G to iPad | Dr.fone
- In 2024, How to Use Phone Clone to Migrate Your Vivo X100 Data? | Dr.fone
- In 2024, How to Use Phone Clone to Migrate Your Xiaomi Redmi Note 12 Pro 4G Data? | Dr.fone
- In 2024, Top 6 Ways to Transfer Text Messages from Nokia 130 Music to Other Android Devices | Dr.fone
- In 2024, Top 6 Ways to Transfer Text Messages from Tecno Pova 5 Pro to Other Android Devices | Dr.fone
- Tips of Transferring Messages from Samsung Galaxy A34 5G to iPhone 14/15 | Dr.fone
- Two Ways to Sync Contacts from Vivo Y78 5G to Gmail | Dr.fone
- Title: Two Ways to Sync Contacts from Realme 12 5G to Gmail | Dr.fone
- Author: Emma
- Created at : 2024-11-11 16:48:57
- Updated at : 2024-11-15 20:52:34
- Link: https://android-transfer.techidaily.com/two-ways-to-sync-contacts-from-realme-12-5g-to-gmail-drfone-by-drfone-transfer-from-android-transfer-from-android/
- License: This work is licensed under CC BY-NC-SA 4.0.