
Two Ways to Sync Contacts from Tecno Spark 10 Pro to Gmail | Dr.fone
Two Ways to Sync Contacts from Tecno Spark 10 Pro to Gmail
If you have ever lost your phone, you will agree that getting all the information that used to be on your misplaced device back can be a very trouble-laden venture, which can sometimes end in heartbreak.
One of the most important stuff you can keep on your phone is your contacts, the information about the people in your life, as well as their phone numbers. This can prove to be the most difficult data to get back after a phone is lost. Therefore, this article will tell you ways to keep your contacts updated by synchronizing contacts from Tecno Spark 10 Pro to Google mail account. As with almost everything in the tech world, there is more than one way to skin a cat, and this is especially true about synchronizing contacts on Android phones.
There are two major ways to transfer contacts from Android phone to Gmail. So, shall we begin to discuss this?
Part 1: How to Sync Contacts from Tecno Spark 10 Pro to Gmail? (Easier way)
One of the best ways to synchronize contacts from the phone to Gmail is to use a handy tool known as Dr.Fone - Phone Manager (Android) . It is one of the widely used and accepted tools for managing and transferring your Tecno Spark 10 Pro contact details to another platform.
Dr.Fone - Phone Manager (Android)
One-Stop Solution to Sync Contacts from Tecno Spark 10 Pro to Gmail
- Transfer, manage, export/import your music, photos, videos, contacts, SMS, Apps, etc.
- Backup your music, photos, videos, contacts, SMS, Apps, etc. to computer and restore them easily.
- Highlighted features such as 1-click root, gif maker, ringtone maker.
- Fully compatible with 3000+ Android devices (Android 2.2 - Android 8.0) from Samsung, LG, HTC, Huawei, Motorola, Sony, etc.
3981454 people have downloaded it
To use this safe and reliable way to synchronize contacts with Gmail on Android, follow these steps:
- 1. First of all, download the Dr.Fone software on your Windows PC and follow the installation instructions, then launch the software after the application has successfully installed.
- 2. Click on the “Phone Manager” option to continue to the next screen of the software.
- 3. Connect your phone to your PC via a USB cable. Ensure that USB debugging is enabled on your phone
- 4. Now click on the “Information” tab at the top of the interface of the software.

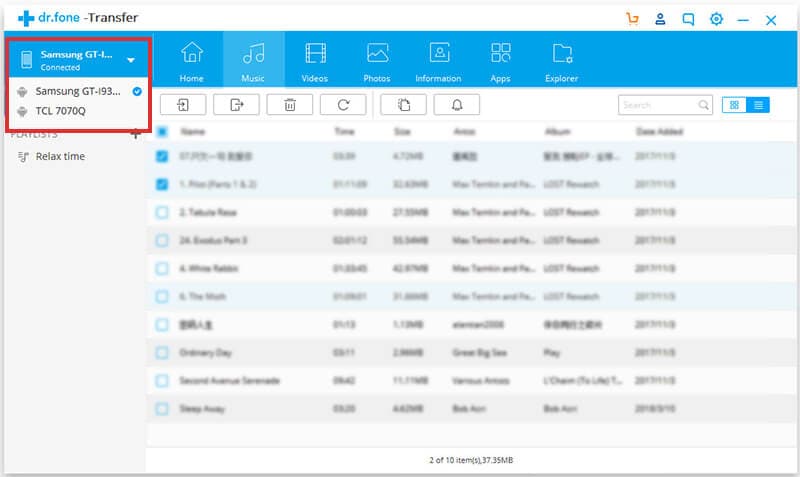
- 5. On the left side pane, click on the “Contacts” option to view the contacts available on your device.
- 6. You can select the contacts you wish to transfer to your PC or just simply select all and uncheck unwanted contacts.
- 7. Click on the “Export” button and choose “to vCard file” as your export format.

- 8. You will be taken to a page to select where you want the file to be saved on your PC, select the location, and click on OK to start exporting your contacts.
Once your contacts have been successfully saved to your PC as a vCard or in.VCF format can be easily imported into your Gmail account right from your computer by following these steps.
- 1. Open browser on your PC and Login to your Gmail account.
- 2. On the left side pane, click on the Gmail drop-down arrow to see and click on the “Contacts” option.
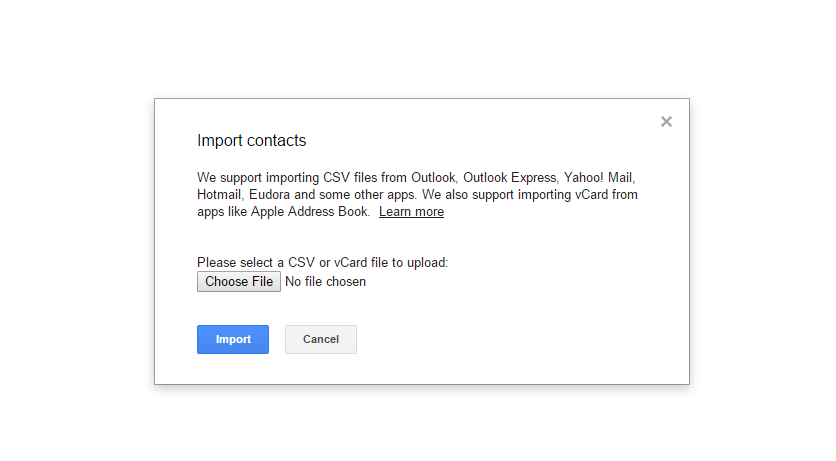
- 3.Tap on the “More” button and select “Import” from the list. Gmail will open a pop-up for you to select the location of the previously saved.VCF or vCard file.
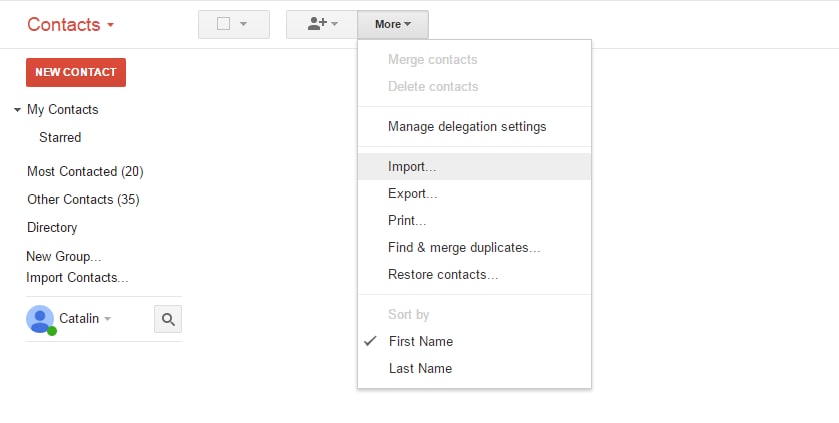
- 4. Select the vCard and then hit the “Import” button. Your contacts will be imported into your Gmail account in no time.
If you followed these steps, you would not only have synced your contacts with your computer, and you would also have synchronized them with your Gmail account.
Thus, by using Dr.Fone - Phone Manager (Android), you can not only easily transfer contacts from the phone to the Gmail account but also keep them safe from any data loss.
Part 2. How to Sync Contacts from Tecno Spark 10 Pro to Gmail? (Official Way)
There is also a way whereby you can sync your contacts to your Gmail account on Android using just Your Tecno Spark 10 Pro. You can do this simply by following these steps:
- 1. The first thing would be to ensure that Gmail is installed on your phone. If it is not, go to Play Store and install the Gmail App on your phone.
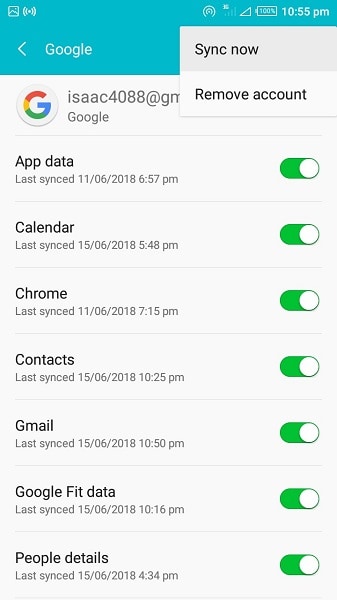
- 2. Now, go to your phone Settings, then tap on the “Accounts and Sync” option.
- 3. Tap on the Accounts and Sync service on the next screen.
- 4. Choose your Gmail account from the email accounts setup page.

- 5. Enable the “Sync Contacts” option.
- 6. Tap on the Options tab and then on the “Sync Now” button and wait until your Contacts have been successfully synchronized with your Google mail account. You will know that the Contacts have successfully completed synchronization when the “Sync” icon disappears.
And that’s it! You have successfully transferred your contact from the phone to your Gmail account. Also, when you initially add and set up a Gmail account on your mobile device, the “Automatically Sync” option should be switched on by default. If this does not occur for some reason, there are ways by which the error can be dealt with. These methods of fixing the error shall be addressed in the latter portion of this article.
Part 3. Other Ways to Backup Android Contacts
Smartphone users as a whole never want to lose their contacts; however, sometimes, due to human error or a program glitch or sheer mistake, it does happen. So it is pertinent for you to desire to have a backup of your contacts before entrusting the rest into the hands of an online backup program, in this case, your Gmail accounts. It is not about being paranoid; it is just a case of taking precautions to avoid the loss of contacts while you sync Android to Gmail account.
Although there has been no record of such occurrence in the past from users who export contacts from Tecno Spark 10 Pro to Gmail, it is still advisable to perform a backup.
Another way to back up your contacts before you sync contacts from Tecno Spark 10 Pro to Gmail can be found in this article: Four Ways to Backup Android Contacts Easily .
Part 4. Basic Solutions to Fix Google Contacts Syncing Issues on Android
In the above parts, you have learned how to transfer contacts from Tecno Spark 10 Pro to Gmail. So what if your contacts have, for some reason, refused to sync? Well, don’t panic; here are some of the possible fixes for the problem.
Ensure that the Sync option is turned on for your device. To do this, simply:
- Tap on Settings for your device
- Go to Data Usage, then go to Menu.
- Ensure that the “Auto-Sync data” option is active on your device, if not, activate it.
- If it is already turned on, try toggling it on and off a few times, then proceed to Sync your Contacts.
Ensure that Google Contacts sync is turned on. To do this, simply:
- Once again, go to Android Settings.
- Go to the “Accounts” option.
- Go to the Google Account that you have used as your backup preference.
- Make sure that the “Contacts” option for the sync data is turned on.
- If it is already on and is still not working, try toggling the option on and off a few times.
Make sure that you have an active Internet connection, and that background data is switched off. The importance of checking your Internet connection before proceeding to more extreme measures for all issues cannot be ignored. The issues that may be disturbing you might be due to an issue with your device’s connection to the Internet
- Switch Off and Switch On your Data Connection.
- Go to Settings, then go to “Data Usage” and ensure that Restricting Background Data is disabled on your device.
Clear the App Cache for Google Contacts.
- Go to Settings
- Then tap on “Apps” or “Apps Manager,” depending on your device and Android version.
- Go to all Apps and find Contact Sync.
- Select Clear Cache and also Clear Data.
- This should knock the Contacts sync back to normal and ensure that your sync goes on without a hitch from there on out.
Remove your Google Account and set up again. The issue you are facing might be due to a malfunctioning Google Account setup. To fix this:
- Go to Settings.
- Go to Accounts, then proceed to your Google Account.
- Select the Remove Account option
- Then proceed to set up your email account again.
As a last-ditch fix, some users have reported that an account merging for the contacts fixed the problems of the contacts not syncing. To do this, do the following steps:
- Go to Contacts
- Tap on the menu, then tap on “Contacts to Display” option
- Select “Only Device”. Note that this will make only the contacts saved on the Tecno Spark 10 Pro device to display.
- Tap on “Menu” and then on “Merge Accounts”
- Select Google Merge. This will merge all your Contacts with Google.
- Go back and select Menu again, this time selecting “Contacts to Display”, then “All Contacts”
- This should make all the contacts on your device to appear, and your sync problem should also be solved.
These fixes should ensure that your sync of contacts with the Google Account is now fixed, and you are now able to backup and sync your contacts to your Gmail Account. It is also worthy of note that if you want new contacts to be saved automatically to your Google account, you have to select the Google Account option when prompted on where to save the new contact, or else, the contact will not be automatically synced to your Gmail account, and you will have to create an export to add it to your Google Contacts.
Also, keep in mind that it might take a longer period of time for the contacts to synchronize to Google on a slower network connection, in deviance to a fast network connection, so you might need to exercise some patience if you’re on a slower Internet connection.
It can sometimes be bewildering and baffling when people probably lose their phones, and then they complain of loss of contacts. However, you need not worry about such loss of information again in this technological age since there are several ways to backup contacts. All the methods mentioned above are easy to execute and will help you transfer contacts from the phone to Gmail in a snap.
Lastly, you can also use Dr.Fone - Phone Manager (Android) for smoothly exporting contacts from Tecno Spark 10 Pro to Gmail.
Top 6 Ways to Transfer Text Messages from Tecno Spark 10 Pro to Other Android Devices
With the advancement in technology, your expectations have also increased. You have made technology as your magic stick. It makes your life easy and smooth. Isn’t it? However, at the same moment, it is very painful when you don’t get know the ways to transfer text messages from Tecno Spark 10 Pro to another Android. We understand that it might be little tricky on how to get the task done. For this reason, we have collated top 6 ways to transfer messages from Tecno Spark 10 Pro to Other Android Devices. And made sure to get you the step by step details of all the entire procedure you need to go through to transfer text messages from Tecno Spark 10 Pro to Other Android Devices.
Part 1: Best free apps to transfer text messages from Tecno Spark 10 Pro to Other Android Devices
When you are planning to upgrade your phone from one Android version to another, and you want to transfer all your existing SMS’s from one phone to another, then there are several free applications that are available on the Play Store that can make your life easy.

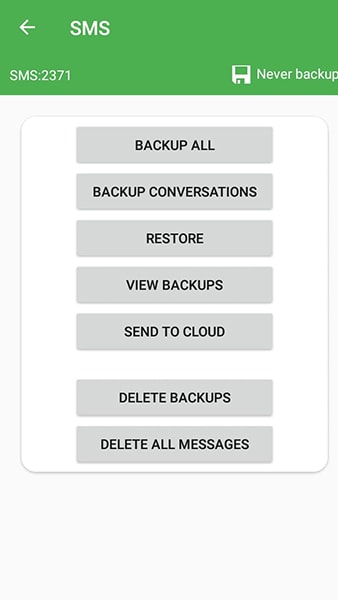
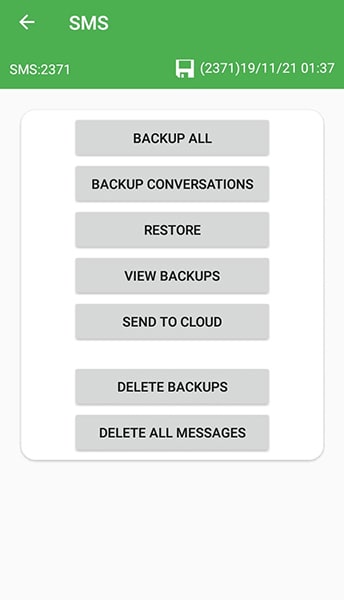
1. SMS Backup and Restore App
One of the best and easiest ways to transfer text messages from your old Android device to new Android device is by using the SMS Backup and Restore App available on the Play Store. You don’t have to worry about any data cable connections. It just needs data connection and your attention. In order to transfer text messages from Tecno Spark 10 Pro to Other Android Devices, follow the below-mentioned steps.
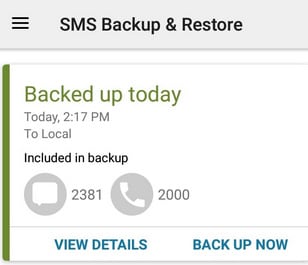
Step 1 - Open the Backup app on the Tecno Spark 10 Pro device from which you want to transfer the text messages.
Step 2 - Click on “Set Up A Backup” once you check-in the app.
Step 3 - Select Messages from the options you receive on the next tab and click on “Next”.
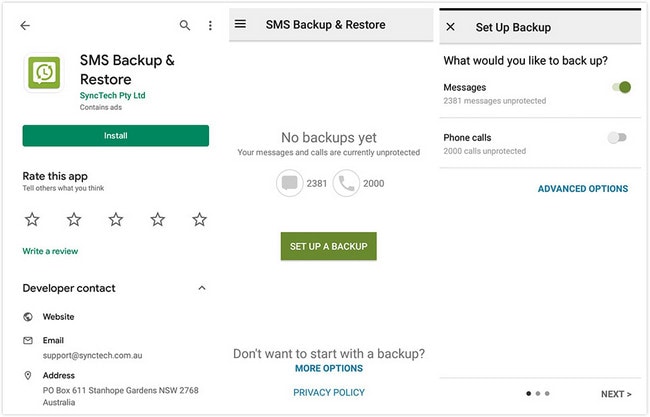
Step 4 - Select where you want to create your backup. And click on “Next”.
Step 5 - Once you click on next, you will be prompted to select one option from Hourly, Weekly or Daily which will set the frequency of the backup. Click on “Back Up Now” to start taking the backup of SMS.
Note: All this you need to do when you feel that your backups should be taken at regular intervals.
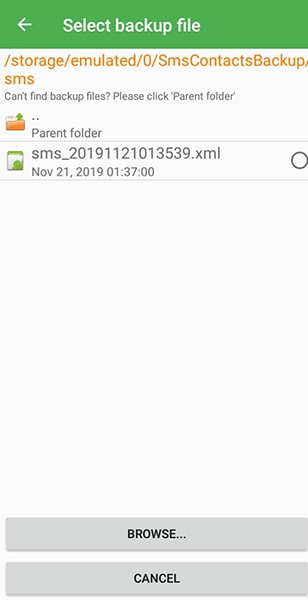
Step 6 - Once the backup file is ready, share it on the Tecno Spark 10 Pro device where you need to copy the backup. Once that is done, download the same app on the Tecno Spark 10 Pro device.
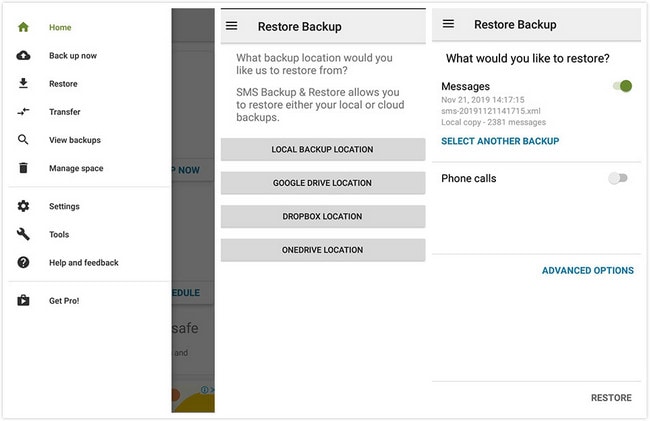
Step 7 - Click on the “Restore” button from the side menu.
Step 8 - Click on the “storage location” where you have saved your file.
Step 9 - Select the message option from the two options displayed and click on “Restore”.
Upon completion of the process, transfer of messages from one Android to another Android phone is carried out successfully.
2. Super Backup & Restore
Another and a simpler way to transfer text messages from one Android to another Android is by using the Super Backup & Restore app. It will not take much time of yours and will create backup in seconds. You just need to follow the steps as directed below.
Step 1 - Open the app and click on “SMS”.
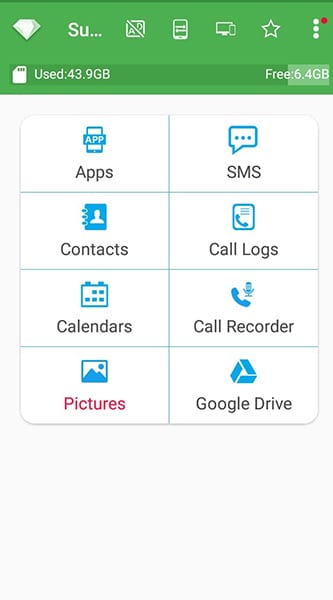
Step 2 - Click on “Backup All”. Once done, now click on the “Ok” button when you receive a pop-up. It will then start taking a backup of all your text messages.
Step 3 - Share the generated .xml file generated on the Android device where you want to restore the backup.
Step 4 - Now download the same app on another device where you have shared the .xml file.
Step 5 - Click on “SMS”, then click on the “Restore” button. It will ask you to select the .xml file which you had saved in step #3.
Step 6 - It will start restoring all your SMS’s.
3. Smart Switch (Samsung)
Whether you are switching from iPhone or from any Android phone to Samsung Galaxy phone, the transfer of data like image, text messages, videos, etc. is done easily and smoothly using Samsung smart switch. In order to do so, please follow the steps discussed below on how to transfer text messages from Tecno Spark 10 Pro to Other Android Devices using Smart Switch.
Step 1 – Install and Open Smart Switch app on both the Tecno Spark 10 Pro devices.
Step 2 - Click on “Send” data on your old smartphone and click on “Receive” data on your new Galaxy phone.

Step 3 - Connect with the “Wireless” connection on both the Tecno Spark 10 Pro devices.
Step 4 - Select the content you want to transfer to the Galaxy device and click on “Send” button to start transferring the content from one device to another.
Part 2: Great software Dr.Fone - Phone Transfer to transfer text messages from Tecno Spark 10 Pro to Other Android Devices (Recommended)
Every user in this world is looking out for the easiest way to tackle the task. Let’s say that you want to transfer text messages from Tecno Spark 10 Pro to Other Android Devices. And in order to do so, you are searching for an app which is secured, powerful, and user-friendly. Then Dr.Fone - Phone Transfer (iOS&Android) will be the best option. It is compatible across platforms like iOS and Android. Moreover, it can effectively transfer data between cross platform devices in just matter of one click.
Step by Step Tutorial
Here are the steps on how you can transfer text messages from Tecno Spark 10 Pro to Other Android Devices using Dr.Fone - Phone Transfer.
Dr.Fone - Phone Transfer
Transfer Everything from Android/iPhone to New iPhone in 1 Click.
- It supports all the leading iOS devices, including devices running on iOS 11.
- The tool can transfer your photos, videos, contacts, messages, music, call logs, notes, bookmarks, and so much more.
- You can transfer all your data or select the type of content you wish to move.
- It is compatible with Android devices as well. This means you can easily perform a cross-platform transfer (e.g. iOS to Android).
- Extremely user-friendly and fast, it provides a one-click solution
3,285,946 people have downloaded it
Step 1 - First of all, download the tool going on the official site. Once it is done, you just need to launch your application. Now click on the “Switch” option from the main screen.
Step 2 - Now, you need to connect your Tecno Spark 10 Pros with your PC using the USB cable to transfer the text messages from the old Android to new Android device. If the source and destination positions are not correct, do it using the Flip button available at the bottom center.

Step 3 – Simply select the files you want to transfer.

Step 4 - Once you have selected the files, click on start. This will quickly and easily transfer the files from the source device to the destination device.

Part 3: Manage Text Messages from Tecno Spark 10 Pro to Other Android Devices using Dr.Fone - Phone Manager
The app named Dr.Fone - Phone Manager (Android) is a smart way to transfer text messages from Tecno Spark 10 Pro to Other Android Devices. If you are trying to transfer your files from a mobile device to a computer, from a computer to a mobile device, etc. Dr.Fone - Phone Manager is yet another powerful option available at present. You can also transfer data from iTunes backup to Android. It is fully compatible with all Android and iOS devices.
Step by Step Tutorial
Whether you want to transfer data, i.e. images or videos or text messages, the steps that are mentioned below remains the same.
Step 1: Grab your copy of the Dr.Fone - Phone Manager (Android) from its official website and then install it over your PC. Now, launch the tool and then opt for the “Transfer” tab from the main screen. Meanwhile, get your “Source” device connected with your PC using the genuine USB cable only.
Step 2: Next, once your device is detected by the tool, you need to get into the required data section from the navigation panel at the top. For instance, “Information” in this case. Meanwhile, get your target device connected to the PC too.
Step 3: Now, get into the “SMS” section from the left panel. Then, hit on the “Export” icon followed by the “Export to [Device Name]” option.
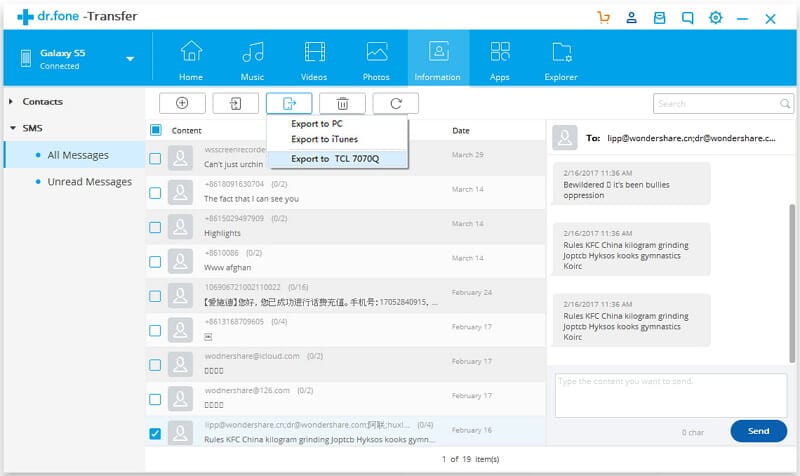
Step 4: [Optional] Once done, repeat the process for all other data types. In a short span of time, you’ll get all your data transferred to your target device without any hassles.
Bottom Line
People take this transfer work as burdensome as it takes some additional time from their busy schedule to transfer messages from Tecno Spark 10 Pro to Other Android Devices. But, now understanding the ways of transferring the files, it will be quite easy and faster for you to transfer messages from Tecno Spark 10 Pro to Other Android Devices.
We hope we have answered all your queries regarding phone to phone transfer in details. All the best!
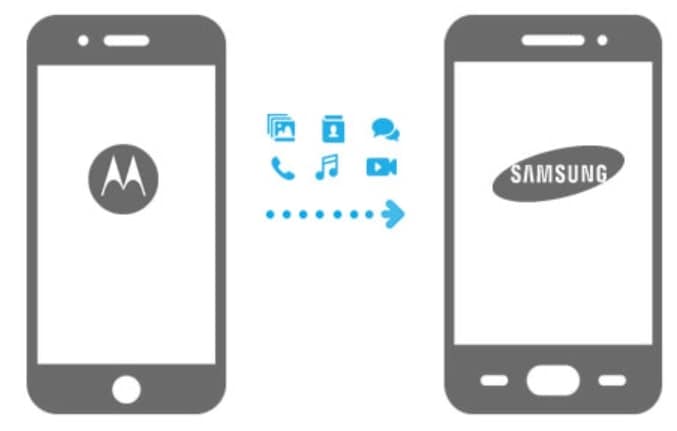
How to Transfer Data from Tecno Spark 10 Pro to Samsung Phone
Samsung is undoubtedly the most widely used smartphone manufacturer today. Cutting edge functionalities in prices that are affordable makes Samsung a favorite. Therefore, more and more users will need to transfer data to Samsung’s devices. In this article, we are going to share how to transfer data from Motorola to Samsung, especially for how to transfer contacts from Motorola to Samsung. Check them out.
If you’re going to buy a new Samsung S23, these solutions work as well.
Part 1: Transfer Data from Motorola to Samsung using Dr.Fone
Dr.Fone - Phone Transfer can be used for transferring data from to phone to another phone like messages, contacts, call logs, calendars, photos, music, video, and apps. Also, you can back up your iPhone and save the data on your PC, for example, and restore it later when you wish. Basically, all your necessary data can be transferred fast from a phone to another phone, including transfer from Motorola to Samsung.
Dr.Fone - Phone Transfer
Migrate all data from Motorola to Samsung quickly
- Easily move 11 types of data like photos, videos, calendars, contacts, messages, music, apps, etc. from Motorola to Samsung.
- You can also transfer between iOS and Android, and iOS and iOS.
- Simple clicks to operate.
- The all-in-one process to read from the source device, transfer, and write to the target device.
4,919,791 people have downloaded it
Steps to Transfer Data from Motorola to Samsung
To transfer data from your Motorola to your Samsung phone, you will require:
- USB Cables x2
- A laptop or a computer
To start transferring data from your Motorola to your Samsung phone you will need to
Step 1. Download Dr.Fone and install it on your laptop or computer.
Step 2. Using the USB cables, attach both of your phones to the computer or laptop that you just installed Dr.Fone. When you run Dr.Fone, you’ll see a screen similar to the one shown below:
Step 3. There will be several modes listed on the screen. Select the “Phone Transfer” mode. Dr.Fone - Phone Transfer will display both of your devices after detecting them.
Step 4. Notice that the menu in the center shows the items to be transferred to the destination device. If you want to transfer the contacts, check the contacts item to transfer contacts from Motorola to Samsung. Check or uncheck the boxes as per your requirement. Click “Start Transfer” when you are done. Dr.Fone - Phone Transfer will begin the transferring process. A menu will appear showing the progress of the transfer.
Step 5. You can cancel the transferring process at any time by hitting the “Cancel” button however, make sure that neither of the Tecno Spark 10 Pro devices gets detached while the transferring process is still underway.
Part 2: Transfer WhatsApp from Motorola to Samsung via WhatsApp Transfer Tool
Looking for a hassle-free way to transfer your WhatsApp data from Motorola to Samsung? If yes, your best bet to complete the transfer without a hitch is Dr.Fone - WhatsApp Transfer . This solution facilitates the smooth transfer of WhatsApp chats, ensuring all attachments are included. Not only can you transfer chats, but you can also effortlessly backup and restore your WhatsApp data,
![]()
Dr.Fone - WhatsApp Transfer
One-click to transfer WhatsApp messages from Tecno Spark 10 Pro to iPhone
- Transfer WhatsApp messages from Tecno Spark 10 Pro to iOS, Android to Android, iOS to iOS, and iOS to Android.
- Backup WhatsApp messages from iPhone or Android on your PC.
- Allow restoring any item from the backup to iOS or Android.
- Completely or selectively preview and export WhatsApp messages from iOS backup to your computer.
- Support all iPhone and Android models.
3,480,561 people have downloaded it
This versatile tool enables effortless transfer of WhatsApp and WhatsApp Business chats between smartphones. Dr. Fone stands as your ultimate answer if you seek a smooth merging of WhatsApp chats between two devices. Here is how you can transfer your WhatsApp data with ease using Wondershare Dr.Fone:
Step 1: Access Transfer WhatsApp Messages in Wondershare Dr.Fone
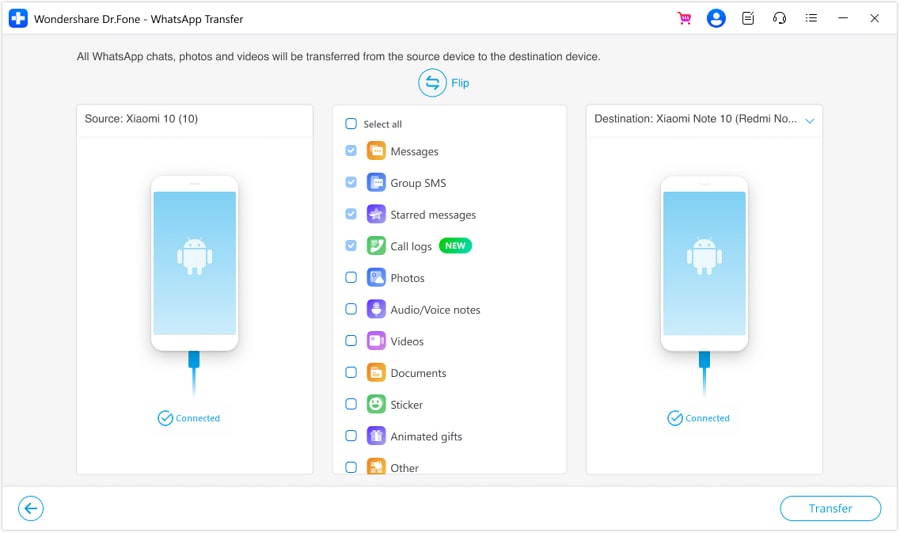
Begin by opening Wondershare Dr.Fone on your computer and proceed to link your Motorola and Samsung devices using a USB cable. Once the Tecno Spark 10 Pro devices are connected, navigate to “Toolbox” and there, tap “WhatsApp Transfer” to proceed. On the following screen, move to the “WhatsApp” tab and click “Transfer WhatsApp Messages.”
Step 2: Assign Correct Positions to Motorola and Samsung Devices
Now, you need to assign the Motorola and Samsung devices to their respective positions. Here, the Motorola phone should be in the “Source” position. In the same way, the Samsung device needs to be in the “Destination” position. Use the “Flip” button in case the assigned positions are incorrect.
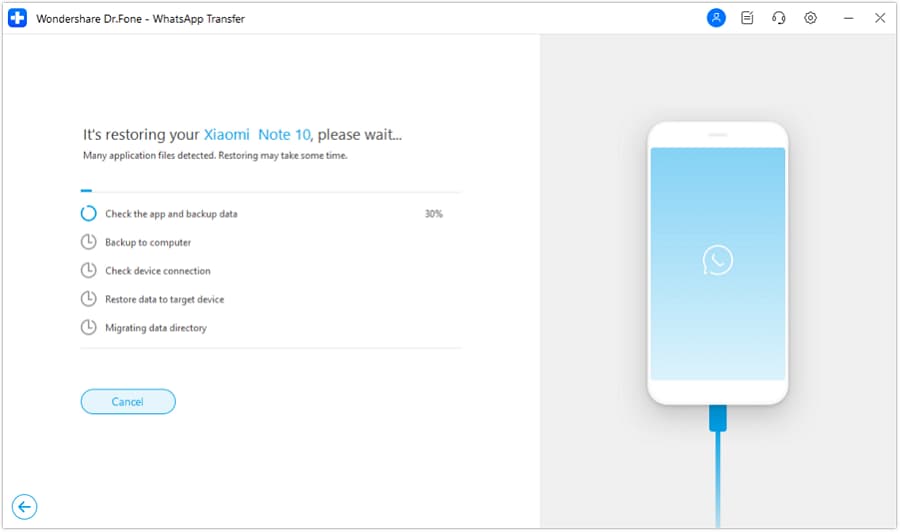
Step 3: Complete the WhatsApp Transfer Process
Afterward, click “Transfer” to commence the WhatsApp transfer process. A prompt will appear asking whether you want to back up WhatsApp data on the destination device. After making your choice, wait for the transfer process to finish, which will take only a few moments.
Part 3. Using Official Tools to Transfer Data from Motorola to Samsung
Samsung Smart Switch is an official tool developed by Samsung. This tool is designed to simplify transferring data from an old device, including non-Samsung devices like Motorola, to a new Samsung smartphone or tablet. This tool supports various data types, such as contacts, photos, messages, videos, calendars, and music. You can use the steps given below to transfer your data from Motorola to Samsung using Smart Switch:
Step 1. Begin with ensuring the Smart Switch app is installed on both devices. It comes pre-installed on Samsung devices, and you can download it from the Google Play Store for Motorola. Now, launch the app on both devices and keep both devices near each other.
Step 2. On the Motorola device, tap “Send Data” and follow it by pressing “Wireless.” Now move to Samsung and tap “Receive Data,” then press “Galaxy/Android,” and finally tap “Wireless.”
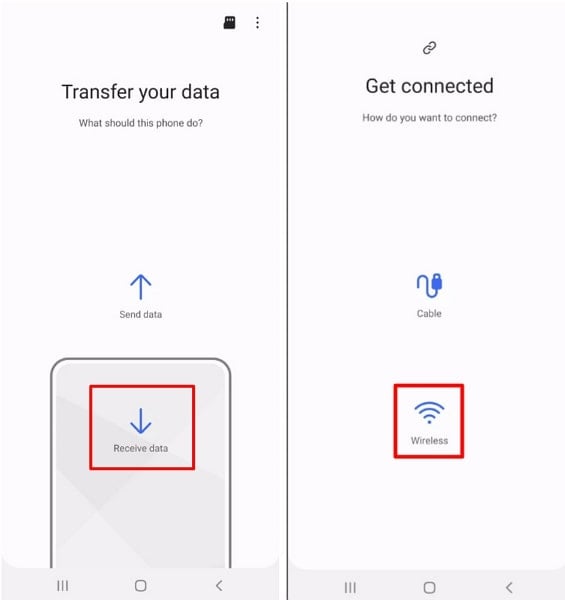
Step 3. Afterward, finalize the connection by selecting “Allow” on the old phone. Then, on your new phone, select the content you wish to transfer and proceed by tapping “Transfer.” Once the transfer finishes, tap “Go to Home Screen” on the new phone, and you’re all set to proceed.

Bonus Tip: Want to Manage Your Tecno Spark 10 Pro Data before Transferring Data?
Before initiating data transfer from your Motorola phone to your new Samsung device, it’s a great idea to declutter and organize your data. Wondershare Dr.Fone is your go-to smart solution for managing and transferring Android data. With its intuitive features, you can preview, delete, export, and manage your data. This software facilitates smooth file transfers between your Tecno Spark 10 Pro and computer.
Moreover, it enables easy transfer of media files between iTunes and Android. Dr.Fone also offers the capability to import contacts from iCloud to either your Tecno Spark 10 Pro or computer. Additionally, it allows you to view and manage mobile notifications directly on your PC. It checks how much storage is left and generates a report showing the Tecno Spark 10 Pro device’s history with basic details automatically.
To cater for the above mentioned problems and many other, Dr.Fone - Phone Transfer was developed. Dr.Fone - Phone Transfer is an easy to use tool. It has been designed to assist you to in transferring data from your old phone to your new phone, including transferring contacts from Motorola to Samsung.
Also read:
- [New] Perfectly Timed Instagram Content - Our List of the Top 8 Schedulers for 2024
- [Updated] MyVidHub Testing A Quest for More Features for 2024
- 2024 Approved The Art of Crafting Impressive HDR Images Using Lightroom
- Discover the Top Max Right Now Documentaries Airing This July 2024!
- How to Use Phone Clone to Migrate Your Honor 90 GT Data? | Dr.fone
- In 2024, 8 Ways to Transfer Photos from Oppo K11 5G to iPhone Easily | Dr.fone
- In 2024, Best 3 Software to Transfer Files to/from Your Nubia Red Magic 9 Pro+ via a USB Cable | Dr.fone
- In 2024, How Can You Transfer Files From OnePlus Open To iPhone 15/14/13? | Dr.fone
- In 2024, How to Transfer Contacts from Samsung Galaxy F04 to Other Android Devices Using Bluetooth? | Dr.fone
- In 2024, How to Transfer Photos From Motorola Edge 40 Pro to Samsung Galaxy S21 Ultra | Dr.fone
- In 2024, Which Pokémon can Evolve with a Moon Stone For Xiaomi 13 Ultra? | Dr.fone
- iSpoofer is not working On OnePlus 12? Fixed | Dr.fone
- Rapide & Sécurisé : WinX DVD Ripper Platine Avec Vitesse Allant Jusqu'à 32X Pour Tous Vos Disques DVD Protégés Sous Windows 10
- Title: Two Ways to Sync Contacts from Tecno Spark 10 Pro to Gmail | Dr.fone
- Author: Emma
- Created at : 2024-09-25 17:25:17
- Updated at : 2024-10-02 18:26:57
- Link: https://android-transfer.techidaily.com/two-ways-to-sync-contacts-from-tecno-spark-10-pro-to-gmail-drfone-by-drfone-transfer-from-android-transfer-from-android/
- License: This work is licensed under CC BY-NC-SA 4.0.